Chapter 8. Troubleshooting and diagnostics
This chapter provides information about diagnosing and troubleshooting computer problems. If your
computer problem is not described here, see Chapter 12 “Getting information, help, and service” on page
153 for additional troubleshooting resources.
Basic troubleshooting
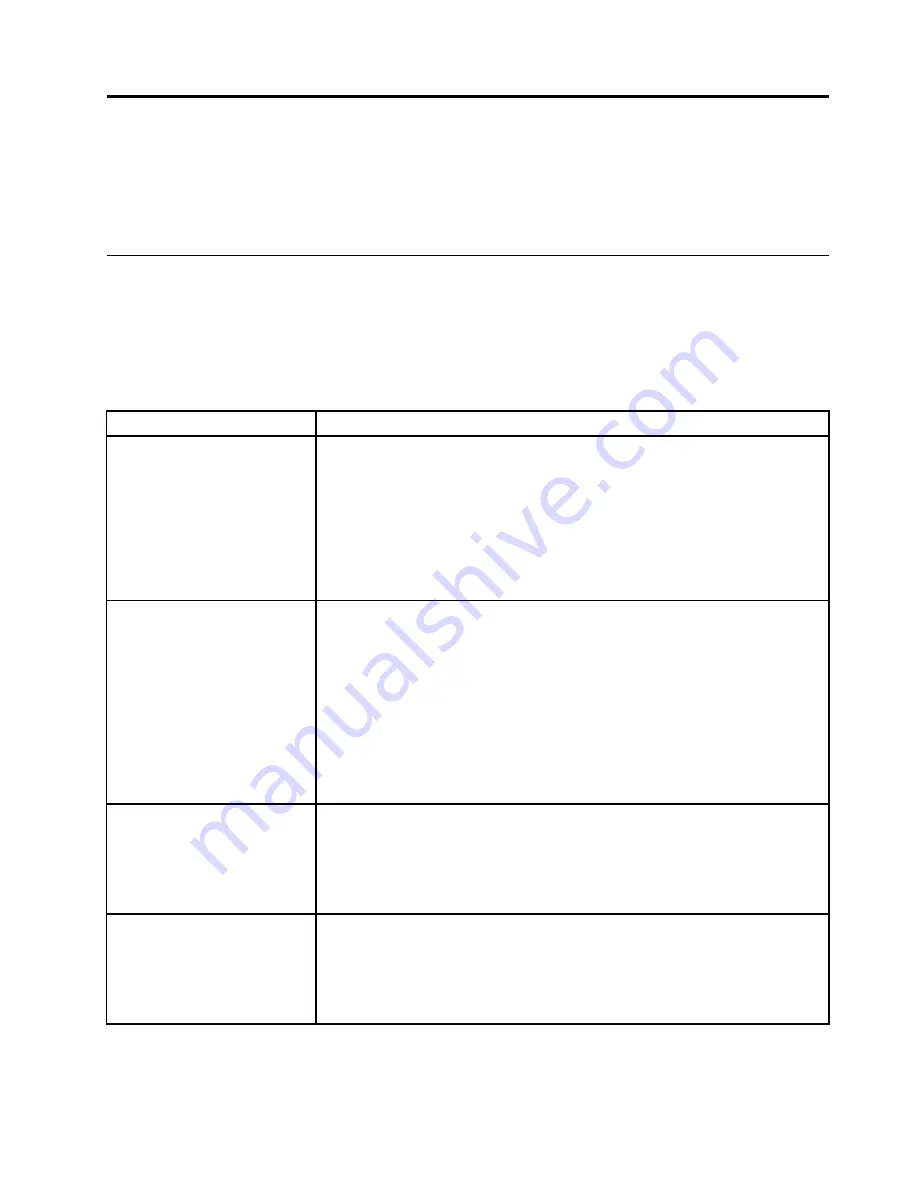
The following table provides some basic instructions to help you troubleshoot your computer problems.
Note:
If you cannot correct the problem, have the computer serviced. For a list of service and support
telephone numbers, refer to the
Safety, Warranty, and Setup Guide
that comes with your computer or go to
the Lenovo Support Web site at:
http://www.lenovo.com/support/phone
Symptom
Action
The computer does not start
when you press the power
button.
Ensure that:
• The power cord is correctly connected to the rear of the computer and to a
working electrical outlet.
• If your computer has a secondary power switch on the rear of the computer,
ensure that it is switched on.
• The power indicator on the front of the computer is on.
• The computer voltage matches the voltage available at the electrical outlet for
your country or region.
The monitor screen is blank.
Ensure that:
• The monitor signal cable is correctly connected to the monitor and to the
appropriate monitor connector on the computer.
• The monitor power cord is correctly connected to the monitor and to a working
electrical outlet.
• The monitor is turned on and the brightness and contrast is set correctly.
• The computer voltage matches the voltage available at the electrical outlet for
your country or region.
• If your computer has a discrete graphics card installed, be sure to use a monitor
connector on the discrete graphics card.
The keyboard does not work.
Ensure that:
• The computer is turned on.
• The keyboard is securely connected to a PS/2 keyboard connector or a USB
connector on the computer.
• No keys are stuck.
The mouse does not work.
Ensure that:
• The computer is turned on.
• The mouse is securely connected to a PS/2 mouse connector or a USB
connector on the computer.
• The mouse is clean. Refer to “Optical mouse” on page 75 for further information.
© Copyright Lenovo 2014
77
Содержание ThinkCentre M79
Страница 1: ...ThinkCentre M79 Hardware Maintenance Manual Machine Types 10CT 10CU 10CV and 10CW ...
Страница 6: ...iv ThinkCentre M79 Hardware Maintenance Manual ...
Страница 8: ...vi ThinkCentre M79 Hardware Maintenance Manual ...
Страница 16: ... 18 kg 37 lb 32 kg 70 5 lb 55 kg 121 2 lb 8 ThinkCentre M79 Hardware Maintenance Manual ...
Страница 19: ...1 2 Chapter 1 Read this first Important safety information 11 ...
Страница 20: ...1 2 12 ThinkCentre M79 Hardware Maintenance Manual ...
Страница 21: ...Chapter 1 Read this first Important safety information 13 ...
Страница 27: ...Chapter 1 Read this first Important safety information 19 ...
Страница 31: ...Chapter 1 Read this first Important safety information 23 ...
Страница 40: ...Figure 4 Component locations 32 ThinkCentre M79 Hardware Maintenance Manual ...
Страница 68: ...Figure 8 Installing a padlock 60 ThinkCentre M79 Hardware Maintenance Manual ...
Страница 80: ...72 ThinkCentre M79 Hardware Maintenance Manual ...
Страница 98: ...90 ThinkCentre M79 Hardware Maintenance Manual ...
Страница 112: ...104 ThinkCentre M79 Hardware Maintenance Manual ...
Страница 168: ...160 ThinkCentre M79 Hardware Maintenance Manual ...
Страница 172: ...164 ThinkCentre M79 Hardware Maintenance Manual ...
Страница 175: ...Appendix D China Energy Label Copyright Lenovo 2014 167 ...
Страница 176: ...168 ThinkCentre M79 Hardware Maintenance Manual ...
Страница 178: ...170 ThinkCentre M79 Hardware Maintenance Manual ...
Страница 184: ...176 ThinkCentre M79 Hardware Maintenance Manual ...
Страница 185: ......
Страница 186: ......


