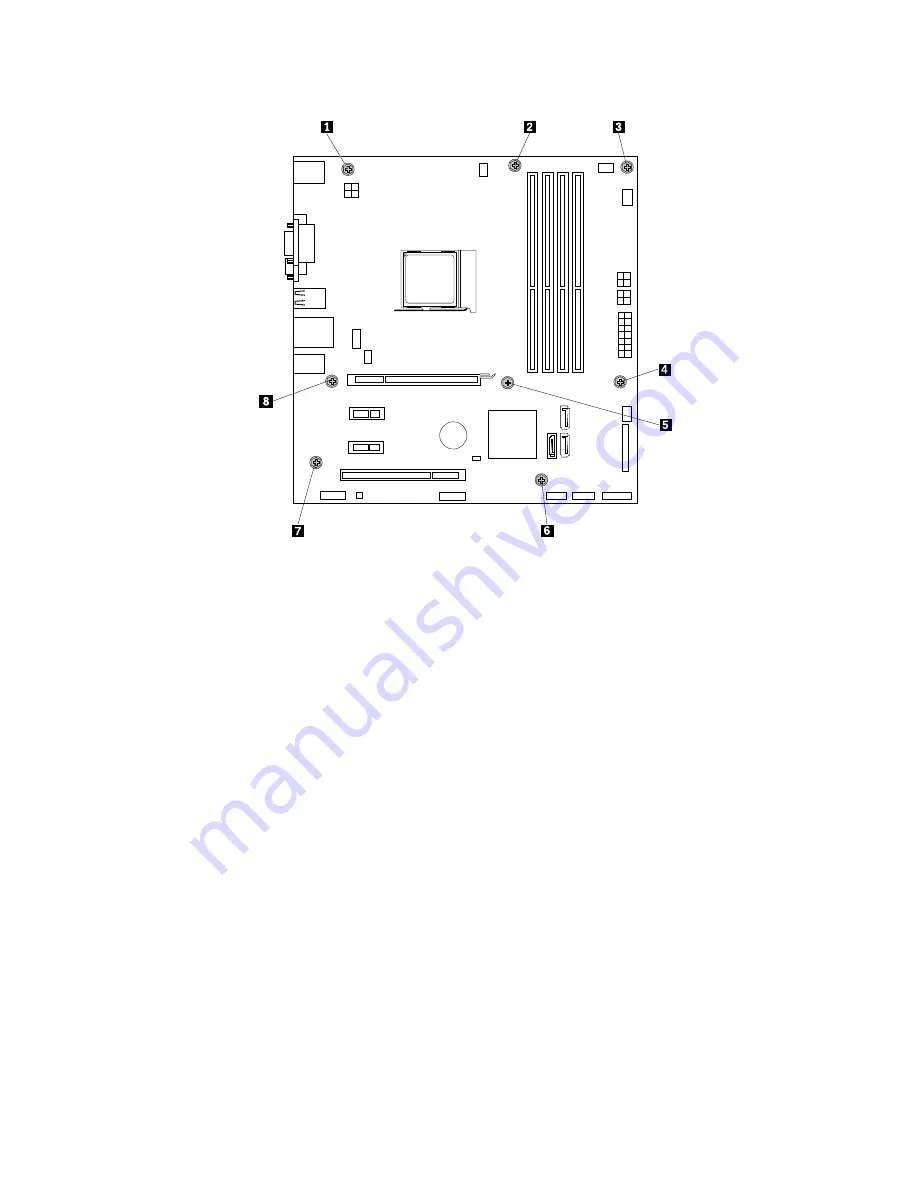
Figure 52. Removing the screws that secure the system board
9. Slide the system board to the front of the computer and then carefully lift the system board out of the
chassis. Place the failing system board on a flat, clean, and static-protective surface.
10. Remove the microprocessor from the failing system board and install it on the new system board. See
“Replacing the microprocessor” on page 132.
11. Install the new system board into the chassis by aligning the six screw holes in the new system
board with the corresponding mounting studs on the chassis. Then, install the eight screws to secure
the system board.
12. Install the heat sink and fan assembly and connect the heat-sink-and-fan-assembly cable to the new
system board. See “Replacing the heat sink and fan assembly” on page 126.
Note:
If necessary, apply the appropriate amount of thermal grease on the bottom of the heat sink
and fan assembly.
13. Install all memory modules and PCI Express cards removed from the failing system board onto the
new system board. See “Installing or replacing a memory module” on page 109 and “Installing or
replacing a PCI card” on page 111.
14. Refer to your record to connect cables to the new system board. You also can refer to “Locating
parts on the system board” on page 34 to help you locate the connectors on the system board and
connect cables.
15. To complete the replacement, go to “Completing the parts replacement” on page 151.
The failing system board must be returned with a microprocessor socket cover to protect the pins during
shipping and handling.
To install the microprocessor socket cover, do the following:
136
ThinkCentre M79 Hardware Maintenance Manual
Содержание ThinkCentre M79
Страница 1: ...ThinkCentre M79 Hardware Maintenance Manual Machine Types 10CT 10CU 10CV and 10CW ...
Страница 6: ...iv ThinkCentre M79 Hardware Maintenance Manual ...
Страница 8: ...vi ThinkCentre M79 Hardware Maintenance Manual ...
Страница 16: ... 18 kg 37 lb 32 kg 70 5 lb 55 kg 121 2 lb 8 ThinkCentre M79 Hardware Maintenance Manual ...
Страница 19: ...1 2 Chapter 1 Read this first Important safety information 11 ...
Страница 20: ...1 2 12 ThinkCentre M79 Hardware Maintenance Manual ...
Страница 21: ...Chapter 1 Read this first Important safety information 13 ...
Страница 27: ...Chapter 1 Read this first Important safety information 19 ...
Страница 31: ...Chapter 1 Read this first Important safety information 23 ...
Страница 40: ...Figure 4 Component locations 32 ThinkCentre M79 Hardware Maintenance Manual ...
Страница 68: ...Figure 8 Installing a padlock 60 ThinkCentre M79 Hardware Maintenance Manual ...
Страница 80: ...72 ThinkCentre M79 Hardware Maintenance Manual ...
Страница 98: ...90 ThinkCentre M79 Hardware Maintenance Manual ...
Страница 112: ...104 ThinkCentre M79 Hardware Maintenance Manual ...
Страница 168: ...160 ThinkCentre M79 Hardware Maintenance Manual ...
Страница 172: ...164 ThinkCentre M79 Hardware Maintenance Manual ...
Страница 175: ...Appendix D China Energy Label Copyright Lenovo 2014 167 ...
Страница 176: ...168 ThinkCentre M79 Hardware Maintenance Manual ...
Страница 178: ...170 ThinkCentre M79 Hardware Maintenance Manual ...
Страница 184: ...176 ThinkCentre M79 Hardware Maintenance Manual ...
Страница 185: ......
Страница 186: ......


