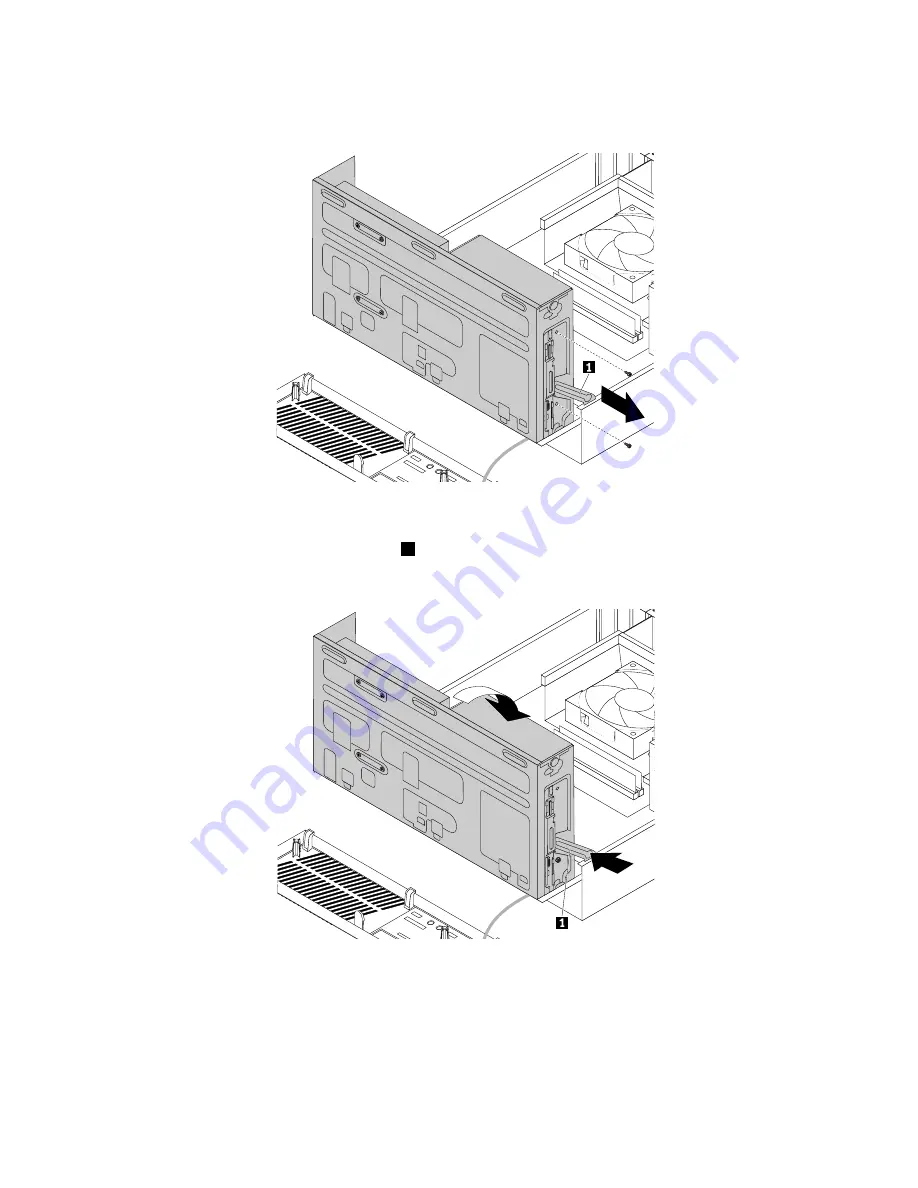
6. Hold the optical drive and remove the two screws that secure the optical drive.
Figure 33. Removing the optical drive screws
7. Slightly press the drive bay assembly clip
1
inward and pivot the drive bay assembly downward as
shown.
Figure 34. Lowering the drive bay assembly
122
ThinkCentre M79 Hardware Maintenance Manual
Содержание ThinkCentre M79
Страница 1: ...ThinkCentre M79 Hardware Maintenance Manual Machine Types 10CT 10CU 10CV and 10CW ...
Страница 6: ...iv ThinkCentre M79 Hardware Maintenance Manual ...
Страница 8: ...vi ThinkCentre M79 Hardware Maintenance Manual ...
Страница 16: ... 18 kg 37 lb 32 kg 70 5 lb 55 kg 121 2 lb 8 ThinkCentre M79 Hardware Maintenance Manual ...
Страница 19: ...1 2 Chapter 1 Read this first Important safety information 11 ...
Страница 20: ...1 2 12 ThinkCentre M79 Hardware Maintenance Manual ...
Страница 21: ...Chapter 1 Read this first Important safety information 13 ...
Страница 27: ...Chapter 1 Read this first Important safety information 19 ...
Страница 31: ...Chapter 1 Read this first Important safety information 23 ...
Страница 40: ...Figure 4 Component locations 32 ThinkCentre M79 Hardware Maintenance Manual ...
Страница 68: ...Figure 8 Installing a padlock 60 ThinkCentre M79 Hardware Maintenance Manual ...
Страница 80: ...72 ThinkCentre M79 Hardware Maintenance Manual ...
Страница 98: ...90 ThinkCentre M79 Hardware Maintenance Manual ...
Страница 112: ...104 ThinkCentre M79 Hardware Maintenance Manual ...
Страница 168: ...160 ThinkCentre M79 Hardware Maintenance Manual ...
Страница 172: ...164 ThinkCentre M79 Hardware Maintenance Manual ...
Страница 175: ...Appendix D China Energy Label Copyright Lenovo 2014 167 ...
Страница 176: ...168 ThinkCentre M79 Hardware Maintenance Manual ...
Страница 178: ...170 ThinkCentre M79 Hardware Maintenance Manual ...
Страница 184: ...176 ThinkCentre M79 Hardware Maintenance Manual ...
Страница 185: ......
Страница 186: ......


