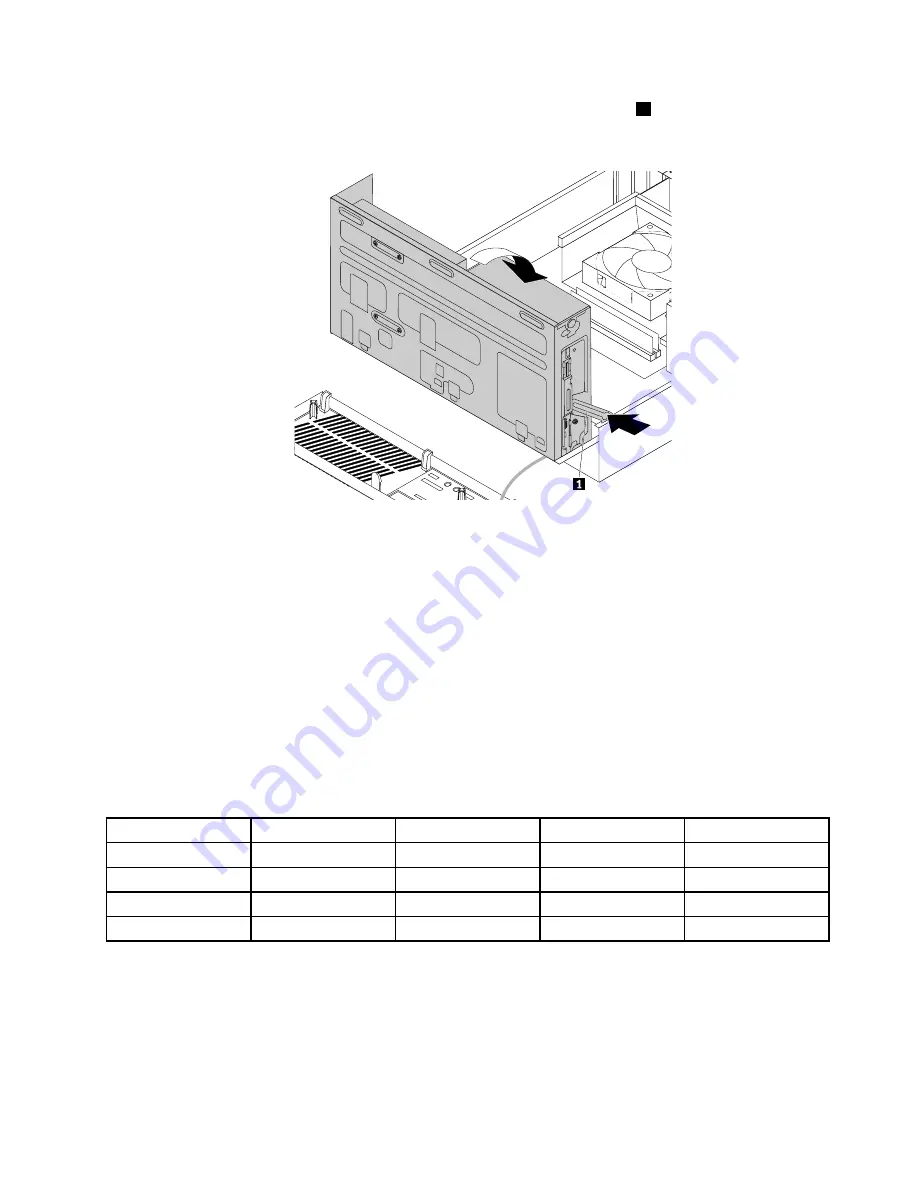
5. To lower the drive bay assembly, slightly press the drive bay assembly clip
1
inward and pivot the drive
bay assembly downward as shown.
Figure 14. Lowering the drive bay assembly
Installing or replacing a memory module
Attention:
Do not open your computer or attempt any repair before reading and understanding the Chapter
1 “Read this first: Important safety information” on page 1.
Your computer has four slots for installing or replacing DDR3 UDIMMs that provide up to a maximum of
32 GB system memory. When installing or replacing a memory module, use 2 GB, 4 GB, or 8 GB DDR3
UDIMMs in any combination up to a maximum of 32 GB.
The following table provides information about the memory module installation rules that you should
consider when installing or removing a memory module. The “X” mark indicates the memory slot(s) into
which the memory module(s) should be installed in different situations. The numbers 1, 2, 3, and 4 indicate
the installation sequence. To locate the memory module slots, see “Locating parts on the system board”
on page 34.
UDIMM
DIMM 1
DIMM 2
DIMM 3
DIMM 4
One UDIMM
X
Two UDIMMs
X, 1
X, 2
Three UDIMMs
X, 1
X, 3
X, 2
Four UDIMMs
X, 1
X, 3
X, 2
X, 4
To install or replace a memory module, do the following:
1. Remove any media from the drives and turn off all attached devices and the computer. Then, disconnect
all power cords from electrical outlets and disconnect all cables that are connected to the computer.
2. Remove the computer cover. See “Removing the computer cover” on page 105.
3. Lay the computer on its side for easier access to the system board.
4. Remove the heat sink fan duct. See “Replacing the heat sink and fan assembly” on page 126.
Chapter 11
.
Installing or replacing hardware
109
Содержание ThinkCentre M79
Страница 1: ...ThinkCentre M79 Hardware Maintenance Manual Machine Types 10CT 10CU 10CV and 10CW ...
Страница 6: ...iv ThinkCentre M79 Hardware Maintenance Manual ...
Страница 8: ...vi ThinkCentre M79 Hardware Maintenance Manual ...
Страница 16: ... 18 kg 37 lb 32 kg 70 5 lb 55 kg 121 2 lb 8 ThinkCentre M79 Hardware Maintenance Manual ...
Страница 19: ...1 2 Chapter 1 Read this first Important safety information 11 ...
Страница 20: ...1 2 12 ThinkCentre M79 Hardware Maintenance Manual ...
Страница 21: ...Chapter 1 Read this first Important safety information 13 ...
Страница 27: ...Chapter 1 Read this first Important safety information 19 ...
Страница 31: ...Chapter 1 Read this first Important safety information 23 ...
Страница 40: ...Figure 4 Component locations 32 ThinkCentre M79 Hardware Maintenance Manual ...
Страница 68: ...Figure 8 Installing a padlock 60 ThinkCentre M79 Hardware Maintenance Manual ...
Страница 80: ...72 ThinkCentre M79 Hardware Maintenance Manual ...
Страница 98: ...90 ThinkCentre M79 Hardware Maintenance Manual ...
Страница 112: ...104 ThinkCentre M79 Hardware Maintenance Manual ...
Страница 168: ...160 ThinkCentre M79 Hardware Maintenance Manual ...
Страница 172: ...164 ThinkCentre M79 Hardware Maintenance Manual ...
Страница 175: ...Appendix D China Energy Label Copyright Lenovo 2014 167 ...
Страница 176: ...168 ThinkCentre M79 Hardware Maintenance Manual ...
Страница 178: ...170 ThinkCentre M79 Hardware Maintenance Manual ...
Страница 184: ...176 ThinkCentre M79 Hardware Maintenance Manual ...
Страница 185: ......
Страница 186: ......


