34
(2) On the
Job Palette
, double click the color you wish to change to a color to pounce within this file. This color
should then appear at the top on the Smart Bar. Note that if you fail to select your images using this method,
then one or more images may not be changed to the new color that will be pounced.
(3)
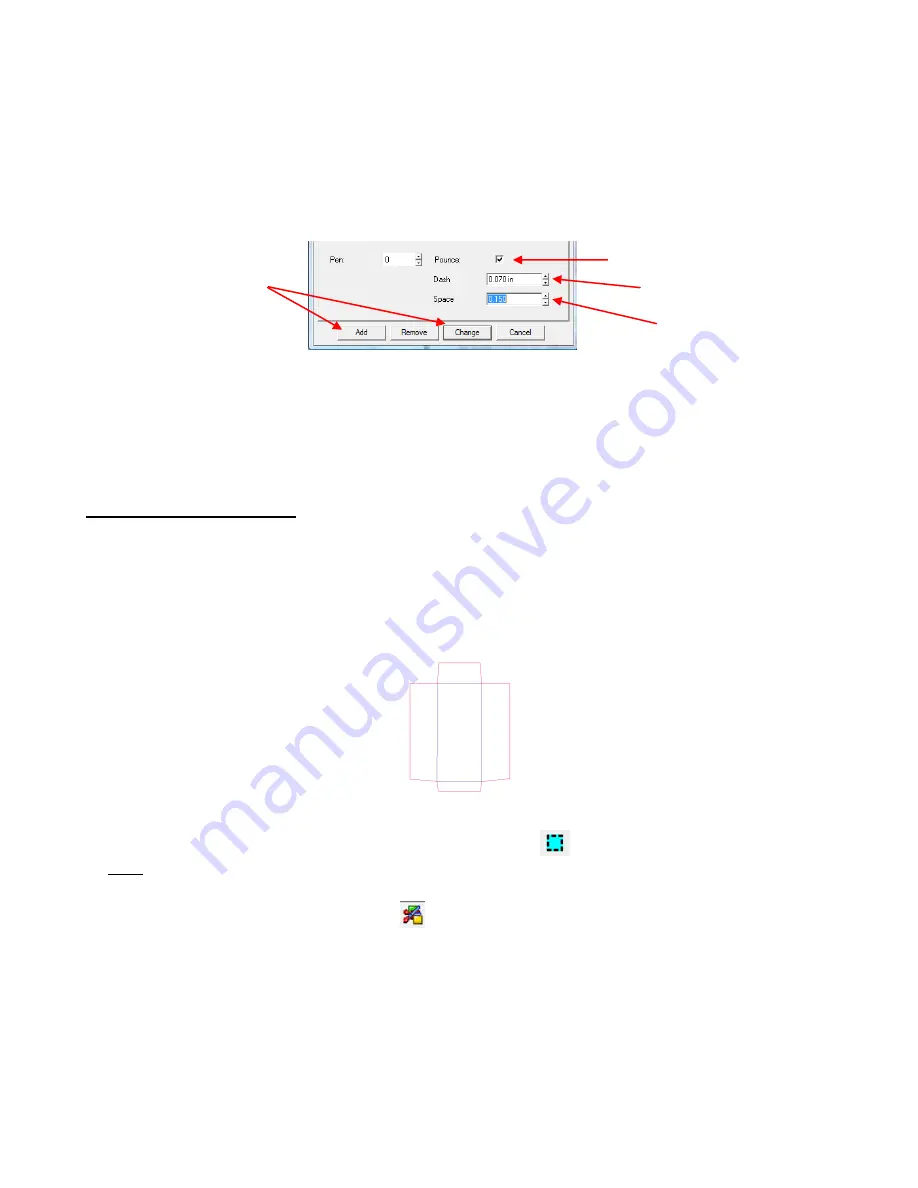
Double click on this color’s box on the Smart Bar and a window will open. At the bottom, check the box
next
to
Pounce
and then enter values for the
Dash
length and the
Spacing
of the dashes. Recommended
starting values are 0.07 and 0.15, as shown. If working in metric, then try 2mm and 4mm for the
Dash
and
Space
.
(4) Click on
Add
or
Change
. A new color number is assigned to that color and your images of that color should
change to dashed lines on the screen. If not, then select the images, note the new color number, and click
on it by locating it on the
Shop Palette
.
(5) Proceed with the normal cutting procedure. This new color will be dash line cut while other colors will be
solid cut. Note that you can assign other colors to be dashed cut, as needed.
Pounce First and Then Cut
Occasionally, you may find that pounce and cut in one step is not what you need. For example, you may
wish to use a pen to draw dashed lines first and then switch to the blade holder to cut the image afterwards.
Of course, you have the option to only select the color to be pounced while still in the main window.
However, it is also possible to turn on pounce after entering the cut window.
In this example, the following policy envelope will be used as the example. The exterior red lines will be cut
and the interior blue lines will be pounced (cut as dashed lines).
Select the entire image for cutting and click on the
Scissors
icon on the
Tools
toolbar.
In the
Cut Toolbox
window, click on the sixth icon from the right
to indent the box and
Enable Pounce
.
Right click on this icon and the settings window will appear. Try a value of 0.07
” (or 2mm)
for
Dash
and a
value of 0.15 (or 4mm) for
Space
. Click on
OK.
Now click on the second icon from the right
, which is
Sort and Cut All Colors
. In this example, you
would uncheck the Red color and leave the Blue checked and then click on
Cut
. The Blue fold lines will be
pounced.
When it is completed, click on the
Enable Pounce
icon again to un-indent and turn off pounce. Then click on
Sort and Cut All Colors
again, uncheck Blue, check Red and then click on
Cut
to cut the exterior red lines.
In general, it is recommended that pounced lines always be cut first and then the solid lines cut.
Check the Pounce box.
Enter a value for the length
of the dash.
Enter a value for the spacing
of the dashed cuts.
Click on
Add
or
Change
to
activate
Pounce
for this
color and close the window.


