background image


5  OPERATION 

EM210F-1  

5-33


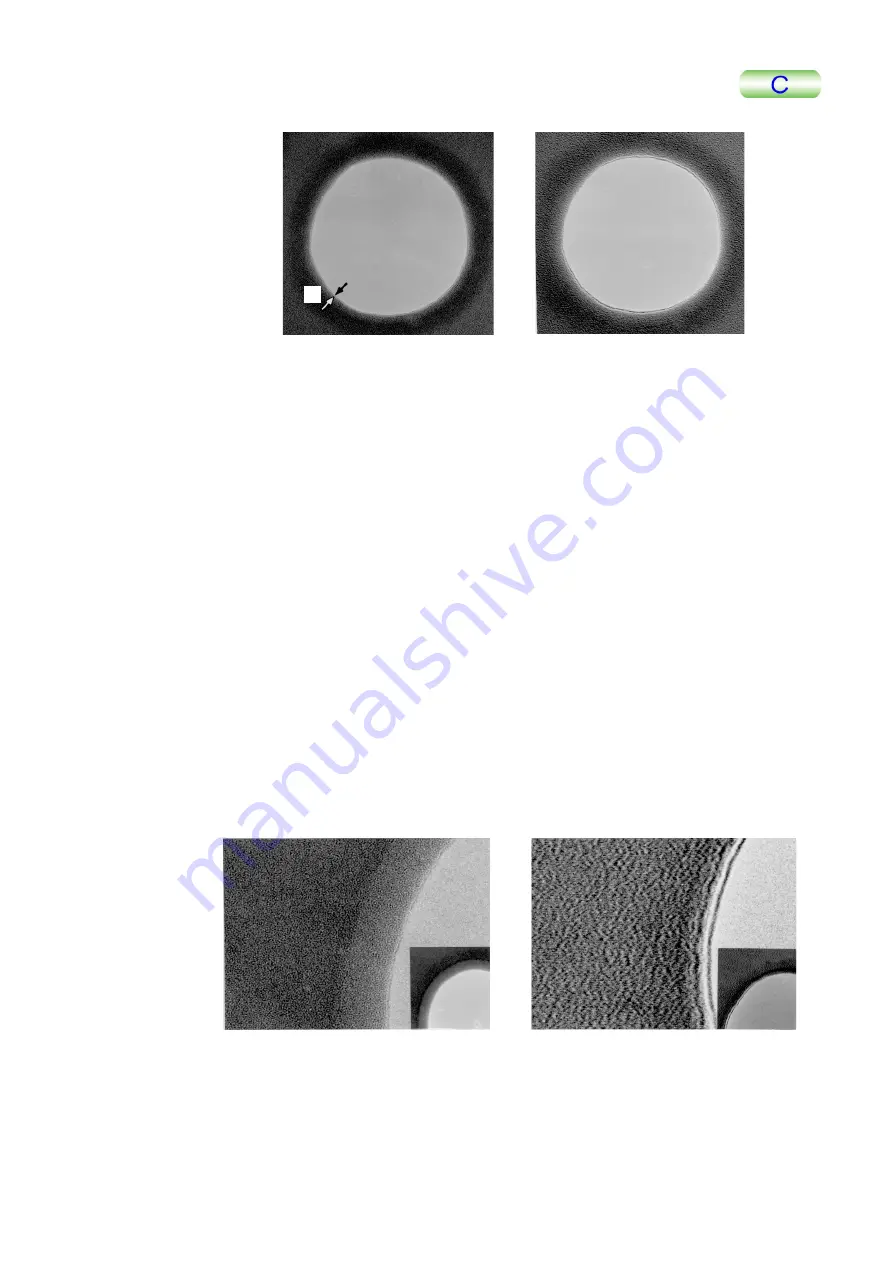
B: when astigmatism exists 

a: when astigmatism does not exist


Fig. 5.32  Astigmatism in the objective lens 


5.3.6b  At High Magnifications 


An amorphous specimen (the specimen supporting film itself or specimen itself) is used 
for astigmatism correction at high magnifications. 


1. 

Select “Maintenance” on the “TEN Controller” main menu to display the 
“Alignment Panel for Maintenance” screen. 

2. 

Set the magnification to 100,000 times or higher in the MAG mode. 

3. 

Obtain suitable image brightness using BRIGHTNESS (L1-

) and SHIFT 

(L1-

, R1-

). 

4. 

Manipulate OBJ FOCUS (R1-

) to focus the image. 

5. 

Use the trackball (SC-

) or X,Y buttons (SC-

) to obtain an amorphous 

specimen on the screen using the . 

6. 

Depress OBJ STIG (L1-

) or select “DEF select-OL” on the “Alignment 

Panel for Maintenance” screen. 

7. 

Slowly turn OBJ FOCUS back and forth from the in-focus position to observe 
a phase image. 

8. 

Manipulate DEF/STIG (L1-

, R1-

) so as to make the phase image as 

separated tiny spots (Fig. 5.33a shown below). 


a: Hole image when 
     astigmatism does not exist

b: Hole image when   
   astigmatism exists 


Fig. 5.33    Effect of objective astigmatism 


Содержание JEM-2100F

Страница 1: ...PE For the proper use of the instrument be sure to read this instruction manual Even after you read it please keep the manual on hand so that you can consult it whenever necessary IEM210F 1 17200 APR2...

Страница 2: ...EM210F 1 JEM 2100F FIELD EMISSION ELECTRON MICROSCOPE...

Страница 3: ...with the instrument after transport The information in this manual which is based on specifications believed cor rect at the time of publication is subject to change without notice due to im provement...

Страница 4: ...not avoided could result in minor or moderate injury Also could mean a potentially hazardous situation which could result in serious damage to facili ties and acquired data CAUTION Points requiring gr...

Страница 5: ...NITROGEN AND GAS SUPPLIES 2 4 2 9 DIMENSIONS AND WEIGHT MM AND KG 2 5 2 10 WARRANTY 2 5 3 COMPOSITION AND CONSTRUCTION 3 1 COMPOSITION 3 1 3 2 ACCESSORIES 3 1 3 3 CONSTRUCTION OF COLUMN 3 2 3 3 1 Col...

Страница 6: ...Down Procedure 5 2 5 2 3 Film Loading 5 2 5 2 4 Electron Beam Generation 5 8 5 2 5 Aperture Insertion 5 15 5 2 6 Photographing 5 17 5 2 7 Image Observation 5 20 5 2 8 Film Processing 5 22 5 3 METHOD B...

Страница 7: ...5 47 5 6 1 Filling the Refrigerant Tank 5 47 5 6 2 Raising the Trap Temperature to Room Temperature 5 48 5 7 SPECIAL OPERATION 5 51 5 7 1 Alignment Data Saving 5 51 5 7 2 Free Lens Control FLC 5 52 5...

Страница 8: ...and acquired data Parts of this instrument where safety precautions are required are labeled with illustration signs as shown below Do not touch the parts labeled with these signs Use the instrument i...

Страница 9: ...y occurs immediately shut down the instrument and contact your nearest JEOL subsidiary Be careful not to pinch your fingers between the specimen holder and goniometer when inserting the holder into th...

Страница 10: ...EM210F 1 GENERAL...

Страница 11: ...data and beam deflector data are collectively managed to ease the reproduce the lens condition on the GUI instantly enabling everyone to use such data in anytime The conventional micros copy while obs...

Страница 12: ...2 2 4 CAMERA CHAMBER 2 3 2 5 EVACUATION SYSTEM 2 3 2 5 1 For Microscope Column 2 3 2 5 2 For Electron Gun Chamber 2 3 2 5 3 Vacuum Valves 2 3 2 6 CONTROL SYSTEM 2 3 2 7 INSTALLATION REQUIREMENTS 2 4 2...

Страница 13: ...magnification Diffraction camera length 200 2 00 to 1 500 000 times 8 to 200 cm When the EM 20023 specimen high resolution polepiece is used Accelerating voltage kV Standard magnification Diffraction...

Страница 14: ...pertures click stop mechanism When the EM 20193 or 20458 polepiece is used 5 30 40and 60mm in diameter When the EM 20014 20023 or 20043 polepiece is used 5 20 60and 120mm in diameter Field limiting ap...

Страница 15: ...Column Vacuum pumps For rough evacuation Oil rotary pump oil diffusion pump or dry pump turbo molecular pump For fine evacuation Sputter ion pump or turbo molecular pump Ultimate pressure 10 5 Pa ord...

Страница 16: ...eiling height 3 000 mm or more Entrance 1 000 W 1 900 H mm or more Temperature 15 to 25 Humidity 60 or less Stray magnetic field 0 1 mT or less Compressed air 0 35 to 0 45 MPa gauge pressure 2 8 NITRO...

Страница 17: ...e EM 23078 with EM 23080 evacuation system Three oil rotary pumps In the case of the EM 23075 with EM 23085 evacuation system One oil rotary pump and one dry pump scroll pump In the case of the EM 230...

Страница 18: ...3 2 ACCESSORIES 3 1 3 3 CONSTRUCTION OF COLUMN 3 2 3 3 1 Column Exterior 3 2 3 3 2 Column Interior 3 3 3 3 3 Location of Coils and Lenses 3 4 3 4 LOCATION OF CONTROL PANELS 3 5 3 5 RAY DIAGRAMS 3 6 3...

Страница 19: ...Air compressor Vibration isolators Water supply Drain Power distributor Fig 3 1 Composition and layout diagram 3 2 ACCESSORIES Although some of the items are not used by the users they should neverth...

Страница 20: ...l with yours in detail CM lens shift screws 4 pcs High contrast objective aperture assembly Refrigerant tank Condenser aperture assembly Specimen holder Binoculars Trackball Field limiting Aperture as...

Страница 21: ...oil Binoculars Accelerating tube Condenser lens 1st beam deflector coil Intermediate lens coil High resolution diffraction chamber Large screen Electron gun 2nd beam deflector coil 1st condenser lens...

Страница 22: ...tor coil Condenser lens 1st beam deflector coil Condenser lens 2nd beam deflector coil Condenser minilens CM lens coil Objective lens coil Objective lens stigmator coil Objective minilens OM lens coil...

Страница 23: ...out panel R2 housing and control panel L2 is accessible when cover L2 is opened The PC is accessible when cover PC is opened Control panel SC Control panel L1 Control panel R1 Cover R2 control panel...

Страница 24: ...tion mode For TEM observation EDS mode High current density micro area illumination mode For micro area diffraction mode NBD mode Small convergence angle micro area illumination mode For micro area di...

Страница 25: ...d intermediate lens Projector lens Film Objective lens Specime Objective aperture OM lens Field limiting aperture 1st intermediate lens 2nd intermediate lens 3rd intermediate lens Projector lens Film...

Страница 26: ...SC 4 10 4 2 6 Power Supply Console 4 11 4 2 6a Control panel P1 4 12 4 2 6b Control panel P2 4 12 4 2 6c Control panel P3 4 13 4 2 6d Control panel P4 4 13 4 2 6e Control panel P5 4 13 4 3 MONITOR DI...

Страница 27: ...25 4 4 6c Operation screen 4 26 4 4 6d Specimen Position screen 4 30 4 4 6e Film Camera Property screen 4 31 4 4 6f Status Monitor screen 4 32 4 4 6g Valve Status screen 4 34 4 4 6h EOS Property scre...

Страница 28: ...en Knobs 2 and 3 Knobs 2 and 3 are used to move the apertures in X and Y directions Knob 1 Knob 3 Knob 2 Fig 4 1 Condenser lens aperture assembly 4 1 2 Condenser Mini Lens Shift Screws Used for illumi...

Страница 29: ...t that the goniometer is being roughly evacuated PUMP AIR switch Setting this switch to PUMP evacuates the goniometer the yellow lamp lights up during evacuation and the goniometer vacuum is broken wh...

Страница 30: ...in lamp lights up and the selected aperture can controlled using the aperture number select switches OPEN 1 2 3 or 4 and X Y shift switches Aperture control is impossible when the aperture is not att...

Страница 31: ...angle micro area illumination mode CBD switch When this is turned on the built in lamp brightens and the illumination mode is set to the CBD mode wide range chargeable convergence angle micro area ill...

Страница 32: ...lens beam deflector coil and the current can be adjusted using the SHIFT DEF STIG knobs Used to tilt the electron beam when observing dark field image NTRL switch Depressing this switch brightens the...

Страница 33: ...the voltage center alignment FUNCTION switches Used for selecting an image forming mode The magnification or camera length in the selected mode can be varied with the MAG CAM L knob R1 and is displaye...

Страница 34: ...G mode FINE knob The amount of current variation when the large knob is turned minimum COARSE knob The amount of current variation when the this knob is turned one notch is the same as when the FINE k...

Страница 35: ...vertical direction 4 2 3 Control Panel L2 Fig 4 5 Control panel L2 EM STOP switch Used for emergency shut down POWER switch Depressing the switch turns off the off the instrument and switch turns on...

Страница 36: ...S EM210F 1 4 9 4 2 4 Control Panel R2 Fig 4 6 Control panel R2 Variable resistors round holes Used for maintenance Dip switches square holes Used for turning on and off lens current and deflector coil...

Страница 37: ...direction in which the ball is turned CRS switch Used to select the specimen shift speed Turning this switch on built in lamp is lit selects the fast speed and turning this switch off selects the low...

Страница 38: ...Supply Console Fig 4 8 Power Supply console Control panel P1 SIP POWER SUPPLY 20 L Control panel P2 SIP POWER SUPPLY 60 L Control panel P3 optional attachment SIP POWER SUPPLY 150 L Control panel P4...

Страница 39: ...power supply 3 A This is a fuse holder for a 3 A delay fuse METER RANGE knob Used to select the value to be displayed on the meter P1 4 2 6b Control panel P2 This is a power supply for the 60 L ion pu...

Страница 40: ...osition POWER switch Setting this to the upper position turns on this power supply METER RANGE knob Used to select the value to be displayed on the meter P3 4 2 6d Control panel P4 A FILAMENT and a PO...

Страница 41: ...e The displayed time can be varied using the PHOTO EXP TIME knob R1 when the manual exposure mode is selected When the automatic exposure mode is selected the exposure time is determined automatically...

Страница 42: ...4 DESCRIPTION OF CONTROLS EM210F 1 4 15 4 3 2 Page 2 Fig 4 12 Page 2 Same as on Page 1 Same as and on Page 1 Displays the power values of the lenses Same as on Page 1...

Страница 43: ...4 DESCRIPTION OF CONTROLS 4 16 EM210F 1 4 3 3 Page 3 Fig 4 13 Page 3 Same as on Page 1 Same as and on Page 1 Displays the power values of the coils Same as on Page 1 4 3 4 Page 4 Fig 4 14 Page 4...

Страница 44: ...e AIR Indicates when lit that the compressed air pressure is lower than the specified value DP Indicates when lit that the heater in the DP oil diffu sion pump is broken WATER Indicates when lit that...

Страница 45: ...ng the TEM Server icon on the PC monitor start up the TEM Server The icon is also displayed on the task tray Fig 4 16 TEM Server icon TEM Server icon Fig 4 17 Task tray 4 4 1b TEM Controller Double cl...

Страница 46: ...window and set a function F Sect 4 4 5 for the detail Indicator Indicates that whether the system is connected to the TEM server 4 4 3 Switches Used to select a function used frequently Opens the EOS...

Страница 47: ...tes that the accelerating voltage is being generated Emission The background color is green while the electron beam is being generated Beam Valve Indicates that valve V1 can be opened Green background...

Страница 48: ...exposure mode is selected M appears at the end of this line and the exposure time can be varied with the EXP TIME R1 0 1 to 900 0 and B When the automatic exposure mode is selected A appears 4 4 4c Ri...

Страница 49: ...the specimen position and to set the specimen position ASID Opens the ASID optional attachment screen if incorporated Photo Set Opens the Film Camera Property screen FSect 4 4 6d This is used to displ...

Страница 50: ...Bake Out ACD Heat Opens the Bake Out ACD Heat screen FSec 4 4 6o This screen is used to bake out the microscope column and anti contamination device ACD Aperture Opens the Aperture Adjust screen FSec...

Страница 51: ...ig 4 25 Photo History screen Date of the photographing Film information FFig 4 23 Text The text printed on the film Photo screen Number The film number printed on the film Photo screen The total numbe...

Страница 52: ...HT and Filament mission HT Status Ready is displayed when accelerating voltage generation is allowed and Not Ready is displayed when accelerating volt age generation is not allowed On is displayed whe...

Страница 53: ...ns vary the voltage and the amount of the voltage change per step can be set in the Step box Setting Displays the FEG and QES Setting screen The screen is used to set the FEG condition Detail Giving a...

Страница 54: ...a magnification mode MAG B mode in this instrument DIFF This is a selected area diffraction mode MAG AND vary the magnification DEF Select Alignment Gun The Gun shift function is designated to the SHI...

Страница 55: ...s is selected Freq Amp Opens the EOS Property screen FSect 4 4 6h Screen This moves up and down the fluorescent screen Fig 4 28 Screen OPEN Moves up the screen to incline it at the angle selected in t...

Страница 56: ...cimen shift per step can be varied in the STEP boxes under the triangle buttons and the amount of the specimen tilt per step under the Z buttons TILT The X buttons tilt the specimen in the X direction...

Страница 57: ...s button stores the present specimen position and shows the stored position in the window and on the coordi nates Clear The specimen positions stored in the memory are deleted when this button is depr...

Страница 58: ...lects the automatic exposure mode 1 The fresh film moves to the exposing position every time the photographing is per formed Auto 2 selects the automatic exposure mode 2 The fresh film moves to the ex...

Страница 59: ...ens the screen on which the film number can be changed 4 4 6f Status Monitor screen l Standard screen The information shown in this screen is the same as that shown in the main screen on the TEM contr...

Страница 60: ...am deflectors is shown on this screen Fig 4 35 Alignment Voltage screen l High Voltage screen This screen shows the accelerating voltage electron beam current and anode voltage Depressing the FEG Cont...

Страница 61: ...mpressed air pressure is insufficient RT The pressure in the compressed air reservoir is too low PIG The Pirani gauge is damaged RP1 Rotary pump 1 is not normal RP2 Rotary pump 2 is not normal DP 1 Wa...

Страница 62: ...acuum and reading of the Pirani gauge 5 are shown Pipe The state of the evacuation pipe vacuum for the oil diffusion pump and reading of the Pirani gauge 1 are shown PEG 1 The state of the Penning gau...

Страница 63: ...t coils Frequency is used to vary the wobbler frequency and Amplitude is used to vary the wobbler frequency l Etc screen Fig 4 40 Etc screen Etc Opens the etc screen Store The present magnification is...

Страница 64: ...pecimen tilt X speed using the triangle button TiltY Rot Varies the specimen tilt Y speed or rotation speed when a rotation holder is used using the triangle button Set Sets the selected speed 4 4 6j...

Страница 65: ...Lens Control screen Off On Turns on and off the free lens control function of the individual lens Sliders Used to vary the lens current All Turns on and off the free lens control function of all the...

Страница 66: ...is turned 4 4 6m Lens Def Memory screen Fig 4 45 Lens def Memory screen This is used to save the lens and beam deflector current data Save Depressing this button displays the lens list in the Memory...

Страница 67: ...igns the beam shift 2 function to the DEF STIG knobs L1 R1 PLA Assigns the PL alignment function to the DEF STIG knobs L1 R1 CL STIG Assigns the condenser lens stigmator function to the DEF STIG knobs...

Страница 68: ...e current center adjustment ImageX Y Clicking this button pulsates the condenser lens beam deflector current Used for the Shift Balance adjustment TiltX Y Clicking this button pulsates the condenser l...

Страница 69: ...en Start Starts the bake out Stop Stops the bake out Bar Shows the bake out process Column Stage Used to select the microscope column or stage for bake out Calendar Used to check the date for the bake...

Страница 70: ...is is for aperture control when the motor drive aperture assembly is used Fig 4 49 Aperture screen Adjust Mode Turns on and off the Adjust Mode Backlash Correction Sets the backlash in the X and Y dir...

Страница 71: ...tor reached the limit the corresponding lamp lights up The movement is detected using a poten tiometer in this case H W limited Alarms that the specimen movement X Y Z Tilt X and or Rotation reached t...

Страница 72: ...p lights up This screen will disappear when the cause of the abnormality is removed The abnormality sign left displayed unless the abnormality is removed Fig 4 51 Emergency screen GUN HT Items concern...

Страница 73: ...goniometer 5 7 5 2 4 Electron Beam Generation 5 8 5 2 4a Outline of beam generation 5 8 5 2 4b HT conditioning 5 9 5 2 4c Accelerating voltage generation 5 12 5 2 4d Electron beam generation in the a...

Страница 74: ...ge 5 39 5 4 3a Low magnification image observation 5 39 5 4 3b Current center adjustment 5 39 5 4 3c Astigmatism Correction 5 40 5 4 4 Minimum Dose Exposure MDS 5 41 5 5 ELECTRON DIFFRACTION 5 43 5 5...

Страница 75: ...t 5 2 It is advisable to become familiar with method A before attempting methods B Procedures detailed in this section are skeletonized in the section on method B METHOD B Sect 5 3 This section covers...

Страница 76: ...3 Remove all the aperture from the beam path or set it to bubble 4 Shut down the TEM Controller 5 Shut down the TEM Server 6 Shut down the computer 7 Shut down the microscope using the POWER switch L...

Страница 77: ...l it stops The door will open in 5 minutes 3 Open the camera chamber door and close the nitrogen source valve If the door does not open in five minutes after turning the door handle clockwise turn the...

Страница 78: ...hen needed Also as one receiving magazine is being filled during the course of photogra phy the second one can be kept handily ready for the next sequence of film ing When handling the magazines hold...

Страница 79: ...tool and remove the cartridge from the holder 2 Loosen the specimen securing plates rotate the specimen securing plate and remove the specimen Specimen cartridge Specimen securing plate Plate fixing...

Страница 80: ...Align the specimen holder guide pin with the guide groove on the microscope column or goniometer push the holder in the goniometer until it stops and set the goniometer PUMP AIR switch FFig 4 2 to PUM...

Страница 81: ...iometer If you do not do so the specimen holder may hit the goniometer causing damage to the goniometer due to the force of vacuum 5 2 3e Removing the specimen holder from the goniometer 1 Turn off BE...

Страница 82: ...condition in the automatic mode can be changed on the screen The new condition is saved and used when generating an electron beam next time The following items should be kept in mind while the electr...

Страница 83: ...rol screen appears 2 Set the HT status to Ready on the High Voltage Control screen FSect 4 4 6b after setting HT to OFF 3 Ready a stable and solid step mount on the step and set the conditioning knob...

Страница 84: ...at the speed of 1 kV per 30 seconds e Leave it for 15 minutes 7 Press Manual Conditioning OFF on the High Voltage screen The HT conditioning is now complete The voltage applied is now the same as tha...

Страница 85: ...1 5 11 Accelerating voltage 200 kV 180 kV 140 kV 100 kV a b c d e 40 s 10 m 40 s 20 m 40 s 30 m 40 s 45 m 40 s Time elapsed b d e COND a OPERAT c Electron gun chamber Conditioning knob Fig 5 11 Condit...

Страница 86: ...sition is OPERATE 5 Make sure that HT status on the screen is Ready 6 Set the HT value to 100 kV using the UP DOWN triangles on the screen 7 Depress the HT ON button on the screen 5 2 4d Electron beam...

Страница 87: ...th the triangle buttons The value on the Monitor increases toward the Target value b Use the triangle buttons to set Monitor of Filament so that the Monitor value increases 0 1 A per one minute increa...

Страница 88: ...should be performed under the directions from a JEOL service office 1 Close isolation valve V1 2 Minimize the value on the Monitor of A1 using the triangle buttons The 1st anode voltage is set to 0 3...

Страница 89: ...BRIGHTNESS knob L1 3 Center the beam with the SHIFT knobs L1 R1 4 Select the largest aperture Manipulate knob 2 and 3 to find the aperture on the fluorescent screen if aperture does not appear on the...

Страница 90: ...the DEF STIG knobs L1 R1 Turn off the PLA switch after centering Fig 5 15 Caustic spot 4 Obtain the smallest illumination spot with the BRIGHTNESS knob L1 and make the illumination spot coincide with...

Страница 91: ...K 500nm 200 0 KV 123456789012345678 Fig 5 17 Data printout TEXT specimen name etc Entered on the Film Camera Property screen FSect 4 4 6e Magnification or camera length Accelerating voltage Film numbe...

Страница 92: ...screen FSect 4 4 6e 3 Depress the PHOTO switch R1 to bring the film to the photographing position Advance can be used to select the film advancing mode FSect 4 4 6e 4 Depress the PHOTO switch R1 agai...

Страница 93: ...g the film to the photographing position Advance can be used to select the film advancing mode FSect 4 4 6e 4 Depress the PHOTO switch R1 again to carry out photographing The lamp located at the left...

Страница 94: ...the goniometer Electron beam generation is impossible if the specimen holder is not in the goniometer f Find the beam on the fluorescent screen g Place the specimen in the beam path 4 Depress the STD...

Страница 95: ...IMAGE WOBB X or Y switch R1 10 Manipulate the BRIGHTNESS knob L1 to set the exposure time shown on Exp Time on the center main screen FSect 4 4 4b to an optimum value 11 Depress the PHOTO switch R1 wi...

Страница 96: ...o suspend development so as to prevent the film from becoming blotchy and to prolong the effectiveness of the fixer 6 Immerse the film in a rapid acid hardening fixer 18 to 21 and leave it in for appr...

Страница 97: ...cellophane etc and keep the bag in a dry place away from direct sunlight Consequences of faulty film processing etc are listed in Table 1 assuming that the exposure is in order Drying cabinet Hanger...

Страница 98: ...erature too low Too grainy Developing time too long Uneven density Developing time too short Effete developer Spotty staining mottled Developer agitation insufficient Film electrostatically charged be...

Страница 99: ...smaller the a SELECTOR No the higher the image quality with smaller field of view Refer to the following when selecting the a SELECTOR No a SELECTOR No 3 For any magnification a SELECTOR No 2 For 100...

Страница 100: ...e when lens astigmatism is present It will be seen that when the lens is free from astigmatism the background structure is clear and the edge of the hole can be readily observed all the way round and...

Страница 101: ...he way round In the latter case the background structure appears to be unidirectional and the edge of the hole exhibits one way blurring a Hole image when there is no drift b Hole image when there is...

Страница 102: ...ce screen Fig 5 29 Alignment Panel for Maintenance screen 2 Set the magnification to 5 000 times 3 Set the SPOT SIZE knob L1 to 1 4 Converge the electron beam using the BRIGHTNESS knob L1 5 Select Gun...

Страница 103: ...ustment This is to adjust the ratio of the current in the condenser lens beam deflector upper coil and lower coil so that the electron beam deviation when tilting the beam is minimum 1 Select Maintena...

Страница 104: ...1 to obtain a caustic spot 5 Depress the compensator Tilt button on the Alignment Panel for Mainte nance screen 6 Depress the Wobbler TiltX button on the Alignment Panel for Maintenance screen The bea...

Страница 105: ...bler OBJ on the Alignment Panel for Maintenance screen by depressing Wobbler OBJ 5 3 5b Voltage center adjustment 1 Select Maintenance on the TEN Controller main menu to display the Alignment Panel fo...

Страница 106: ...le hole on the specimen to the screen center 6 Press OBJ STIG L1 or DEF Selector OL on the Alignment Panel for Maintenance screen 7 Manipulate OBJ FOCUS R1 so that the a fresnel fringe A white line se...

Страница 107: ...higher in the MAG mode 3 Obtain suitable image brightness using BRIGHTNESS L1 and SHIFT L1 R1 4 Manipulate OBJ FOCUS R1 to focus the image 5 Use the trackball SC or X Y buttons SC to obtain an amorph...

Страница 108: ...e Alignment Panel for Maintenance screen 2 Set the microscope to the MAG mode 3 Depress IMAGE WOBBLER X or Y R1 or depress Wobbler Image X or Y on Alignment Panel for Maintenance screen A doubled imag...

Страница 109: ...5 OPERATION EM210F 1 5 35 Table 5 2 Under focus In focus Over focus ON OFF IMAGE X or Y switch...

Страница 110: ...e edge of the hole increases as the amount of over focus is increased In focus lies between under focus and over focus As the knob is gradually turned clockwise from the under focus condition the widt...

Страница 111: ...er point to keep in mind when focusing images at high magnifications is that since the possibility of mistaking the apparent fine structure for the actual structure is large it is necessary to photogr...

Страница 112: ...tion pattern aperture position c Dark field image Fig 5 37 Bright dark field images 5 4 2 Dark Field Image When the incident electron beam passes through the specimen it splits chiefly into unscattere...

Страница 113: ...objective and field limiting apertures from the beam path F Sect 5 2 9 4 Depress the LOW MAG switch R1 5 Select the desired magnification with the MAG CAM L knob R1 A selected magnification appears on...

Страница 114: ...BLER X switch R1 5 Turn on the IMAGE WOBBLER Y switch R1 A doubled image appears on the screen 6 Manipulate the DEF STIG Y knob R1 to make the doubled image as a single image 7 Turn off the IMAGE WOBB...

Страница 115: ...2 to display the MDS screen FSect 4 4 6j Fig 5 38 MDS screen 2 Set the After Photo mode FItem in sect 4 4 6j beam blanking time beam blanking method FItem in Sect 4 4 6j and delay time F Item in Sect...

Страница 116: ...am should be converged as much as possible converged to the area where the image focusing is narrowly carried out 6 Repeat the condition setting in the SEARCH FOCUS PHOTO SET modes in this order to ma...

Страница 117: ...to be used to the screen center using the triangle buttons or trackball FSect 4 2 5 5 Insert a field limiting aperture into the electron beam path A selected area image appears on the fluorescent scr...

Страница 118: ...6d to carry out the first photograph 7 Depress the NBD switch L1 to obtain the NBD mode 8 Converge the beam using the BRIGHTNESS knob R1 9 Manipulate the SPOT SIZE knob L1 to select the spot size valu...

Страница 119: ...BRIGHTNESS knob L1 to diverge the beam to the extent where the entire specimen image appears 10 Bring the field of view to be studied to the screen center 11 Insert a small condenser aperture 10 or 20...

Страница 120: ...5 OPERATION 5 46 EM210F 1 a Micrograph of optical replica b Corresponding high dispersion diffraction pattern Fig 5 41 High dispersion diffraction...

Страница 121: ...trons resulting in an increase of objective lens astigmatism and fluctuation of the electron beam If the yellow lamp on the connector box lights up when the check button is depressed stop the instrume...

Страница 122: ...olumn when the trap is cooled down moisture in the air will condense and ice will form the latter enveloping the trap It is therefore necessary to raise the trap temperature to room temperature before...

Страница 123: ...onnect the cable to the tank again and wait for the lamp to go out In order to terminate trap heating before the trap reaches room temperature depress the Off button for few seconds on the screen CAUT...

Страница 124: ...5 OPERATION 5 50 EM210F 1 Plug Protective cylinder Heater Fig 5 44 Refrigerant drainer Refrigerant drainer Protective cylinder Plug Connector box Refrigerant tank Fig 5 45 Tank with drainer...

Страница 125: ...osing the beam 5 7 1a Saving 1 Select Maintenance on the main menu on the TEM Controller screen to open the Alignment Panel for Maintenance screen Fig 5 46 Alignment Panel for Maintenance screen 2 Dep...

Страница 126: ...ck mark to On for the lens to be controlled or ALL 3 Move the scroll bar on the screen to vary the lens current 4 Click the Save button on the screen to save the file and click the Load button to read...

Страница 127: ...m PT Every 5 years Condenser aperture f100 mm PT Every 5 years Condenser aperture f200 mm PT Every 5 years Field limiting aperture f10 mm VMP Every 5 years Field limiting aperture f20 mm VMP Every 5 y...

Страница 128: ...used in the instrument 5 8 3a EM 23075 evacuation system Part name Specification Exchanging frequency Nylon tube AS4 50 04 2 5 4 Every 5 years Gum hose 603 13 4 black Every 5 years Nylon tube AS4 50...

Страница 129: ...10 UF 25 10 blue Every 5 years Oil mist filter DT 250 25A Every 5 years Gum hose 18 42 1000 Every 5 years RP oil MR 100 IL Every 2 years V belt Every 2 years 5 8 3d EM 23085 evacuation system Part na...

Отзывы: