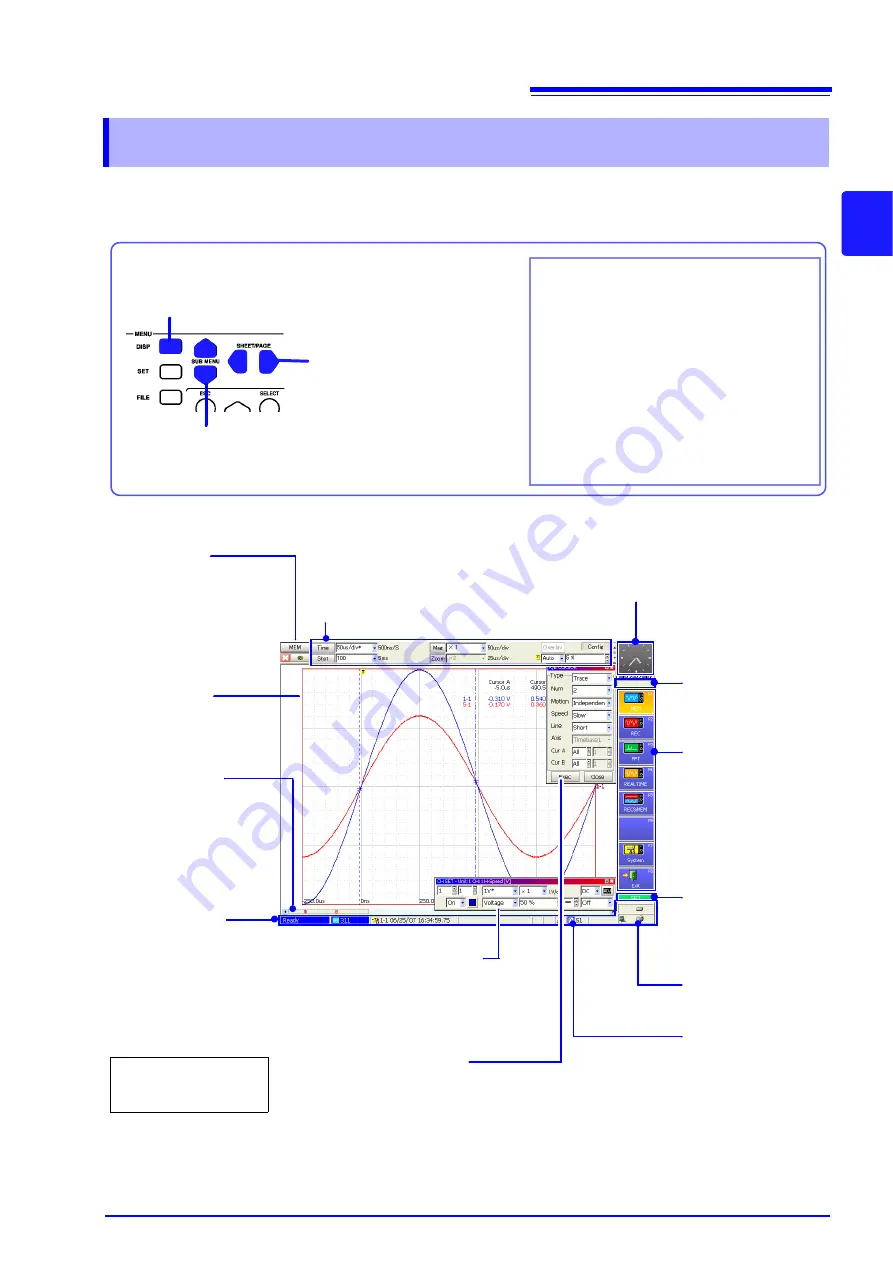
2.4 Waveform Screen
19
2
Chapter 2
Ope
rat
ing Keys a
nd Screen Conte
nt
s
Parts of the displayed screen depend on the selected operating function.
Refer to the Analysis and Communication Supplement for details of the FFT function.
2.4
Waveform Screen
(To change sheets)
This is valid only when measure-
ment data has been assigned to
multiple sheets.
To open the Waveform screen
Press the
DISP
key
Press the
SUB MENU
keys
(To change choices of setting items)
See
"Setting Items and Choices" (p. 21)
(The Waveform screen appears)
Press the
SHEET/PAGE
keys
Displays acquired data as waveforms or
numerical values.
To change the display type (Waveform,
numerical values or X-Y Composite):
See
"7.2.3 Setting the Display Type" (p. 177)
To display any combination of recorded
data:
See
"7.2.1 Assigning Display Data to Sheets"
(p. 175)
(Example: Memory Function Waveform Screen)
Function Menu
Select a function before
measuring.
To change functions:(p. 81)
Internal and External
Connection Status
Recorded Data
Shows data acquired with this
instrument. (p. 20)
Setting Items and Choices
Measurement configuration and trigger criteria set-
tings can be changed. These can be changed while
measuring.
Press the
SUB MENU
keys to select the items to
change.
Clock
Shows the current time. You can
change the display appearance.
Clock setting procedure (p. 364)
Setting Choices
(GUI area)
The cursor indicates the
current setting choice.
Select with F keys (F1 to
F8).
Press the
FUNCTION
MODE
key to change the
F key functions. (p. 26)
Scroll Bar (p. 192)
Scrolls waveforms.
The width of the scroll bar indi-
cates the displayed area within
the overall recorded waveform.
You can use the mouse to
scroll.
Status Bar (p. 24)
This bar indicates the current
states of data acquisition, inter-
nal processing, settings and
display information.
“Key Lock” appears when
the key-lock state is en-
abled.
F-Key Function
Status
Shows the current F key
status.
A/B Cursor Settings Dialog
Select the type of cursors.
(Appears when you press the
TYPE
key or knob
A
)
On-screen changes can be
made by clicking the mouse.
(p. 69)
Sheet No.
Press the
ESC
key to
remove the dialog.
Input Channel Settings Dialog
Input channel settings can be changed. (p. 134)
(Appears when you press the
UNIT
or
CH
keys,
or press or turn the
RANGE
knob)
Содержание 8860-50
Страница 2: ......
Страница 12: ...Contents x...
Страница 18: ...Reading this Manual 6...
Страница 24: ...1 3 Interconnection and Block Diagrams 12...
Страница 180: ...6 12 Making Trigger Settings on the Waveform Screen 168...
Страница 246: ...8 15 Inserting and Searching for Event Marks on a Waveform 234...
Страница 354: ...12 7 Print Examples 342 Print Example 4 Row Printing 1 4 steps Settings data Each step is 25 div...
Страница 356: ...12 7 Print Examples 344 A B Waveform_________________________________________________...
Страница 360: ...12 7 Print Examples 348 Event ________________________________________________________ Event mark...
Страница 406: ...14 2 External I O 394...
Страница 489: ......
Страница 490: ......


