background image

GE Medical Systems

EAGLE 1000

               Page 55

Information Technologies

Servicing Instructions

227 468 01 Rev. G

2.2.12.3 Internal interfaces

Mechanical interfaces

-

30-lead flat strip cable with cased socket housing to printhead

-

4-lead male multipoint connector with coding to the motor

Electronic interfaces

Printhead interface

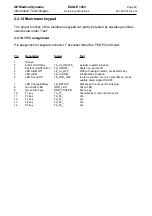
The thermal-array printhead is connected with a 30-lead flat strip cable to the PCB DIGI-

TAL. Serial loading of data ensues via the KDATA cables, using the clock signal KCLOCK

into the printhead shift register. Parallel data is transferred to the printhead latch register

with the KLATCH signal. The heating period is controlled by the KSTRB cable.

The printer controller receives an analog signal, which varies according to the temperature

of the printhead, via cables TERM1 and TERM2.

Via signals delivered by the VDD1 cable when not printing the thermal-array printhead is

put into power save mode.

The remaining leads are used to supply voltage to the printhead. Refer to P-Plan PCB

Recorder for pin assignment.

Motor interface

The motor is connected to the male multipoint connector on the  printer controller via a 4-

lead plug-in socket. The motor is connected b22V and Motor+, the speedo gene-

rator between MOTGEN- and .

Refer to P-Plan PCB Recorder for pin assignment.

Содержание Eagle 1000

Страница 1: ...Eagle 1000 Patient Monitor Servicing Instructions 227 468 01 SA e Revision G ...

Страница 2: ...uthorizedbyGE Medical Systems Information Technologies the electrical installation of the relevant room complies with the applicable national and local requirements and the instrument is used in accordance with the instructions for use This manual contains service information operating instructions are provided in the operator s manual of the instrument This manual is in conformity with the instru...

Страница 3: ...ay 19 2 1 3 Monitor functions 19 2 1 4 Power supply 20 2 1 5 Operation and storage 21 2 1 6 ECG and heart rate 21 2 1 7 Oxygen saturation Sp02 23 2 1 8 Non invasive blood pressure 24 2 1 9 Invasive blood pressure 25 2 1 10 Temperature 27 2 1 11 Trend 28 2 2 Functional description of PCBs and subassemblies 28 2 2 1 Eagle 1000 configuration and functional groups 28 2 2 2 PCB ECG Monitor 29 2 2 3 Sys...

Страница 4: ...an Please refer to the appendix 2 5 Master Record Index MRI Please refer to the appendix 3 Maintenance and technical inspection 69 3 1 Visual check 69 3 2 Checkout Procedures 70 3 2 1 Recommended testing calibration equipment and accessories 70 3 2 2 Test preliminaries 71 3 2 3 Operating control and indicator performance checks 71 3 2 4 ECG performance check 72 3 2 4 1 Patient cable identification...

Страница 5: ...formation 90 4 5 1 Service repair kit 90 4 5 2 Opening the instrument 90 4 5 3 Removing and reinstalling assemblies 91 4 5 4 Adjustment procedures 95 4 5 4 1 Location of the adjustment devices on PCB ECG Monitor Index G to I 97 4 5 5 Recorder service 99 4 5 6 PCB Press Temp 388 031 75 PCB Temp partly equipped PCB Press Temp 101 4 6 Troubleshooting tips 101 4 7 QuickLink test 105 4 7 1 Technical in...

Страница 6: ...ce The revision code a letter that follows the document part number changes with every update of the manual The initial version of the manual has the letter A Part No Revision Code Date Comment 227 468 01 A 1997 05 Initial Release 227 468 01 B 1997 06 Updates 227 468 01 C 1997 08 Updates 227 468 01 D 1997 12 Updates 227 468 01 E 1998 02 ECO 063757 227 468 01 F 2001 02 ECO 065760 227 468 01 G 2003 ...

Страница 7: ...onfiguration thus having no influence on the part No E g Instrument Type Version EAGLE 1000 without recorder 101 123 with recorder 101 124 07 complete system 02 ECG only 1 1 2 Configuration of the PCB par numbers 388 xxx yy Spare part numbers for the operative PCBs The instrument documentation e g reference diagrams circuit diagrams and parts lists are listed under these part numbers The 388 numbe...

Страница 8: ... is to be returned to the Freiburg factory Replacement PCB part numbers are included in the spare parts list 1 1 3 Instrument status documentation nominal status Due to the hardware and software combination unambiguous documentation of the instru ment assembly status is necessary also in the event of repairs This documentation comprises the following documents and measures Master Record Index MRI ...

Страница 9: ...larm recorder 101 123 03 EAGLE 1004 ECG SPO2 101 124 03 EAGLE 1005 ECG SPO2 Alarm recorder 101 123 04 EAGLE 1006 ECG NBP 101 124 04 EAGLE 1007 ECG NBP Alarm recorder 101 123 05 EAGLE 1008 ECG SPO2 NBP 101 124 05 EAGLE 1009 ECG SPO2 NBP Alarm recorder 101 123 06 EAGLE 1010 ECG SPO2 NBP TEMP 101 124 06 EAGLE 1011 ECG SPO2 NBP TEMP Alarm recorder 101 123 07 EAGLE 1014 ECG SPO2 NBP TEMP 2 x IBP 101 12...

Страница 10: ... port Alarm release ensues from one of the two OctaBus devices these being connected ap propriately The OctaBus devices and the Central Station PC monitor controll each others performance and give an alarm when a malfunction is detected For configuration see figure below Figure 1 Connection of EAGLE 1000 with current loop output to Nurse Call Central Station socket Connection The Nurse Call socket...

Страница 11: ... EAGLE 1000 Page 11 Information Technologies Servicing Instructions 227 468 01 Rev G Central Station PC Figure 2 Connection of EAGLE 1000 monitors to a PC Central Station SynOpsis 1000 using 2 OctaBus hardware interfaces ...

Страница 12: ...into the transport monitor Upon arrival at his new destination the patient is hooked up to the destination monitor and the transfer of the trend data initiated by the transport monitor operator The transport monitor establishes a connection over an IR beam and a terminal server QuickLink with the LAN and transfers the data to the Gateway In the Gateway the data are stored in a file bearing a file ...

Страница 13: ...e transferred once more When the data transfer is initiated the time will be sent by the transport monitor real time clock From this the Gateway can identify any possible time misalignment of the internal clock of the transport monitor and account for this when the trend data are entered Sporadic trend data e g non invasive blood pressure values are only transferred for the period of time in which...

Страница 14: ...cal Systems EAGLE 1000 Page 14 Information Technologies Servicing Instructions 227 468 01 Rev G Configuration with BNC AUI or twisted pair TP Figure 4 QuickLink LAN connection twisted pair installation option ...

Страница 15: ...th VICOMserver This is where the patient data and the measured values recorded during transportation are made available for complete documentation on any patient monitor or on a clinical infor mation system 1 3 2 4 2 Main components for the installation of QuickLink Part Number Device Description 216 135 01 QuickLink Adapter IR Interface connectable to Eagle 1000 216 134 01 QuickLink Station Stati...

Страница 16: ... Systems EAGLE 1000 Page 16 Information Technologies Servicing Instructions 227 468 01 Rev G 1 3 2 4 3 EAGLE 1000 QuickLink Network link HELAN CheaperNet SMX 008 SMX 001 can be used in place of SMX 009 BNC T Plug ...

Страница 17: ...GE Medical Systems EAGLE 1000 Page 17 Information Technologies Servicing Instructions 227 468 01 Rev G 1 3 2 4 4 Network link HELAN Concentrator ...

Страница 18: ...GE Medical Systems EAGLE 1000 Page 18 Information Technologies Servicing Instructions 227 468 01 Rev G 1 3 2 4 5 Network link HELAN Twisted Pair ...

Страница 19: ...Central Station SynOpsis with V2 1 or higher version RS 232 interface RS 232 V24 interface for connection of QuickLink to HELAN available from V 2 0 or higher 2 1 2 Display size 6 inch diagonal 14 cm type monochrome liquid crystal display resolution 320 by 240 pixels Waveform display 3 channels sweep speed of 25 mm s erase bar mode 2 1 3 Monitor functions Operating modes test monitoring enabled di...

Страница 20: ...with automatic adaption of charge characteristics fast battery charging to 80 of its capacity within 3 5 hours afterwards normal charging to 100 of its capacity within 8 hours afterwards continuous trickle charging by means of charge pulses to prevent the memory effect Charge balance measurement of the charge and load current compensation for battery self discharge graphic indication of battery ca...

Страница 21: ...n atmospheric pressure between 500 and 1060 hPa Dimensions width 262 mm height 215 mm depth 160 mm weight 2 kg to 4 4 kg depending on monitor model 2 1 6 ECG and heart rate ECG signal inputs Electrode connection for simultaneous transfer of 2 ECG signals ECG 1 and ECG 2 via lead selector 7 standard lead configurations each Signal inputs for 3 lead and 5 lead patient cables with connections for ele...

Страница 22: ...to a signal free of inter ference Amplification QRS detection digitization display HR measuring range 15 to 300 bpm error 1 BPM EC 13 ECG cut off frequency 100 Hz differential signal range 4 5 mV ECG resolution 0 005 mV sampling rate 1000 1200 Hz noise below 0 04 mV time constant for ECG transfer 0 3 s 0 5 Hz HR averaging for displayed value weighted average from the most recent RR intervals displ...

Страница 23: ...t connection of the CF type IEC Used in conjunction with the approved probes the module is protected from voltages generated by defibrillation discharges and electrocautery Signal processing dual wavelength pulse oximeter Sp02 measuring range 1 to 100 PR measuring range 20 to 250 BPM resolution 1 Sp02 deviations from actual value Sp02 1st standard deviation in combination with standard finger prob...

Страница 24: ...lt neonate mmHg adult systolic 25 to 255 diastolic 10 to 220 mean 18 to 255 neonate systolic 20 to 155 diastolic 5 to 110 mean 10 to 130 The specifications are met for pulse rates between 40 and 240 BPM adult neonate Safety circuits Redundant monitoring of the cuff pressure by means of a second independent pressure sensor cuff deflation immediately on exceeding max cuff pressure on detection of fa...

Страница 25: ...a the pressure transducer 3 mmHg Measurement duration adult 90 seconds max neonate 70 seconds max typical duration for undisturbed measurement 30 seconds Technical inspection calibration Technical inspection must be carried out once a year calibrations every two years refer to section 3 Maintenance and technical inspection 2 1 9 Invasive blood pressure Signal inputs 2 connections which are both is...

Страница 26: ...mean values can be displayed display update interval 2 seconds Signal processing Pressure measuring range 30 to 300 mmHg resolution 0 25 mmHg internal cut off frequency 12 Hz accuracy 2 mmHg 1 of actual value zero drift 0 1 mmHg C 5 minutes to warm up for full accuracy Zero balancing automatic compensation of the transducer value for a zero pressure in both channels every channel to be zeroed is c...

Страница 27: ... test readings and a correction value the temperature reading is proces sed for regular self tests and for fine balancing by multiplexing in a common amplification circuit measuring range 0 to 44 C error limits for module without probe between 0 and 25 C 0 2 C between 25 and 44 C 0 1 C display update interval 2 seconds 5 minutes to warm up for full accuracy Functional safety Continuous self tests ...

Страница 28: ...emblies 2 2 1 Eagle 1000 configuration and functional groups see diagram Functional groups The basic Eagle 1000 patient monitor version comprises the large PCB ECG Monitor installed in the system on the front side of an L shaped metal plate In addition to the ECG input circuit the instrument control system is also located on this PCB The keypad display screen battery and the PCB Power Supply are c...

Страница 29: ...cting or replacing PCBs in the system to ensure PCBs and circuits are correctly installed and the insulat ing foil positioned accordingly 2 2 2 PCB ECG Monitor The PCB ECG monitor appears as a block diagram in the PCB circuit diagrams The circuits are arranged so that viewing Eagle 1000 from the rear the floating ECG Proces sing is located in the left hand third in the remainder all the other func...

Страница 30: ...lass I with a protective ground terminal A primary regulated wide range power supply unit delivering 15 5 V DC precludes the necessity of a power toggle switch This unit also acts as a charger for the 12 V system battery All con trol functions are regulated on the PCB ECG Monitor A charge controller measures the battery current across a resistance referred to zero activates the front panel charge ...

Страница 31: ...d on a HF transformer i e individual power fluctuations on some PCBs are not fully compensated The individual floating components receive power via the primary HF transformers connected in parallel Isolation is effected in these floating transformers These each generate 7 5V 5 In turn in each case a linear 5V 2 analog digital voltage is obtained from these voltages Signal flow see diagram Floating...

Страница 32: ...ach is generated for each of the three signal groups A clock signal synchronizes the transfer of the two Master In Slave Out and Master Out Slave In signals The PCBs Oximeter and Non Invasive Blood Pressure are each connected separately via an asynchronous interface This has both an Rx and a Tx cable as well as a reset cable Another EC Syn signal is provided for the oximeter Sp02 another RESETB si...

Страница 33: ...tructions 227 468 01 Rev G Registriergerät Recorder Bildschirm Display NBP Tastenfeld Keypad Oxymeter ECG Monitor EKG ECG AC AD RS 232 Stromversorgung Power Supply Schw Ruf Nuse Call Press Temp 230 V 115 V AC AC AD Batterie Battery 2 2 7 Block diagrams 2 2 7 1 Functional groups ...

Страница 34: ...cing Instructions 227 468 01 Rev G 2 2 7 2 Floating system supply and signal flow FLOATING NON FLOATING SENSORS PRESS1 PRESS2 TEMP ECG each 7 5 V 5 V ISOLATION BEEPER RS 232 NURSE DISPLAY CALL PROCESSOR Asyn Float Supply 15 V 100 kHz QSPI KEYPAD RECORDER NIBP SPO 2 Asyn ...

Страница 35: ...Technologies Servicing Instructions 227 468 01 Rev G 2 2 7 3 System power supply Mains 99 V AC 264 V AC 15 5 V 11 5 V Lo Bat Warn 10 V SW OFF Processor 9 5 15 5 V 12 V 5 V REF 5 V 5 V SW Generator 12 V ON OFF Charge Control Charge Battery Front ON OFF ...

Страница 36: ...echnologies Servicing Instructions 227 468 01 Rev G 2 2 7 4 PROCESSOR block diagram Watch Dog MEMORY 32 kHz CONTROLLER RECORDER IF CPU IF RS 232 IF Nurse Call IF QSPI IF SPO 2 Asyn IF NIBP Asyn IF ECG Temp BPress BEEPER KEYPAD TIME OF DAY CLOCK Display ...

Страница 37: ...ge 37 Information Technologies Servicing Instructions 227 468 01 Rev G 2 2 7 5 DISPLAY block diagram LCD CONTROL LCD DISPLAY CPU IF RAM CONTRAST 3 6 MHz U EE 23 V 12 V CCFT SUPPLY 565 V 300 V 30 40 kHz 5V Hinterleuchtung back lighting ...

Страница 38: ...ch ECG leads are available and which connections need to made to the patient For this reason the lead selector is preset to identify the patient cables used and to test whether all the electrode leads are connected correctly Every disconnected electrode lead produces an error signal which is evaluated by the processor so that such electrodes are not used for ECG monitoring ECG signal transfer If f...

Страница 39: ... prior amplitudes The processor receives a signal for every beat detected by the ECG circuit calculates the heart rate from these and triggers an alarm when the heart rate is outside the programmed limits Pacing detection Signal segments with a steep rising or falling edge are suppressed as long as their ampli tude exceeds a value of 6 mV This suppression is limited to a time period of about 50 ms...

Страница 40: ...lectrodes Protective circuit Pat Cable coding Lead Fault Detection Electrode Ampl Lead Selector ECG 1 ECG 2 PACE DETECT BLOCK ECG 2 ECG1 ADC Control Reg 7 5 V 5 V 7 5 V OPTO ISOL QSPI Pace Pace Dir HR TRIG Status Reg Offset Gain 3 6 MHz Offset Gain SW Regulator SR_ON Processor 12 V SR 2 2 8 2 ECG Pace Preprocessing ...

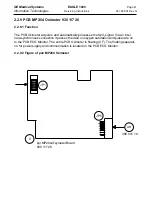
Страница 41: ... 930 117 26 2 2 9 1 Function The PCB Oximeter acquires and automatically processes the Sp02 signal Via an inter nal asynchronous connection it passes the data on oxygen saturation and pulse rate on to the PCB ECG Monitor The entire PCB Oximeter is floating CF The floating separati on for power supply and communication is located on the PCB ECG Monitor 2 2 9 2 Figure of pcb MP204 Oximeter ...

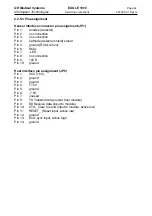
Страница 42: ... shield shield Pin 5 ground RCAL return Pin 6 RCAL Pin 7 LED Pin 8 no connection Pin 9 LED Pin 10 ground Host interface pin assignment JP5 Pin 1 VCC 5V Pin 2 ground Pin 3 ground Pin 4 7 5V Pin 5 ground Pin 6 7 5V Pin 7 unused Pin 8 TX Transmit data output from module Pin 9 RX Receive data input to module Pin 10 CTS_ Clear to send input to module active low Pin 11 RESET_ Reset input active low Pin ...

Страница 43: ...a an internal asynchronous connection it passes the non invasive blood pressu re data on to the PCB ECG Monitor From here it receives a reset signal as well as a separately controlled pump power supply for safety reasons The PCB is not electrically isolated as isolation is effected by the pneumatic signal input Warning For safety requirements when replacing the PCB it is important to use the flat ...

Страница 44: ...GE Medical Systems EAGLE 1000 Page 44 Information Technologies Servicing Instructions 227 468 01 Rev G 2 2 10 2 Figure of PCB NBP Module NB11 930 117 15 Use wire set 383 273 30 PCP NBP Module NB11 ...

Страница 45: ...GE Medical Systems EAGLE 1000 Page 45 Information Technologies Servicing Instructions 227 468 01 Rev G 2 2 10 3 Figure of PCB NBP 2000 Module 930 117 93 or 388 032 60 Use wire set 383 273 65 ...

Страница 46: ... 2 2 10 4 Pin assignment NBP pin connections to PCB ECG Monitor Plug in connector 2 rows of 5 pins 1 7 Vp Pump power supply host controlled 2 7 Vp Pump power supply host controlled 3 7V Power supply for PCB NBP 4 GND 5 GND 6 GND 7 KEY Plug coding 8 RESET Reset host controlled 9 Rx Receive 10 Tx Transmit ...

Страница 47: ...afety reasons 2 2 11 1 PRESS module The circuit is described in the block diagram Press block diagram Power supply The floating power supply for PRESS uses an HF transformer connected in parallel with the other floating transformers The corresponding oscillator delivers a closed loop control led transformer output voltage which may vary somewhat depending on the load from the unregulated battery v...

Страница 48: ...ly as registered 2 2 11 2 Temp module The circuit is shown in the block circuit diagram Temperature block diagram Power supply The floating power supply for TEMP uses an HF transformer connected in parallel with the other floating transformers from the unregulated battery voltage The corresponding oscillator delivers a closed loop controlled transformer output voltage which may vary somewhat depen...

Страница 49: ...e two control values and a reference value for offset correction from the precision resistor network via a multiplexer The multiplexer is controlled along with the ADC of the serial interface by a PAL 2 2 11 3 Internal interfaces Mechanical interfaces The PCB PRESS TEMP is plugged into the PCB ECG Monitor mechanically The floating power supply i e the oscillator connections and the QSPI signal pat...

Страница 50: ...rting an adapter bearing two transducer interfaces to this system input This can be affixed to the system using a Velcro strip TEMP The measurement input to the temperature amplifier is connected floating to the front panel on the other opposite side via the coded left hand plug in connector and ferrite toroidal cores Electronic interfaces PRESS The PRESS channels are identified by resistor coding...

Страница 51: ...901234 12345678901234 12345678901234 12345678901234 12345678901234 12345678901234 12345678901234 12345678901234 12345678901234 12345678901234 12345678901234 12345678901234 15 V 100 kHz CON TROL PAL to CS SCLK MOSI CS 4 2 MHz QSPI INTERFACE MISO RN MUX V SENSOR NOT PLUG OFF ERR U A U D STAB 5 V 7 5 V FLOATING NON FLOATING OPTO ISOLATORS NTC SENSOR CODES ...

Страница 52: ...345678901234 12345678901234 12345678901234 12345678901234 12345678901234 12345678901234 12345678901234 12345678901234 12345678901234 12345678901234 12345678901234 12 Hz 4 2 MHz 12 Hz SCLK MOSI QSPI INTER FACE MISO CS 15 V 100 kHz 7 5 V STAB 5 V U A U D SENSOR NOT PLUG OFF ERR OPTO ISOLATORS ADC 0 2 1 PRESS 1 PRESS 2 SENSOR CODE FLOATING NON FLOATING ...

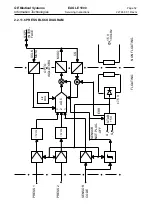
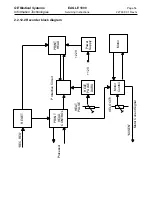
Страница 53: ...dvance The printhead power supply comes from the through connected battery voltage increased to 22 V by a transformer The printhead controller acts on the printhead and the motor indirectly It can be reset by the host processor or by the printhead electronics The printhead controller acquires its data from the host processor and returns relevant information It acts on the printhead via a protectiv...

Страница 54: ...logies Servicing Instructions 227 468 01 Rev G REC_RES RESET PRINT HEAD CONTROL Protective Circuit PRINT HEAD Power Supply 22 V 12 V Motor Motor Control VELOCITY MISEN Motor Current Signal HEAT PULSE DURA HEAT PULSE Processor 2 2 12 2 Recorder block diagram ...

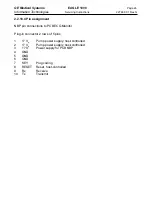
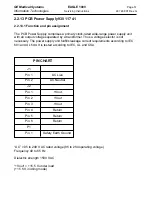
Страница 55: ...ransferred to the printhead latch register with the KLATCH signal The heating period is controlled by the KSTRB cable The printer controller receives an analog signal which varies according to the temperature of the printhead via cables TERM1 and TERM2 Via signals delivered by the VDD1 cable when not printing the thermal array printhead is put into power save mode The remaining leads are used to s...

Страница 56: ...anumeric change over Input AA 13 SELCHAN Waveform channel selection Input AA 14 MARKER_ Marker triggering Input AA 15 RASTER Raster activation Input AA 16 SD One two channel toggling Input AA 17 REC_RES Reset Input AA 18 GND AA 19 GRAPHR Waveform sample acknowledgment Output AA 20 ALPHAR Text and control character acknowledgment Output AA 21 PVALARM_ Motor overcurrent and checksum alarm Output AA ...

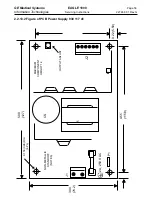
Страница 57: ... 1 Function and pin assignment The PCB Power Supply comprises a primary clock rated wide range power supply unit with an output voltage separated by a transformer Thus a voltage selector is not necessary The power supply unit fullfills leakage current requirements according to IEC 601 and UL 544 It is tested according to IEC UL and CSA AC 95 to 240 V AC rated voltage 85 to 264 operating voltage Fr...

Страница 58: ...ologies Servicing Instructions 227 468 01 Rev G IO 5 00 127 0 158 3 98 DIA 4 PL J1 3 00 76 2 4 55 115 8 0 22 5 59 2A 250 V AC P1 MAXIMUM COMPONENT HEIGHT 1 2 OUTPUT ADJUST CS T1 NON METALLIC STANDOFF NOTE 6 J2 2 2 13 2 Figure of PCB Power Supply 930 117 41 ...

Страница 59: ...key TA_AL_ONOFF_ Actuate in alarm situation 3 System On Off button TA_ONOFF_ Switch on switch off 4 LED Alarm Off LE_AL_OFF Without having an alarm press alarm key 5 LED Alarm LE_ALARM Initiate alarm situation 6 LED Sound Off LE_TON_OFF In alarm situation menu 2 x Next Menu press audible alarm signal ON OFF 7 LED Charge Battery LE_BATLAD Disconnect reconnect mains plug 8 Ground for LED GND_LED Tes...

Страница 60: ...GE Medical Systems EAGLE 1000 Page 60 Information Technologies Servicing Instructions 227 468 01 Rev G 2 2 14 2 Membrane keypad 390 001 30 and 390 001 64 circuit diagram ...

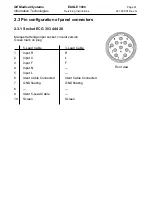
Страница 61: ...configuration of panel connectors 2 3 1 Socket ECG 303 444 28 Marquette Hellige input socket circular version Green mark on plug 5 Lead Cable 3 Lead Cable 1 Input R R 2 Input C L 3 Input F F 4 Input N 5 Input L 6 Ident Cable Connected Ident Cable Connected 7 GND floating GND floating 8 9 Ident 5 Lead Cable 10 Screen Screen ...

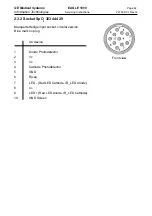
Страница 62: ...7 468 01 Rev G 2 3 2 Socket SpO2 303 444 29 Marquette Hellige input socket circular version Blue mark on plug On device 1 Anode Photodetector 2 nc 3 nc 4 Cathode Photodetector 5 GND 6 R cal 7 LED Red LED Cathode IR_LED Anode 8 nc 9 LED Red LED Anode IR_LED Cathode 10 GND Screen Front view ...

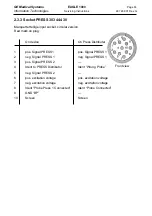
Страница 63: ... Red mark on plug On device On Press Distributer 1 pos Signal PRESS1 pos Signal PRESS 1 2 neg Signal PRESS 1 neg Signal PRESS 1 3 pos Signal PRESS 2 4 Ident to PRESS Distributor Ident Wrong Probe 5 neg Signal PRESS 2 6 pos excitation voltage pos excitation voltage 7 neg excitation voltage neg excitation voltage 8 Ident Probe Press 1 Connected Ident Probe Connected 9 GND BP 10 Screen Screen ...

Страница 64: ...Pin Connector Socket Signal T to PCB TE to System 1 GND_AT T 1 to T 2 2 NTC Pulldown 3 2 NTC Input 4 2 NTC Input 5 1 GND_AT 6 Coding 7 1 GND_AT 8 3 Plug in contact detection by break contact jack 9 Plug in contact detection threshold value T 9 to T 10 10 Reference plug in contact detection threshold value Code Coding slot blue Rear view T 5 T 7 T 4 T 3 T TE ...

Страница 65: ...proof 2 RxD 3 TxD 4 12V V24 5 GND 6 7 Connected to Pin 1 8 Nurse Call to 10V 3 5V 50mA short circuit proof 9 Nurse Call Connector 1 to 12 5V 3V 100mA short circuit proof 2 ECG Trigger Delay max 25ms Pulse 12 5V 3V 15mA 1 ms 3 Alarm ALARM_open Collector max 20V max 20mA load 4 5 6 TxD_20mA Current Loop 7 GND 8 Nurse Call to 10V 3 5V 50mA short circuit proof 9 Pause Alarm KUE_open Collector for V2 1...

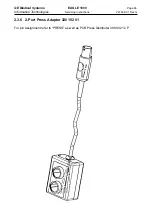
Страница 66: ...l Systems EAGLE 1000 Page 66 Information Technologies Servicing Instructions 227 468 01 Rev G 2 3 6 2 Port Press Adapter 220 102 01 For pin assignment refer to PRESS as well as PCB Press Distributer 388 032 12 P ...

Страница 67: ... Technologies Servicing Instructions 227 468 01 Rev G 2 4 Complete circuit diagram and mechanical diagrams 2 4 1 Systems without a recorder 101 123 2 4 2 Systems with a recorder 101 124 2 4 3 Complete wiring circuit S Plan Please refer to the appendix ...

Страница 68: ...GE Medical Systems EAGLE 1000 Page 68 Information Technologies Servicing Instructions 227 468 01 Rev G 2 5 Master Record Index MRI Please refer to the appendix ...

Страница 69: ...itor A knowledge of how to operate the monitor in compliance with the operator s manual is assumed The tests are based on the test equipment described below Where possible the tests should be carried out using the customer s accessories to detect any defective accessories automatically Using test equipment other than those named below may require changes in the tests and tolerance specifications T...

Страница 70: ...t ECG 1X 3 lead patient cable 223 287 01 1X 3 lead patient trunk cable 223 288 01 1X Set of electrode leads 384 011 34 Invasive blood pressure 1X Blood pressure simulation cable Lionheart with Hellige connector 1X Dual transducer cable 220 102 01 Non invasive blood pressure 1X Digital pressure manometer Diptron 3 plus Measuring range 500 mmHg Accuracy 0 04 FS Parts for the pneumatic circuit compri...

Страница 71: ...ustomer s settings 2 Enable the factory settings by activating the menu option Factory Settings and pressing F5 Enter To save and execute this setting press the following keys F3 EXIT F1 Apply and Save Now retrieve the monitor defaults menu and adjust the following settings enabling the required language enabling the function alarm printout enabling the function Alarms OFF perman To save and execu...

Страница 72: ...yellow LA green LL black RL white C V1 Amplitude 1mV Heart rate RATE 60 3 2 4 3 Analysis of the ECG signal HR value and QRS beep Select the various leads for Channel 1 and Channel 2 all possible leads should be available The ECG waveforms must be noise free The heart rate of 60 bpm 2 bpm appears on the display In the main menu actuate the F5 Next Menu button until you reach the menu op tion QRS Pu...

Страница 73: ...yellow LED illuminates and the message Alarms OFF appears on the screen The alarm recording must contain the following information 2 ECG waveforms 1mV reference pulse leads selected date time of day ECG sensitivi ty filter setting and vital value block Set the HR on the multifunction pulse generator to 60 s Enable the audible alarm with 2 times button F5 Next Menu and pressing F2 Alarm Tone OFF fo...

Страница 74: ...grams Pneumatic Circuit for NBP Performance Check The cuff should be rolled up tightly preferably around a piece of PVC tubing of external diameter 12cm Press F1 and F5 simultaneously Press F3 and F4 simultaneously Ensure the bulb control is open Keep F5 depressed until mano mode is displayed on the screen Using the pumpball inflate to 220 mmHg and wait for about 30 s From now on the drop down of ...

Страница 75: ...e object Pressure cuff p n 217 319 04 or different size Pumpball with deflation valve T piece p n 929 167 02 Diptron 3 plus pressure mano meter or compa rable manometer Tubing approx 1 m p n 822 046 30 Fastening coupling p n 929 166 35 Pneumatic Circuit for NBP Performance Check NI Blood pressure for instrument version 101 123 05 101 123 07 101 124 05 101 124 07 Coupling SNr 929 166 34 ...

Страница 76: ...r mode by pressing F3 and F4 simultaneously 3 2 5 4 Dynamic blood pressure measurement Apply cuff on yourself and measure blood pressure Sys Map and Dia parameter readings are measured and assessed for their plausibility 3 2 6 SpO2 performance check 3 2 6 1 Simulator setting Test the SpO2 parameter with the marquette SpO2 simulator as follows Switch simulator power switch to off Connect connector ...

Страница 77: ...nced Connect up finger probe and check it is working correctly 3 2 7 Invasive blood pressure performance check Vers 2 0 and higher Comment This test is to be applied to both blood pressure channels For devices with rounded connectors use the dual transducer cable Activate Alarms OFF LED 9 should be illuminated Preparing the multifunction simulator Plug pressure simulator cable into simulator input...

Страница 78: ... 2 0 or higher With infrared transmitter plugged in check transfer of patient data to QuickLink When no infrared transmitter is plugged in the RS232 interface can be tested separately Enter Service Menu on Monitor Press F1 and F5 simultaneously Press F3 and F4 simultaneously Prerequisites PC with RS232 port and Windows 3 11 RS232 interface cable configured as follows 9 pin Sub D male 9 pin Sub D f...

Страница 79: ...onnector pin 7 GND Pin 2 Signal for active ECG trigger signal a positive pulse of pulse width 1ms and amplitude 9 5 14 5V should be mea sured For devices of version 2 1 and higher the following additional test needs to be performed Devices connected to a PC Central Station SynOpsis 1000 must be checked for correct transfer of ECG waveforms vital signs and audio alarm signals 3 2 11 Testing conditi...

Страница 80: ... years For these inspections the following devices should be used For NIBP digital manometer Diptron 3 plus measuring range 500 mmHg For TEMP temperature simulator 220 104 01 Conditions Please note that the measurement standards used for these inspections must provide an adequate degree of accuracy These measurement standards must be traceable to a national or European standard Proceed as follows ...

Страница 81: ...l description of the tests For the handling of your Safety Tester follow the user manual The tests may be performed under normal ambient conditions of temperature humidity and pressure and with line voltage The leakage currents correspond to 110 of rated voltage for the tested unit Most Safety Testers take this into account otherwise the mea sured values have to be calculated In countries like Ger...

Страница 82: ... and connected to the telephone socket Testing connector for ECG input 1 Connector 91541378 10 Contact pins 91541394 1 Telephone socket or 91534800 matching isolated plug connection for testing case Short circuit all 10 contact pins with one another and connect to telephone socket Testing connector for SaO2 input 1 Connector 91541871 7 Contact pins 91541394 1 Telephone socket or 91534800 matching ...

Страница 83: ...asuring Circuit M required for leakage cur rent The reading in mV corresponds to µA leakage current The Safety Testers generally work with this Measuring Circuit M and the displayed values are already converted to leakage current 3 4 4 1 Enclosure Leakage Current Test This test is performed to measure leakage current from chassis to ground during normal conditions N C and single fault conditions S...

Страница 84: ...ting input and have to be tested separately ECG SpO2 Temp IBP Blood Pressure 1 and 2 together In all cases the leakage current is measured from input jack of unit under test to ground For testing the ECG input a patient cable or test plug with all leads or pins connected together is used For testing SpO2 Temp and IBP input test plugs are used Connect the unit under test to your Safety Tester Refer...

Страница 85: ...F 22 kOhm 120 to 130 V 47 kOhm 220 to 240 V Typ CF 100 kOhm 220 to 240 V 3 4 4 3 Enclosure Leakage Current Test System If the Eagle is connected to SynOpsis the enclosure leakage current has to be measured additional according chapter 3 4 4 1 Doing this measurement the Eagle needs to be connected hard wired to SynOpsis R UNIT UNDER TEST POWER CORD patient cable or test plug POWER CORD Safety Teste...

Страница 86: ...s actuate key function by pressing key for about 2 seconds Quit service mode with F3 F4 Instrument configuration is identified as display is generated on the service screen do not quit prematurely Key F1 Print Printhead test The entire screen should show diagonal lines Key F2 Dump Screen printout In the case of TEMP the control values are shown Key F3 RS 232 Enables interface to be tested Key F4 K...

Страница 87: ...conds In the event of an error this activates a warm start and the audible technical malfunction alarm signal is activated 4 2 3 Performance in the event of a malfunction during start up After switching on the software performs a start up self test In the event of an error whenever still possible one of the following messages appears on the error screen and the audible technical malfunction alarm ...

Страница 88: ...When the operating time of the instrument with a full battery is only less than 1 5 hours it has to be replaced The charging time to 80 capacity is approx 3 2 hours to 100 approx 12 hours Battery test for version V2 1 and higher Discharge battery switch on instrument without power line until the audible alarm signal sounds and the flashing message Battery appears When this event occurs the battery...

Страница 89: ...Temp or Temp without isolating foil around the PCB x twice round the PCB PRESS TEMP or x around the pcb Temp x around the power unit 4 4 2 High voltage On the PCB ECG Monitor upper right when looking at the reverse side next to the buzzer is the CCFT supply for the LCD Reverse Video In stand by mode this generates 565 V AC at 30 to 40 kHz Sparking as a result of contact with this voltage causes un...

Страница 90: ...ew screwdriver 6 mm for battery screws Offset screwdriver 2 5 mm for instrument adjustment Socket wrench 5 5 mm for hexagonal spacers Claw spanners 5 mm 6 mm and 8 mm for hexagonal bolts to Sub D socket spacer Knife to detach keypad Petrolether for keypad installation remove adhesive Alcohol for display and keypad installation degreases Loctite 242 to secure the battery screws ESD packaging for PC...

Страница 91: ... rear panel can now be removed 4 5 3 Removing and reinstalling assemblies Power unit The power unit bears an additional primary fast acting fuse whose rating is printed on the PCB To remove the board disconnect the contacts to the protective earth the line filter and to the PCB ECG Monitor Undo the spring catches on the spacers and remove the PCB Power Supply When reinstalling the new PCB the insu...

Страница 92: ... adhesive surfaces on the instrument baseplate When reinstalling the battery 2 new cable grips and 2 pieces of 1 mm thick Scotch Mount double sided polystyrene adhesive tape are required to ensure that the two flat strip ca bles do not get pinched under the battery When reinstalling the battery ensure that the battery connection to the ECG input side emerges from the battery block on the left hand...

Страница 93: ...apping around the floating components the insulating foil is put back under the PCB PCB ECG Monitor To remove this PCB disconnect the remaining plug in connectors These are that from the input socket ECG the foil strip contact to the display under the grip recess This requires undoing the securing mechanism by lifting the plug frame at the right and at the left and carefully pulling out the foil s...

Страница 94: ... inches protrude into the device through the aperture in the enclosure Do not break the cable as this would cause a defect Screw the display in firmly first of all turning the self cutting screws in the direction they were turned when being loosened until they click in to avoid cutting a second thread when being tightened Before sticking the metal frame of the display and the filter screen degreas...

Страница 95: ..._1 OFFSET_2 1 Connect a 5 lead patient cable to the Eagle 1000 and short circuit the ECG inputs 2 Switch the Eagle 1000 on 3 Select DISPLAY in the menu accessed with the Next Menu key Select Channel 2 ECG and Channel 3 OFF 4 Select ECG in the menu accessed with the Prev Menu Select leads Channel_1 II and Channel_2 II 5 Press mm mV several times so that 5 10 20 5 appear consecutively Adjust Chan ne...

Страница 96: ...2009071 001 CONTRAST ADJUSTMENT Select DISPLAY in the menu can be called up with the Next Menu key Press Con trast until the darkest setting has been attained Using R776 adjust the contrast so that the display image is still just visible DISPLAY CONTRAST SETTING Keep Contrast depressed until the background noise viewed on the screen vertically disappears When the contrast setting is increased furt...

Страница 97: ...GE Medical Systems EAGLE 1000 Page 97 Information Technologies Servicing Instructions 227 468 01 Rev G 4 5 4 1 Location of the adjustment devices on PCB ECG Monitor Index G to I ...

Страница 98: ... EAGLE 1000 Page 98 Information Technologies Servicing Instructions 227 468 01 Rev G Location of the adjustment devices on PCB ECG Monitor from Index J DISPLAY CONTRAST 2003727 004 930 117 17 2003727 001 for DISPLAY TYPE ...

Страница 99: ...eck sure with Test mode turn exact consider legend Heating time Connect oscil Press Soft Heating time referred to Adjustment loscope to key Print adjuster printhead made at MP 2 1 and for a moment R 504 temperature 25 mm s MP 1 1 GND 22 C Caution printhead warms up during printing 450 µs 1 R520 550 µs 1 R650 Checking the 22 V supply voltage What to adjust What to mea How How big and What else to o...

Страница 100: ...GE Medical Systems EAGLE 1000 Page 100 Information Technologies Servicing Instructions 227 468 01 Rev G Location of the Recorder 50 adjustment items ...

Страница 101: ... actuating On button Battery completely depleted not connected or defective connect up to mains for charging otherwise check battery plug is O K and inserted correctly if necessary replace battery Battery fuse SI 500 on PCB ECG Monitor defective inspect and if necessary replace it after dealing with the cause Membrane keypad not plugged in correctly or defective plug in correctly or replace if req...

Страница 102: ...rinted on PCB Defective battery replace battery Charging controller defective replace PCB ECG Monitor Display image unsatisfactory Contrast too low actuate F5 key Next Menu until you can call up Display press this and keep Contrast depressed until the required contrast is attained Insufficient contrast adjust contrast on PCB ECG Monitor Disturbing background noise press Display key and keep Contra...

Страница 103: ...trode positioning and or lead selection establish sufficient absence of hum check hum am plitude in configuration without line filter if necessary replace PCB ECG Monitor Pacing pulses with appropriate data and amplitude 10 mV see Technical specificati ons are not detected check as above if necessary replace PCB ECG Monitor for stimulation of pacing pulses with patient simulator Lionheart see Para...

Страница 104: ...ce Mode with F3 and F4 and read the control temperatures displayed If the upper value deviates from 38 8 C by more than 0 1 C the lower value from 4 C by more than 0 2 C it is no longer possible to make an accurate measurement and probe value output is disabled 0 2 C internal deviation for both values The PCB PRESS TEMP or PCB TEMP must be replaced The socket is not correctly inserted or is defect...

Страница 105: ...gure the two connection cables mentioned below under QuickLink test RS 232con nections with 9 pin Sub D connectors so that only the four or three wires respectively are wired If necessary connect a commercially available PC adapter 9 pin male to 25 pin female to the PC serial interface RS 232 setting on PC 8 bits no parity 9600 baud 1 stopbit no handshake local echo off 4 7 3 Testing QuickLink ada...

Страница 106: ...a series of characters e g test and press the Enter key This should call up the prompt local_1 6 Entering show server shows the corresponding IP address This must be either 172 16 1 x or 172 16 2 x or 172 16 3 x or 172 16 4 x 7 Entering show port must call up Gateway address 172 16 0 1 as the preferred ser vice This completes the configuration test Performance check with HELAN and Gateway 8 Still ...

Страница 107: ... of the Eagle 1000 Connect 3 wire RS 232 cable zero modem to the connector leading to the Eagle 1000 and to the PC 2 Switch on PC start Windows start terminal exe program If PC is not equipped with Windows start V24 exe under DOS Carry out RS 232 configuration as listed above 3 On the Eagle 1000 press F1 and F5 keys simultaneously to activate the Configura tion mode Then press F3 and F4 keys simul...

Страница 108: ...the 4 connections indicated only Pin 2 Pin 2 Pin 3 Pin 3 Pin 4 Pin 4 Pin 5 Pin 5 Pin 6 Pin 6 Pin 7 Pin 7 Pin 8 Pin 8 Pin 9 Pin 9 Cable for testing internally QuickLink adapter leading to Eagle 1000 male female If necessary use 9 pin male to 25 pin female adapter Pin 1 Pin 1 Use the 3 connections indicated only Pin 2 Pin 3 In zero modem Pin 2 and Pin 3 are swapped round Pin 3 Pin 2 Pin 4 Pin 4 Pin ...

Страница 109: ...itions N C and single fault conditions S F C In any case the leakage current has to be measured from front and backpanel and the metal shield of the Twisted Pair connector to ground Connect the unit under test to your Safety Tester With Quick Link the position of the ground switch GND does not matter During normal conditions N C referring to the electrical diagram measurements have to be done unde...

Страница 110: ...GE Medical Systems EAGLE 1000 Page 110 Information Technologies Servicing Instructions 227 468 01 Rev G ...

Страница 111: ...s 227 468 01 Rev G 5 1 PCB ECG Monitor 388 031 19 V2 0 5 2 PCB ECG Monitor 388 031 19 I V2 01 5 3 PCB Recorder 50 388 031 70 5 4 PCB Press Temp 388 031 75 5 5 PCB Temp 388 032 04 5 6 PCB Press Distributer 388 032 12 5 7 Isolation relay Eagle 1000 388 032 14 Please refer to the appendix ...

Страница 112: ...GE Medical Systems EAGLE 1000 Page 112 Information Technologies Servicing Instructions 227 468 01 Rev G ...

Страница 113: ...nectors 303 444 28 Socket ECG complete with wiring 303 444 29 Socket SpO2 complete with wiring 303 444 30 Socket IBP complete with wiring 303 444 31 Socket TEMP complete with wiring 383 273 66 Socket nurse call RS232 complete for field service 929 166 32 Pneumatic Connector Rectus BPNI 383 273 30 Cable for pcb NIBP NB11 383 273 65 Cable for pcb NIBP2000 Mechanical parts 384 017 24 Frontpanel assy ...

Страница 114: ... Monitor Eagle 1002 1015 vers 2 0 Exchange 303 445 21 Pcb ECG Monitor Eagle Dash 1000 vers 2 1 389 004 27 Pcb ECG Monitor Eagle Dash 1000 vers 2 1 Exchange not for use with Graphic Display 2003727 004 2004448 001 Pcb ECG Monitor Eagle Dash 1000 vers 2 1 Exchange for Graphic Display 2003727 004 303 445 12 Pcb Press Temp Eagle Dash 1000 389 004 19 Pcb Press Temp Eagle Dash 1000 Exchange 303 445 13 P...

Страница 115: ...1 443 309 03 Eprom EAGLE 1000 V 2 0 443 309 04 Eprom EAGLE 1000 V 2 01 443 309 05 Eprom EAGLE 1000 V 2 1 216 134 01 Quick Link Station 216 134 02 Exch Quick Link Station 216 134 01 303 444 91 Case 303 445 04 Power Cord 911 007 90 Signal lamp green 919 203 01 Connection Cable to Transceiver Twisted Pair length 2 m 930 117 72 IRDA Adapter infrared RS 232 ...

Страница 116: ...GE Medical Systems EAGLE 1000 Page 116 Information Technologies Servicing Instructions 227 468 01 Rev G ...

Страница 117: ...GE Medical Systems EAGLE 1000 Page 117 Information Technologies Servicing Instructions 227 468 01 Rev G ...

Страница 118: ...GE Medical Systems EAGLE 1000 Page 118 Information Technologies Servicing Instructions 227 468 01 Rev G ...

Страница 119: ...CB R Plan P Plan PCB ECG Monitor 388 031 19 Index F V2 0 Lpl EKG Monitor 388 031 19 Index J V 2 1 PCB ECG Monitor 388 031 19 Index J V2 1 Lpl Registrierteil 50 388 031 70 Index B PCB Recorder 50 388 031 70 Index B Lpl Press Temp 388 031 75 Index E PCB Press Temp 388 031 75 Index E Lpl Temp 388 032 04 Index E PCB Temp 388 032 04 Index E Lpl Press Verteiler 388 032 12 B PCB Press Distributor 388 032...

Страница 120: ...GE Medical Systems EAGLE 1000 Page 120 Information Technologies Servicing Instructions 227 468 01 Rev G ...

Страница 121: ......

Страница 122: ......

Страница 123: ......

Страница 124: ......

Страница 125: ......

Страница 126: ...on Marquette Hellige GmbH D 79007 Freiburg Date Name ISSUED APPROVED DRAWN Date Name REVISIONS Index x1 09 05 96 WHL W LOEHNING SCHEMATIC ECG MONITOR 1 9 433 671 94 38803119 DATE A B A03 DIR 38803119 D02 202572 064702 04 12 96 WHL 24 05 00 MSG 14 02 96 WHL ...

Страница 127: ...007 Freiburg Date Name ISSUED APPROVED DRAWN Date Name REVISIONS Index x1 DATE 38803119 D03 202356 202377 202572 064702 09 05 96 WHL 26 06 96 WHL 24 05 00 MSG 23 07 96 WHL 14 02 96 WHL 09 05 96 WHL W LOEHNING SCHEMATIC ECG MONITOR 2 9 04 12 96 WHL 433 671 94 38803119 DIR A03 E D C B A ...

Страница 128: ...007 Freiburg Date Name ISSUED APPROVED DRAWN Date Name REVISIONS Index x1 ECG MONITOR 3 9 04 12 96 WHL 433 671 94 38803119 DATE A B C D E A03 DIR 38803119 D04 202356 202377 202572 064702 09 05 96 WHL 26 06 96 WHL 24 05 00 MSG 23 07 96 WHL 14 02 96 WHL 09 05 96 WHL W LOEHNING SCHEMATIC ...

Страница 129: ... Freiburg Date Name ISSUED APPROVED DRAWN Date Name REVISIONS Index x1 SCHEMATIC ECG MONITOR 4 9 04 12 96 WHL 433 671 94 38803119 DATE B C D E F A03 DIR 38803119 D05 202356 202377 202455 202572 064702 09 05 96 WHL 23 07 96 WHL 24 05 00 MSG 23 08 96 WHL 14 02 96 WHL 09 05 96 WHL W LOEHNING ...

Страница 130: ......

Страница 131: ... Freiburg Date Name ISSUED APPROVED DRAWN Date Name REVISIONS Index x1 23 07 96 WHL 26 06 96 WHL 064854 064702 202572 202377 202356 38803119 D07 DATE B C D E F A03 DIR 38803119 433 671 94 24 05 00 MSG 9 6 ECG MONITOR SCHEMATIC W LOEHNING 09 05 96 WHL 14 02 96 WHL 04 12 96 WHL 08 06 00 MSG ...

Страница 132: ...007 Freiburg Date Name ISSUED APPROVED DRAWN Date Name REVISIONS Index x1 9 7 ECG MONITOR SCHEMATIC W LOEHNING 09 05 96 WHL 14 02 96 WHL 23 07 96 WHL 24 05 00 MSG 26 06 96 WHL 09 05 96 WHL 064702 202572 202377 202356 38803119 D08 DIR A03 E D C B A DATE 38803119 433 671 94 04 12 96 WHL ...

Страница 133: ...007 Freiburg Date Name ISSUED APPROVED DRAWN Date Name REVISIONS Index x1 9 8 ECG MONITOR SCHEMATIC W LOEHNING 09 05 96 WHL 14 02 96 WHL 23 07 96 WHL 24 05 00 MSG 26 06 96 WHL 09 05 96 WHL 064702 202572 202377 202356 38803119 D09 DIR A03 E D C B A DATE 38803119 433 671 94 04 12 96 WHL ...

Страница 134: ... Freiburg Date Name ISSUED APPROVED DRAWN Date Name REVISIONS Index x1 064854 26 06 96 WHL 23 07 96 WHL 05 06 00 PHG 04 12 96 WHL 14 02 96 WHL 09 05 96 WHL W LOEHNING SCHEMATIC ECG MONITOR 9 9 24 05 00 MSG 433 671 94 38803119 DATE DIR A03 F E D C B 38803119 D10 202356 202377 202572 064702 ...

Страница 135: ......

Страница 136: ......

Страница 137: ...ed in Version Marquette Hellige GmbH D 79007 Freiburg Date Name ISSUED APPROVED DRAWN Date Name REVISIONS Index x1 A03 38803170 D02 065687 19 10 00 MSG 29 01 96 MLM 29 01 96 MLM M Mueller SCHEMATIC RECORDER 50 1 1 43367203 38803170 1995 11 2 5 A ...

Страница 138: ......

Страница 139: ...uette Hellige GmbH D 79007 Freiburg Date Name ISSUED APPROVED DRAWN Date Name REVISIONS Index x1 A 1995 11 28 3 43367205 2 1 PRESS TEMP SCHEMATIC LEIST 16 04 96 JHL 18 12 95 WHL 25 05 00 MSG 064818 38803175 D03 38803175 38803204 USER_CAD_B f67205 design press A03 ...

Страница 140: ...uette Hellige GmbH D 79007 Freiburg Date Name ISSUED APPROVED DRAWN Date Name REVISIONS Index x1 1995 11 28 3 A A03 USER_CAD_B f67205 design temp 43367205 2 2 PRESS TEMP SCHEMATIC LEIST 16 04 96 JHL 18 12 95 WHL 25 05 00 MSG 064818 38803175 D04 38803175 38803204 ...

Страница 141: ......

Страница 142: ......

Страница 143: ......

Страница 144: ......

Страница 145: ......

Страница 146: ......

Страница 147: ......

Страница 148: ...1 414 355 3790 European Representative GE Medical Systems InformationTechnologiesGmbH Postfach 60 02 65 D 79032 Freiburg Germany Tel 49 761 45 43 0 Fax 49 761 45 43 233 Asia Pacific GE Medical Systems Hong Kong Ltd 11th Floor The Lee Gardens 33 Hysan Avenue Causeway Bay Hong Kong Tel 852 2100 6300 Fax 852 2100 6292 gemedicalsystems com ...

Отзывы: