U
lstein Power & Control AS
This document and its content is the property of ULSTEIN. Non-
public information contained herein shall be treated as
Confidential Information. No use, copying, citation or publication
of this document or its content is permitted without prior written
consent from ULSTEIN. Any conflicts arising from unauthorized
use shall be governed by the laws of Norway.
File Name:
BRI-D32004-01II (D)
System Installation
Manual.doc
Page:
Page 28 of
56
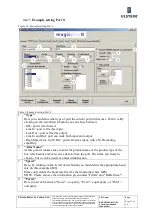
5
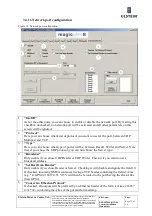
Stop bits"
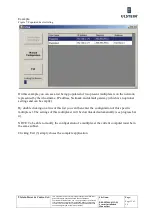
Here, by clicking on the 'scroll down' button you can switch between 1 (standard
setting) or 2.
6
Databits"
Here, by clicking on the 'scroll down' button you can switch between 5, 6, 7 and 8
(standard setting).
7
"FiowControl"
Here you can chose between "off"(standard setting) and "on".
8
"RS422 ON/OFF (default on use RS422)"
See below (3.4.8).
9
"Set GPS Time"
If this field is checked, then the first valid ZDA or RMC sentence coming on this
port will be used to set the new date and time of the multiplexer.
10
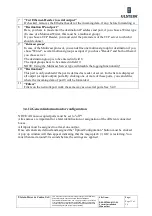
"Logging on/off"
Enables logging of the data, using parameters defined in 6.3. Should be used for
service purposes only.
11
"Buffer Size"
If on one output several inputs (sources) are defined, it sometimes makes sense to
increase the size of the buffer to avoid unnecessary data loss/ failure recording. The
buffer can be changed between 5 and 60. The standard setting is 5.
NOTE: Data or signals of several inputs on one output lead to a so called bottle
neck.
Please chose the number of inputs always in a meaningful way to avoid
unnecessary failure recording. This is when the data input is bigger than the output
can treat.
Example: input = 38000 bits per second and output = 4800 per sec.
Please see the information given under "Filter settings"
12
"Destinations"
This part is only enabled if the current port (here Port 0) is defined as input (or
input/output).
In the list are displayed all output (or input/output) ports. By clicking one or more
of these ports, you can define where the incoming data of this port will be
forwarded. For example, here, all the incoming data to PortO will be transferred to
Port2 (which is an output or an input/output)
13
"Set Dest from Header"
This checkbox must be checked if you want the incoming data to be routed to a
port depending on its TCP header. The routing using the list as described in point
12 is then disabled.
Incoming NMEA sentences having a TCP header containing the field d:Aiias (e.g.
"\d:GPS2,c:16857 4.31 *A3 ")will then be rerouted to the port having the alias
Alias (here GPS2).
14
"Redundancy"
See 3.4.10
15
"Filters"
See 3.4.9
Содержание FA-150
Страница 2: ...This page left intentionally blank ...
Страница 4: ...This page left intentionally blank ...
Страница 5: ...Revision history manual Rev A B C Description Date dd mm yyyy Sign A A 06 05 2015 HAB ...
Страница 6: ...This page left intentionally blank ...
Страница 8: ...This page left intentionally blank ...
Страница 9: ...Index divider Section 1 N ...
Страница 10: ......
Страница 12: ...PRINTED IN JAPAN UAIS TRANSPONDER FA 150 ...
Страница 53: ...Antenna Cable Set CP20 02700 004 381 160 CP20 02710 004 381 170 A 8 ...
Страница 54: ...Antenna cable Set CP24 00300 000 041 938 CP24 00310 000 041 939 A 9 ...
Страница 55: ...Y Hatai D 1 ...
Страница 56: ...Y Hatai D 2 ...
Страница 57: ...Y Hatai D 3 ...
Страница 58: ...Y Hatai D 4 ...
Страница 59: ...Feb 19 03 D 5 ...
Страница 60: ...May 20 03 D 6 ...
Страница 61: ...Feb 22 05 D 7 ...
Страница 62: ...Jan 9 03 D 8 ...
Страница 63: ...Mar 11 04 H Hayashi D 9 ...
Страница 64: ...Feb 02 05 D 10 ...
Страница 65: ...Nov 28 03 D 11 ...
Страница 66: ...Oct 02 03 D 12 ...
Страница 67: ...H Hayashi Mar 10 05 D 13 ...
Страница 69: ...Index divider Section 2 N ...
Страница 70: ......
Страница 72: ...This page left intentionally blank ...
Страница 129: ...Index divider Section 3 N ...
Страница 130: ......
Страница 187: ...Index divider Section 4 N ...
Страница 188: ......
Страница 190: ...TECHNICAL MANUAL A100K11209 v 1 3 Sound Reception System VSS V2 Installation User Manual ...
Страница 204: ...15 VSS V2 Technical Manual A100K11209 v 1 3 4 7 Cable Connection Diagram ...
Страница 205: ...16 A100K11209 v 1 3 VSS V2 Technical Manual 5 Dimensions Mounting Details 5 1 VSS V2 Microphone Unit Dimensions in mm ...
Страница 206: ...17 VSS V2 Technical Manual A100K11209 v 1 3 5 2 VSS V2 Master Panel Dimensions in mm ...
Страница 207: ...18 A100K11209 v 1 3 VSS V2 Technical Manual 5 3 VSS V2 Slave Panel Dimensions in mm ...
Страница 216: ...This page left intentionally blank ...

