21
VSS-V2 Technical Manual
A100K11209 v.1.3
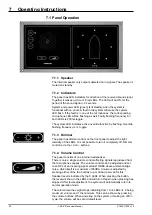
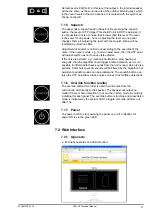
Default level is 8 LEDs lit. At this level the output in the internal speaker
will be the same as the sound levels at the outdoor listening post, which
is the sound levels at the microphones. It is marked with the symbol as
shown on the left.
7.1.5 Squelch
The panel has a squelch button (Squelch). By pressing the squelch
button, the level of UTP (Upper Threshold Point) in DSP is adjusted. It
is not possible to listen to noise that is lower than this level. The level
is the same for all panels - hence, adjusting the level on one panel
changes them all. Adjusting the level with the squelch button will be
indicated by direction LEDs.
Adjustment of squelch is carried out according to the specifics of the
noise. If the noise is white, e.g. common wind noise, then the UTP point
will adjust itself so as not to cause false alarms.
If the noise is periodic, e.g. mechanical vibrations, wind howling or
sea gulls, then the algorithm could trigger a false detection, as it is not
possible to differentiate these sounds from the horn sound, which is also
periodic. Short burst periodic sounds will be filtered by the algorithm, but
persistent periodic sounds can be problematic. The squelch button can
raise the UTP point above these noise sources to avoid false detections.
7.1.6 Override function (audio)
The override button (Override) is used to send audio from the
microphone unit directly to the speaker. The speaker will output no
matter if there is horn detection or not and be in listen mode. Override is
individual for each panel. The override button is latching and press/listen
mode is indicated by the system LED 1s toggle. Override will time out
after 15s.
7.1.7 Power
The power button is for powering the panel on or off. Indication for
power ON is via the green LED.
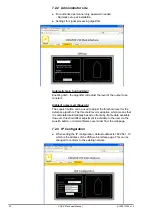
7.2 Web Interface
7.2.1 Open site
●
Microphone status and LED direction.
Содержание FA-150
Страница 2: ...This page left intentionally blank ...
Страница 4: ...This page left intentionally blank ...
Страница 5: ...Revision history manual Rev A B C Description Date dd mm yyyy Sign A A 06 05 2015 HAB ...
Страница 6: ...This page left intentionally blank ...
Страница 8: ...This page left intentionally blank ...
Страница 9: ...Index divider Section 1 N ...
Страница 10: ......
Страница 12: ...PRINTED IN JAPAN UAIS TRANSPONDER FA 150 ...
Страница 53: ...Antenna Cable Set CP20 02700 004 381 160 CP20 02710 004 381 170 A 8 ...
Страница 54: ...Antenna cable Set CP24 00300 000 041 938 CP24 00310 000 041 939 A 9 ...
Страница 55: ...Y Hatai D 1 ...
Страница 56: ...Y Hatai D 2 ...
Страница 57: ...Y Hatai D 3 ...
Страница 58: ...Y Hatai D 4 ...
Страница 59: ...Feb 19 03 D 5 ...
Страница 60: ...May 20 03 D 6 ...
Страница 61: ...Feb 22 05 D 7 ...
Страница 62: ...Jan 9 03 D 8 ...
Страница 63: ...Mar 11 04 H Hayashi D 9 ...
Страница 64: ...Feb 02 05 D 10 ...
Страница 65: ...Nov 28 03 D 11 ...
Страница 66: ...Oct 02 03 D 12 ...
Страница 67: ...H Hayashi Mar 10 05 D 13 ...
Страница 69: ...Index divider Section 2 N ...
Страница 70: ......
Страница 72: ...This page left intentionally blank ...
Страница 129: ...Index divider Section 3 N ...
Страница 130: ......
Страница 187: ...Index divider Section 4 N ...
Страница 188: ......
Страница 190: ...TECHNICAL MANUAL A100K11209 v 1 3 Sound Reception System VSS V2 Installation User Manual ...
Страница 204: ...15 VSS V2 Technical Manual A100K11209 v 1 3 4 7 Cable Connection Diagram ...
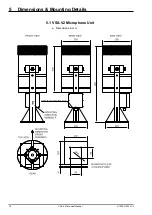
Страница 205: ...16 A100K11209 v 1 3 VSS V2 Technical Manual 5 Dimensions Mounting Details 5 1 VSS V2 Microphone Unit Dimensions in mm ...
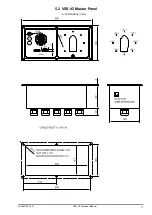
Страница 206: ...17 VSS V2 Technical Manual A100K11209 v 1 3 5 2 VSS V2 Master Panel Dimensions in mm ...
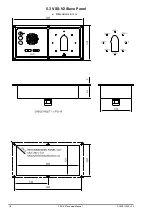
Страница 207: ...18 A100K11209 v 1 3 VSS V2 Technical Manual 5 3 VSS V2 Slave Panel Dimensions in mm ...
Страница 216: ...This page left intentionally blank ...

