56
Printer Connection and Software Installation
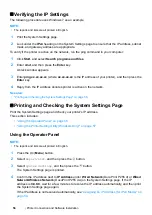
Verifying the IP Settings
The following procedure uses Windows 7 as an example.
NOTE:
•
The reports and lists are all printed in English.
1
Print the System Settings page.
2
Look under the
IPv4
heading on the System Settings page to ensure that the IP address, subnet
mask, and gateway address are appropriate.
To verify if the printer is active on the network, run the ping command in your computer:
1
Click
Start
, and select
Search programs and files
.
2
Enter
cmd
, and then press the
Enter
key.
A black window appears.
3
Enter
ping xx.xx.xx.xx
(where
xx.xx.xx.xx
is the IP address of your printer), and then press the
Enter
key.
4
Reply from the IP address denotes printer is active on the network.
See also:
• "Printing and Checking the System Settings Page" on page 56
Printing and Checking the System Settings Page
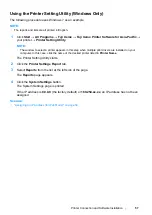
Print the System Settings page and check your printer's IP address.
This section includes:
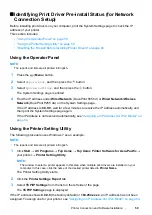
• "Using the Operator Panel" on page 56
• "Using the Printer Setting Utility (Windows Only)" on page 57
Using the Operator Panel
NOTE:
•
The reports and lists are all printed in English.
1
Press the
(
Menu
) button.
2
Select
Report/List
, and then press the
button.
3
Select
System Settings
, and then press the
button.
The System Settings page is printed.
4
Confirm the IP address next to
IP Address
under
Wired Network
(DocuPrint P255 d) or
Wired
Network/Wireless Network
(DocuPrint P255 dw) on the System Settings page. If the IP
address is
0.0.0.0
, wait for a few minutes to resolve the IP address automatically, and then print
the System Settings page again.
If the IP address is not resolved automatically, see
Содержание DocuPrint P255 dw
Страница 1: ...User Guide DocuPrint P255 d P255 dw ...
Страница 6: ...6 Contents ...
Страница 26: ...26 Product Features ...
Страница 38: ...38 Basic Operation ...
Страница 69: ...Printer Connection and Software Installation 69 5 Select Advanced ...
Страница 114: ...114 Printer Connection and Software Installation ...
Страница 195: ...Troubleshooting 195 7 Close the rear cover 8 Insert the paper tray into the printer and push until it clicks into place ...
Страница 197: ...Troubleshooting 197 4 Lower the levers to the original position 5 Close the rear cover ...
Страница 226: ...226 Troubleshooting ...
Страница 248: ...248 Contacting Fuji Xerox ...
Страница 252: ...252 Index X XML Paper Specification print driver 58 96 ...

