182
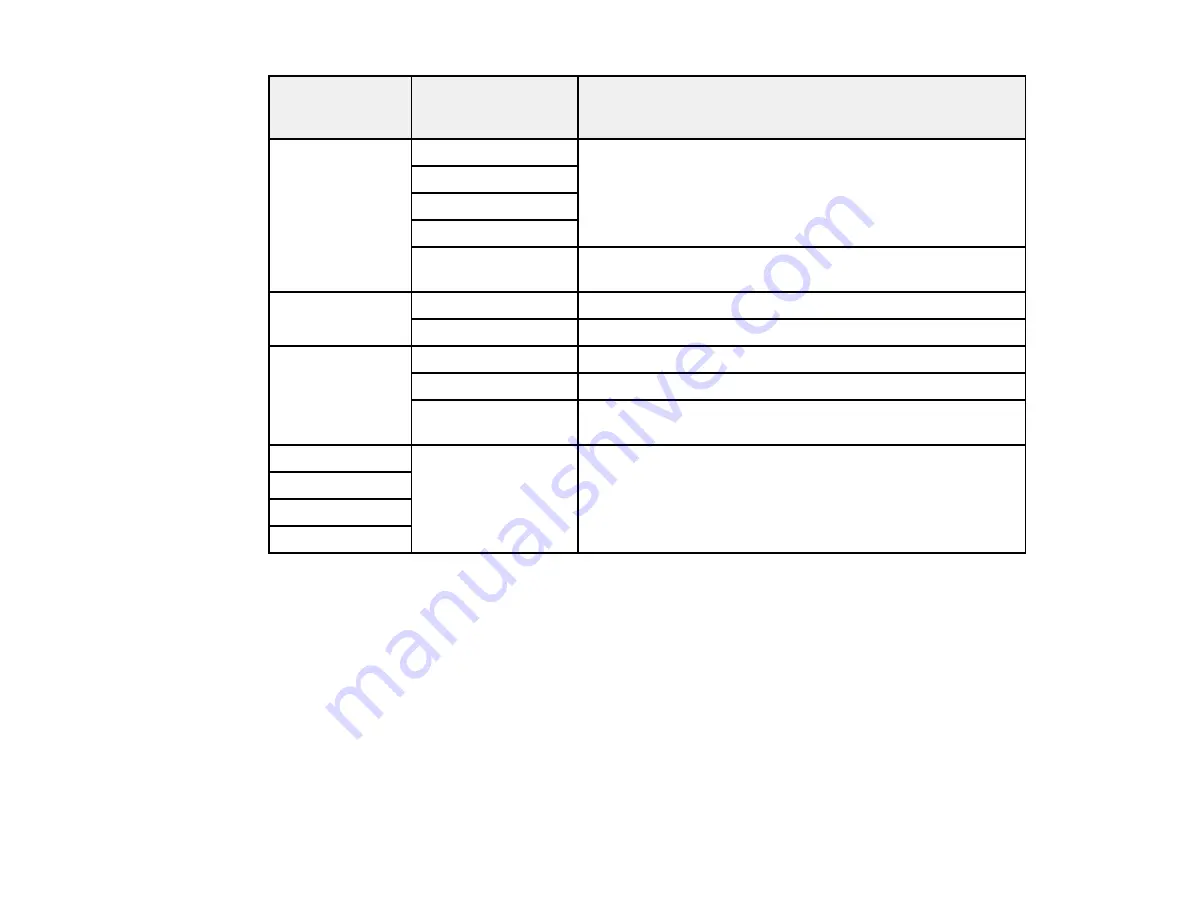
Photo
Adjustments
settings
Available options
Description
Fix Photo
Auto
Optimizes the
Fix Photo
adjustments for specific types of
photos; select the option that best matches your photo
content
People
Landscape
Night Scene
P.I.M
Uses your camera's PRINT Image Matching or Exif Print
adjustments
Fix Red-Eye
Off - Current
Does not automatically fix the red-eye effect in photos
On - Current
Automatically fixes the red-eye effect in photos
Filter
Off
Turns off the filter setting
Sepia
Applies a sepia tone filter to the viewed or printed photo
B&W
Applies a black-and-white filter to the viewed or printed
photo
Brightness
Various settings
Adjust individual qualities in your photo
Contrast
Sharpness
Saturation
Note: Fix Photo
uses a sophisticated face recognition technology to optimize photos that include faces.
For this to work, both eyes and the nose must be visible in the subject's face. If your photo includes a
face with an intentional color cast, such as a statue, you may want to turn off
Fix Photo
to retain the
special color effects.
Parent topic:
Selecting Print and Photo Adjustment Settings
Connecting and Printing from a Camera
Before you connect your camera, make sure the product is turned on but not printing.
Содержание Expression Premium XP-6005
Страница 1: ...XP 6000 User s Guide ...
Страница 2: ......
Страница 13: ...13 XP 6000 User s Guide Welcome to the XP 6000 User s Guide For a printable PDF copy of this guide click here ...
Страница 24: ...24 Product Parts Inside 1 Document cover 2 Scanner glass 3 Memory card slot ...
Страница 57: ...57 1 Slide in the output tray 2 Open the front cover until it clicks ...
Страница 58: ...58 3 Pull on the front cover to slide out the lower paper cassette 4 Slide the edge guides outward ...
Страница 131: ...131 You see an Epson Scan 2 window like this ...
Страница 133: ...133 You see an Epson Scan 2 window like this ...
Страница 135: ...135 You see this window ...
Страница 178: ...178 2 Select Settings and press the OK button 3 Select Camera Print Settings and press the OK button ...
Страница 183: ...183 1 Open the front cover 2 Raise the control panel ...
Страница 264: ...264 Caution Do not touch the flat white cable or the metal bar inside your product 3 Close the scanner unit ...

