30
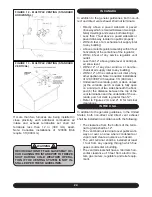
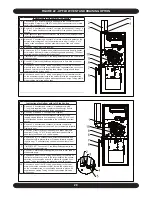
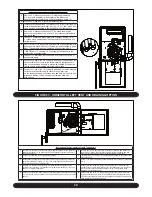
FIGURE 23 - HORIZONTAL LEFT VENT AND DRAINING OPTION
Instructions for Upflow with Right Side Venting
1.
Remove 2.5” knockout and connect 2” nipple approximately
2.5” long (field supplied) to the coupler on the exhauster.
Ensure exhauster coupler drain outlet is facing downward 15°.
2.
Connect 2” elbow and 2” vent pipe (field supplied)
3.
Install gasket on panel then vent bracket, use three (3) self tapping
screws (all parts from parts bag). If using 1.5” or 3” vent, make tran-
sition as close as possible to the unit and on a vertical section.
4.
Remove 2.5” knockout and connect 2” air intake coupler with
gasket on the outside of unit, use the 2” nut to fasten this (all parts
from parts bag).
5.
Connect 2” elbow and intake pipe (field supplied). If using 1.5” or
3” intake, make transition as close as possible to the unit and on a
vertical section.
6.
Remove two (2) 7/8” knockouts and install the condensate trap with
gasket, hold in place with two (2) screws (all parts supplied in parts
bag). **Condensate trap can be placed on either side of unit**
7.
**IMPORTANT** Connect a 1/2” tee fitting (field supplied) to the
outlet of the condensate trap.
8.
Connect 1/2” drain tube (field supplied) and route to floor drain or
condensate pump.
9.
Connect one end of the 5/8” tubing (in parts bag) to the drain on the
front manifold cover, route to the larger outlet on the condensate
trap, cut excess tube and hold in place with supplied hose clamps.
Tubing should slope towards drain trap with no sags.
10.
Connect one end of the 1/2” tubing (in parts bag) to the lowest drain
outlet on the exhauster coupler, route to the smaller inlet
on the condensate trap, cut excess tube and hold in place with sup-
plied hose clamps. Tubing should slope towards drain trap
with no sags.
Instructions for Horizontal Left with Top Venting
1.
Remove 2.5” knockout and connect 2” nipple approximately 2.5” long (field sup-
plied) to the coupler on the exhauster. Ensure exhauster coupler drain outlet is
facing downward 15°.
6.
Remove two (2) 7/8” knockouts and install the condensate trap bracket by
removing and reusing the 2 top panel screws, install condensate trap with
gasket, hold in place with 2 screws (all parts supplied in parts bag).
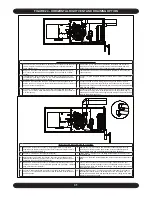
2.
Connect 2” elbow and 2” vent pipe (field supplied).
7.
**IMPORTANT** Connect a 1/2” tee fitting (field supplied) to the outlet of the
condensate trap.
3.
Install gasket on panel then vent bracket, use three (3) self tapping screws (all
parts from parts bag). If using 1.5” or 3” vent, make transition as close as pos-
sible to the unit and on a vertical section.
8.
Connect 1/2” drain tube (field supplied) and route to floor drain or condensate
pump.
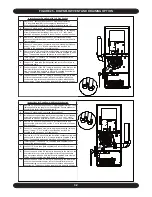
4.
Remove 2.5” knockout and connect 2” air intake coupler with gasket on the
outside of unit, use the 2” nut to fasten this (all parts from parts bag). **Refer to
page 26 for inducer orientation**
9.
Connect one end of the 5/8” tubing (in parts bag) to the drain on the front
manifold cover, route to the larger outlet on the condensate trap, cut excess
tube and hold in place with supplied hose clamps. Tubing should slope
towards drain trap with no sags.
5.
Connect 2” street elbow (from parts bag) and intake pipe (field supplied). If using
1.5” or 3” intake, make transition as close as possible to the unit and on a vertical
section.
10.
Connect one end of the 1/2” tubing (in parts bag) to the lower drain outlet
on the exhauster coupler, route to the smaller inlet on the condensate trap,
cut excess tube and hold in place with supplied hose clamps. Tubing should
slope towards drain trap with no sags.
Содержание G95V
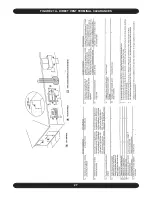
Страница 27: ...27 FIGURE 21A DIRECT VENT TERMINAL CLEARANCES...
Страница 28: ...28 FIGURE 21B NON DIRECT VENT TERMINAL CLEARANCES...
Страница 53: ...53 22 WIRE DIAGRAM FOR TWO STAGE FURNACE WITH ECM...

