


Motor Cavity 10–3
•
Hang a heat lamp with a 300 watt bulb 1 foot from the opening of the motor casting
and dry for at least 4 hours.
•
Lay the casting down and put a space heater that has a fan about 1 foot from the
opening of the motor casting and dry for at least 4 hours.
•
Use a heat gun with a stand and place it no closer than 1 foot from the opening of
the motor casting and dry for at least 4 hours.
•
Use a hair dryer on a stand and place it no closer than 1 foot from the opening of the
motor casting and dry for at least 4 hours.
•
If it is a warm, sunny day, place it directly in the sun on the pavement for a day.
1.
After the motor is clean, dry and cooled, test the motor windings resistance. Refer to
Table 9-1, Motor Field Winding Resistance, in
Chapter 9 – Control Cavity
.
2.
Meg the windings to Ground. Readings should be 500M to 1000M at 500 volts.
Note:
If the motor winding has failed, it does not need to be removed. The new assembly (PT#
1288) contains a winding installed into a motor housing.
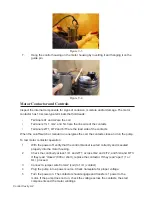
Assembling the Core and Motor
1.
Clean all machined surfaces including the motor head, motor housing, bearing bores,
and seal bore. Surfaces must be clean and free of rust.
2.
Press the new upper and lower bearings onto the armature shaft.
3.
Set the motor head on the suction housing or place on a bench with a hole for the
armature shaft to penetrate. Install new radial seals and lubricate with Molycote 55.
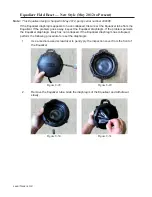
4.
Apply Loctite 641 to
either
the upper and lower bearings
or
to the bearing bores.
Use a sponge tip or nozzle tip applicator to apply a thin, even coat around the entire
surface (Figure 10-7).
Figure 10-6
Figure 10-7
Figure 10-8
Содержание Extreme Series
Страница 1: ...Service Manual E One Extreme Grinder Pumps 240V 60 Hz Hardwired Controls...
Страница 2: ......
Страница 32: ...Pump End 5 8 Figure 5 9a D Series Pump Exploded View...
Страница 33: ...Pump End 5 9 Figure 5 9b W Series Pump Exploded View...
Страница 34: ...Pump End 5 10 Figure 5 9c Gatorgrinder GH Series Pump Exploded View...
Страница 35: ...Pump End 5 11 Figure 5 9d IH091 Pump Exploded View...
Страница 36: ...Pump End 5 12...
Страница 58: ...Level Sensor 8 10 Figure 8 35 Level Sensor Assembly Exploded View all hardwired pumps...
Страница 70: ...Mechanical Seal Assembly 11 2...
Страница 75: ......


