


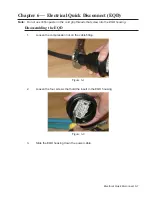


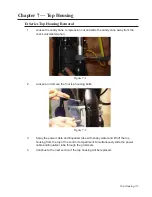


Electrical Quick Disconnect 6–3
4.
Tighten the six setscrews. Ensure the wires have been stripped back 1/4” to 3/8” for
proper installation.
5.
Tighten the four connector screws into the EQD housing.
6.
Tighten the compression nut on the cord grip.
EQD Retrofit: 2000 Series to Extreme Series
1.
To seal the core bolt inserts in the tank transition, install the six foam pads onto the
underside of the new top housing. Flats on the underside will guide you.
2.
With the power off, loosen the screws on both sides of the 2000 Series EQD. Unplug
the EQD.
3.
Remove the four screws at each corner of the insert. Loosen the packing nut and
push the cable through the housing.
4.
Disconnect the six leads from the insert by loosening the set screws.
5.
Cut off the old, stripped portion of the cable.
6.
Slip off the old EQD housing and compression fitting from the cable.
Figure 6-5
Figure 6-6
Содержание Extreme Series
Страница 1: ...Service Manual E One Extreme Grinder Pumps 240V 60 Hz Hardwired Controls...
Страница 2: ......
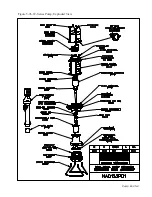
Страница 32: ...Pump End 5 8 Figure 5 9a D Series Pump Exploded View...
Страница 33: ...Pump End 5 9 Figure 5 9b W Series Pump Exploded View...
Страница 34: ...Pump End 5 10 Figure 5 9c Gatorgrinder GH Series Pump Exploded View...
Страница 35: ...Pump End 5 11 Figure 5 9d IH091 Pump Exploded View...
Страница 36: ...Pump End 5 12...
Страница 58: ...Level Sensor 8 10 Figure 8 35 Level Sensor Assembly Exploded View all hardwired pumps...
Страница 70: ...Mechanical Seal Assembly 11 2...
Страница 75: ......


