


Motor Cavity 10–2
Note:
If the upper bearing remains in the motor bearing bore, the freeze plug will have to be
removed and the bearing punched out. A new freeze plug will need to be installed.
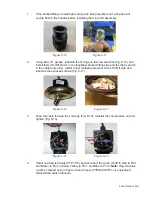
8.
Remove the pump rotor. Support both ends with wooden blocks to avoid bending the
armature shaft. Use a hammer and a 1/8-inch punch to remove the grooved pin that
retains the pump rotor.
9.
Remove the armature shaft from the motor head. Hold the armature assembly from
the upper bearing and tap the cutter wheel end of the shaft on a piece of 4x4 block.
The motor head will drop off the lower bearing and land on the 4x4 block.
Note:
If the lower bearing remains in the motor head bearing bore, it will need to be punched out.
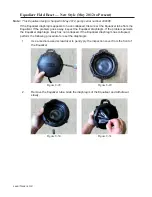
10.
Remove and discard the old bearings.
11.
Remove and discard the old mechanical seal from the motor head.
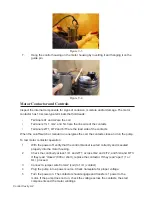
Motor Drying Techniques
Note:
If the motor was wet or flooded, clean and dry the motor before reassembling the unit.
Use
a mild detergent, such as household dishwashing liquid, to clean the motor. Soft brushes
can be used with caution; take care not to damage the insulation on the windings. Inspect
the windings for varnish flaking off as a result of overheating. Look for burn marks in the
windings and in the plastic insulators inside the motor field.
Several methods can be used to dry the motor. Optimally, bring the temperature of the motor
above water boiling temperature (212 F or 100 C) for about two hours. Dry the motor in an
oven at 250 F for 2 hours. Alternately, bring the motor above room temperature for a longer
period of time (4 hours or more) so the moisture evaporates.
Note:
Do not get any of the devices described below too close to the opening of the motor castings
or damage could occur. Temperatures above 311 F will damage the windings insulation.
Figure 10-4
Figure 10-5
Содержание Extreme Series
Страница 1: ...Service Manual E One Extreme Grinder Pumps 240V 60 Hz Hardwired Controls...
Страница 2: ......
Страница 32: ...Pump End 5 8 Figure 5 9a D Series Pump Exploded View...
Страница 33: ...Pump End 5 9 Figure 5 9b W Series Pump Exploded View...
Страница 34: ...Pump End 5 10 Figure 5 9c Gatorgrinder GH Series Pump Exploded View...
Страница 35: ...Pump End 5 11 Figure 5 9d IH091 Pump Exploded View...
Страница 36: ...Pump End 5 12...
Страница 58: ...Level Sensor 8 10 Figure 8 35 Level Sensor Assembly Exploded View all hardwired pumps...
Страница 70: ...Mechanical Seal Assembly 11 2...
Страница 75: ......


