OPERATION
Roadie 25K User’s Manual
3-51
Image Optimization
AND
Fade Time
NOTE: These features are not available in this projector.
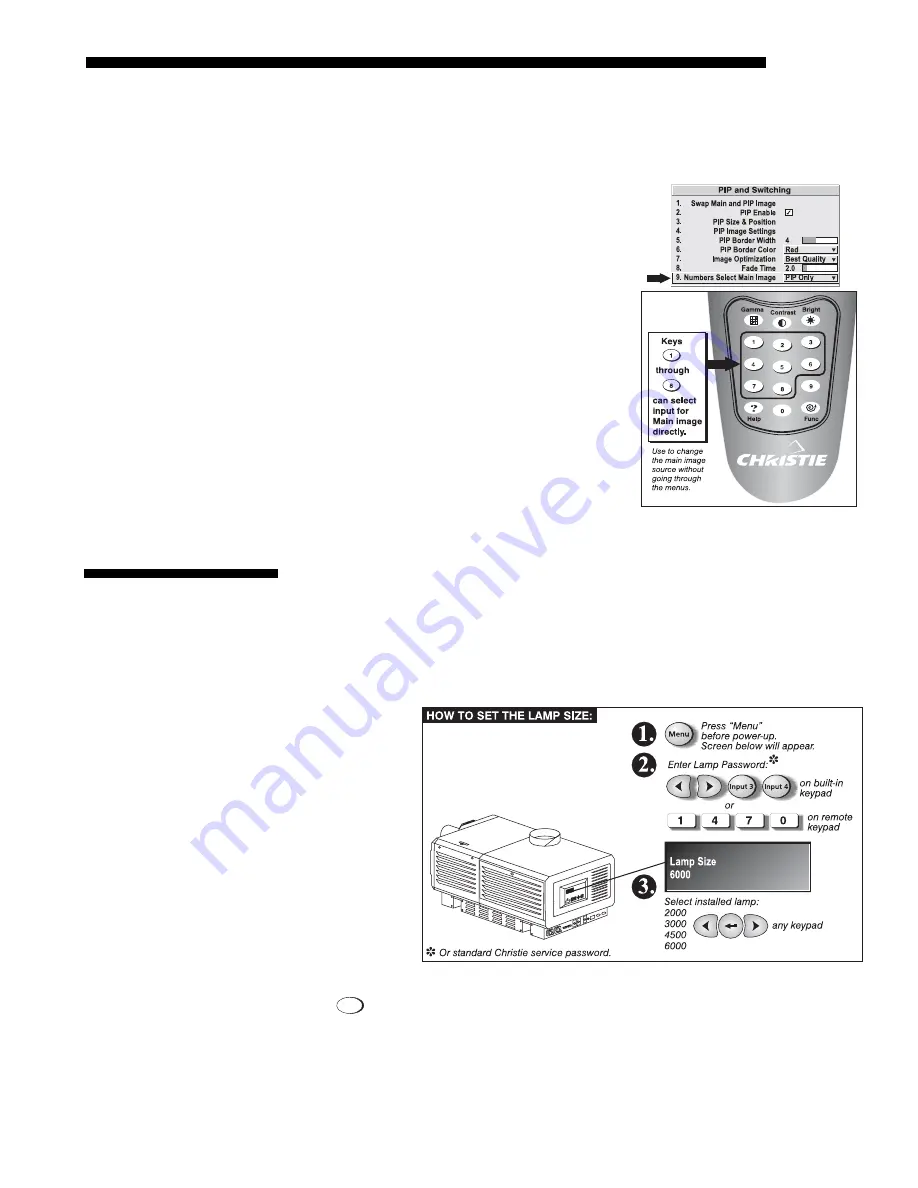
Numbers Select Main Image
Use Numbers Select Main Image to use the
numeric keys #1-8 as input keys. This remapping
of the keypad (see right) can be particularly
useful with PIP displays, providing a convenient
shortcut for changing the primary (background)
image without first having to return to the Main
menu. To use the keys in this manner all of the
time, even with single displays, select Always.
For normal keypad function, select Never
(default). Set to PIP Only to activate number
keys as input keys only when PIP is in use.
NOTE: Numbers Select Main Image keypad
functionality works only when menus are closed.
Four different sized lamps can be used with this projector: 2, 3, 4.5 or 6 kW. To
ensure that the required ignition and power level is supplied to the lamp, you must
define in software—preferably before power-up—which size lamp is installed,
otherwise the lamp could be seriously overdriven or underdriven. Subsequent
adjustments in the Lamp menu can then help to optimize lamp performance and
ensure the brightest, most uniform image possible for the life of the lamp.
The ideal time
to check your
lamp size is
prior to each
power up. This
avoids the
possibility of
igniting your
lamp with the
wrong level of
power:
See Figure 3.29.
Before
powering up the
projection head,
press
Menu
. The
LCD STATUS DISPLAY
at the rear of the projector will show a “Lamp Size” of 2000,
3000, 4500 or 6000 watts, depending on its most recent setting (factory
default=6000). Select the lamp that is currently installed—if you are unsure, a
qualified service technician must unlock the lamp door and look at the lamp.
Figure 3.28. Keypad Remap
(Optional “Lite” keypad shown)
3.10 Working
with
the Lamp
Which Lamp is Installed?
'
Figure 3.29. Checking/Setting Lamp Size
Содержание Roadie 25K
Страница 6: ......
Страница 15: ...INSTALLATION AND SETUP Roadie 25K User s Manual 2 9 Figure 2 10 Switching Between Flat Scope Displays ...
Страница 56: ......
Страница 153: ...SPECIFICATIONS Roadie 25K User s Manual 6 7 ...
Страница 164: ......
Страница 165: ...Appendix B Remote Keypad Roadie 25K User s Manual B 1 Figure B 1 Standard Remote Keypad ...
Страница 166: ......
Страница 168: ...SERIAL COMMUNICATION CABLES C 2 Roadie 25K User s Manual ...
Страница 169: ...SERIAL COMMUNICATION CABLES Roadie 25K User s Manual C 3 ...
Страница 170: ......
Страница 186: ......


