INSTALLATION AND SETUP
2-4
Roadie 25K User’s Manual
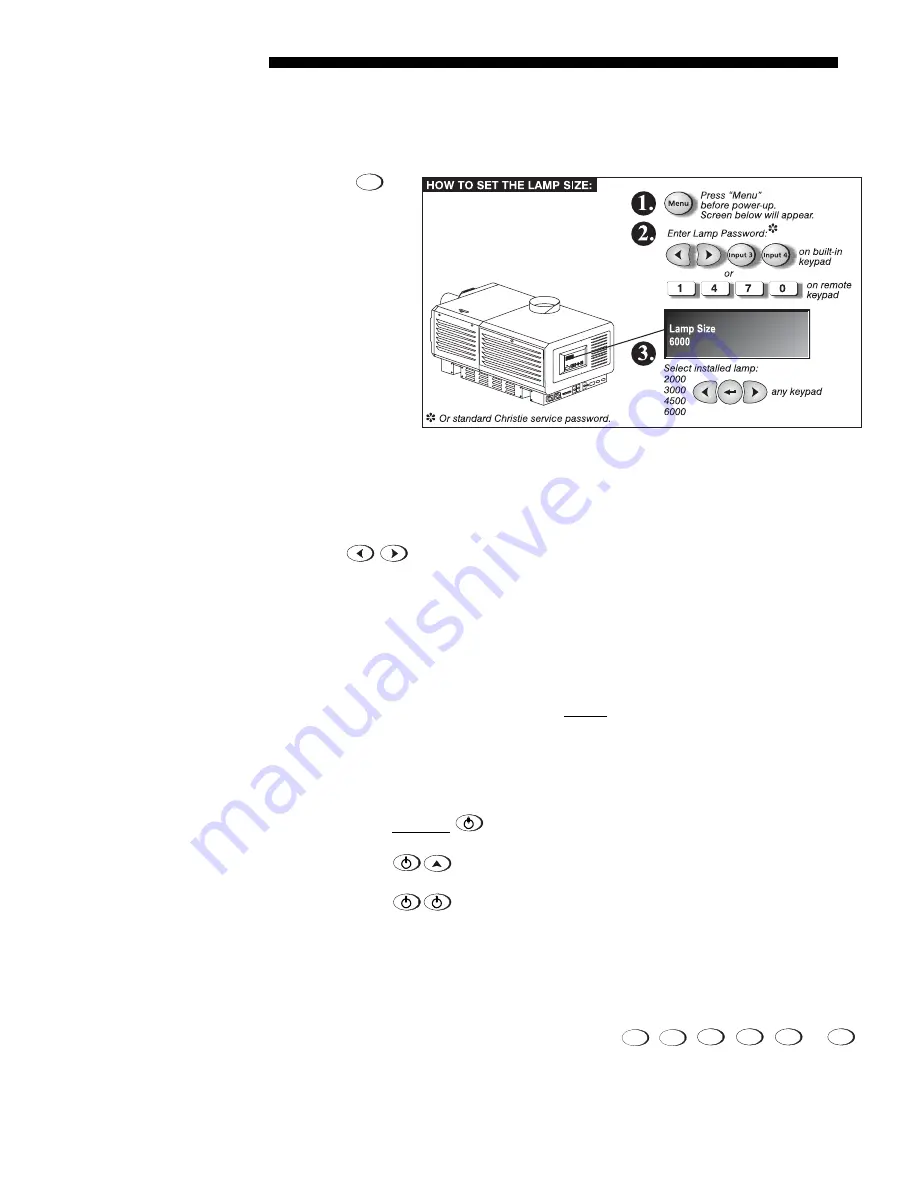
Before powering up the projector and igniting the lamp, you must define in memory
which size lamp is installed, otherwise you risk severely overdriving or underdriving
a lamp. Record on the “Lamp Installed” label too.
1. Press
Menu
.
The Status
Display at the
rear of the
projector will
show a
“Lamp Size”
of 2000,
3000, 4500 or
6000 watts,
depending on
its last
setting.
Factory
default=6000.
2. Enter either
the Lamp Password (see Figure 2.3), or the Christie service password. NOTE:
Password is required unless the “Enable Password” service option has been
turned off.
3. Use
to select which lamp is currently installed. Make sure the lamp type
is also indicated on the lamp door label—use a small sticker from the front cover
of this manual, or mark with a pen.
4. When the Status Display shows the correct lamp type, the projector and lamp can
be turned on.
NOTE: Lamp size can also be changed in the Service menu (Service password
required) if the projector is running, but will not take effect until the next power-up.
Whenever possible, define the lamp size before igniting the lamp.
Turn the Projector and Lamp ON
Using either the built-in or remote keypad, do one of the following to turn the
projector on and ignite the lamp.
•
Press and hold
for at least two seconds
—or—
•
Press
—or—
•
Press
The main
PROJ.
STATUS
light at the rear of the projector should be green when the
projector is up-and-running. For best results, let the projector warm up for about five
minutes.
Select the Source
Using either the remote or built-in keypad, press
Input 1
,
Input 2
,
Input 3
,
Input 4
,
Input 5
or
Input 6
to select and display the image for the corresponding source connected in Step 3. The
display will resize as needed, producing an image as large as possible for the type of
source present.
Figure 2.3. Setting Lamp Size
STEP
6
'
STEP
7
'
Содержание Roadie 25K
Страница 6: ......
Страница 15: ...INSTALLATION AND SETUP Roadie 25K User s Manual 2 9 Figure 2 10 Switching Between Flat Scope Displays ...
Страница 56: ......
Страница 153: ...SPECIFICATIONS Roadie 25K User s Manual 6 7 ...
Страница 164: ......
Страница 165: ...Appendix B Remote Keypad Roadie 25K User s Manual B 1 Figure B 1 Standard Remote Keypad ...
Страница 166: ......
Страница 168: ...SERIAL COMMUNICATION CABLES C 2 Roadie 25K User s Manual ...
Страница 169: ...SERIAL COMMUNICATION CABLES Roadie 25K User s Manual C 3 ...
Страница 170: ......
Страница 186: ......


