background image

24

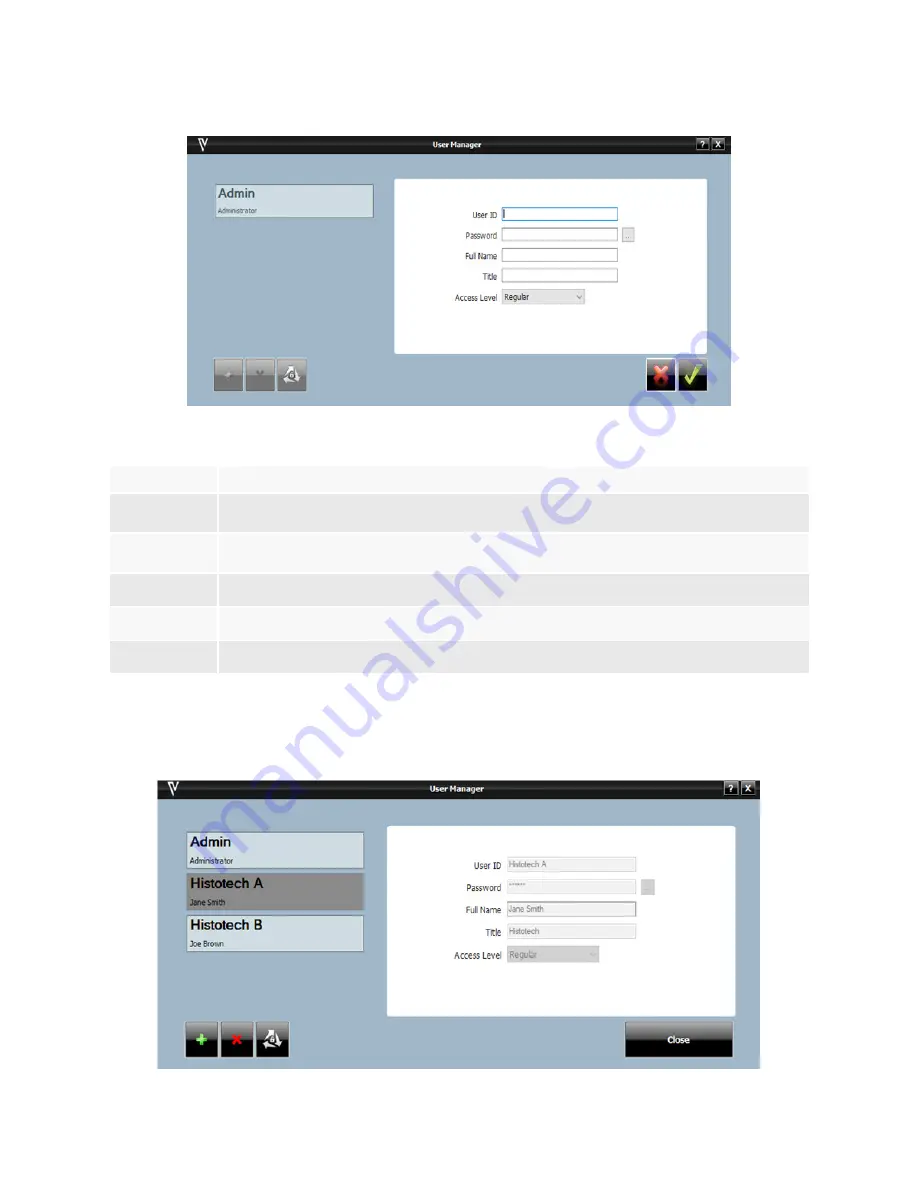
      • Enter the appropriate user information and click Save (green check mark).

User Information Guideline 

User Information

Description

User ID

This must be unique. The system does not require a specific naming convention and is at the discretion of 
the user.

Password

This must be unique. The system does not require a specific naming convention and is at the discretion of 
the user. There is a minimum of 6 characters required and a maximum of 15 characters.

Full Name

Enter user’s first and last name. Full Name may be duplicated, but the User ID must remain unique.

Title

List end-user title. This is a free form text field.

Access Level

Access level is defined to administrator or regular user.

Modify a User Account

To modify an account or password, select the appropriate account and press Delete (X) or Edit (3 gray arrows) button at the bottom left 
side of the screen.

Содержание VALENT

Страница 1: ...www biocare net VALENT Manual Automated Slide Staining Platform User Manual ...

Страница 2: ...Biocare Medical Technical Support 800 799 9499 Option 3 Customer Service 800 799 9499 Option 2 Fax 925 603 8080 Corporate Office 60 Berry Drive Pacheco CA 94553 www biocare net ...

Страница 3: ......

Страница 4: ...ty 9 Waste Disposal 9 Instrument Disposal 9 Site Installation Requirements 9 Support 9 Chapter 2 Safety Precautions 10 Recommended Use 10 Reagents and Chemicals 10 Reagent Rack 10 Instrument Safety Guidelines 10 Programming Cautions 10 Lithium Battery 11 Safely Turning on the Cart 11 Turn ON the Cart 11 Turn OFF the instrument 12 Symbols Glossary 13 Chapter 3 VALENT Software Features Functions 14 ...

Страница 5: ...Groups 27 DePar 27 Antigen Retreval 27 Enzyme 27 Block 27 Antibody 27 At the bottom of the Reagent Details box 28 Negative Serum Group 28 Secondary Group 28 Tertiary Group 28 Chromogen Group 28 Counter Stain Group 28 Ancillary Group 28 Mix Group 28 Display Reagent Information 28 Template Manager 30 Description of Template Manager Icons 30 Creating a Template from a Blank Template 30 Create a Templ...

Страница 6: ...Add Delete and Modify Reagents 47 Add a New Reagent 47 Delete a Reagent 48 Modify a Reagent 48 Import a Reagent from Reagent Manager 49 Add a Reagent in Mix Group 51 Specify Mixing Properties 52 Volume Calculation for Mixing Reagents 53 Inventory Manager 55 View Reagents 55 Add Reagents 56 Delete Reagents and Clean Inventory 57 Print Labels in Inventory Manager 57 Register Reagents in Inventory Ma...

Страница 7: ...ents 85 6 Scan or Map Reagents 86 7 Pre Start Checklist 88 8 Start Staining 89 Chapter 7 System Cleaning 90 Daily 90 Weekly 90 Program Cleaning 91 Monthly 93 Clean AR Carboys 95 Drain the Secondary Containment Sump 95 Additional Cleaning of the Instrument 95 Chapter 8 Troubleshooting 96 Printer Port Connections 96 Changing Printer Labels and Ribbons 96 Staining Performance 97 Mechanical 97 Electri...

Страница 8: ...istry IF Immunofluorescence L Liters LED Light Emitting Diode mL Milliliter mm Millimeter Probe dispense range The minimum and maximum reagent volume that can be dispensed by an instrument PPE Personal Protective Equipment Pollution degree Pollution degree measures how much conductivity is in the air including dry pollution and condensation which determines how close to each other conductive parts...

Страница 9: ...y and will have to be optimized by the user The datasheet recommendations and protocols are based on exclusive use of Biocare Medical products Ultimately it is the responsibility of the investigator to determine optimal staining protocol conditions The clinical interpretation of any positive or negative staining should be evaluated within the context of clinical presentation morphology and other h...

Страница 10: ...eries to run down and necessitate a service call Reagent Vial Label and Slide Label Printers The VALENT Software is compatible with Microsoft Windows 10 and will have all computer system software pre installed The system also includes two TSC TC310 Thermal Transfer Printers One printer is required for slide labels and the second printer is required for reagent vial labels Report Printer Please see...

Страница 11: ...ys 4 Reagent Rack 5 System Board Cover 6 Power Switch 4 3 2 1 5 1 2 3 4 5 6 7 8 9 10 11 1 Z head 2 Probe Wash Station 3 Dispense Manifold 4 Reagent Rack 5 Val DePar Side 6 Syringe Pump 7 System Lid 8 Fans 8 Total 9 Troughs Below Slide Tray 10 Slide Trays 4 Total 11 Service Panel ...

Страница 12: ...ar reagent and Wash Blow Wash 1 Liquid Level Sensor 2 Barcode Camera 3 Wash Blow Wash 4 Val DePar Probe 5 Reagent Probe VALENT Cart Components Carboy Connections A R HI pH A Q UA RIN S E A R LO p H C A R BOY SEN S O R W A SH BUF F E R WASTE H A Z A R DOUS W A S T E RMIPH50081 REV A Image of carboy connection panel ...

Страница 13: ...e VALENT Cart displaying electrical connections 1 Carboys 2 Secondary Containment 3 Instrument Power Circuit Breaker 4 Cart Power Circuit Breaker 5 Battery Circuit Breaker 6 Air Vents NOTE All cart circuit breakers must be in the OFF down position before disconnecting the power cord from the cart or the wall outlet Failure to do so may cause the batteries to run down and necessitate a service call...

Страница 14: ...e washing Fans The internal fans are designed to reduce humidity and temperature during heated antigen retrieval There are a total of 8 fans in the upper chassis 4 intake fans are located on the VALENT system lid and 4 exhaust fans are located on the back panel of the VALENT The fans operate in different combinations and automatically turn on and off during AR In addition there are five fans in th...

Страница 15: ...he reagent probe is cleaned in the wash station throughout a run Bulk reagents and carboys Antigen Retrieval AR Aqua Rinse and Wash Buffer AR Hi pH AR Lo pH Wash Buffer and Aqua Rinse Carboy assemblies have liquid level sensors to detect volume levels The carboys allow for a nominal volume of 8L with 1L of dead volume If there is insufficient Wash Buffer or Aqua Rinse in the carboy assemblies the ...

Страница 16: ...cial exhaust ventilation unless required by safety regulations when using reagents not specified by Biocare Medical Recommended maximum altitude 6562 feet Lower boiling temperature and a higher evaporation rate must be considered for labs in a higher elevation For example if the optimal temperature for antigen retrieval is 98 C with an elevation below 1500 feet the antigen retrieval temperature ma...

Страница 17: ... VALENT is to be removed from service and disposed of the instrument must be disinfected using Lysol IC Quaternary Disinfectant Cleaner through the fluid delivery and waste systems Similarly all exposed surfaces must be disinfected using 10 Professional Lysol IC Quaternary Disinfectant Cleaner before it is disposed of in accordance with local state and federal regulations The VALENT Cart batteries...

Страница 18: ...the front of the VALENT facing the user When unloading a reagent rack once a run is complete the bottom of the reagent rack may be cold use a paper towel or other absorbent material to hold the reagent rack from the bottom Tipping of the reagent rack may result in injury if the rack is not securely placed in its designated position or handled securely during transport Instrument Safety Guidelines ...

Страница 19: ...5 VAC 100 120 VAC Model VLT8102 50 Hz Model VLT8103 60 Hz Circuit Breaker ISA Resettable WARNING 1 Turn On the Cart Power Circuit Breaker 2 Turn On the Cart Battery Circuit Breaker 3 Turn On the Instrument Power Switch Circuit Breaker 1 2 3 Confirm that all circuit breakers on the side of the cart are in the OFF down position refer to the diagram above Confirm that the cart is plugged into a dedic...

Страница 20: ...reaker which is the black switch located on the left side of the cart panel Turn off the cart battery circuit breaker which is the black switch located on the right side of the panel Turn off the cart power circuit breaker which is the white switch on the cart panel NOTE All cart circuit breakers must be in the OFF down position before disconnecting the power cord from the cart or the wall outlet ...

Страница 21: ...ting instruction Consultez les instructions d utilisation consultez le mode d emploi Electrical Earth Ground Terre électrique Main Power ON OFF Interrupteur Principal ON OFF Caution Surface may be hot Attention La surface peut être chaude Warning Pinch Point Keep hands and fingers clear Attention Risque de pincement Gardez les mains et les doigts éloignés Caution consult accompanying documents Att...

Страница 22: ... be discussed in this chapter Screens used by both users are described in this chapter The VALENT Software can only have one administrator with an Admin user id but there can be many administrator level users Login To log in double click the VALENT icon on the desktop enter the User ID and Password in the dialog box select Language and click Login to continue Note Default User ID is admin default ...

Страница 23: ...ensure reagents are stored at an acceptable temperature range 8 Carboy Status The carboy status indicates if there is sufficient DePar Aqua Rinse Antigen Retrieval AR and Wash Buffer available in the bulk reagent carboys The carboy status also displays the amount of non hazardous waste and hazardous waste in the carboy A reminder will be displayed when bulk reagent carboys are low and when waste c...

Страница 24: ...es for a run and select or modify protocols Map Slides Allow assignment of protocol or prepared slides by manually mapping to a specific tray location Print Reports View and print IHC Summary IHC Report IHC Short Report and Protocol Validation Cancel Run Allows user to abort a run This button is red when a run is in process Menu Bar The menu bar in the upper left corner of the VALENT application s...

Страница 25: ...Create new user accounts and modify existing accounts Inventory Manager Enter and track reagent lot expiration starting volume current volume and lot number to be used on the instrument Custom Groups Allows the laboratory to create groups of protocols under Group Manage frequently used by the laboratory rather than having to scroll through all the protocols Slide Fields Slide Fields allows the use...

Страница 26: ...labels can be edited under Label Designers Instrument Operations Allows the user to perform routine maintenance such as Drain Waste Prime Buffers System Cleaning Reset Carboys and Read Sensors Configure Reagent Wash Lists The user can add reagents that require special handling for decontamination to the Configure Reagent Wash List to signal a cleaning step to help prevent contamination in the prob...

Страница 27: ...e desired report parameter then click the Generate Report button Report Description IHC Summary Report Provides a summary of all the slides that were stained in a run along with the protocol used for each slide IHC Report Provides a detailed summary of all the slides within a case with the protocol for each slide IHC Short Report Provides a brief summary of all the slides within a case with the pr...

Страница 28: ...mination any Alkaline Phosphatase AP polymer needs to be added to the Contamination List 2 The mixing component that has the potential for contamination typically the Alkaline Phosphatase AP chromogen buffer used to dilute the Alkaline Phosphatase AP chromogen needs to be added to the Prep Wash List 3 Set the end product chromogen in the Reagent Manager to unstable Contamination List To add reagen...

Страница 29: ...ffected Follow prompts on the screen to clear the notification Run Time Estimates When a staining run is started the run end time is estimated Run time estimates can be viewed two ways Run Time Estimates can be found on the top of the main screen above the reagent rack display The time the run is expected to end is displayed Separate run end times for each slide tray can be found above each slide ...

Страница 30: ...ID serial number VALENT Software version and run name The Run Log also displays all operations performed by the instrument As an operation is performed the log is updated The Run Log can be viewed during a run or immediately after a run is completed otherwise the Run Log option will be grayed out not allowing access until the next VALENT run Help The Help dropdown menu allows the user to View the ...

Страница 31: ... Add modify or delete reagents Template Manager Add modify or delete template protocols Modify templates only adding and deleting templates is restricted Software Settings Set Instrument Parameters Notifications and Alarms No Access Allowed User Accounts Add delete or modify accounts including passwords Change password Assign or Modify Users Only administrators can assign or modify user accounts R...

Страница 32: ... convention and is at the discretion of the user There is a minimum of 6 characters required and a maximum of 15 characters Full Name Enter user s first and last name Full Name may be duplicated but the User ID must remain unique Title List end user title This is a free form text field Access Level Access level is defined to administrator or regular user Modify a User Account To modify an account ...

Страница 33: ...te the password information and click Save green check mark to proceed Click Close to close window Software Settings Software Settings can be accessed from the menu bar under Tools This feature allows the administrator to set preferences and default parameters Software settings are selected from dropdown menus There are two parameters listed System Parameters and Instrument Parameters When the use...

Страница 34: ...lse is selected slides will air dry after the run completes Select Post Run Buffer Designates either Buffer or Aqua Rinse to be applied if Buffer Slides After Run is set to True Buffer Interval Time in minutes between buffering of slides after run completion Valid range is between 15 and 30 minutes Default Vendor Default Vendor is Biocare Medical This is displayed when creating a new reagent in Re...

Страница 35: ...Secondary Tertiary Chromogen Counter Stain Ancillary and Mix DePar The user is required to use Biocare Medical s DePar and cannot edit this group Antigen Retreval The user is required to use Biocare Medical s Antigen Retreval Solution and cannot edit this group Enzyme This group is used to add modify and delete enzymes Block This group is used to add modify and delete blocking solutions Antibody T...

Страница 36: ...specify if a reagent is stable or unstable if added under Chromogen Components under the Mix Group Counter Stain Group The Counter Stain reagent group includes all counter stains This screen will allow the addition modification and deletion of counterstains Ancillary Group The Ancillary reagent group includes all ancillary reagents not included in any other Reagent Group options This screen will a...

Страница 37: ...29 ...

Страница 38: ...ck in the changes Description of Template Manager Icons Icon Description Icon Description Add a new step at the end of a protocol Move up the selected step in a protocol Delete a step at the end of the protocol Move down the selected step in a protocol Insert a new step before the selected step in a protocol Creating a Template from a Blank Template From the Home Screen go to Data Manager then sel...

Страница 39: ...31 In the Template Name field type in the name of the new template Under Options select Blank Template Click Create Select Add located at the bottom of the window this opens the Add a New Step window ...

Страница 40: ...template and make modifications A dropdown menu is provided to allow the user to select a template In the Template Name field type in the name of the new template Click create and use the icons to create a template Once all steps are added the user can program time select reagents from a dropdown menu to add reagents go to Reagent Manager The user can select the number of washes required in each s...

Страница 41: ... Manager then select Custom Groups The Group Manager window will appear On the bottom left of the screen click the Add button and name the Custom Group Name the Custom Group in the group tab From Master Protocols list select the protocols to be added to the Custom Group and click the arrow facing right to add to Assigned Protocols To remove a protocol from the Assigned Protocols list select the pr...

Страница 42: ...p and clicking the red X button Edit a Custom Group The user can also edit a Custom Group by selecting the Custom Group and clicking Edit 3 gray arrows button Use the green arrows to add and delete protocols in the Custom Group Select the protocol to be added then click the green arrow button pointing right To delete select the protocol to be deleted then the green arrow button pointing left Click...

Страница 43: ...utton to add fields Use the Delete X button to delete fields Each Case Field has the following properties o Name The name of the field that can be referenced by other parts of the program o Display Text The text that appears in the Slide Details section of Add Slides Slide Manager and Assign Slides to identify the field Slide Fields are displayed in the Slide Details section of the Add Slides wind...

Страница 44: ...n In each of the 4 fields choose from the following options in the drop down menu Case Protocol Name Primary Antibody PreTreatment Active Step or Block ID The Work Flow List is a display option that will appear in parenthesis by the slide s protocol under Prepared Slides in both Slide Manager and Assign Slides windows When the user is preparing slides or manual mapping several protocols the Work F...

Страница 45: ...ser The available options in each drop down menu are Instrument Date Slide ID Protocol Name Pretreatment Antibody Case Block ID Case Block ID Institution Date o The Type of field i e Text is displayed in the third column o The fourth column is the font size This ranges from 8 smallest to 10 largest If not all fields print on a slide label the font may be too large Decreasing the font size should r...

Страница 46: ...ld lines which are configurable by the user The available options in the dropdown menu are Reagent Name Short Name Catalog Lot Expiration Date Lot Expiration Date Upon choosing a Label Field option from the Field drop down menu the Type i e Text will be displayed in the third column A preview of the label is available in the upper right of the screen Seceral Settings are visible in the lower right...

Страница 47: ...nd go to Print Reports then click Report Generator The Generate Reports window will appear go to Tools and click Configure Report Fields Select a report from the Select a Report dropdown menu After selecting IHC Summary the following appears in the window Select True to display reagents in IHC Summary report or False to not display reagents in the report Click Close ...

Страница 48: ...s worked Negative Tissue Control Include a known negative tissue and apply primary antibody Test result should indicate negative staining with no background Negative Reagent Control Replace primary antibody with negative control serum Test result should indicate negative staining with no background Bulk Reagent Preparation Bulk reagents can be prepared in 8L bulk reagent carboys or 10L bulk reagen...

Страница 49: ...l solution If manually mapping slides use a VALENT slide label Failing to use a slide label may yield poor staining quality The lack of slide labels may introduce issues such as slide cracking as the slide may not load easily without the slide label and frosted paint from slide melting off and mixing with antigen retrieval solution When placing the slide label on the slide make sure the whole labe...

Страница 50: ...el Place the slide flat directly below the slide clip making sure it s centered Gently push the slide inward so slide is under the slide clip Slides should be inserted in a straight horizontal motion do not insert slide at an angle this may cause the slide to crack Slides should be straight and evenly spaced between each other If a slide is not straight it may affect staining due to possible reage...

Страница 51: ...ad the reagent rack with filled reagent vials in the correct orientation the reagent rack handle should be towards the front of instrument facing the user Reagent vials must be positioned toward the front of the VALENT facing the user 9 To print slide or reagent labels make sure the slide label printer reagent label printer and report printer are attached to the computer 10 When placing the slide ...

Страница 52: ...nstrument Operations Drain Waste Prime Buffers Prime Probe Select Prime from the Select Operation section When Prime is selected the following are enabled Probe Buffers DePar and Trough To prime probe select Probe and adjust the duration of prime in seconds as needed then click Prime Solution When priming is complete click Close or select another priming option Prime Buffers To prime select Prime ...

Страница 53: ...k Close or select another priming option Prime Troughs and Manifold To prime select Prime under Select Operation then click Troughs under Select a Priming Option Select the Trough to be primed To prime the manifold for the selected trough check the Prime Manifold box Adjust the duration of prime in seconds as needed and click Prime Solution When priming is complete click Close or select another pr...

Страница 54: ...re are 2 selections Drain Waste or Prime Buffers Select Drain under Select Operation then click the trough to be drained under Select Trough or Wash Station To drain into non hazardous waste select Non Hazardous and click Start Drain To drain into hazardous waste select Hazardous and click Start Drain ...

Страница 55: ...ft of the screen under Reagent Groups highlight the Reagent Group to which the new reagent belongs Use the add button under Reagent Details to add a new reagent Enter the Name Short Name Catalog Number Vendor Incubation Time etc of the new reagent Select Save green plus and Close to save the information When a reagent is added to this screen it will be added to Inventory Manager as a reagent for s...

Страница 56: ... button X under Reagent Details to delete a reagent Select Close to save the information Modify a Reagent From the Home Screen select Data Manager then go to Reagent Manager Under Reagent Groups click the Reagent Group under which the reagent is categorized From the reagent table click the reagent to be modified Use the Edit 3 gray arrows button under Reagent Details to modify a reagent Make the n...

Страница 57: ... Reagent Details to import a reagent The Reagent Master List window will appear Select the reagent to be imported and click Import Selected Reagents Select Close to save the information and exit out of window Note Reagents in gray signify that they are already part of the Reagent Master List and do not need to be imported while reagents in black have not been imported to Reagent Master List Only B...

Страница 58: ...n under Reagent Details to open the Print Reagent Labels window To the left of the screen under Reagent Groups click the Reagent Group under which the reagent is to be categorized In the reagent table click and highlight reagent to be printed or choose Select All to print out all reagent labels Click Print Labels ...

Страница 59: ...k the desired subgroup category Chromogen Components Enzyme Components Ancillary Click the Add button below Reagent Details box to add a new reagent Enter the Name Catalog Number Short Name Vendor and Incubation Time Select Stability Stable or Unstable to designate whether the reagent needs to be made just before being dispensed or can be made at the beginning of the run o Stable and unstable reag...

Страница 60: ...r Reagent Groups select from either Chromogen Ancillary or Enzyme Components Click the Add button under Reagent Details and fill out Reagent Details such as Name Short Name Catalog Number Vendor Mix or Regular Waste Disposal Properties Mixing Properties and Stability For Stability Stable means the mix is stable Unstable means the mix is unstable and must be used immediately by the instrument Once ...

Страница 61: ...nt DAB Chromogen DAB Buffer The dispense volume per slide is 300μL with an extra 20μL needed the extra 20μL volume is to compensate for lost volume during slide application for a total of 320μL DAB Reagent Volume for 12 slides 12 320μL 3840μL Dead volume 50μL Total DAB Reagent required for 12 sides 3890μL a DAB Chromogen Volume needed for 12 slides 240μL Dead volume 50μL Total volume 290μL b DAB B...

Страница 62: ... menu to select the desired volume in μL of buffer Add Chromogen concentrate to the mix in the same way The minimum volume required is 100μL To delete a component from the list on the right of the screen highlight it in either list and click the back arrow button Click Save then Close to exit Important Note When setting up mixing components reagents that require larger volumes should be added firs...

Страница 63: ...ntory Manager can be opened from the Data Manager dropdown menu from the Home Screen When Inventory Manager is chosen the Reagent Inventory Manager window is displayed The list of reagents can be sorted by any field by clicking on the header Reagents can also be sorted by the Reagent Step dropdown menu located to the top left of the screen A search field is provided to quickly find a reagent ...

Страница 64: ...ser to enter reagent information such as Catalog Number Lot Number Expiration Date Starting Volume and Serial Number The Reagent Lookup button is located next to Catalog field to quickly pull up reagents already in inventory Click Close to exit Important Note When Inventory Manager is opened from the Data Manager dropdown menu in the Home Screen the Register Reagents button is displayed ...

Страница 65: ...ory The system will only allow the user to Clean Inventory if the reagent is expired and contains a volume below 350μL The Current Volume of reagents is calculated by the VALENT Software as the reagent is used up during staining runs Click Close to exit Print Labels in Inventory Manager Select Inventory Manager Select the reagent that requires a print label and click the barcode button Click Close...

Страница 66: ... option of manually entering reagents into inventory Select Inventory Manager Select the Register Reagent 3 gray arrows button to scan To scan the reagents click Start Scan To save these listed reagents to the inventory click the Save button Reagents with valid lot numbers and expiration dates are saved to the inventory and this window is closed To cancel scanning click Cancel Click OK once scanni...

Страница 67: ...gher elevation If the optimal temperature for antigen retrieval is 98 C with an elevation of 1500 feet the temperature for antigen retrieval may need to be adjusted to 95 C if the elevation is above 3750 feet Please call Technical Support if you have further questions Description of Template Manager Icons Icon Description Icon Description Add a new step at the end of a protocol Move up the selecte...

Страница 68: ...a protocol highlight the protocol and click Delete Selected Protocol X located to the bottom left of the window Important Note There are two delete X buttons select the one under Show Biocare Protocols The information about the selected protocol will appear in the Protocols section on the right half of the window including the name of the protocol dispense volume and protocol steps Use the buttons...

Страница 69: ...0μL for all protocols Select Add located at the bottom of the window this opens the Add a New Step window Using the dropdown menu Select a Step along with the reagent required for this step then click Add Step Use the icons provided to finish creating a protocol Once all steps are added the user can program time and select reagents from a dropdown menu to add reagents go to Reagent Manager The use...

Страница 70: ... if needed The dispense volume is 300μL Use the icons provided to finish creating a protocol Once all steps are added the user can program time and select reagents from a dropdown menu to add reagents got to Reagent Manager The user can select the number of washes required in each step under Count with a maximum of 3 washes per step allowed Blow can be switched on or off by selecting the red X for...

Страница 71: ...ce the green Add icon is selected select the Create from the Selected Protocol option On the top right side of the window under Protocol name COPY will be added at end of the protocol name edit the Protocol name if needed The dispense volume is 300μL Use the icons provided to finish creating a protocol Once all steps are added the user can program time and select reagents from a dropdown menu to a...

Страница 72: ... in demo mode not allowing the user to start the run There are two ways to processes slides described below Process Overview 1 Summary of the run setup process by Scanning Slide Labels Details of each step are provided within this chapter 1 Login 2 Select Prepare Slides 3 Print Labels 4 Scan Slides 8 Start Staining 5 Prepare Load Reagents 6 Scan or Map Reagents 7 Pre Start Checklist Process Overvi...

Страница 73: ...ser ID is admin default password is valent Home Screen 1 Menu Bar 2 Run Designation Buttons 3 Run End Time 4 Reagent Rack 5 System Lid Status 6 Reagent Rack Lock Unlock Status 7 Reagent Rack Temperature 8 Carboy Reagent Levels 9 Slide Tray Position 10 Slide Tray Lock Unlock Status 11 Slide Tray Status ...

Страница 74: ... down to select more than one protocol Click the green right arrow to select the protocol If positive and or negative controls are desired check the box under the plus sign to order a positive control and check the box under the minus sign to order a negative control Click OK The Slide Manager window will open for additional features including printing slide labels copying slides importing slides ...

Страница 75: ...onal slides can be added by clicking the plus sign slide icon This will bring the user back to the Add Slides window The user can then select additional slides for processing The user can make copies of a Prepared Slide by highlighting the slide to be copied and clicking the multiple slide icon from the Slide Manager Enter the number of copies ...

Страница 76: ...de can be deleted by checking the box next to the slide to be deleted and clicking the red X sign slide icon Important Note Make sure only the slides desired to be deleted are check marked or everything will be deleted ...

Страница 77: ...ocessed Slides Recent Slides Pending Slides and Saved Slides can be imported by clicking the Import Slides blue arrow pointing down sign slide icon The Import Slides Window will appear Select which set of slides are to be imported from the dropdown menu check the box for each required slide and click Import Selected Slides ...

Страница 78: ...pped Slides slides that are still in the list check the box next to Save Un Mapped Slides To save only the checked slides under Un Mapped slides select Only CHECKED Slides To save both checked and unchecked slides within unmapped slides select ALL Slides To save only mapped slides check the box next to Save Mapped Slides Enter a name for the list of slides in the box Click Save A representation fo...

Страница 79: ...t button to print slide labels located to the bottom right Make sure each slide that requires printing has a check mark next to its box Once the labels are printed place the labels on the slides and load the slides onto the slide tray Select Save and Close The Assign Slides window will appear which is required to start scanning Important Note When placing the slide label on the slide make sure the...

Страница 80: ... Slide List All reagents required to run these slides are listed on the right Selecting specific slides from the Slides List will only show the reagents needed for those slides in the Reagent List on the right To print the Reagent List click Print Reagent Worksheet To print labels check the boxes next to the reagents that require labels and click Print Labels Select All is available if required Re...

Страница 81: ...rom the Slide Manager Window under Prepared Slides once all slides have been ordered and information is correct select the print button to print slide labels located to the botton right Click Save Close The Assign Slides window will appear Select Scan Mode Check the box for each slide tray that contains slides the Select All checkbox is available if all 4 slide trays contain slides Click Scan Slid...

Страница 82: ...e Home Screen will display all scanned slides in the Slide Tray Slide Positions will appear green under Assign Slides once slides have been detected Use the mouse to hover over a scanned slide for the Slide Information window to appear Once all slides have been scanned the Prepare Reagent button will be accessible ...

Страница 83: ...bers and Expiration Dates for the reagents listed This information will only be tracked for this run If a permanent entry is needed go to the Inventory Manager If reagent labels are needed check the box for each reagent that a label is needed or check Select All for Printing and click Print Label Label reagent vials Reagent labels should be placed next to opening of vial and centered If using hema...

Страница 84: ... s responsibility to physically load the reagent vials in the auto mapped locations correctly o Manual Map allows the user to choose a reagent from the Load Reagents list and then choose the position in the reagent rack to which the user desires it to be loaded Repeat until all reagents in the Load Reagents list have been mapped It is the user s responsibility to physically load the reagent vials ...

Страница 85: ... carboys have adequate bulk reagent and waste capacity for the run Check the buffer lines above the Z head for air bubbles if air bubbles are present refer to Drain Waste and Prime Buffers of Chapter 5 for instructions on how to remove air bubbles The Delayed Run checkbox on the top right side of the Pre Start Checklist window allows the user to set a delayed start time for the run To set Delayed ...

Страница 86: ...78 ...

Страница 87: ...g Start Run the Run will start in countdown clock will appear in orange at the top of the Home Screen The run automatically begins after the countdown is completed Alternatively the user may select Start Now or Cancel Run Slide and Reagent Information Once the run has started the user can view Slide Information by using the mouse cursor to hover over a slide ...

Страница 88: ...nformation by using the mouse cursor to hover over a reagent Once the run has started the user can view Reagent Information by using the mouse cursor to hover over a reagent Run Complete When a run is complete slides will turn blue and a Run completed notification will appear ...

Страница 89: ...e Tools dropdown menu of the main screen This will release or unlock the slide tray from the instrument to allow the user to remove the slides At the end of run an icon appears below the slide trays Clicking this icon allows the user to clear reagents and the slides in the VALENT Software Reagents are automatically cleared after the run completes ...

Страница 90: ... Details of each step are provided within this chapter 1 Login 2 Select Map Slides 3 Manually Assign Slides 4 Load VALENT Labeled Slides 8 Start Staining 5 Prepare Load Reagents 6 Scan or Map Reagents 7 Pre Start Checklist 1 Login Login to VALENT Software Enter username and password in the dialog box Note Default User ID is admin default password is valent ...

Страница 91: ...tem Custom Group Displays protocols from a particular Custom Group An additional dropdown exists to filter by specific Custom Group Prepared Slides Only shows the Protocols from the Prepared Slides section of the Slide Manager Window An additional dropdown menu allows the user to view All Prepared Slides or Printed Slides both Prepared Slides and Printed Slides come from the Prepared Slides sectio...

Страница 92: ... If positive and or negative controls are desired check the box under the plus sign to order a positive control and check the box under the minus sign to order a negative control After mapping slides to slide tray print a copy of the Slide Layout Report to keep track of each slide s location To Print the Slide Layout Report go to Tools Print Reports Slide Layout Report To remove a slide from the s...

Страница 93: ...he run will be displayed A lot and expiration link is available to view and enter lot number along with the expiration date for the reagents listed This information will only be tracked for this run If a permanent entry is needed go to the Inventory Manager If reagent labels are needed check the box for each reagent that a label is needed or use the Select All for Printing checkbox Label reagent v...

Страница 94: ...ad the reagent vials in the auto mapped locations o Manual Map allows the user to choose a reagent from the Load Reagents list and then choose the position in the reagent rack to which the user desires it to be loaded Repeat until all reagents in the Load Reagents list have been mapped It is the user s responsibility to physically to physically load the reagent vials in the manually mapped locatio...

Страница 95: ...have been checked if a reagent is highlighted in red indicating the volume is low the user can manually override the system and enter the correct volume in the vial Once reagent levels have been manually entered or scanned the user can enter reagent lot numbers ...

Страница 96: ...capacity for the run Check the buffer lines above the Z head for air bubbles if air bubbles are present refer to Drain Waste Prime Buffers of Chapter 5 for instructions on how to remove air bubbles The Delayed Run checkbox on the top right side of the Pre Start Checklist window allows the user to set a delayed start time for the run To set Delayed Run o Check the Delayed Run box under Load Reagent...

Страница 97: ... Run box was selected in the Pre Start Checklist screen after clicking Start Run the Run will start in countdown clock will appear in orange at the top of the Home Screen The run automatically begins after the countdown is completed Alternatively the user may select Start Now or Cancel Run ...

Страница 98: ...hile performing this cleaning step Weekly Perform DAB Away cleaning at least once a week or every 250 slides to clean the reagent probe followed by hematoxylin cleaning to remove residue from troughs and trough level sensors Procedure for DAB away cleaning Program Cleaning From the Home Screen select Tools Instrument Operations System Cleaning The System Cleaning Window will appear Follow each ins...

Страница 99: ...eaning Window will appear follow each instruction and check mark each box for Prerequisites for Cleaning once the task is complete Once all boxes have been check marked click Verify Carboy Reagents and ensure there is sufficient reagent in the bulk reagent carboys and waste carboys have capacity for waste ...

Страница 100: ... when carboys have been verified Once cleaning is completed the System Cleaning Screen will show Cleaning Complete The user can select View Cleaning Log on the top right hand side and print the log if needed Close the window ...

Страница 101: ...Wipe under the trough dispense manifold using 70 Isopropyl alcohol lint free wipe to get rid of any hematoxylin residue Monthly Disinfect carboys and internal supply lines using Lysol I C Quaternary Disinfectant Cleaner follow dilution directions specified on Lysol bottle Empty AR Hi pH AR Lo pH Wash Buffer Aqua Rinse and waste carboys and then fill with at least 2L of diluted Lysol I C Quaternary...

Страница 102: ...the solution has been primed through the instrument lines dump out the remaining solution and rinse the carboys 2 3 times with water Fill each carboy with at least twice as much DI water 4 5L as Lysol solution and repeat the above steps priming for at least 10 seconds Important Note Prime the probe for at least 2 minutes to ensure the instrument is well rinsed The Prime Solution button may be clic...

Страница 103: ... that will fit under the VALENT Cart and place it below the drain plug located underneath the VALENT Cart towards the middle front see diagram Unscrew the drain plug by turning the knob clockwise as viewed from above Allow the liquid to drain into the empty container Re seal the secondary container sump by screwing the plug back in Dispose of the liquid collected into the appropriate container 5 6...

Страница 104: ...ers are connected properly and powered on and still no labels are print log into the VALENT software and go to Tools Label Designers Slide Label Designer Select the drop down menu next to Slide Printer Choose one of the options in the list Select Test Print Repeat the last 2 steps until a slide label successfully prints Select the Save Close button Repeat the same steps for the Reagent Label Desig...

Страница 105: ...5 Resolution Reposition slide labels Slides have dried out Cause Slides positioned incorrectly on the VALENT Resolution Visually inspect the slides from the front of the instrument making sure they are positioned correctly Cause Prolonged incubation requires continued dispensing of reagent on each slide Resolution For incubation time exceeding one hour divide protocol step into two consecutive ste...

Страница 106: ... blow head misaligned Cause VALENT is out of calibration Resolution Call Technical Support to calibrate the instrument Map of slide layout disappears once the corresponding slide tray is removed from the VALENT Cause When a user is manually mapping slides if the user removes the slide tray from the VALENT that particular slide tray will disappear from the Home Screen not allowing the user to map s...

Страница 107: ... found in this chapter If problems still persist contact Technical Support for further assistance Operating Errors Problem Possible Causes Solutions Carboy Details window shows required volume from the previous run after a run is complete Cause If a user hovers over the carboys from the Home Screen the required volume from the previous run will be displayed Required volume is not reset once a run ...

Страница 108: ...ring reagents into inventory The barcode camera is not detecting slide labels or reagent labels Cause Slide labels or reagent labels are positioned incorrectly onto the slide Please see the diagram in the Slide Preparation section of chapter 5 Resolution Reposition slide label or reagent label Cause This may be caused by splashes of reagents or residual oil from the user s fingerprints during prep...

Страница 109: ... tray cancellations Cause Trough not filling for AR step Resolution Check carboy tubing connections Use the Drain Waste Prime buffers tool to confirm proper connection even flow of solution with minimal bubbles in the line If all tubing is connected properly and solution is not flowing as expected call Technical support Cause Temperature did not reach set point Resolution Call Technical Support ...

Страница 110: ...front and the other hand from the bottom load the reagent rack with filled reagent vials in the correct orientation the reagent rack handle should be towards the front of instrument facing the user Reagent vials must be positioned toward the front of the VALENT facing the user 9 To print slide or reagent vial labels make sure the slide label printer reagent label printer and report printer are att...

Страница 111: ...fied under and click 4 Add the reagent information and click to Save and click Close 5 From the menu bar select Data Manager and then Protocol Manager 6 To create a new protocol click and select New Protocol to create from de novo Create from Template or Create from a Selected Protocol 7 Name the Protocol 8 Use the buttons to Add Insert Delete or Move steps within a protocol 9 Click Save Close ...

Страница 112: ...elete or Copy Slides as needed by selecting the appropriate button 9 Make sure all slides are checked and then click Print Slide Labels 10 To print reagent labels click Show Reagent Worksheet 11 Click Save Close 12 Affix labels to reagent vials and slides making sure slide labels are flat and completely adhere to slide 13 Load slides and reagents onto the instrument 14 In the Assign Slides window ...

Страница 113: ... Select Prepare Slides 3 Print Labels 4 Scan Slides 8 Start Staining 5 Prepare Load Reagents 6 Scan or Map Reagents 7 Pre Start Checklist Process Overview 2 Summary of the run setup process using Manual Mapping of Slides Details of each step are provided in Chapter 6 1 Login 2 Select Map Slides 3 Manually Assign Slides 4 Load VALENT Labeled Slides 8 Start Staining 5 Prepare Load Reagents 6 Scan or...

Страница 114: ...INSTRUMENT CART BATTERY Turn cart battery OFF when cart power is off or cart is unplugged CART POWER COMPUTER INSTRUMENT POWER Power 1 800 VA 115 VAC 100 120 VAC Model VLT8102 50 Hz Model VLT8103 60 Hz Circuit Breaker ISA Resettable WARNING Electrical Label for the VALENT ...

Страница 115: ...107 ...

Страница 116: ...800 799 9499 60 Berry Drive Pacheco CA 94553 www biocare net VLT8118 010219 V3 ...

Отзывы: