Chapter 9: Replacing Modules
188
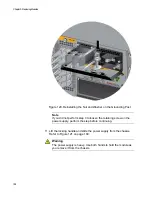
Figure 120. Reinstalling the Nut and Washer on the Grounding Post
Note
If you did not perform step 3 to loosen the retaining screw on the
power supply, perform the step before continuing.
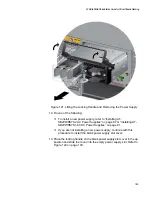
11. Lift the locking handle and slide the power supply from the chassis.
Refer to Figure 121 on page 189.
Warning
The power supply is heavy. Use both hands to hold the module as
you remove it from the chassis.
Содержание AT-FAN08
Страница 10: ...Figures 10...
Страница 12: ...Tables 12...
Страница 16: ...Preface 16...
Страница 38: ...Chapter 1 Overview 38...
Страница 60: ...Chapter 2 Virtual Chassis Stacking 60...
Страница 80: ...Chapter 4 Installing the Chassis 80 Figure 32 Chassis Orientations in the Equipment Rack Continued...
Страница 82: ...Chapter 4 Installing the Chassis 82 Figure 34 Example of Adjusting the Equipment Rack Brackets...
Страница 104: ...Chapter 4 Installing the Chassis 104...
Страница 140: ...Chapter 5 Powering On the Chassis 140...
Страница 166: ...Chapter 7 Cabling the AT XEM2 Line Card Ports 166...
Страница 214: ...Appendix A Technical Specifications 214...

