AT-SBx908 GEN2 Installation Guide for Virtual Chassis Stacking
83
Installing the Chassis in an Equipment Rack
This chassis is designed for a standard 19-inch equipment rack. Please
review the installation guidelines in “Choosing a Site for the Chassis” on
page 69 before installing the chassis.
Caution
The chassis may be heavy and awkward to lift. Allied Telesis
recommends that you get assistance when mounting the chassis in
an equipment rack.
E28
To install the chassis, perform the following procedure:
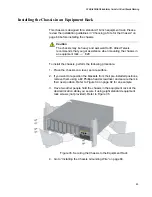
1. Place the chassis on a level, secure surface.
2. If you want to reposition the brackets from their pre-installed positions,
remove them using a #2 Phillips-head screwdriver and secure them in
their new position. Refer to Figure 34 on page 82 for an example.
3. Have two other people hold the chassis in the equipment rack at the
desired location while you secure it using eight standard equipment
rack screws (not provided). Refer to Figure 35.
Figure 35. Securing the Chassis to the Equipment Rack
4. Go to “Installing the Chassis Grounding Wire” on page 84.
Содержание AT-FAN08
Страница 10: ...Figures 10...
Страница 12: ...Tables 12...
Страница 16: ...Preface 16...
Страница 38: ...Chapter 1 Overview 38...
Страница 60: ...Chapter 2 Virtual Chassis Stacking 60...
Страница 80: ...Chapter 4 Installing the Chassis 80 Figure 32 Chassis Orientations in the Equipment Rack Continued...
Страница 82: ...Chapter 4 Installing the Chassis 82 Figure 34 Example of Adjusting the Equipment Rack Brackets...
Страница 104: ...Chapter 4 Installing the Chassis 104...
Страница 140: ...Chapter 5 Powering On the Chassis 140...
Страница 166: ...Chapter 7 Cabling the AT XEM2 Line Card Ports 166...
Страница 214: ...Appendix A Technical Specifications 214...


