Chapter 8: Powering On and Verifying the Stack
176
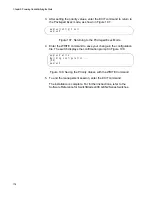
3. After setting the priority values, enter the EXIT command to return to
the Privileged Exec mode, as shown in Figure 107.
Figure 107. Returning to the Privileged Exec Mode
4. Enter the WRITE command to save your change in the configuration
file. The switch displays the confirmation prompt in Figure 108.
Figure 108. Saving the Priority Values with the WRITE Command
5. To end the management session, enter the EXIT command.
The installation is complete. For further instructions, refer to the
Software Reference for SwitchBlade x908 GEN2 Series Switches.
awplus(config)# exit
awplus#
awplus# write
Building configuration ...
[OK]
awplus#
Содержание AT-FAN08
Страница 10: ...Figures 10...
Страница 12: ...Tables 12...
Страница 16: ...Preface 16...
Страница 38: ...Chapter 1 Overview 38...
Страница 60: ...Chapter 2 Virtual Chassis Stacking 60...
Страница 80: ...Chapter 4 Installing the Chassis 80 Figure 32 Chassis Orientations in the Equipment Rack Continued...
Страница 82: ...Chapter 4 Installing the Chassis 82 Figure 34 Example of Adjusting the Equipment Rack Brackets...
Страница 104: ...Chapter 4 Installing the Chassis 104...
Страница 140: ...Chapter 5 Powering On the Chassis 140...
Страница 166: ...Chapter 7 Cabling the AT XEM2 Line Card Ports 166...
Страница 214: ...Appendix A Technical Specifications 214...


