AT-SBx908 GEN2 Installation Guide for Virtual Chassis Stacking
109
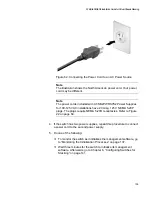
Figure 62. Connecting the Power Cord to an AC Power Source
Note
The illustration shows the North American power cord. Your power
cord may be different.
Note
The power cords included with AT-SBxPWRSYS2 Power Supplies
for 100-125 VAC installations have 20 Amp, 125 V NEMA 5-20P
plugs. The plugs require NEMA 5-20R receptacles. Refer to Figure
22 on page 69.
4. If the switch has two power supplies, repeat this procedure to connect
a power cord to the second power supply.
5. Do one of the following:
To monitor the switch as it initializes the management software, go
to “Monitoring the Initialization Processes” on page 137.
Wait three minutes for the switch to initialize its management
software. Afterwards, go to Chapter 6, “Configuring Switches for
Stacking” on page 141.
Содержание AT-FAN08
Страница 10: ...Figures 10...
Страница 12: ...Tables 12...
Страница 16: ...Preface 16...
Страница 38: ...Chapter 1 Overview 38...
Страница 60: ...Chapter 2 Virtual Chassis Stacking 60...
Страница 80: ...Chapter 4 Installing the Chassis 80 Figure 32 Chassis Orientations in the Equipment Rack Continued...
Страница 82: ...Chapter 4 Installing the Chassis 82 Figure 34 Example of Adjusting the Equipment Rack Brackets...
Страница 104: ...Chapter 4 Installing the Chassis 104...
Страница 140: ...Chapter 5 Powering On the Chassis 140...
Страница 166: ...Chapter 7 Cabling the AT XEM2 Line Card Ports 166...
Страница 214: ...Appendix A Technical Specifications 214...


