48
CK1500-001_v01
4
CK1500-001_v01
Dear Customers,
Congratulations on your choice of Zelmer electric kettle, and
welcome among the users of Zelmer products.
In order to achieve best results, we recommend using only
original Zelmer accessories. They have been specially
designed for this product.
Please read this user manual carefully. Special attention
should be paid to the safety precautions. Please keep this
manual safe for future reference.
Safety precautions and instructions on the
proper use of the electric kettle
●
Do not fill the kettle beyond the maxi
-
mum fill indicator ”MAX” – water might
spatter out of the kettle.
●
Be careful not to wet the plug of the
power cord.
●
Steam coming out of the kettle when
the water is boiling may cause scald-
ing.
●
Allow the kettle to cool completely
before cleaning.
●
Do not open the lid while the water is
boiling.
●
Always remove the plug from the
mains before cleaning the kettle.
●
This appliance can be used by children
aged from 8 years and above if they
have been given supervision or instruc-
tion concerning use of the appliance in
a safe way and if they understand the
hazards involved. Cleaning and user
maintenance shall not be made by chil-
dren unless they are older than 8 and
supervised. Keep the appliance and its
cord out of reach of children aged less
than 8 years.
●
Appliances can be used by persons
with reduced physical, sensory or men-
tal capabilities or lack of experience
and knowledge if they have been given
supervision or instruction concerning
use of the appliance in a safe way and
understand the hazards involved.
●
Children shall not play with the appli-
ance.
WARNING!
Risk of property damage
●
Always plug the appliance to the mains (AC only) with
voltage corresponding to that indicated on the rating
plate.
●
Always plug the appliance to a grounded outlet. If an
outlet is not grounded, contact a qualified electrician. Do
not modify the plug and/or use any adapters.
DANGER! / WARNING!
Risk of injury
●
Special attention should be kept when
using the kettle in the presence of chil-
dren.
●
Do not operate the kettle if the power
cord is damaged or if there is any vis-
ible damage to the kettle body.
●
Do not plug the kettle to an ungrounded
outlet as this may cause an electric
shock.
●
Do not plug the power cord with wet
hands.
●
If the non-detachable power
cord is damaged, it should
be replaced by the manufac-
turer, an authorised service point
or a qualified person in order to avoid
any hazards.
●
Only qualified staff may repair the
appliance. Improper repair may cause
a serious threat to the user. In case
of any defects, contact an authorised
ZELMER service point.
●
Do not touch the metal body of the ket-
tle when in use; move the kettle only
using the handle.
●
Do not touch any hot surfaces of the
kettle. Surfaces remain hot even after
the device is switched off.
EN
Read this entire manual carefully before using the
appliance.
5
CK1500-001_v01
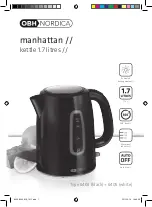
Kettle elements
1
Spout
2
Kettle body
3
Water level indicator
4
360° swivel base
5
Lid
6
Lid release button
7
LCD display
boiling water
keep warm
boiling time
8
Boiling program selection button
9
Settings button
10
On/Off button
11
Filter
12
Ühendusjuhtme peidik
13
Handle
Preparing the kettle for operation
Before first use, wash the inside of the kettle
(follow the procedure described in the follow
-
ing sections), fill it with water to the „MAX”
level. Then boil water four times (use fresh
water each time) and clean the inside of the
kettle again.
Operating the kettle
1
Pull the lid release button
(6)
in the direction indicated by
the arrow. The kettle lid will open.
2
Place the filter
(11)
in the kettle (if it is not in place).
3
Fill the kettle with the desired amount of water (the level
is visible on the indicator
(3)
).
Do not boil water if the water level is below the
MIN or above the MAX indicator (3).
Technical data
The technical parameters are given on the rating plate
of the product.
1.7 litre capacity.
The kettle is a class 1 appliance equipped with a power cord
with a protective conductor and a plug with an earthed pin.
The kettle meets the requirements of valid standards.
The appliance is compliant with the requirements of the fol-
lowing directives:
- Low Voltage Directive (LVD) – 2006/95/EC.
- Electromagnetic Compatibility (EMC) – 2004/108/EC.
The product is affixed with the CE mark on the rating plate.
●
Always place the kettle on a stable, smooth, flat sur
-
face; the power cord must not hang loosely off the
edge of a table (or any other work surface) or touch
a heated surface.
●
Do not remove the plug from the mains by pulling
by the cord.
●
This appliance is intended for indoor use only.
●
The kettle can only be operated with the original power
base (each base is type-specific).
●
Use the kettle for boiling water only.
●
Do not open the lid right after the water has boiled
– steam might condense and appear on the exterior
of the kettle.
●
Do not place the kettle on or near hot objects.
●
Do not immerse the kettle or the power base in water
when filling or washing the electric kettle.
●
If water gets into any electric elements inside the kettle
or onto the base, carefully dry these elements before
plugging the kettle to the mains.
●
Do not operate the kettle when empty.
●
Do not use the kettle with the lid open – the automatic
shut off will not work then.
●
Do not tilt the kettle back when it is filled with water,
as water may pour out through the steam outlet. If this
happens, dry the kettle thoroughly before switching it on
again.
●
Do not use any abrasive cleaning agents – such
as emulsions, creams, pastes, etc. – for cleaning the
kettle body. They might remove graphic information
symbols, such as scales, marks, warning signs, etc.
●
The appliance is not intended to be operated by means
of an external timer or separate remote-control system.
●
Always switch off the kettle before lifting it off the base.
●
Do not unplug the kettle when it is in operation. Switch
off the kettle first.
●
The inside of the kettle should be cleaned regularly to
remove limescale. Limescale may cause malfunctions.
TIP
Product information and tips on use
●
This appliance is intended to be used in household and
similar applications such as:
●
staff kitchen areas in shops, offices and other wor
-
king environments;
●
farm houses;
●
by clients in hotels, motels and other residential
environments;
●
bed and breakfast type environments.
In case it is used for food business purposes, the war
ranty conditions change.
●
Do not use the kettle without the filter.
A
B
Summary of Contents for CK1500
Page 22: ...24 CK1500 001_v01 CK1500 001_v01 Zelmer Zelmer ZELMER MAX o 8 8 8 RU...
Page 25: ...27 CK1500 001_v01 CK1500 001_v01 15 10 o 1 2 11 3 4 6 10 6 0 5 40 MAX 30 11 C PE...
Page 26: ...28 CK1500 001_v01 CK1500 001_v01 Zelmer Zelmer MAX 8 8 8 BG...
Page 29: ...31 CK1500 001_v01 CK1500 001_v01 1 2 11 3 4 6 10 6 0 5 l 40 g MAX 30 11 C...
Page 30: ...32 CK1500 001_v01 CK1500 001_v01 Zelmer Zelmer MAX 8 8 8 UA...
Page 50: ...Notes...