


78
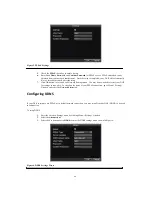
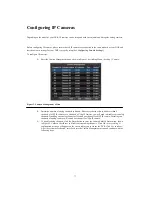
Figure 2. Camera Enabled Status Menu
4.
Select the Add button to enter IP Channel Settings menu, shown in Figure 3.
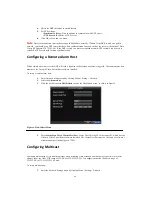
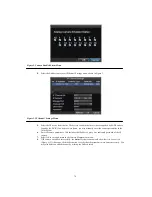
Figure 3. IP Channel Settings Menu
5.
Select the IP device from the list. The devices found in the list are those supported by SADP and are
found by the DVR. If no devices were found, you may manually enter the camera parameters in the
fields below.
6.
Enter IP camera parameters. This includes the IP address, ports, user name and password of the IP
camera.
7.
Select OK to save and return to the Camera Management menu.
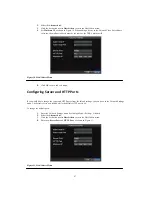
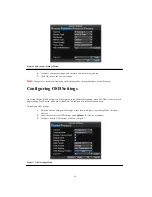
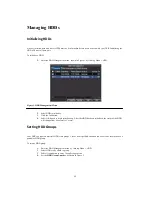
8.
If IP camera was added successfully, the
Status
for that camera would show that it is
Connected
(Figure 4)
.
If it does not, click the Set button to verify that the parameters were entered correctly. You
may also delete an added channel by clicking the Delete button.
Summary of Contents for XL-HDVR series
Page 1: ...XL HDVR Series USER S MANUAL...
Page 2: ...2...
Page 7: ...7 C H A P T E R 1 Introduction...
Page 17: ...17 C H A P T E R 2 Getting Started...
Page 23: ...23 5 Click the Apply button to save the setting...
Page 24: ...24 C H A P T E R 3 Live Preview...
Page 30: ...30 C H A P T E R 4 Record Settings...
Page 39: ...39 C H A P T E R 5 Playback...
Page 44: ...44 Figure 7 Digital Zoom Area Selection...
Page 45: ...45 C H A P T E R 6 Backup...
Page 50: ...50 C H A P T E R 7 Alarm Settings...
Page 61: ...61 C H A P T E R 8 Network Settings...
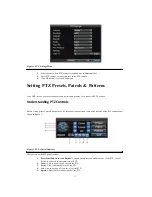
Page 69: ...69 C H A P T E R 9 PTZ Controls...
Page 76: ...76 C H A P T E R 1 0 Camera Management...
Page 83: ...83 C H A P T E R 1 1 HDD Management...
Page 89: ...89 C H A P T E R 1 2 DVR Management...
Page 101: ...101 C H A P T E R 1 2 Appendix...


