4. Selecting Sounds
Getting Started
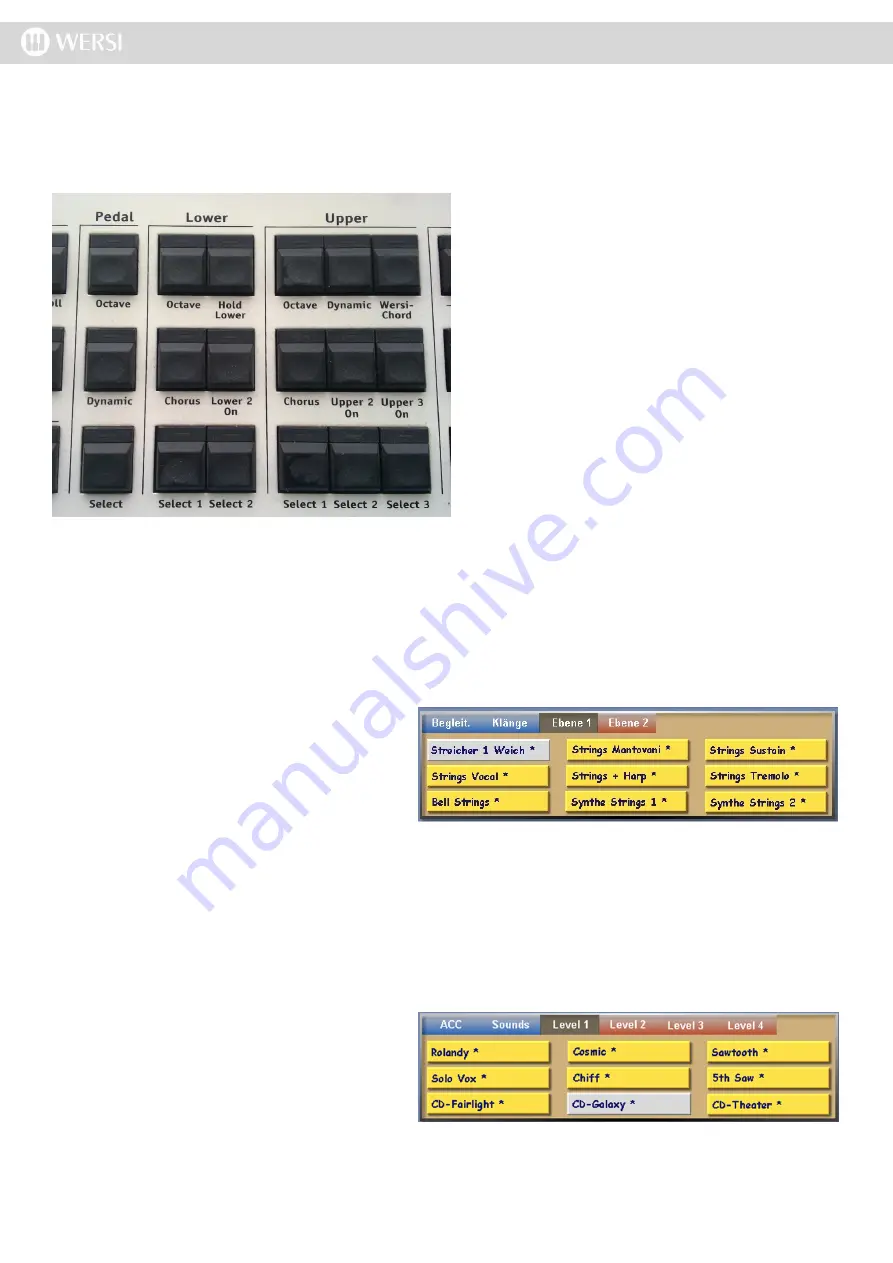
To assign a specific sound to the Upper, Lower Manual or Pedals, you must first push a ‘Select’ push button.
i.e first you need to define the ‘target’ for the sound as
-
signment.
The Upper Manual can have three different sounds as
-
signed to it and the Push Buttons ‘Select 1, Select 2 and
Select 3’ in the Upper group are used to select one of
these three ‘targets’. Alternatively you can choose the
‘target’ by touching one of the six selectors on the Main
Display via the TFT screen.
The Lower Manual can be the ‘target’ for two different
sounds that are selected with the ‘Select 1 and Select 2’
push buttons in the Lower group.
The Pedals can only accept one sound. Push the
‘Select’ push button in the Pedal group to select the
Pedal as the ‘sound target’.
The ‘Select 1 sounds assigned to both manuals and pedal are always active (always on), while the sounds assigned
with ‘Select 2 and ‘Select 3’ for the Upper Manual, and ‘Select 2’ for the Lower Manual will only be audible when the
push buttons ‘Upper 2 On’, ‘Upper 3 On’ and / or ‘Lower 2 On’ are active. If a sound is active, you will see small Piano
Manuals in the corresponding fields on the Main Display, indicating the playable manual section of this selector, while
these will be missing from the Main Display when the section is inactive.
After you have selected a ‘target’ for a sound-assignment, with one of the ‘SELECT’ push buttons, you should press
one of the ‘Sound Buttons’ in the right hand control panel (to the right of the TFT Display). i.e a push button in the
OR-
GAN, PERCUSSION, ENSEMBLE, BRASS, TRADITIONAL, SYNTHESIZER or PEDAL
groups.
Once you have pressed one of the Sound Groups,
on the Main Display will show the first nine sounds
housed in the Sound Group button. In our example
we have pressed the ‘Strings 1’ push button in the
‘Ensemble’ sound group.
The first sound is automatically selected for you.
To select any of the sounds located in this sound group, simply press one of the Yellow ‘Virtual Buttons’.the Button will
change colour to highlight the selected sound.
PLEASE NOTE: Sounds marked with an Asterisk (*) are called ‘Longwave Sounds’. The Instrument’s DSP
hardware generates these very high quality sounds.
Besides the sounds you can access by pressing the Sound Push Button (Strings 1 push button in our example), you
can use more sounds through changing the mapping level of your Sound-Button (if you press a Sound Button you
always access the first level of the sound Mappings stored in your Total Preset).
You can see in the screen shot to the right that the
sound family displays nine sounds. Above the
Yellow buttons, there are several buttons called
‘Level 1, Level 2, Level 3 etc. Press the desired
Level button to access even more sounds.
TIP: To quickly access the other sound levels of a Sound Push button, you can simply press the Sound Push
button several times to access the different sound levels. For example: Press the Strings 1 just once to see
Level 1. Press the button Twice to access Level 2, Press the button Three times to access Level 3 and so on.
Summary of Contents for Abacus
Page 1: ...Abacus Verona Vegas User Manual Edition 18 02 2011 V 1 Gedownload bij www wersi fan nl ...
Page 88: ...User Notes ...
Page 89: ...User Notes ...
Page 90: ...User Notes ...
Page 91: ...User Notes ...
Page 92: ...User Notes ...
Page 93: ...User Notes ...
Page 94: ...User Notes ...
Page 95: ...User Notes ...


