16.3 Other Buttons In the Selector Menu
There are three other buttons in the Selector Menu
•
Advanced -
Opens the Advanced Selector Settings (you can gain access to even more parameters for affecting
the sounds and manuals).
•
Sub-Presets
- This button opens the ‘Sub-Preset Menu’. This is a quick access overview area that allows you to
quickly see exactly what presets (for all aspects of the instrument) are currently selected, rather than having to go
into each sections own dedicated screen. Naturally you can make change any of the Sub-Preset selections at any
time. (Please note that you can not make direct adjustments to any of the Sub-Preset parameters from the Sub-
Presets Menu).
•
Sound Control
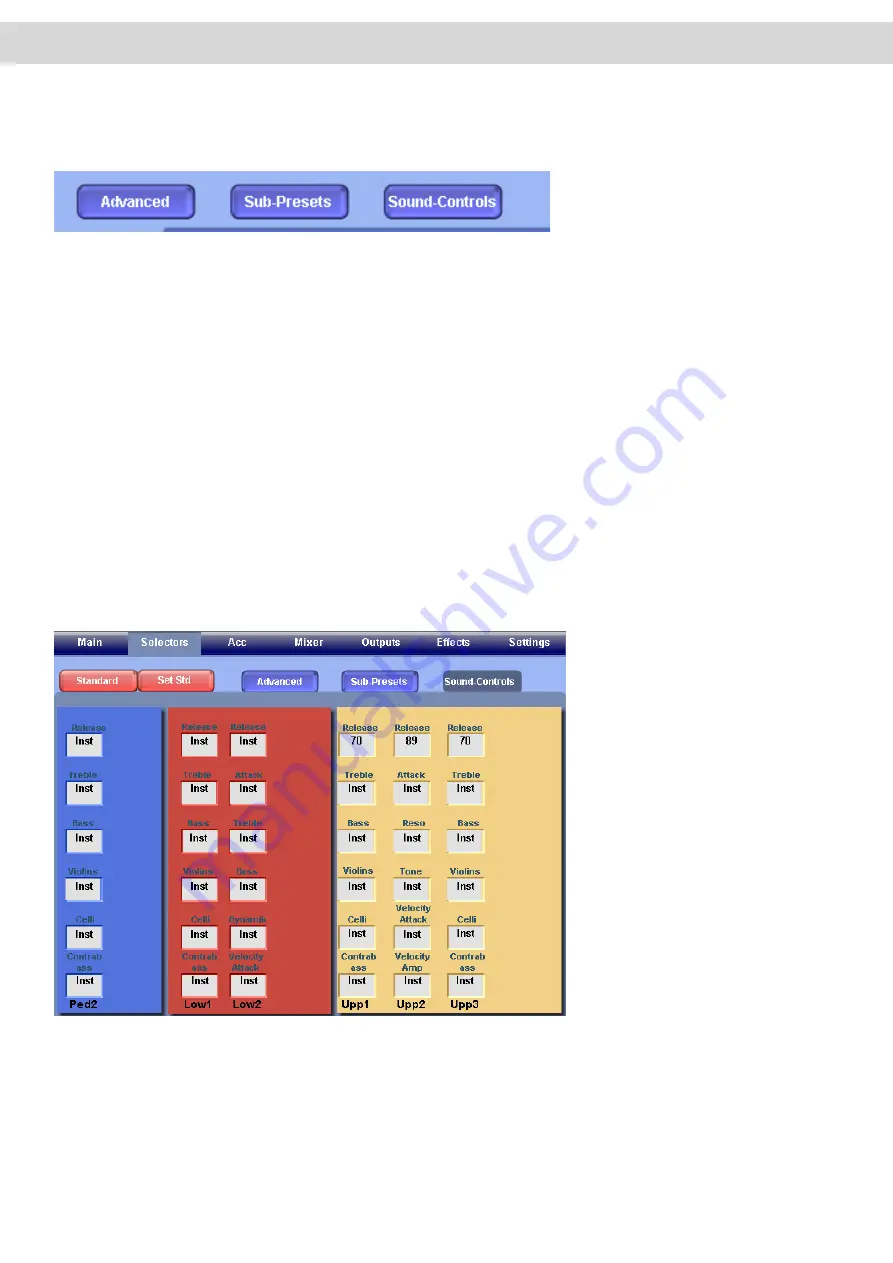
- As the name suggest, this is a ‘Sound Control’ menu. From the Sound Control display you can
make adjustments to the sounds that you have selected without needing to use the Sound Editor or save any
modifications to the sounds as a new User Sound.
16.4 Sound Control
Sound control is one of the most useful and easy to use ‘Sound Editing’ tools in the OpenArt-System. Every factory
sound has six changeable parameters assigned to them that can be quickly changed by opening the ‘Sound Control’
display.
To change any of the Sound Control settings, simply press the ‘Box’ that you wish to adjust and use the Data / Tempo
wheel to make the adjustments. The values that can be adjusted are from 0 to 127. 0 being that the intensity of the
setting is at it’s lowest parameter (Think of it as practically being turned off in most cases) whereas 127 is the maxi
-
mum value and is quite intense.
PLEASE NOTE: There are literally hundreds of changeable settings built into the OAS system and WERSI
have pre-set the six Sound Controls per sound. Please remember that often ‘Less is more’ in terms of adjust-
ments to sound values. Subtle changes are often advised over large alterations. Naturally though, we encour-
age you to experiment!
•
Fanfare Harmony
•
Fingered Harmony
•
Hymn Harmony
•
Normal Harmony
•
Solo-Voice
•
Theatre Harmony
Sound Control is laid out in the same
order as the Selector Controls.
To the far left of the screen (in Blue)
is the Sound Control section for the
Pedals.
In the middle (in Red) is the Sound
Control section for the Lower Manual.
To the Right (in a Light Yellow) is the
Sound Control section for the Upper
Manual.
At the bottom of the Screen, the sec
-
tions are clearly labelled by name.
Summary of Contents for Abacus
Page 1: ...Abacus Verona Vegas User Manual Edition 18 02 2011 V 1 Gedownload bij www wersi fan nl ...
Page 88: ...User Notes ...
Page 89: ...User Notes ...
Page 90: ...User Notes ...
Page 91: ...User Notes ...
Page 92: ...User Notes ...
Page 93: ...User Notes ...
Page 94: ...User Notes ...
Page 95: ...User Notes ...


