


41
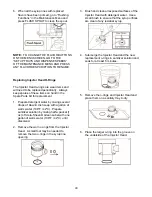
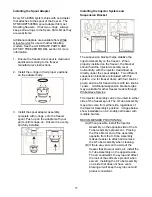
7. Apply food-grade lube to the two syrup port
o-rings and then place them into their
respective places inside the syrup port. A
small tool may be used to ensure the
o-rings are fully seated in the grooves.
NOTE:
O-RINGS MUST BE COMPLETELY
SEATED TO PREVENT LEAKAGE.
Miscellaneous Cleaning Procedures
The following parts of the STL-80SS do not
require daily cleaning. Inspect these areas
periodically and clean if necessary according to
instructions.
Prepare detergent water by mixing several
drops of Dawn
®
dish soap with a gallon of
warm water (108°F / 42°C). Prepare sanitizer
solution by mixing half a packet (1 oz) of Stera-
Sheen® Green Label with one gallon of warm
water (108°F / 42°C) until dissolved. Pour
approximately 16 oz. of sanitizer solution into a
spray bottle and set aside the rest.
NOTE:
DO NOT USE AN EXCESSIVE
AMOUNT OF WATER OR DETERGENT IN
CLEANING THE OUTSIDE OR INSIDE OF
THE CABINET.
Cleaning the Injector Assembly Suspension
Bracket
The Injector Assembly suspension bracket is
installed behind the freezer door. Therefore, it is
only removed to be sanitized when the freezer
barrel is empty. The bracket must be cleaned
and sanitized at least every 30 days, preferably
when the Clean-In-Place procedure is
performed. Follow these instructions to clean
and sanitize the suspension bracket.
NOTE:
YOU CAN USE THIS OPPORTUNITY
TO CLEAN THE FREEZER BARREL AND ITS
PARTS ACCORDING TO MANUFACTURER’S
INSTRUCTIONS.
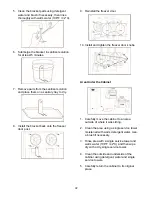
1. Ensure the freezer barrel is empty. If the
freezer has multiple barrels, ensure all
barrels are empty before proceeding.
2. Remove the door knobs from the freezer
door.
3. Remove the freezer door from the freezer.
4. Remove the suspension bracket from the
freezer door post.
Summary of Contents for STL-80SS
Page 2: ......
Page 9: ...6 PAGE INTENTIONALLY LEFT BLANK ...
Page 11: ...8 General System Overview Figure 1 ...
Page 13: ...10 Cabinet Continued Figure 2 ...
Page 17: ...14 Syrup Pump and Related Parts Figure 4 ...
Page 19: ...16 Sanitizer Pump and Related Parts Figure 5 ...
Page 23: ...20 Spare Parts Kit Figure 7 ...
Page 24: ...21 PAGE INTENTIONALLY LEFT BLANK ...
Page 36: ...33 PAGE INTENTIONALLY LEFT BLANK ...
Page 50: ...47 PAGE INTENTIONALLY LEFT BLANK ...
Page 73: ......
Page 74: ......


