DOC: 03-925461-00
DESC: Assy, PFPD Ignitor W/Cable
PAGE:
REV
3 of 7
1
PREPARED BY: Sax Makthepharack REVISED BY:
CONTROL: INDUSTRIAL ENGINEERING
REV. DATE:
SHOWN
-
01 - 13 - 00
Bob Vickroy
1.
PFPD IGNITOR W/CABLE ASSEMBLY PROCEDURES
1.1
IGNITOR CONNECTOR ASSEMBLY - (03-925162-00)
1.1.1
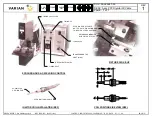
Place Ignitor Probe Insert (03-925164-00) into the holding tool T-8876. Obtain Connector (58-200020-00), screw onto the
holding tool T-8876 until it bottoms out. Insert two Pin Tube Assembles (03-925166-00) through the Connector into two holes on
the Ignitor Probe Insert.
Caution: Make sure the Pin Tube Assembly does not contact the Connector.
If necessary, swag top of connector to provide
additional clearance for Pin Tube Assembly. Place the assembly into the holding fixture tool T-4161.
1.2
FIXING/EPOXY IN PLACE
1.2.1
Using a digital Scale, turn on scale, place 100ml beaker on scale and zero. Using metal spatula, place 50g of Duralco 4700 Ultra
Hi-temp Epoxy (88-900909-00) resin into beaker. Clean spatula with Kim-Wipe. Zero scale. Add 14g of Duralco 4700 hardener
to beaker containing Duralco 4700 resin. Mix (fold) to avoid entrapment of air until completely mixed. Place dispensing tip onto
30cc disposable barrel. Using glass spatula (or glass stirring rod) as an aid, transfer epoxy into 30cc disposable barrel of
previous step 1.1.7. Set pneumatic dispenser to 10psi, and back pressure regulator to 1/4 turn (adjust as required), set timer to
off.
Caution: Do not allow epoxy to back flow into adapter tubing.
1.2.2
Epoxy Ignitor Probe Insert and Pin Tube Assembly in place, cure it. Curing: Place fixture T-4161 and assembled parts in oven
start at 50°c and raise at 5°c per minute until part gets to 105°c for 2 hours followed by 4 hours at 175°c.
Continue next page...

