82
03-914648-00:7
Manual Pneumatics
Tools and
equipment
needed
•
Bubble or electronic flowmeter, e.g., Varian Intelligent Digital
Flowmeter, 01-900115-00
1
Turn the 1079 Split Flow Controller (on the GC pneumatics panel)
counterclockwise to open the split flow controller.
2
Adjust the Back Pressure Regulator (on the GC pneumatics panel)
to establish a positive column head pressure (monitored on the
pressure gauge).
Note:
Set the column head pressure based on the column
installed in the GC. For example, for a 30M x 250 µm ID column,
set the column head pressure to 12-15 psig to achieve
∼
1 mL/min
column flow rate at 50
°C oven temperature (helium).
3
Connect the flowmeter to the split vent on the left side of the GC
and measure the split vent flow rate. Turn the Split Flow Controller
valve to adjust the split vent flow rate to 50 mL/min.
4
Adjust the Septum Purge Needle valve to adjust the septum purge
flow rate to 3-5 mL/min. Readjust the split vent flow rate to
50 mL/min.
5
Before heating the column, purge the system with carrier gas for
10 - 15 minutes.
1079 Modes of Operation
The 1079 can be operated in several modes, depending on the nature of the
sample and requirements of the analysis. When designing an injection
method the most important parameters are:
•
the injector insert used and the position of the column within the insert;
•
the injector and column temperature when the injection is made;
•
the carrier gas flow profile through the injector.
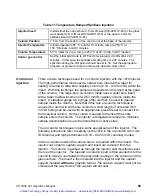
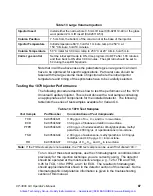
The following is a brief description of the method parameters used for each
injection mode. In all cases Electronic Flow Control is used for carrier gas
control.
Artisan Technology Group - Quality Instrumentation ... Guaranteed | (888) 88-SOURCE | www.artisantg.com


