CP-3800 GC Operator’s Manual
145
ECD
Installation
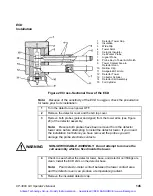
Figure 20 Cross-Sectional View of the ECD
Note:
Because of the sensitivity of the ECD to oxygen, check the pneumatics
for leaks prior to its installation.
1
Turn the detector oven power OFF.
2
Remove the detector cover and the GC top cover.
3
Remove both probes (pulser and signal) from the tower arms (see Figure
20) of the detector assembly.
Note:
Be sure both probes have been removed from the detector
tower arms before attempting to install the detector tower. If you insert
the installation tool before you have removed the probes you will
damage the probe electrode contacts.
WARNING
NON-SERVICEABLE ASSEMBLY. Do not attempt to remove the
cell assembly which is fixed inside the tower.
4
Check to see whether the detector tower, base, and detector cell fittings are
clean. Install the ECD shim on the detector base.
Note:
Poor metal-to-metal contact between the tower contact area
and the detector oven can produce a temperature gradient.
5
Remove the insulated detector cap.
1
Detector Tower Cap
2 Insulation
3 Wide
Clip
4 Tower
Arms
5 Ceramic
Insulator
6 Cell-Pulser
Probe
7 Signal
Probe
8
Probe Key in Tower-Arm Notch
9
Tower Contact Area to
Detector
Oven
10 Narrow
Clip
11 Swagelok®
Ferrule
12 Detector
Tower
13 Collector
Cylinder
14 Detector Cell Assembly
15 Foil
Cylinder
Artisan Technology Group - Quality Instrumentation ... Guaranteed | (888) 88-SOURCE | www.artisantg.com


