MAINTENANCE
550E MM149 (6--97)
3-30
BRAKES AND TIRES
SERVICE BRAKES
The service brakes are hydraulically activated by
a master brake cylinder.
Check the master brake cylinder fluid level after
every 50 hours of operation and add brake fluid
as needed. The master brake cylinder is located
at the front of the machine. Open the side access
door for access to the master cylinder.
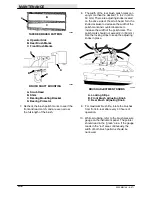
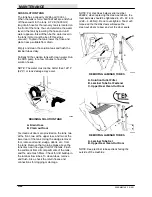
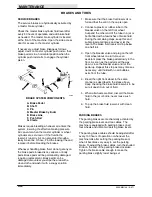
If necessary, adjust brake linkage as follows:
adjust clevis on master cylinder push rod so that
brake pedal is in a horizontal position when the
cylinder push rod starts to engage the cylinder
piston.
C
B
A
D
F
G
E
00105
BRAKE SYSTEM COMPONENTS
A. Brake Pedal
B. Shaft
C. Pin
D. Master Brake Cylinder
E. Brake Line
F. Push Rod
G. Clevis
Brakes require bleeding whenever air enters the
system, lowering the effective braking pressure.
Air can enter when the master cylinder or wheel
cylinders are serviced or if the fluid in the
reservoir runs dry. Air can also enter through a
leaky brake line or hose. Find the leaking line and
replace it before bleeding the brakes.
Whenever handling brake fluid, do not get any on
the brake pads, brake discs, calipers, or body
paint. Brake pads will be permanently damaged,
requiring replacement. Body paint can be
damaged also unless you wipe the area with a
clean cloth and wash it with a soapy solution
immediately.
1. Make sure that the brake fluid reservoir is
full and that the vent in the cap is open.
2. Connect a plastic or rubber tube to the
bleeder valve on the left front wheel.
Suspend the other end of the tube in a jar or
bottle filled with a few inches of brake fluid.
During the remaining steps, keep this end
submerged at all times and never let the
level in the brake fluid reservoir drop below
one half full.
3. Open the bleeder valve and plug on the left
front wheel about one turn. Have an
assistant press the brake pedal slowly to the
floor. As soon as the pedal is all the way
down, close the bleeder valve and let the
pedal up. Repeat this step as many times as
necessary, until fluid with no air bubbles
exits from the tube.
4. Bleed the right front wheel in the same
manner as described in the steps above.
Keep checking the brake fluid reservoir to be
sure it doesn’t run out of fluid.
5. When all wheels are bled, discard the brake
fluid in the jar or bottle; never reuse such
fluid.
6. Top up the brake fluid reservoir with clean
fluid.
PARKING BRAKES
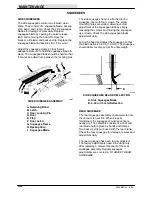
The parking brakes are mechanically activated by
the parking brake lever and two cables. The
machine is equipped with parking brakes on all
four wheels and utilize two parking brake levers.
The parking brake cables should be adjusted after
every 100 hours of operation or whenever the
machine rolls after setting the parking brake or
when it becomes very easy to set the parking
brake. To adjust the brake cables, turn the knurled
knob on the end of the parking brake clockwise.
Tighten the brake cable enough to make the
parking brake slightly resist being set.
Summary of Contents for 550
Page 10: ...GENERAL INFORMATION 550E MM149 3 94 viii ...
Page 12: ...OPERATION 550E MM149 3 91 2 2 ...
Page 30: ...OPERATION 550E MM149 9 00 2 20 ...
Page 32: ...MAINTENANCE 550E MM149 3 91 3 2 ...
Page 62: ...MAINTENANCE 550E MM149 2 05 3 32 ...
Page 66: ...APPENDIX 550E MM149 3 91 4 4 ...
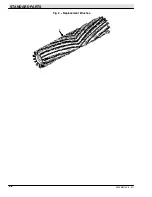
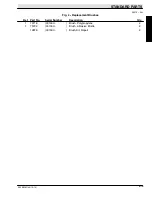
Page 74: ...STANDARD PARTS 550E MM149 5 01 6 4 Fig 2 Replacement Brushes 1 ...
Page 96: ...STANDARD PARTS 550E MM149 5 01 6 26 Fig 17 Electric Motor Group 1 2 3 4 5 6 ...
Page 105: ...STANDARD PARTS 6 35 550E MM149 5 01 Fig 23 Electrical Schematic 1 2 3 4 5 01228 550E ...
Page 106: ...STANDARD PARTS 550E MM149 5 01 6 36 Fig 23 Electrical Schematic 1 2 3 4 5 01228 550E ...
Page 117: ...STANDARD PARTS 6 47 550E MM149 5 01 Fig 31 Hydraulic Schematic 001330 005607 02361 550E ...
Page 118: ...STANDARD PARTS 550E MM149 5 01 6 48 Fig 32 Hydraulic Schematic 005608 11118 550E ...
Page 168: ...OPTIONS 550E MM149 9 99 8 18 ...
Page 182: ...BREAKDOWNS 550E MM149 10 10 9 14 ...


