


TASCAM SS-CDR250N / SS-R250N
15
2 – Names and Functions of Parts
files within the same folder. (See “Navigating the BROWSE
screen” on page 42.)
Button functions
i
When the Home Screen is open and the unit is stopped,
recording, in recording standby, playing back or in play-
back standby, press this button to add a mark. (See “Adding
marks manually when recording” on page 68.), (See
“Adding marks” on page 87.)
i
When a Menu Screen is open, press to confirm selections
and settings (ENTER button function).
i
When the
BROWSE
screen is open, press this to show the
pop-up folder/file menu for the selected folder/file. (See
“Folder operations” on page 43.),(See “File operations” on
page 44.)
CAUTION
Marks cannot be added when the current medium is
CD
.
p
STOP button/STOP [LOAD] button (SS-CDR250 only)
i
Press to stop playback or recording.
i
When the playback area is set to
PROGRAM
and playback is
stopped, press to clear the entire program.
i
Press this button while pressing and holding the SHIFT
button to start flash loading (SS-CDR250N only).
a
PLAY button/indicator
i
Press when stopped or in playback standby to start play-
back.
i
Press when in recording standby to start recording.
i
This button lights during playback and recording.
i
This button blinks during jog playback.
s
PAUSE [CALL] button/indicator
i
Press when stopped or playing back to start playback
standby.
i
Press when recording to start recording standby.
i
This button lights when in playback standby or recording
standby.
i
This button blinks during jog playback.
i
When in playback standby, press this button to search for
the call point (last point playback started from playback
standby) and resume playback standby. (See “Using the call
function” on page 39.)
d
RECORD [TRK INC] button/indicator
i
Press when stopped to start recording standby.
i
When recording, press to divide the recording by creating a
new file (increment the track number).
i
This button lights when recording or in recording standby.
i
If the currently-selected medium is not loaded, pressing
this button starts input monitoring and the selected input
signal will be output. This button blinks during input moni-
toring.
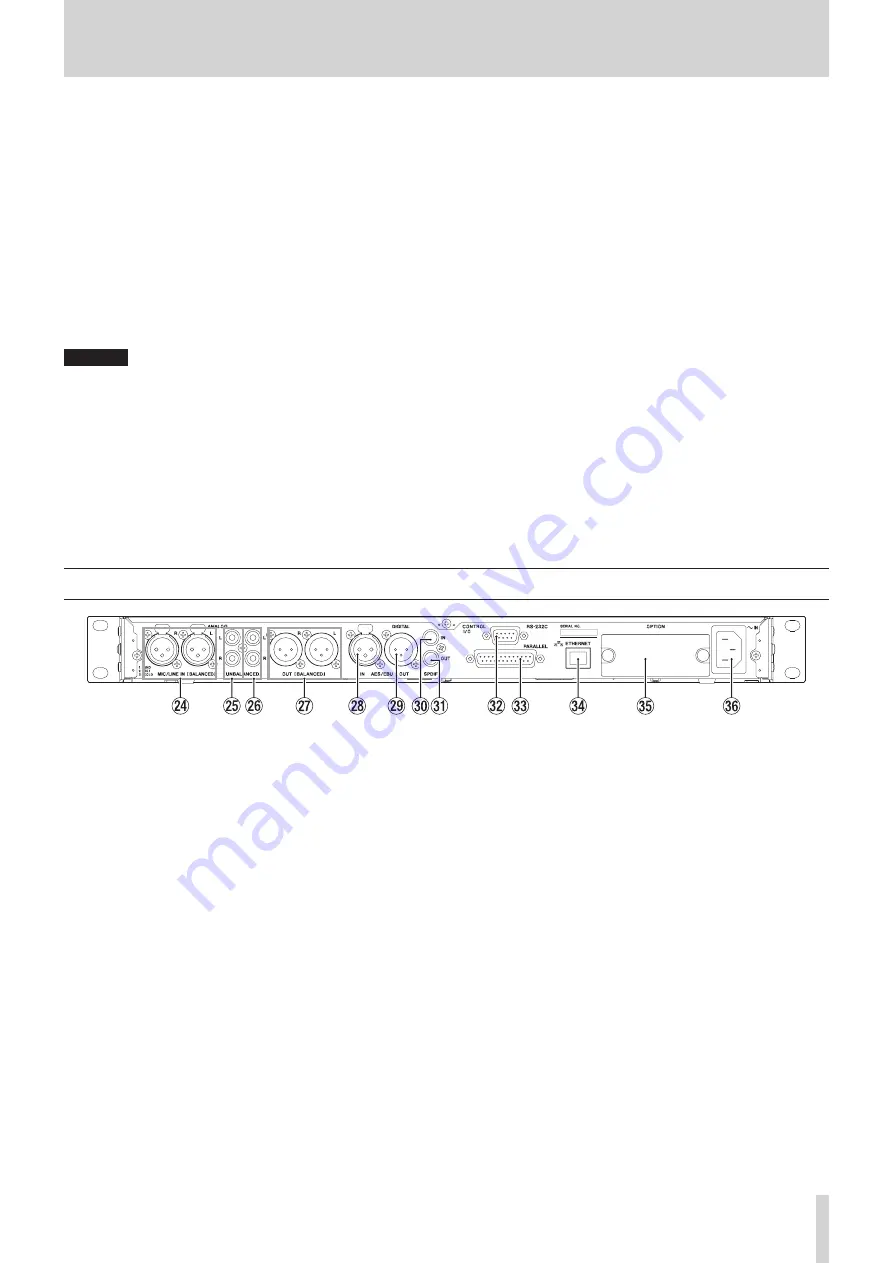
Rear panel
f
MIC/LINE IN (BALANCED) L/R jacks
These are balanced XLR analog input jacks.
i
The nominal input level can be set to 4 dBu (default)
or +6 dBu. (1: GND, 2: HOT, 3: COLD),(See “Setting the refer-
ence level” on page 96.)
i
By changing the input sensitivity, you can use these as mic
inputs. (See “Setting mic/line input sensitivity” on page
58.)
g
ANALOG IN (UNBALANCED) L/R jacks
These are analog RCA pin input jacks.
The nominal input level is -10 dBV.
h
ANALOG OUT (UNBALANCED) L/R jacks
These are analog RCA pin output jacks.
The nominal output level is -10 dBV.
j
ANALOG OUT (BALANCED) L/R jacks
These are balanced XLR analog output jacks.
The nominal output level can be set to 4 dBu (default)
or +6 dBu. (1: GND, 2: HOT, 3: COLD), (See “Setting the refer-
ence level” on page 96.)
k
AES/EBU IN jack
This is a balanced XLR AES3-2003/IEC60958-4 (AES/EBU) format
digital audio input jack.
A sampling rate converter that supports 32–192 kHz is built-
in.(See “Using the sampling rate converter” on page 64.)
To link a second
SS-CDR250N/
SS-R250N, connect the
AES/
EBU OUT
jack on the other unit to this jack. (See “Making
connections for link playback” on page 40.)
l
AES/EBU OUT jack
This is a balanced XLR AES3-2003/IEC60958-4 (AES/EBU) format
digital audio output jack.
To link a second
SS-CDR250N/
SS-R250N, connect the
AES/
EBU IN
jack on the other unit to this jack. (See “Making con-
nections for link playback” on page 40.)
;
SPDIF IN jack
This is a digital audio input jack.
A sampling rate converter that supports 32–192 kHz is built-
in.(See “Using the sampling rate converter” on page 64.)
To link a second SS-R250N, connect the SPDIF OUT jack on
the other unit to this jack. (See “Making connections for link
playback” on page 40.)


