background image

SVP08-0/1/2/3 - Code: 3529.0231.01

Rev. F

dated 02/07/2015

Arc. 66-IV

PT

0715

MV

0715

MC

0715

Service

Phone (+39) 0445.595.111

23

4.

Product specification

4.1

General description

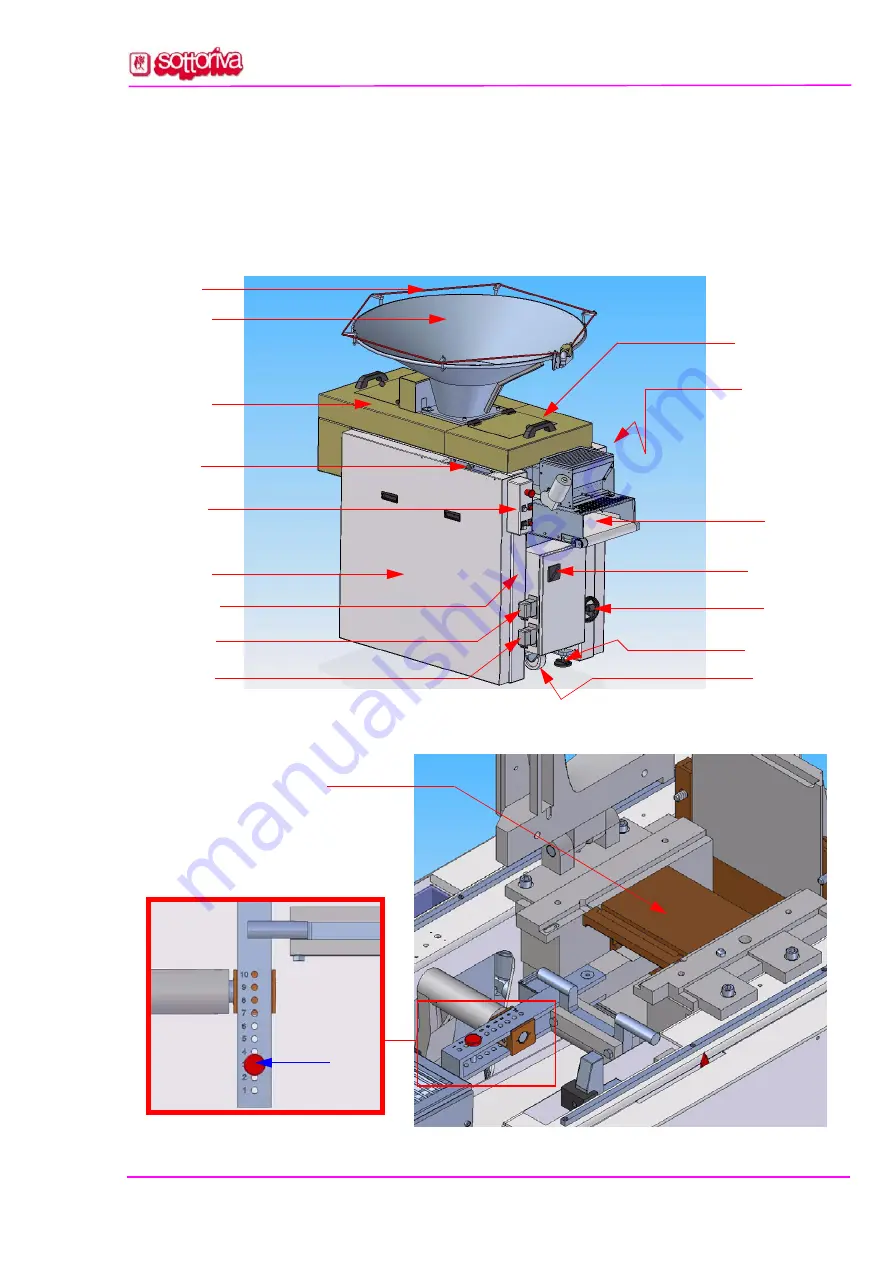
Fig. 4   Overview

Fig. 5    View of the front piston

1

2

3

4

5

6

7

8

9

10

11

12

13

A

B

14

15

16

Summary of Contents for SVP08-0

Page 1: ...0 1 2 3 Version ENGLISH Arc 66 Code 3529 0231 01 Revision F dated 02 07 2015 Costruzioni Meccaniche SOTTORIVA S p A Via Vittorio Veneto 63 36035 MARANO VICENTINO VI ITALY Tel 39 0445 595 111 Fax 39 0...

Page 2: ......

Page 3: ...s and checks 13 2 3 General precautions Prohibitions 15 2 4 General precautions Workplace 15 2 5 Emergency fire regulations 16 2 6 Hygiene rules for the use of lubricants 16 2 7 First aid regulations...

Page 4: ...ic circuit Not applicable to the machine 32 5 4 4 Connection to the pneumatic circuit Not applicable to the machine 32 5 4 5 Consumables 32 5 4 5 1 Table of lubricants 33 5 5 Commissioning 34 5 5 1 Gr...

Page 5: ...4 50 7 4 1 5 Replacement of the main piston ref 1 Fig 13 a pag 51 51 7 4 1 6 Replacement of the secondary piston ref 3 Fig 13 a pag 51 52 7 4 2 Electrical maintenance 52 7 4 2 1 Resetting a thermal cu...

Page 6: ...Rev F dated 02 07 2015 SVP08 0 1 2 3 Code 3529 0231 01 4 Service Phone 39 0445 595 111 PT 0715 MV 0715 MC 0715 Arc 66 ig...

Page 7: ...o the machine the nameplate is in aluminium with the text punched or screen printed onto it in an indelible manner Fig 1 Nameplate Fig 2 Location of nameplate C M SOTTORIVA S p A Via Vittorio Veneto 6...

Page 8: ...Parts section should any part of the machine need to be replaced as a consequence of failure or expiry All the information drawings diagrams tables and other contents of the Manual are reserved and m...

Page 9: ...ttention of the user to the correct and safe use of the machine the Manual also uses the following symbols Remark The Manufacturer reserves the right to make available at any time any further informat...

Page 10: ...ted Manual It indicates a particularly important rule mentioned in the document pointed out by the orange line Indicates that safety glasses must be worn during the operation in question Indicates tha...

Page 11: ...l adjust commission service and repair the machine Operator A staff member who operates the machine in its normal duty actuation of controls loading objects monitoring production cleaning surfaces and...

Page 12: ...machine will be correctly done replacing immediately every single piece that can get in contact with the food dough flour water etc and that seem to be adultered ruined or not more suitable for a cor...

Page 13: ...ce Department The Manufacturer s telephone number is given at the foot of each page of this Manual the cover also gives the Manufacturer s fax number and email address 1 6 3 Spare parts The drawings r...

Page 14: ...Rev F dated 02 07 2015 SVP08 0 1 2 3 Code 3529 0231 01 12 Service Phone 39 0445 595 111 PT 0715 MV 0715 MC 0715 Arc 66 I Remark This page intentionally left blank...

Page 15: ...Always use the ISE prescribed for each specific operation z The workplace must be adequately illuminated for the tasks in hand Insufficient or excessive lighting is hazardous z Check that the power su...

Page 16: ...the wiring diagrams provided by the Manufacturer along with this Manual z Provide adequate fire equipment in the working area as specified by the Fire Service z Check the wear of all electrical cablin...

Page 17: ...g the exposure of workers to the risks arising from physical agents artificial optical radiation z Directive 91 156 EEC of 18 3 1991amending directive 75 442 EEC on waste Directive 91 689 EEC of 12 12...

Page 18: ...s against the hazard constituted by the fluids they contain 2 6 Hygiene rules for the use of lubricants Warning Provide CO2 and powder extinguishers in the workplace To prevent fire keep the machine c...

Page 19: ...s for the use of lubricants For first aid regulations refer to the safety sheets of the lubricants in use Remark Refer to the safety sheets of the lubricants in use as regards their hygienic use Keep...

Page 20: ...Rev F dated 02 07 2015 SVP08 0 1 2 3 Code 3529 0231 01 18 Service Phone 39 0445 595 111 PT 0715 MV 0715 MC 0715 Arc 66 II Remark This page intentionally left blank...

Page 21: ...must be secured Remark Check that the consignment corresponds to the specification of supply Check that the machine has not suffered damage during shipping and that the packaging has not been tampere...

Page 22: ...icult to brake To move the machine proceed as follows 1 remove the upper guards ref 1 and 11 Fig 4 on page 23 2 attach the ropes as shown in Fig 3 on page 20 to a lifting device crane bridge crane hoi...

Page 23: ...oor itself With the exception of the front of the machine which is used by the operator and requires greater clearance leave a space of at least 50 cm around the sides of the machine for access during...

Page 24: ...production and cooking of bakery products must z permit access for the passage of the largest parts of the machine z be constructed in accordance with established legislation z have a flat even floor...

Page 25: ...01 Rev F dated 02 07 2015 Arc 66 IV PT 0715 MV 0715 MC 0715 Service Phone 39 0445 595 111 23 4 Product specification 4 1 General description Fig 4 Overview Fig 5 View of the front piston 1 2 3 4 5 6 7...

Page 26: ...Operational principles The machine s operation is divided into cycles of variable length as follows 1 loading the machine 2 apportioning the dough 3 unloading the dough 4 cleaning the machine 4 3 Main...

Page 27: ...the dividing zone from the hopper 4 5 Technical specifications Fig 7 a pag 26 shows the overall dimensions of the machine the diameter D of the hopper mouth varies depending on the hopper capacity as...

Page 28: ...02 07 2015 SVP08 0 1 2 3 Code 3529 0231 01 26 Service Phone 39 0445 595 111 PT 0715 MV 0715 MC 0715 Arc 66 IV Fig 7 Overall dimensions 4 6 Power consumption Refer to the wiring diagrams attached to t...

Page 29: ...4 9 Production and elimination of waste material The entire mass of dough produced by the machine is used in further processing Any waste consisting of dough not further processed must be collected an...

Page 30: ...chamber and removal of any leftover dough contained in it must be carried out in accordance with the instructions indicated in 7 3 Periodic cleaning on page 47 which facilitate the cleaning operation...

Page 31: ...to the machine The free end of each hatch when closed overlaps the metal guard cover therefore no openings exist The microswitch is triggered when the hatch is raised by 25 mm max from its resting pos...

Page 32: ...t has been designed and constructed in compliance with the safety regulations and technical specifications of EN 60204 1 Danger DANGER ZONE 5 area comprising the brush and hopper of the flour duster r...

Page 33: ...ose of the hopper 3 fasten the hopper with the 4 screws supplied 4 raise the upper guard ref 1 Fig 4 on page 23 5 connect the hopper cable to the connector which is attached to the machine frame 6 clo...

Page 34: ...4 4 Connection to the pneumatic circuit Not applicable to the machine 5 4 5 Consumables The dividing area of the machine must be kept lubricated and for this purpose it is equipped with an oil pump r...

Page 35: ...duced first unscrew the plastic cover and then rotate the six screws in a clockwise direction by one or more increments To increase the quantity of oil rotate the screws in an anticlockwise direction...

Page 36: ...he power socket 3 ensure that the motors revolve in the correct direction 4 set the master power switch to position 1 the indicator lamp ref 7 Fig 11 on page 40 will illuminate to indicate power ON 5...

Page 37: ...this case either of the black wires may be swapped with the brown one If the cable is three phase ground there is only one black wire swap it with the brown wire Warning Never disconnect the yellow gr...

Page 38: ...to 7 3 Periodic cleaning on page 47 3 cover the machine to protect it against dust 4 post an Out of service notice on the machine Operator If the machine must be put out of service for any reason proc...

Page 39: ...e plug from the mains power socket 6 2 Safety precautions The working positions normally occupied by the operator are shown in Fig 6 on page 24 and are indicated with Lp Supervisor The supervisor must...

Page 40: ...c which may be damaged worn or no longer suited to the hygienic treatment of foodstuffs 6 5 Improper use The following prohibitions do not cover all possible incorrect uses of the machine but relate o...

Page 41: ...Arc 66 VI PT 0715 MV 0715 MC 0715 Service Phone 39 0445 595 111 39 6 7 Machine controls Fig 10 Master power switch The machine is controlled by z a master power switch ref 1 Fig 10 located on the ele...

Page 42: ...z a divider stop button ref 4 z a machine stop button ref 5 z a start button ref 6 z a white indicator lamp ref 7 which indicates power ON Furthermore the following control and adjustment devices are...

Page 43: ...41 Fig 12 Instructions for the adjustment R Type Reducer KAFO Type Reducer Fig 12 Fig 12 B Fig 12 A Fig 12 Fig 12 B Fig 12 A CORRECT position for R reducer CORRECT position for R reducer WRONG positio...

Page 44: ...nt with R reducer e g SVP08 1 R then before starting it select the desired number of rows 1 or 2 and proceed as follows 1 lock the pin ref 1 Fig 12 on page 41 in the raised position the machine will w...

Page 45: ...trary if the machine is equipped with reducer KAFO you have to check the Table 6 on page 44 6 load the dough to be apportioned into the hopper 7 then switch on the machine using the master power switc...

Page 46: ...2300 7 90 105 675 770 1280 1460 1740 1980 2300 2600 8 105 125 770 900 1460 1700 1980 2300 2600 3000 9 125 135 2300 2460 3000 3200 10 135 150 2460 2700 3200 3500 Plug hole n Index SVP08 0 g min max SVP...

Page 47: ...the machine stop button ref 5 Fig 11 on page 40 to stop the machine normally z in emergency press the mushroom head button ref 2 Fig 11 to trigger the emergency stop The emergency stop devices should...

Page 48: ...Rev F dated 02 07 2015 SVP08 0 1 2 3 Code 3529 0231 01 46 Service Phone 39 0445 595 111 PT 0715 MV 0715 MC 0715 Arc 66 VI Remark This page intentionally left blank...

Page 49: ...ke certain that the machine may not be started up even unintentionally to do this set the master power switch ref 1 Fig 10 on page 39 to position 0 and disconnect the plug from the mains supply Wear g...

Page 50: ...r proceed as follows remove the interlocking upper guards each of which is connected to a safety microswitch remove screws ref 7 Fig 13 rotate the hopper and tip it onto its side as shown in Fig 13 ex...

Page 51: ...ve the piston ref 3 Fig 13 clean thoroughly the piston ref 3 Fig 13 also clean the chamber in which it is housed reinsert the piston ref 3 Fig 13 lower the block ref 5 Fig 13 insert the plug ref 4 Fig...

Page 52: ...base ref 8 Fig 14 until the belt can be extracted from the pulley groove 3 keeping the base raised fit the new belt 4 refit the side guards securing them with the relative fixing screws 7 4 1 4 Repla...

Page 53: ...Replacement of the main piston ref 1 Fig 13 on page 51 To replace the main piston proceed as follows remove the upper covers fixed joint placed and connected to as many safety micro switches remove t...

Page 54: ...t the safety pin ref 4 Fig 13 re assemble the protection covers 7 4 2 Electrical maintenance 7 4 2 1 Resetting a thermal cut out To reset a thermal cut out perform the following steps in order 1 set t...

Page 55: ...he correct tension z With the suitable manual pump supplied with the machine grease the connect ing rods through the lubricators ref 1 Fig 14 B and ref 1 Fig 14 C on page 55 using only grease type Mob...

Page 56: ...intervals Table 7 Checks and maintenance operations to be carried out daily weekly and quarterly COMPONENT INTERVENTION PERIODICITY PERFORMED BY Dividing chamber Cleaning see para 7 3 1 1 and 7 3 1 2...

Page 57: ...5 1 Replacing the divider motor ref 7 Fig 14 on page 55 To replace the motor perform the following operations in order 1 remove the belt ref 2 Fig 14 as described in par 7 4 1 2 1 1 2 3 4 5 6 7 8 9 1...

Page 58: ...rew 13 align the pulleys ref 7 and 4 Fig 14 14 secure the spacers inside the slots of the motor base using the fixing screws 15 reposition the pivot and pass the threaded rod through it ref 10 Fig 14...

Page 59: ...s to the terminal block of the new motor 9 Insert the motor into the machine and loosely secure it using the 4 screws 10 refit the belt ref 6 Fig 14 and tension it 11 securely fasten the motor to the...

Page 60: ...4 2 1 on page 52 z Fuse blown z Replace fuse See par 7 4 2 2 on page 53 z Motor faulty z Replace motor See par 7 5 1 on page 55 and par 7 5 2 on page 57 z START button faulty z Replace it See par 7 4...

Page 61: ...machine is made of ferrous materials which must be recycled as such 9 Attached documentation The following documentation is attached to this Manual z Declaration of conformity z Power circuit wiring d...

Page 62: ...Rev F dated 02 07 2015 SVP08 0 1 2 3 Code 3529 0231 01 60 Service Phone 39 0445 595 111 PT 0715 MV 0715 MC 0715 Arc 66 VIII IX X Remark This page intentionally left blank...

Page 63: ...ces These stickers do not replace the safety instructions given in the Manual nor may they be considered the sole precautions to be observed They are to be considered as an aid to the machine s operat...

Page 64: ...ts on page 11 Hazard of entrapment entrainment of the hands ref 1 Yellow background black symbol and border Hazard of entrapment shearing of the hands ref 2 Yellow background black symbol and border E...

Page 65: ...s and spare parts For the list of spare parts refer to the parts subject to wear indicated in negative in the following tables Fig 16 Overall view of the 4 assemblies Ref Fig Description Quantity 1 Fi...

Page 66: ...Rev F dated 02 07 2015 SVP08 0 1 2 3 Code 3529 0231 01 64 Service Phone 39 0445 595 111 PT 0715 MV 0715 MC 0715 Arc 66 XII Fig 17 View of Dividing Assembly List 1...

Page 67: ...40011 9 Fig 17 Lever 32360010 32360010 32360010 32360010 10 Fig 17 Front lever 32360056 32360056 32360056 32360056 11 Fig 17 Blade support 32420080 32420080 32420080 32420080 12 Fig 17 Support 3245000...

Page 68: ...Rev F dated 02 07 2015 SVP08 0 1 2 3 Code 3529 0231 01 66 Service Phone 39 0445 595 111 PT 0715 MV 0715 MC 0715 Arc 66 XII Fig 18 View of Weight Adjustment Assembly List 2...

Page 69: ...aw anti shock bar 30220209 30220209 30220209 30220209 14 Fig 18 Ring 30600112 30600112 30600112 30600112 15 Fig 18 Spacer 30600509 30600509 30600509 30600509 16 Fig 18 Pulley washer 30610424 30610424...

Page 70: ...Rev F dated 02 07 2015 SVP08 0 1 2 3 Code 3529 0231 01 68 Service Phone 39 0445 595 111 PT 0715 MV 0715 MC 0715 Arc 66 XII Fig 19 View of Outfeed Conveyor Belt Assembly List 3...

Page 71: ...30440000 7 Fig 19 Driven roller 30450750 30450750 30450750 30450750 8 Fig 19 Washer 30600377 30600377 30600377 30600377 9 Fig 19 Belt frame cap 31010527 31010527 31010527 31010527 10 Fig 19 Motor pull...

Page 72: ...Rev F dated 02 07 2015 SVP08 0 1 2 3 Code 3529 0231 01 70 Service Phone 39 0445 595 111 PT 0715 MV 0715 MC 0715 Arc 66 XII Fig 20 View of Transmission Assembly List 4...

Page 73: ...or support 30050067 30050067 30050067 30050067 19 Fig 20 Con rod shaft 30050785 30050785 30050785 30050785 20 Fig 20 Gooseneck shaft 30050788 30050788 30050786 30050786 21 Fig 20 Shaft 30050789 300507...

Page 74: ...0888 32200888 32200888 32200888 52 Fig 20 Con rod 32360008 32360008 32360008 32360008 53 Fig 20 Con rod 32380009 32380009 32380009 32360011 54 Fig 20 Con rod 32380010 32380010 32380010 32380010 55 Fig...

Page 75: ...Connection to the hydraulic circuit Not applicable to the machine 32 Connection to the pneumatic circuit Not applicable to the machine 32 Consumables 32 Correct use of the machine 38 Customer s respo...

Page 76: ...oduction and purpose of manual 6 IP protection rating 28 L List of components and spare parts List 1 65 List 2 67 List 3 69 List 4 71 72 M Machine controls 39 Main components 24 Maintenance 47 Daily 5...

Page 77: ...t ref 2 Fig 14 on page 57 50 the outfeed conveyor belt ref 3 Fig 4 50 the outfeed conveyor drive belt ref 6 Fig 14 50 the outfeed conveyor motor ref 8 Fig 14 on page 57 57 Residual risks and special g...

Page 78: ...02 07 2015 SVP08 0 1 2 3 Code 3529 0231 01 76 Service Phone 39 0445 595 111 PT 0715 MV 0715 MC 0715 Arc 66 ia U Unpacking and disposal of packaging materials 22 Use 37 Using the Manual 6 W Warranty c...

Page 79: ...SVP08 0 1 2 3 Code 3529 0231 01 Rev F del 02 07 2015 Arc 66 ia PT 0715 MV 0715 MC 0715 Service Phone 39 0445 595 111 77...

Reviews: