background image

Dialogue boxes and functions

93

850-164692 / Rev.B

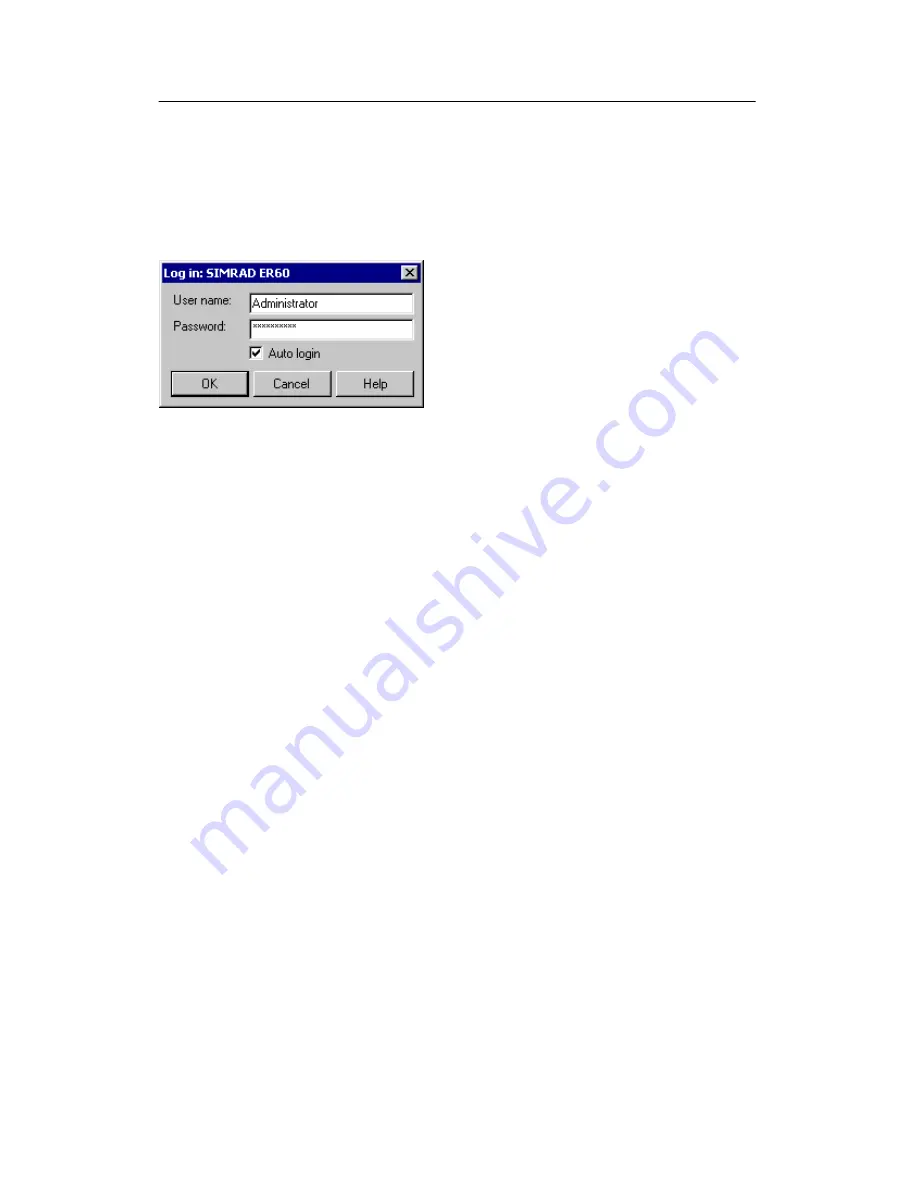
Log In

Log in

is accessed from the

Operation

menu. The

Log in

dialogue will also appear automatically when you switch on the
echo sounder.

Purpose

This dialogue is used to log in to the echo
sounder program.

The user name must exist on the application
for the log in to succeed.

Use

Enter user name and password.

Check the

Auto login

if you want to log in automatically when

the sounder software is started, and thus bypass this dialogue.

Related topics

Log out, page 94

Users and Passwords, page 129

Summary of Contents for ER60

Page 1: ...Simrad ER60 Scientific echo sounder application Operator manual M A X I M I Z I N G Y O U R P E R F O R M A N C E A T S E A www simrad com...

Page 2: ......

Page 3: ...850 164692 ER60 Scientific echo sounder Operator manual...

Page 4: ...e Simrad AS shall not be liable for errors contained herein or for incidental or consequential damages in connection with the furnishing performance or use of this document No part of this work covere...

Page 5: ...edures covering the key functions of the ER60 Refer to page 15 4 Menus The ER60 is operated using a set of menus short cut menus and dialogue boxes This chapter lists the menus with page references to...

Page 6: ...11 Scope 12 Colour scale 13 Numerical 14 OPERATIONAL PROCEDURES 15 Introduction 15 Power on off 16 Basic operations 18 Transceiver installation 20 Data recording and playback 21 Calibration 24 Noise...

Page 7: ...79 File Output 80 HAC Datagram 85 Hide View 86 Histogram 87 Horizontal Axis 88 LAN Port setup 89 Layer Properties 90 Load Setting 92 Log In 93 Log Out 94 Motion 95 Navigation 96 New channel 100 New L...

Page 8: ...otation datagram 139 Sample datagram 140 Data subscriptions and remote control 141 Introduction 141 Overview 141 Requesting server information 143 Connecting to server 144 Keep connection alive 146 Is...

Page 9: ...sceiver operation control Sensor input control Information display echograms and numerical data Data output and record control Replay of previously recorded data Important notice Windows 2000 XP and W...

Page 10: ...ion displayed by the ER60 and how it is organised Topics Display organisation page 3 Main menu page 4 Toolbar page 5 Status bar page 6 Channel windows overview page 7 Channel windows Depth page 8 Sing...

Page 11: ...ews 3 850 164692 Rev B Display organisation The ER60 display is organised as follows from top Main menu Tool bar A number of Channel windows Status bar A display with two channels windows is shown as...

Page 12: ...nu name and observe the drop down menu Select a new item on the drop down menu by clicking on the command Commands shown with light grey colour are unavailable in the present configuration or operatio...

Page 13: ...quivalent dialogue buttons and controls are listed in the table below Easy operation Equivalent Dialogue Start pinging Start Ping control Perform single ping Single step Ping control Stop pinging Stop...

Page 14: ...rmation has been enabled the Status bar will display from left Current messages Current Pitch in degrees P 0 0 Current Roll in degrees R 0 0 Current Heave in meters 0 00 m Event number Current Speed i...

Page 15: ...nel window is the main information bearer on the echo sounder display Topics Each Channel window contains the following views Depth page 8 Single Target Position page 9 Single Target Histogram page 10...

Page 16: ...displays the current depth CD6974A If you click the right mouse button with the cursor position within this view a dedicated shortcut menu will appear If you press the middle mouse button the Bottom D...

Page 17: ...value and the settings in the Colour scale If you place the cursor inside the view a small yellow label will appear to give you a detailed readout of certain information The Tooltip dialogue defines w...

Page 18: ...ics are based on the active layer and the current calculation interval If you place the cursor inside the view a small yellow label will appear to give you a detailed readout of certain information Th...

Page 19: ...he view a small yellow label will appear to give you a detailed readout of certain information The Tooltip dialogue defines which information that will be shown If you click the right mouse button wit...

Page 20: ...our lines The distance from the vertical center axis and the line colour reflects the received echo scatter If you place the cursor inside the view a small yellow label will appear to give you a detai...

Page 21: ...umeric TVG value displays weak echo signals properly while the stronger signals saturate into dark brown colour A low numeric value displays strong echo signals properly Weak signals below the lower l...

Page 22: ...ng lists are available Transducer Typical specifications for the active transducer Transceiver Typical specifications for the transceiver Environment displays the current readout from the active senso...

Page 23: ...S Introduction This chapter contains a number of specific procedures to be used with your ER60 echo sounder Topics Power on off page 16 Basic operations page 18 Transceiver installation page 20 Data r...

Page 24: ...assword 5 On the Operation menu select Normal 6 Once the echo sounder is running start pinging by pressing the arrow symbol on the toolbar Set up If no channels appear in the Normal Operation dialogue...

Page 25: ...any When the ER60 software has closed down you need to close down the computer as well 1 Click on the Start button in the lower left corner of the display 2 Exit the operating system in the normal mat...

Page 26: ...Range dialogue box depending on the current setting 5 Make the required changes 6 Click Ok Changing the vertical resolution The vertical resolution of the echogram increases with a shorter pulse dura...

Page 27: ...inimum Depth and Maximum Depth to 0 m will turn off bottom detection 1 Position the cursor over the depth information in the Depth view 2 Click the right mouse button 3 Select Bottom Detector from the...

Page 28: ...ies in the frequency channel list are shown in black green blue or red colour identifying its current status To install a channel 1 Select Transceiver on the Install menu The Transceiver Installation...

Page 29: ...ansducer face is independent of any other range settings in the echo sounder Echogram data This is user defined excerpts of the processed sample data pixel data ie the backscatter value of the targets...

Page 30: ...yed If no file is listed click the Add button to select Note that only one replay file can be listed if this single file shall be replayed 3 Click Loop if you wish to loop through the selected file en...

Page 31: ...If Loop is enabled the playback will return to the first file and play through all of them one more time This will be repeated until the playback is stopped During playback the ping rate is not limit...

Page 32: ...ecessary to adjust the echo sounder this is performed automatically by the ER60 calibration software Since the echo sounder is digital right from the receiver front end no analogue gain adjustment is...

Page 33: ...ormal mode functions properly for all transducers 1550 Sound speed in m s at depth 0 m Mackenzie 1981 J acoust Soc Am 70 807 12 Del Grosso 1972 J acoust Soc Am 52 1442 6 1500 1450 1400 0 5 10 Water te...

Page 34: ...or aft the wind will cause it to drift sideways If the current then attacks with a different angle it will make a bad situation even worse If the vessel is allowed to move sideways or if the current...

Page 35: ...mm diameter monofilament nylon line which is marked with small swivels at 5 m intervals beginning 10 m from the loose end The purpose of the swivels is threefold to unravel rotation of the nylon line...

Page 36: ...o which it is inevitably subjected In most cases calibration will be performed at depths larger than 10 m However the chosen depth should be limited to ensure that it is possible to cover the entire b...

Page 37: ...dB 34 5 34 0 33 5 33 0 3 0 0 3 CD3146 Pulse duration ms Calibration using ER60 Only one frequency may be calibrated at a time Thus you must uninstall all transceivers in ER60 except for the one you in...

Page 38: ...rol dialogue set Ping rate to Interval and 1 second This can also be done from the Toolbar 4 From the Operation menu select Normal 5 In the Normal Operation dialogue select transceiver and switch to A...

Page 39: ...ow A narrow window will have same effect as above reducing the possibility of detecting unwanted echoes from fish e Any comments you may wish to add to the calibration file 14 Click OK when you have f...

Page 40: ...a recording open the File menu choose Save As to open the Save As dialogue 6 Choose the directory where you want the calibration file to be saved and enter a file name for your calibration file 7 Clic...

Page 41: ...ld start using the Plot view and the polynomial model to check the shape of the polar plot A circular transducer should have a circular beam and an elliptic transducer an ellipse both with only insign...

Page 42: ...lculated curve are may be caused by poor acoustic conditions or by back scattering objects other than the reference target Isolated echoes with large deviation from the calculated beam pattern can be...

Page 43: ...bration exe If you have performed a standard installation this file is normally found in the following path c program files simrad scientific ek60 bin calibration exe If you have a calibration file pr...

Page 44: ...eeds from 0 to maximum speed in steps of 1 or 2 knots The vessel s course must be kept steady during these measurements The noise level for 38 kHz with the vessel in deep water and without sailing sho...

Page 45: ...a Passive mode b Maximum transmit power c Same pulse duration as used during the calibration d 0 0 m transducer depth 3 From the Operation menu open the Ping Control dialogue Set the following parame...

Page 46: ...sible to allow the vessel to slow down by itself 3 Write down the time to tag each 1 or 2 knots speed decrease 4 Stop the echogram recording once the vessel has stopped If the noise decreases quickly...

Page 47: ...target strength the desired lower TS limit has to be set in the same way as above Example If the desired lower TS limit is 50 dB and at the same time a signal to noise ratio of 10 dB is required the...

Page 48: ..._____ _____ _____ _____ NL from background noise dB re 1 Pa _____ _____ _____ _____ _____ _____ _____ _____ _____ Ref 9 10 11 12 13 14 15 16 Engine revolutions rpm _____ _____ _____ _____ _____ _____...

Page 49: ...ices that are shown in grey are not available for the current operation or operational mode Several parameters are also available using short cut menus accessed by clicking the right mouse button For...

Page 50: ...the presence of the Toolbar and Status bar The following choices are available Toolbar page 121 Status bar page 60 Options The Option drop down menu allows you defined certain general parameters such...

Page 51: ...ollowing choices are available File page 80 Ethernet page 78 Depth page 66 Window The Window drop down menu allows you to open new channel windows and control the arrangement of the windows The follow...

Page 52: ...e following choices are available from the short cut menu in the Single Target Position view Single Target Detection page 117 Colour Scale 40 log page 59 Print page 109 Print preview page 110 Configur...

Page 53: ...onfigure Window page 61 Hide View page 86 Colour Scale The following choices are available from the short cut menu in the Colour Scale view Colour Scale 40 log page 57 Print page 109 Print Preview pag...

Page 54: ...pter provides reference information about the dialogue boxes and major functions used througout the Simrad ER60 Scientific echo sounder The information is provided in alphabetical order Topics Alphabe...

Page 55: ...500 Datagram 73 Environment 77 Errors page 131 Ethernet Output 78 Exit 79 File Output 80 HAC Datagram 85 Hide View 86 Histogram 87 Horizontal Axis 88 LAN Port Setup 89 Layer Properties 90 Load Setting...

Page 56: ...p menu The current ER60 software version and other related information is provided here Press OK to close the dialogue box Note that the software version displayed in this dialogue box should match th...

Page 57: ...n the Users and Passwords dialogue box This dialogue is used to enter user information when a new user is added to the program The user must be assigned an access level These are described in the User...

Page 58: ...e This dialogue allows you to add annotations to the data The annotations defined are stored with the raw data as Annotation datagrams Annotations are displayed on the echogram if this feature is enab...

Page 59: ...e toolbar Number All events are identified with a number This number can be included in the annotation string Using this feature you can manually select the next number to be used and you can choose t...

Page 60: ...arge depth value and the tail of the transmitting pulse or a large school of fish may cause problems if a too small value is set Maximum Depth The search for the bottom echo extends down to this depth...

Page 61: ...ottom The dialogue title and the range settings will be surface related if the dialogue is opened while the echogram displays a surface referenced echogram The dialogue title and the range settings wi...

Page 62: ...der are only calculated once for a set interval This interval can be any value for distance time or ping Use the settings in this dialogue to define each of these three interval factors A vertical lin...

Page 63: ...Cascade function is accessed from the Window menu This function is identical to the common function available in the operating system The active windows are presented in cascade ie partly on top of ea...

Page 64: ...56 850 164692 Rev B Close All The Close all function is accessed from the Window menu Once activated it will close all open windows To open new windows select New channel from the same menu Related t...

Page 65: ...colour 20 or 40 log When the dialogue is launched from the Single Target Position and the Single Target Histogram views the colour scale represents colour mapping for the 40Log TVG function This TVG...

Page 66: ...ge in dB each colour will cover Altering the colour step will automatically adjust the maximum level Apply to all Check this box to make the chosen settings apply to all views Related topics Single Ta...

Page 67: ...ale Select the desired colour scale from the drop down list Note that all colour scales except Smooth Echosounder require that the number of colours is set to 64 Palette Select the colour palette for...

Page 68: ...Configure Statusbar The Configure Statusbar dialogue box is accessed when you click the right mouse button on the Statusbar Purpose This dialogue is used to select which sensor information to display...

Page 69: ...et which views to show in the active window Use Use the check boxes to show or hide views in the window Hiding a view does not disable it This means that all data for this view are still collected whi...

Page 70: ...Simrad ER60 Operator manual 62 850 164692 Rev B Contents The Contents dialogue box is accessed from the Help menu It opens the first page of the context sensitive on line help system...

Page 71: ...her echo sounder programs the list will only contain one entry This single entry is the echo sounder program running on the local processor unit You will not be able to perform installation operations...

Page 72: ...ucceed For more information on adding users refer to the Remoting dialogue Access level This column displays the access level for the user name Change user Click this button to change the user name us...

Page 73: ...e This command is used to delete the active selected layer in the view The layer is identified with red text in the Numerical view To create a new layer select New Layer from the shortcut menu To chan...

Page 74: ...ial or LAN port to be used for the data communication Setup If required you can set up the necessary communication parameters for the selected port Note that the changes made for the applicable port a...

Page 75: ...the shortcut menu in the Echogram view Purpose This dialogue box is used to specify what should be displayed in the Echogram view and how sample data shall be converted to pixel data You have these ta...

Page 76: ...switched off White Line A band in the current background colour is drawn below the detected bottom depth Horizontal Trawl On Headrope and footrope depth are indicated by two lines in the echogram Off...

Page 77: ...gram once every specified number of seconds Distance A short vertical line is drawn in the upper part of the echogram once every specified number of nautical miles Annotation Click Text to allow text...

Page 78: ...vertical pixels in the Echogram view The data samples must therefore be compressed or expanded to fit the number of available pixels In other echo sounders this function is handled automatically witho...

Page 79: ...ion describes the situation when the number of samples is lower than the number of pixels and the sample values are expanded to pixel values Interpolation Pixel values are interpolated between two sam...

Page 80: ...e echo sounder The current depth range is specified in the Surface Range and Bottom Range dialogues Backscatter These selections define the type of acoustic backscatter data to be displayed in the Ech...

Page 81: ...sed Data Output tab in the File Output dialogue and from the Ethernet Output dialogue box Purpose This dialogue is used to specify which EK500 datagrams to output Note that changes made in this dialog...

Page 82: ...which datagrams to output For a detailed specification of the datagrams refer to the Simrad EK 500 Operator manual Echo Trace Setup Click this button to specify parameters for the Echo Trace datagram...

Page 83: ...urface and bottom values for the Echogram datagrams No of Surface Values Select the number of echogram samples to export in the pelagic part of the datagram No of Bottom Values Select the number of ec...

Page 84: ...ou to specify the range for the Echogram Echo Trace and Sample Data datagrams Surface Range Click this button to choose the surface range for the datagrams Bottom Range Click this button to choose the...

Page 85: ...arious frequencies to examine the effect of temperature salinity and sound speed parameters on this parameter Conditions Use these spin boxes to provide manual values for temperature and salinity If y...

Page 86: ...to the Ethernet EK500 Datagram Use this box to enable or disable the EK500 datagram output Click the button to open the EK 500 Datagram dialogue to set up the individual datagrams Communication settin...

Page 87: ...xit Exit is accessed from the Operation menu Use this option to close the ER60 application Note that when you exit the ER60 the echo sounder closes down just like any other standard application You ca...

Page 88: ...Output dialogue box is accessed from the Output menu Purpose This dialogue box is used to specify which output you wish to save to a data file and in which disk directory the data file s shall be plac...

Page 89: ...Dialogue boxes and functions 81 850 164692 Rev B File Output Directory This dialogue allows you to define where the data files are stored Browse Click this button to select where to store the files...

Page 90: ...atagrams on Ethernet These datagrams can also be recorded onto a file Save EK500 Check this box to choose to save EK500 datagrams to file Click the button to open the EK500 Datagram dialogue box to se...

Page 91: ...on on the data format for the raw data files refer to the Data formats chapter Each raw data file name has the format PREFIX DYYYYMMDD THHMMSS General Save Raw Data Check this box to save raw data to...

Page 92: ...ax File Size Use this spin box to define a limit for the maximum amount of bytes to be contained in one raw data file A value of 0 means no limit Current File Size When recording raw data is in progre...

Page 93: ...Simrad EK60 channel 2100 Ping U 16 10030 Ping U 16 angles 10031 Single targets 10090 Parameters Range Click to open the Surface Range dialogue The range specified is the valid range for all ping and s...

Page 94: ...menu in all the views Purpose This function hides the view from which the command was chosen The view can be re established by selecting Configure Window from the shortcut menu in another view in the...

Page 95: ...et Histogram view Purpose This dialogue is used to set parameters for the histogram displayed in the Single Target Histogram view Max Percentage Use the spin box to define maximum value for the percen...

Page 96: ...iew Parameters Distance The echogram view displays the specified distance span Time The echogram view displays the specified time span Ping The echogram view displays the specified ping span Check the...

Page 97: ...cation with external sensors Parameters Local IP Address Select local network card if more than one is available Local port Specify local port Remote IP Address Select remote computer If the data comm...

Page 98: ...view are detected within a layer Limits Start Relative Surface Start Relative Bottom This parameter controls the depth at the upper boundary of the layer relative the surface or detected bottom depth...

Page 99: ...n Check the Targets Integration box to calculate integration values based on single target detections Compared with the normal integration sA this value can be used to get an idea of how much of the b...

Page 100: ...ese files are located in the directory displayed in the File Path box Select a setting file by clicking on the setting file and choose OK Note that installation settings e g Transceiver and sensor ins...

Page 101: ...he echo sounder Purpose This dialogue is used to log in to the echo sounder program The user name must exist on the application for the log in to succeed Use Enter user name and password Check the Aut...

Page 102: ...imrad ER60 Operator manual 94 850 164692 Rev B Log Out Log out is accessed from the Operation menu Purpose This function allows you to log out Related topics Log in page 93 Users and Passwords page 12...

Page 103: ...data Display of roll and pitch information can be useful when replaying previously recorded data files Note that heave information may be monitored in the Status bar Parameters Port Select input sourc...

Page 104: ...gation The Navigation dialogue box is accessed from the Install menu Purpose This dialogue box controls the installation of position speed and travelled distance information from external sensors The...

Page 105: ...distance information either internally derived from speed information via NMEA datagrams or from 1 200 nmi contact pulses Source Select source Port Select the input port Setup Set up the selected por...

Page 106: ...rt for the datagrams Setup Press this button to set up the interface parameters NMEA sentence Select which NMEA sentence to use Auto means that all datagrams are interpreted Talker ID Specify the NMEA...

Page 107: ...input source port from the list Setup Set up the selected port NMEA sentence Select datagram from the list Auto means that all datagrams are interpreted Manual speed If speed information is unavailabl...

Page 108: ...on the echo sounder Displayed channel windows are listed at the bottom of the Window menu To view the channel windows use the Cascade or Tile commands on the Window menu To close a channel press the X...

Page 109: ...accessed from the shortcut menus in the Echogram and Numerical views Purpose This dialogue is used to insert a new vertical layer Parameters All parameters are identical to the Layer Properties dialo...

Page 110: ...Channel The is column lists the transceivers that have been installed using the Transceiver command on the Install menu Mode This is the operational status for the channel Active The transmitter and r...

Page 111: ...depth for each transducer Pulse duration This parameter controls the duration of the transmit pulse The table below shows the pulse duration given in S available for the different operational frequenc...

Page 112: ...merical View dialogue is accessed from the shortcut menu in the Numerical view Purpose This dialogue is used to select which information is displayed in the Numerical view Check the boxes in front of...

Page 113: ...x can also me made in the Tool bar Use In Maximum mode click the Start button to start pinging This operation will toggle the button text to Stop which you can click to stop pinging In Single step mod...

Page 114: ...clicked Interval Select this mode to set the echo sounder to transmit a ping once every set time If the system is not ready to transmit a ping due to the limitations described for Maximum ping rate th...

Page 115: ...nd identify ethernet and serial line interfaces USB interfaces are only recognized if they are defined to communicate serial data Once the software has established a list of valid interfaces you can s...

Page 116: ...igure the communication parameters LAN ports Local IP This is the IP number of the network card in your computer that you wish to use Local port This is local port you wish to use Remote IP This is th...

Page 117: ...all the short cut menus Purpose This dialogue box allows you to print the current view Note that this is a standard operating system dialogue box The appearance may differ between the operating syste...

Page 118: ...inter Sends the job to the default printer Note that the Print dialogue does not appear so you if you wish to use a printer other than your default you need to change this before you open the Print Pr...

Page 119: ...ue is accessed from the Install menu Purpose This dialogue controls setting of parameters related to remote operation of the echo sounder With these parameters you can operate the echo sounder from an...

Page 120: ...perations from the list of IP addresses The remote port number is the port number on the server which is used to establish the initial connection This number must be equal to the local port number fou...

Page 121: ...the other network card for transferring data between server and clients Specify network card for server functionality by selecting the appropriate IP address from the list The initial connection betwe...

Page 122: ...ay be set up in Replay mode This dialogue is used to select a raw data file for replay Use To make switching between different replay files easier you can add multiple files to the displayed file list...

Page 123: ...dialogue is used to save your program settings Use Type a name for the file which will contain the settings to be saved Installation settings e g Transceiver and sensor installation settings will not...

Page 124: ...lague boxes Navigation Motion Trawl Purpose The Serial Port Setup dialogue is used to set up the serial port for communication with external sensors Use Set up the parameters for baud rate number of d...

Page 125: ...e is used to set the operational parameters for detecting single targets within the active layer Parameters Min Threshold dB The target strength for a single target must exceed this threshold to be ac...

Page 126: ...The two way maximum compensation will be 12 dB All single targets outside the angle corresponding to the chosen gain compensation are skipped Thus one can reduce the sample volume beam angle by choos...

Page 127: ...bottom related if the dialogue is opened while the echogram displays a bottom referenced echogram Parameters Start Relative Surface Start Relative Bottom This parameter controls the depth at the uppe...

Page 128: ...le function is accessed from the Window menu This function is identical to the common function available in the operating system The active windows are presented tiled ie reduced in size and automatic...

Page 129: ...rom the View menu This is simply an on off switch to show or hide the toolbars You can choose to open the Normal Operation or the Easy Operation toolbars or both When enabled the toolbars will appear...

Page 130: ...which information you wish to have displayed as tooltips information displayed next to the cursor in the different views Use Each view has its own set of parameters which can be toggled on or off Rela...

Page 131: ...ransceivers are un installed by selecting transducer type None Frequency channels Each transceiver contains one or more frequency channels Split beam transceivers contain only one frequency channel ea...

Page 132: ...ing the echo sounder software Network IP Address Describes which numbers must be identical between the console IP address and the transceiver IP address for the transceiver to be identified by the con...

Page 133: ...v B Communication mode Select mode from the list Point to point or Broadcast Browse Click this button to generate a new browse list for transceivers Related topics Transceiver installation procedure p...

Page 134: ...ansducer Parameters dialogue box is accessed from the Transceiver Installation dialogue Purpose This dialogue allows you to manually modify key transducer parameters Caution This functionality is for...

Page 135: ...ource from the list and set up the communication interface Parameters Port Select one of the serial ports or LAN If no trawl system is connected select None Setup Click this button to open the applica...

Page 136: ...s and Passwords dialogue Purpose This dialogue is used to change the description password and access level for an existing user If you wish to change the name as well you need to delete the user using...

Page 137: ...mited from performing installation operations Observer Limited from changing settings which will affect raw data recordings Four users are built in accounts These can not be deleted Administrator User...

Page 138: ...ens the Add User Account dialogue Click the Remove button to remove the user selected in the list Use the Properties button to change access level and password for the selected user The User Propertie...

Page 139: ...arnings are indicated with a yellow button on the Status bar while errors are indicated with a red button Purpose This dialogue will list all the current messages from the ER60 Use Click on the messag...

Page 140: ...atagram page 136 NMEA datagram page 138 Annotation datagram page 139 Sample datagram page 140 Data subscriptions and remote control page 141 Requesting server information page 143 Connecting to server...

Page 141: ...mmon C structures are used to represent individual data blocks The size of the various C types are char 8 bit integer WORD 16 bit unsigned integer short 16 bit integer Int 32 bit integer long 32 bit i...

Page 142: ...configuration telegram A second configuration datagram within the file is illegal The data content of the configuration datagram of an already existing file cannot be altered from the echo sounder NME...

Page 143: ...ytes and its content is highly datagram dependent Common computers fall into two categories Intel based computers write a multibyte number to file starting with the LSB Least Significant Byte HP Sun a...

Page 144: ...See note below float EquivalentBeamAngle dB float BeamWidthAlongship degree float BeamWidthAthwartship degree float AngleSensitivityAlongship float AngleSensitivityAthwartship float AngleOffsetAlongs...

Page 145: ...Gain parameter was used actively in raw data files generated with software version 1 3 This was before PulseLengthTable GainTable and SaCorrectionTable were introduced in software version 1 4 to enab...

Page 146: ...ram contains the original NMEA 0183 input sentence struct TextDatagram DatagramHeader DgHeader NME0 char Text GPGLL 5713 213 N The size of the datagram depends on the sentence length Example An exampl...

Page 147: ...agram The annotation datagram contains comment text struct TextDatagram DatagramHeader DgHeader TAG0 char Text Dangerous wreck The text string is zero terminated The size of the complete datagram depe...

Page 148: ...ure C char spare 12 Future use long Offset First sample long Count Number of samples short Power Compressed format See below short Angle See below Short Power The power data contained in the sample da...

Page 149: ...o your application Client application Echo sounder or third party Subscriber parameter updates UDP Binary Subscribed data updates UDP Binary Commands and responses UDP XML Echo sounder server applicat...

Page 150: ...eter notifications Stop parameter notifications 5 Disconnecting from server Topics Requesting server information page 143 Connecting to server page 144 Keep connection alive page 146 Issue commands on...

Page 151: ...fo char Header 4 RSI 0 ServerInfo2 The server applications will respond to the requesting application with a message containing information about the server application The content of the ServerInfo2...

Page 152: ...id if the connect command succeeded or an error if the connect command failed The contents of the various parts of a response message for a successful connect command is shown below struct Response c...

Page 153: ...application AccessLevel general access level for the current client A successful connection will for example provide a MsgResponse containing ResultCode S_OK Parameters ClientID 1 AccessLevel 1 0 Con...

Page 154: ...to the server may contain example ClientID 1 SeqNo 1 0 SeqNo The SeqNo part of the Info field shall contain the sequence number of the next request message from the client to the server the sequence n...

Page 155: ...DP messages Total message contains the total number of messages the current request consists of If the contents of MsgControl is 2 1 3 0 it means that the current UDP message is the second request mes...

Page 156: ...quence no Current msg no Total msg no char MsgResponse 1400 XML based response text containing result of command request The contents of the Response depend on the current command target and will be d...

Page 157: ...quence number incremented for each response message sent to the client Current message contains the current message in case a request must be split into several UDP messages Total message contains the...

Page 158: ...the following sections only the contents of the Response field of the Response will be described Related topics Data subscription types page 159 Create data subscriptions The method part of the reque...

Page 159: ...esponse clientInfo cid dt 3 1 cid rid dt 3 1 rid clientInfo fault detail errorcode dt 3 0 errorcode detail fault SubscribeResponse subscriptionID dt 3 subscriptionID SubscribeResponse response Handlin...

Page 160: ...t to ChangeSubscription The ChangeSubscription method has the following parameters Parameter name Description subscriptionID The id of the subscription that should be changed dataRequest The actual sp...

Page 161: ...to Unsubscribe The Unsubscribe method has the following parameters Parameter name Description subscriptionID The identification of the subscription that shall be closed An example of the contents of t...

Page 162: ...the contents of the Response field of an Unsubscribe command to the RemoteDataServer is shown below response clientInfo cid dt 3 1 cid rid dt 3 1 rid clientInfo fault detail errorcode dt 3 0 errorcode...

Page 163: ...he method part of the request shall be set to GetParameter The GetParameter method has the following input parameters Parameter name Description ParamName Full name of the current parameter Time The t...

Page 164: ...o fault detail errorcode dt 3 0 errorcode detail fault GetParameterResponse paramValue value 60 value time 0 time paramValue GetParameterResponse response Set parameter The method part of the request...

Page 165: ...pe 3 paramType SetParameter method request The server application will respond with a Response message The SetParameter method does not have any output parameters An example of the contents of the Res...

Page 166: ...necting from server The client application shall send a DisconnectRequestDef message to the server application when the client is finished with its operation against the server Structure field name Co...

Page 167: ...64 bit integer time value which identifies the number of 100 nanoseconds intervals that has elapsed since January 1 1601 If a parameterer is skipped in the subscription input string it will be replac...

Page 168: ...pthHeader DWORDLONG dlTime struct StructBottomDepthData double dBottomDepth detected bottom depth meter double dReflectivity bottom surface backscatter dB double dVesselLogDistance sailed distance nmi...

Page 169: ...6 0 None MaxPhaseDeviation 0 100 8 0 phase steps Output struct StructTSDataHeader DWORDLONG dlTime struct StructEchoTrace double Depth Target depth meter double TSComp Compendated TS dB double TSUncom...

Page 170: ...164692 Rev B Example Building a TS Detection Subscription String TSDetection ChannelID ChannelID LayerType Surface Range 200 RangeStart 3 MinTSValue 55 MinEcholength 0 7 MaxEcholength 2 0 MaxGainComp...

Page 171: ...r DWORDLONG dlTime struct StructSampleDataArray short nSampleDataElement 30000 16 bits sample in logarithmic format struct StructSampleData StructSampleDataHeader SampleDataHeader StructSampleDataArra...

Page 172: ...ngle StructSampleDataHeader SampleDataHeader StructSamplePowerAngleValues SamplePowerAngleValues StructSamplePowerAngleArray SamplePowerAngleArray Example Building an SampleData Subscription String Sa...

Page 173: ...Peak Mean None ExpansionType Interpolation Copy Interpolation None Output struct StructEchogramHeader DWORDLONG dlTime struct StructEchogramArray short nEchogramElement 30000 16 bit logarithmic forma...

Page 174: ...e EchogramType Surface Bottom Surface None MinTSValue 120 50 50 dB MinEchoLength 0 20 0 8 None MaxEchoLength 0 20 1 8 None MaxGainCompensation 0 12 6 0 dB MaxPhaseDeviation 0 100 8 0 Phase steps Examp...

Page 175: ...ce None IntegrationState Start Stop Start None Update UpdatePing UpdateAccumulate UpdatePin g None Range 0 20000 100 m RangeStart 0 20000 10 m Margin 0 200 1 m SvThreshold 200 100 100 dB Ouput struct...

Page 176: ...rt Stop Start None Update Update ping Update accumulate Update ping None Range 0 20000 100 m RangeStart 0 20000 10 m Margin 0 200 1 m SvThreshold 200 100 100 dB MinTSValue 120 50 50 dB MinEchoLength 0...

Page 177: ...argetsIntegration Subscription String TargetsIntegration ChannelID ChannelID State Start Layertype Surface Range 100 Rangestart 10 Margin 0 5 SvThreshold 100 0 MinTSValue 55 0 MinEcholength 0 7 MaxEch...

Page 178: ...the new value will immediately be overwritten if a live sensor is connected Related topics Parameter management page 155 Descriptions Description Parameter name R O Range Unit PING BASED List of Chan...

Page 179: ...ip No 0 to 100 deg Beam Width Athwartship TransceiverMgr ChannelID BeamWidthAthwartship No 0 to 100 deg Angle Offset Alongship TransceiverMgr ChannelID AngleOffsetAlongship No 10 to 10 deg Angle Offse...

Page 180: ...Ship Roll No 90 to 90 deg Vessel Pitch OwnShip Pitch No 90 to 90 deg Vessel Distance OwnShip VesselDistance No 0 to 100 000 nmi Environment Temperature OwnShip EnvironmentData Temperature No 5 to 50 d...

Page 181: ......

Page 182: ...E 2004 Simrad AS ISBN 82 8066 011 9 Simrad AS Strandpromenaden 50 Box 111 N 3191 Horten Telephone 47 33 03 40 00 Facsimile 47 33 04 29 87 M A X I M I Z I N G Y O U R P E R F O R M A N C E A T S E A...

Reviews: