background image


Programming and Operating Manual (Milling) 

92


6FC5398-4DP10-0BA1, 01/2014 

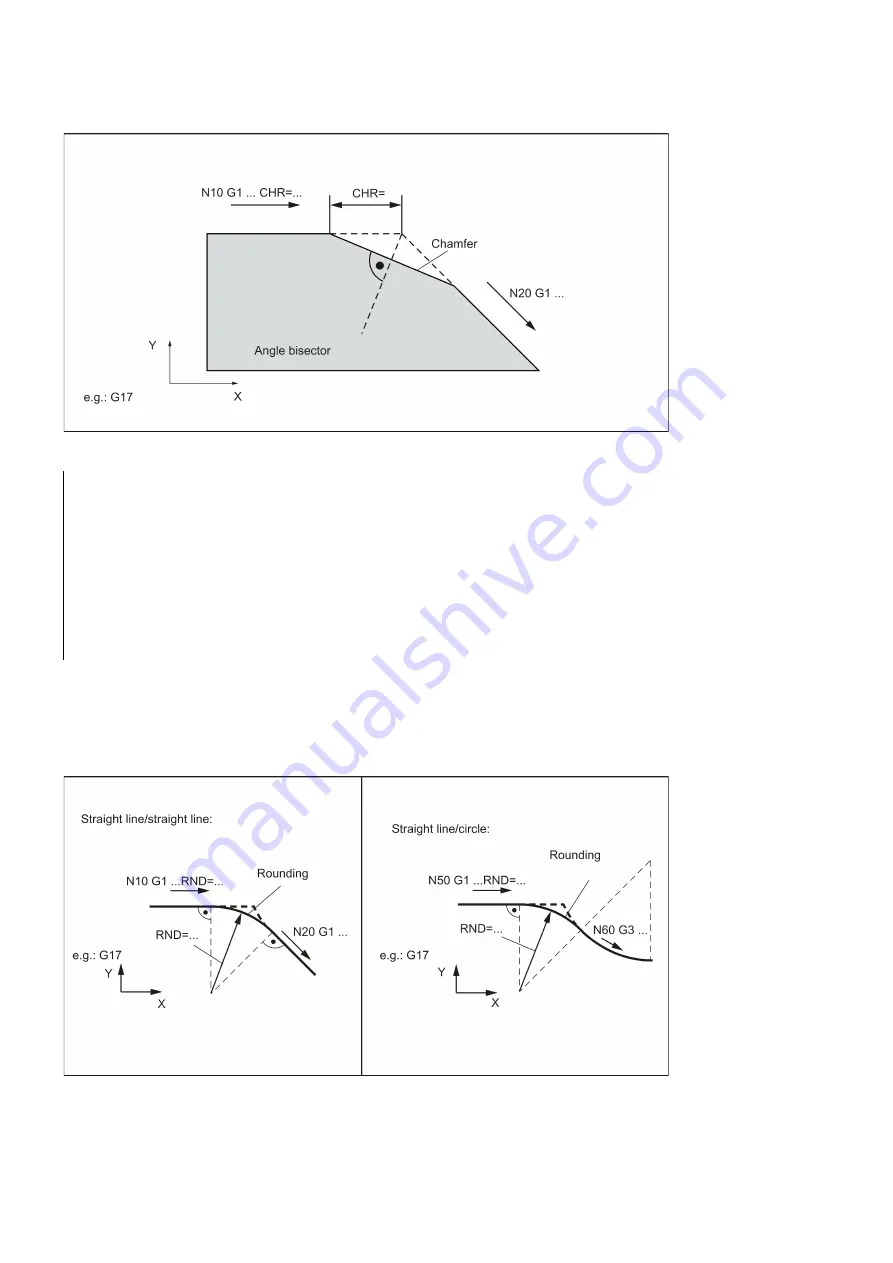
See the following illustration for inserting a chamfer with CHR using the example: Between two straight lines. 


Programming examples of chamfer 

N5 G17 G94 F300 G0 X100 Y100 


N10 G1 X85 CHF=5 

; Insert chamfer with chamfer length of 5 mm 

N20 X70 Y70 


N30 G0 X60 Y60 


N100 G1 X50 CHR=7 

; Insert chamfer with leg length of 7 mm 

N110 X40 Y40 


N200 G1 FRC=200 X30 CHR=4 

; Insert chamfer with feedrate FRC 

N210 X20 Y20 


M30 


Rounding RND or RNDM 
A circle contour element can be inserted with tangential connection between the linear and circle contours in any 

combination. 
See the following examples for inserting roundings: 


Summary of Contents for SINUMERIK 808D

Page 1: ...the warning notice representing the highest degree of danger will be used A notice warning of injury to persons with a safety alert symbol may also include a warning relating to property damage Qualified Personnel The product system described in this documentation may be operated only by personnel qualified for the specific task in accordance with the relevant documentation in particular its warni...

Page 2: ...ngineers and service and maintenance personnel Function Manual Mechanical and electrical designers technical professionals Parameter Manual Mechanical and electrical designers technical professionals PLC Subroutines Manual Mechanical and electrical designers technical professionals and commissioning engineers My Documentation Manager MDM Under the following link you will find information to indivi...

Page 3: ...up the workpiece 25 3 2 7 Verifying the tool offset result in MDA mode 28 3 2 8 Entering modifying the tool wear data 29 3 3 Operating area overview 30 4 Part programming 31 4 1 Creating a part program 32 4 2 Editing part programs 33 4 3 Managing part programs 35 5 Automatic machining 37 5 1 Performing the simulation 38 5 2 Program control 39 5 3 Program test 41 5 4 Starting and stopping interrupt...

Page 4: ...ng with constant lead G33 79 8 5 2 Tapping with compensating chuck G63 80 8 5 3 Thread interpolation G331 G332 81 8 6 Fixed point approach 82 8 6 1 Fixed point approach G75 82 8 6 2 Reference point approach G74 83 8 7 Acceleration control and exact stop continuous path 84 8 7 1 Acceleration pattern BRISK SOFT 84 8 7 2 Exact stop continuous path control mode G9 G60 G64 84 8 7 3 Dwell time G4 86 8 8...

Page 5: ...CLE87 148 9 4 11 Drilling with stop 2 CYCLE88 150 9 4 12 Reaming 2 CYCLE89 151 9 5 Drilling pattern cycles 153 9 5 1 Requirements 153 9 5 2 Row of holes HOLES1 154 9 5 3 Circle of holes HOLES2 157 9 5 4 Arbitrary positions CYCLE802 160 9 6 Milling cycles 161 9 6 1 Requirements 161 9 6 2 Face milling CYCLE71 162 9 6 3 Contour milling CYCLE72 167 9 6 4 Milling a rectangular spigot CYCLE76 177 9 6 5 ...

Page 6: ...peration wizard 232 A 11 Editing Chinese characters 232 A 12 Pocket calculator 233 A 13 Calculating contour elements 234 A 14 Free contour programming 238 A 14 1 Programming a contour 239 A 14 2 Defining a start point 240 A 14 3 Programming contour element 241 A 14 4 Parameters for contour elements 243 A 14 5 Specifying contour elements in polar coordinates 246 A 14 6 Cycle support 248 A 14 7 Prog...

Page 7: ...essing Unit is available in the following variants PPU161 2 horizontal panel layout applicable for the SINUMERIK 808D ADVANCED T turning or SINUMERIK 808D ADVANCED M milling control system PPU160 2 vertical panel layout applicable for the SINUMERIK 808D ADVANCED T turning or SINUMERIK 808D ADVANCED M milling control system PPU161 2 horizontal panel layout PPU160 2 vertical panel layout ...

Page 8: ...Calls help information Menu extension key Opens the next lower level menu or navigate between the menus of the same level Cursor keys Alphabetic and numeric keys Operating area keys Control keys USB interface Alarm cancellation key Cancels alarms and messages that are marked with this symbol Status LEDs For more information refer to the table below Further information Alphabetic and numeric keys T...

Page 9: ...at this key can be used together with another key to function as a key combination Operating area keys To open the system data management operating area press the following key combination Enables user defined extension applications for example generation of user dialogs with the EasyXLanguage function For more information about this function refer to SINUMERIK 808D ADVANCED Function Manual Status...

Page 10: ... Machine Control Panel front The SINUMERIK 808D MCP is available in the following variants Horizontal MCP variant Vertical MCP variant with a reserved slot for the handwheel Vertical MCP variant with an override switch for the spindle Horizontal MCP Vertical MCP with reserved handwheel slot Vertical MCP with spindle override switch ...

Page 11: ...ted axis at the specified feedrate override Program control keys Keys for program start stop and reset User defined keys For more information refer to the table below Further information User defined keys Pressing this in any operating mode switches on off the lamp LED lit The lamp is switched on LED unlit The lamp is switched off Pressing this key in any operating mode switches on off the coolant...

Page 12: ...ion LED unlit The chip remover stops rotation Keeping pressing this key in any operating mode rotates the chip remover in reverse order Releasing the key changes the chip remover to the previous forward rotation or stop state active only in JOG mode LED lit The chip remover starts reverse rotation LED unlit The chip remover stops reverse rotation Pre defined insertion strips The MCP machine contro...

Page 13: ...ips from the blank plastic sheet 4 Pull out the pre inserted strips from the MCP 5 Insert the customized strips on the back of the MCP Note This manual assumes an 808D standard machine control panel MCP Should you use a different MCP the operation may be other than described herein 1 3 Screen layout Alarms and messages Displays active alarms with alarm text The alarm number is displayed in white l...

Page 14: ... 1 Protection level 1 requires a manufacturer password With this password entry you can perform the following operations Entering or changing part of the machine data and drive data Conducting NC and drive commissioning Protection level 3 6 Protection level 3 6 requires an end user password With this password entry you can perform the following operations Entering or changing part of the machine d...

Page 15: ... is selected 2 Turning on reference point approach Note When turning on off the CNC and the machine also observe the machine tool manufacturer s documentation since turning on and reference point approach are machine dependent functions Operating sequence 1 Switch on the power supply for the control system and the machine 2 Release all emergency stop buttons on the machine By default the control s...

Page 16: ... up 3 1 Coordinate systems As a rule a coordinate system is formed from three mutually perpendicular coordinate axes The positive directions of the coordinate axes are defined using the so called 3 finger rule of the right hand The coordinate system is related to the workpiece and programming takes place independently of whether the tool or the workpiece is being traversed When programming it is a...

Page 17: ...n the opposite direction to the infeed of the spindle The origin of this coordinate system is the machine zero This point is only a reference point which is defined by the machine manufacturer It does not have to be approachable The traversing range of the machine axes can be in the negative range Workpiece coordinate system WCS To describe the geometry of a workpiece in the workpiece program a ri...

Page 18: ...The workpiece must be aligned such that the axes of the workpiece coordinate system run in parallel with those of the machine Any resulting offset of the machine zero with reference to the workpiece zero is determined along the X Y and Z axis and entered in a data area intended for the settable work offset In the NC program this offset is activated during program execution for example using a prog...

Page 19: ...e lower level menu for tool type selection 4 Select a desired tool type with the corresponding softkey 5 Enter the tool number value range 1 to 31999 preferentially enter a value less than 100 in the following window Note Select the corresponding tool edge position code according to the actual tool point direction 6 Use this softkey to confirm your settings The window below shows the information o...

Page 20: ...dow 4 Enter the desired tool number for example 1 in the T S M window 5 Use this key or move the cursor to confirm your entries 6 Press this key on the MCP to activate the tool 3 2 3 Assigning the handwheel Method 1 Assigning through the MCP 1 Select the desired operating area 2 Press this key on the MCP to control the axis movement with external handwheels 3 Press the desired axis traversing key ...

Page 21: ...r keys Press the following softkey to confirm your input 6 Press this vertical softkey to activate the value change Note that the control system restarts to accept the new value 7 After the control system has booted select the desired operating area 8 Press this key on the MCP 9 Press this vertical softkey to open the handwheel assignment window 10 Select the desired handwheel number with the curs...

Page 22: ...e increment is 0 010 mm The override increment is 0 100 mm 3 2 4 Activating the spindle Operating sequence 1 Select the desired operating area 2 Switch to JOG mode 3 Open the T S M window 4 Enter the desired value for the spindle speed in the T S M window 5 Press this key to select the spindle direction 6 Use this key or move the cursor to confirm your entries 7 Press this key on the MCP to activa...

Page 23: ...l Page 19 for more information By using the actual position of point F machine coordinate and the reference point the control system can calculate the offset value assigned to length 1 or the tool radius for the selected axis Figure 3 1 Determination of the length offset using the example of a drill 1 Z axis length milling Operating sequence 1 Select the desired operating area 2 Switch to JOG mode...

Page 24: ...the Z axis The tool diameter radius and cutting edge position are all taken in to account 10 Press this vertical softkey to open the window for measuring the tool diameter 11 Use the axis traversing keys to move the tool to approach the workpiece in the X direction 12 Switch to handwheel control mode 13 Select a suitable override feedrate and then use the handwheel to move the tool to scratch the ...

Page 25: ...the workpiece Overview You have selected the relevant offset panel for example G54 and the axis you want to determine for the offset Figure 3 2 Determining the work offset milling Before measuring you can start the spindle by following the steps in Section Activating the spindle Page 22 Operating sequences Workpiece edge measurement 1 Select the desired operating area 2 Switch to JOG mode 3 Open t...

Page 26: ...ection for example G54 and 10 Enter the distance for example 0 Press this key or move the cursor to confirm your input 12 Press this vertical softkey The work offset of the X axis is calculated automatically and displayed in the offset field 13 Repeat the above operations to measure and set the work offsets in the Y and Z axes respectively Rectangular workpiece measurement 1 Select the desired ope...

Page 27: ...tions are measured Circular workpiece measurement 1 Select the desired operating area 2 Switch to JOG control mode 3 Open the lower level menu for workpiece measurement 4 Press this vertical softkey to open the window for measurement of a circular workpiece 5 Traverse the tool which has been measured previously in the direction of the orange arrow P1 shown in the measuring window in order to scrat...

Page 28: ...her softkey functions in MDA mode This window displays important G functions whereby each G function is assigned to a group and has a fixed position in the window To close the window press this softkey once again To display additional G functions use the following keys This window displays the auxiliary and M functions currently active To close the window press this softkey once again This softkey...

Page 29: ...rating sequence 1 Select the desired operating area 2 Open the tool wear window 3 Use the cursor keys to select the required tools and their edges 4 Enter the tool length wear parameter and the tool radius wear parameter Positive value The tool moves away from the workpiece Negative value The tool moves closer to the workpiece 5 Press this key or move the cursor to activate the compensation ...

Page 30: ...s and modifies the tool offsets Measures the tool manually or automatically Displays and modifies the tool wear data Creates a new tool For more information see Section Creating a new tool Page 19 Displays and modifies the work offsets Opens a lower level menu for cutting edge settings For more information see Section Creating a new cutting edge Page 218 Displays and modifies the R variables Remov...

Page 31: ...s and transfers the manufacturer cycles Creates new files or directories Reads in out files via the USB drive and executes the program from the external storage media Searches for files Reads in out files via the RS232 interface and executes the program from the external PC PG Selects all files for the subsequent operations Reads in out files via the Ethernet interface and executes the program fro...

Page 32: ...rectory Press this softkey to confirm your entry Select the new directory with the cursor keys Press this key on the PPU to open the directory 4 Press this softkey to activate the window for creating a new program 5 Enter the name of the new program If you desire to create a main program it is unnecessary to enter the file extension MPF If you desire to create a subprogram you must enter the file ...

Page 33: ...entered if you desire to search for a program file Or Entering the first character on the main screen of the program directory The system directly navigates to the first file starting with that character 4 Press this key to open the program file The system switches over to the program editor window 5 Edit the blocks in the window as required Any program changes are automatically stored See below f...

Page 34: ... search if you choose to search via text 4 Press this softkey to start the search or otherwise press the following softkey to cancel the search Copying cutting and pasting blocks Proceed through the following steps to copy cut and paste blocks 1 Press this softkey in the opened program editor window to insert a marker 2 Use the cursor keys to select the desired program blocks 3 Press the following...

Page 35: ...ld in the search window To narrow your search you can enter the desired text in the second field 5 Use this key to choose whether to include subordinate folders or observe upper lower case 6 Press this softkey to start the search or otherwise press the following softkey to cancel the search Copying and pasting programs 1 Select the desired operating area 2 Open the desired directory 3 Select the p...

Page 36: ...ess the following softkey Renaming programs 1 Select the desired operating area 2 Open the desired directory 3 Select the program file that you would like to rename 4 Press the extension softkey to access more options 5 Press this vertical softkey to open the window for renaming 6 Enter a desired new name with the extension in the input field 7 Press this softkey to confirm your entry or press the...

Page 37: ...real time simulation etc Softkey functions Pressing key on the PPU and then key on the MCP allows you to open the following window Zooms in the actual value window Displays important G functions Performs the program test dry run conditional stop block skipping and auxiliary function lock Displays currently active auxiliary and M functions Finds the desired block location Displays the axis feedrate...

Page 38: ...he window 5 1 Performing the simulation Functionality By using the broken line graphics the programmed tool path can be traced Before the automatic machining you need to perform the simulation to check whether the tool moves in the right way Operating sequence 1 Select the desired operating area 2 Select a part program for simulation 3 Press this key to open the program 4 Switch to AUTO mode 5 Pre...

Page 39: ... block displaying Three displaying options are available Makes the cross hair move in large or small steps with the cursor Shows more options Enables the material removal simulation of a defined blank Zooms in the whole screen Selects whether to show the blocks or not Zooms out the whole screen Returns to the program editor window 5 2 Program control Operating sequence 1 Select the desired operati...

Page 40: ...h a slash in front of the block number e g N100 After activating this option the icon SKP appears immediately in the program status bar and this softkey is highlighted in blue Available only in the following state Each block is decoded separately and a stop is performed at each block However for the thread blocks without dry run feedrate a stop is only performed at the end of the current thread bl...

Page 41: ...this key on the MCP to close the door in the machine if you do not use this function just close the door in the machine manually 6 Make sure the feedrate override is 0 Check that correct tool is in spindle before continuing 7 Press this key on the MCP to run the program 8 Turn the feedrate override switch slowly to the desired value 9 Press this key to stop the program test Testing the program wit...

Page 42: ... mode 3 Press this softkey to open the lower level menu for program control 4 Press this vertical softkey to activate the AFL function 5 Press this key on the MCP to close the door in the machine if you do not use this function just close the door in the machine manually Make sure the feedrate override is 0 6 Press this key on the MCP to run the program 7 Turn the feedrate override switch slowly t...

Page 43: ...nterrupt the execution of a part program The axes stop running while the spindle continues running On the next program start the machining is resumed from the interruption point 5 5 Executing transferring a part program through the RS232 interface 5 5 1 Configuring RS232 communication Communication tool SinuComPCIN To enable the RS232 communication between a SINUMERIK 808D ADVANCED and a PC PG you...

Page 44: ...em and the PC PG Proceed as follows to execute a part program from external through the RS232 interface 1 Select the desired operating area on the PPU 2 Press this softkey to go to the RS232 directory 3 Press this vertical softkey and the system automatically changes to AUTO mode in the machining operating area 4 Press this button on the main screen of SinuComPCIN and select the desired program fo...

Page 45: ...ly to the system drive N MPF or N CMA therefore before transfer make sure the drive identifier contained in the first line in the program file is N and the target directory in the second line is N_MPF or N_CMA If not you must change manually for example Proceed as follows to transfer a part program from external through the RS232 interface 1 Select the desired operating area on the PPU 2 Press thi...

Page 46: ...ing softkeys to set the condition for the block search After the block search the program will continue from the line before the interruption point The same calculations of the basic conditions for example tool and cutting edge numbers M functions feedrate and spindle speed are carried out as during normal program operation but the axes do not move After the block search the program will continue ...

Page 47: ...ing area 2 Open the window for data saving 3 Press this softkey to start saving Do not carry out any operator actions while the data backup is running There are two methods to call the saved data Method 1 1 Press this key when the control system is booting 2 Select Reload saved user data in the setup menu 3 Press this key to confirm Method 2 1 Select the desired operating area 2 Open the window fo...

Page 48: ...guage Note that the HMI is automatically restarted when a new language is selected Sets the system date and time and adjusts the brightness of the screen Configures the access right for the remote control through the Ethernet connection Backs up and restores system data Switches to the ISO programming mode Creates and restores startup archives data archive Saves the contents of the volatile memory...

Page 49: ...files onto an external PC PG This requires a connected network drive on the control system To back up the files in the folder for storing the manufacturer files on the control system This folder is visible with the manufacturer password To back up the files in the folder for storing end user files on the control system 6 Press this softkey to paste the copied data into the current directory Backin...

Page 50: ...th a decimal point Enter the file extension SPF if the current default program type is MPF main program and you desire to create a subprogram Enter the file extension MPF if the current default program type is SPF subprogram and you desire to create a main program Do not enter the file extension if you desire to take the current default program type Avoid using special characters for program names...

Page 51: ...t only for the rotary axis the range of which is set to 0 360 degrees in the machine data Incremental dimension G91 modally effective applies for all axes in the block until it is revoked by G90 in a following block Incremental dimension X IC value only this value applies exclusively for the stated axis and is not influenced by G90 G91 This is possible for all axes and also for SPOS SPOSA spindle ...

Page 52: ...ons G90 G91 the written positional data X Y Z are evaluated as a coordinate point G90 or as an axis position to traverse to G91 G90 G91 applies to all axes Irrespective of G90 G91 certain positional data can be specified for certain blocks in absolute incremental dimensions using AC IC These instructions do not determine the path by which the end points are reached this is provided by a G group G0...

Page 53: ... be deselected in a subsequent block via G90 absolute dimensioning Specification with AC IC After the end point coordinate write an equality sign The value must be specified in round brackets Absolute dimensions are also possible for circle center points using AC Otherwise the reference point for the circle center is the circle starting point Programming example N10 G90 X20 Z90 Absolute dimensions...

Page 54: ... offsets and settable work offsets are not affected by G70 G71 G700 G710 however also affects the feedrate F inch min inch rev or mm min mm rev 8 2 5 Polar coordinates pole definition G110 G111 G112 Functionality In addition to the common specification in Cartesian coordinates X Y Z the points of a workpiece can be specified using the polar coordinates Polar coordinates are also helpful if a workp...

Page 55: ...se if a pole already exists If no pole is defined the origin of the current workpiece coordinate system will act as the pole Programming example N10 G17 X Y plane N20 G0 X0 Y0 N30 G111 X20 Y10 Pole coordinates in the current workpiece coordinate system N40 G1 RP 50 AP 30 F1000 N50 G110 X 10 Y20 N60 G1 RP 30 AP 45 F1000 N70 G112 X40 Y20 New pole relative to the last pole as a polar coordinate N80 G...

Page 56: ... without values clears old instructions for offset rotation scaling factor mirroring The instructions which contain TRANS or ATRANS each require a separate block See the following illustration for the example for programmable offset Programming example N20 TRANS X20 Y15 Programmable translation N30 L10 Subroutine call contains the geometry to be offset N70 TRANS Offset cleared Subroutine call see ...

Page 57: ...the individual planes See the following illustration for programming example for programmable offset and rotation Programming example N10 G17 X Y plane N20 TRANS X20 Y10 Programmable translation N30 L10 Subroutine call contains the geometry to be offset N40 TRANS X30 Y26 New offset N50 AROT RPL 45 Additive 45 degree rotation N60 L10 Subroutine call N70 TRANS Offset and rotation cleared Subroutine ...

Page 58: ...scaling factor mirroring The instructions which contain SCALE or ASCALE each require a separate block Note For circles the same factor should be used in both axes If ATRANS is programmed with SCALE ASCALE active these offset values are also scaled See the following illustration for example for scaling and offset Programming example N10 G17 X Y plane N20 L10 Programmed contour original N30 SCALE X2...

Page 59: ...l radius compensation G41 G42 is reversed automatically when mirroring The direction of rotation of the circle G2 G3 is also reversed automatically when mirroring See the following illustration for example for mirroring with the tool position shown Programming example Mirroring in different coordinate axes with influence on an active tool radius compensation and G2 G3 N10 G17 X Y plane Z standing ...

Page 60: ...he value is activated by the program by selection from six possible groupings G54 to G59 Note Workpiece clamping at an angle is possible by entering the angles of rotation around the machine axes These rotation portions are activated with the offset G54 to G59 Programming G54 to G59 1 to 6th settable work offset G500 Settable work offset OFF modal G53 settable work offset OFF non modal also suppre...

Page 61: ...omial blocks This has the following advantages Reduction of the number of required part program blocks for describing the workpiece contour Continuous block transitions Higher maximum path velocities The following compressor functions are available COMPON The block transitions are only constant in the velocity while acceleration of the participating axes can be in jumps at block transitions COMPCU...

Page 62: ...e tool orientation and where relevant also the tool rotation is programmed using direction vectors can also be compressed It is interrupted by any other type of NC instruction e g an auxiliary function output Examples Example 1 COMPON Program code Comment N10 COMPON Compressor function COMPON on N11 G1 X0 37 Y2 9 F600 G1 before end point and feed N12 X16 87 Y 698 N13 X16 865 Y 72 N14 X16 91 Y 799 ...

Page 63: ...e value Y 0 is also defined here TRACYL transformation types There are three forms of cylinder surface coordinate transformation TRACYL without groove wall offset TRAFO_TYPE_n 512 TRACYL with groove wall offset TRAFO_TYPE_n 513 TRACYL with additional linear axis and groove wall offset TRAFO_TYPE_n 514 The groove wall offset is parameterized with TRACYL using the third parameter For cylinder periph...

Page 64: ...ed or 2 Slot side compensation Optional 3rd parameter whose value for TRACYL is preselected using the mode for machine data Value range 0 Transformation type 514 without groove wall offset as previous 1 Transformation type 514 with groove wall offset TRAFOOF Transformation OFF BCS and MCS are once again identical OFFN Offset contour normal Distance of the groove side from the programmed reference ...

Page 65: ...ode Comment Geometry Length compensation TC_DP3 1 1 8 Length offset vector Calculation acc to type and plane TC_DP4 1 1 9 TC_DP5 1 1 7 Program code Comment Geometry Radius TC_DP6 1 1 6 Tool radius TC_DP7 1 1 0 Slot width b for slotting saw rounding radius for milling tools TC_DP8 1 1 0 Projection k For slotting saw only TC_DP9 1 1 0 TC_DP10 1 1 0 TC_DP11 1 1 0 Angle for taper milling tools Program...

Page 66: ...d groove Program code Comment N90 G1 Y0 Z 10 Approach starting position N100 G42 OFFN 4 5 Tool radius compensation right of contour on N110 X19 F500 N120 Z 25 N130 Y30 N140 OFFN 3 5 N150 Y0 N160 Z 10 N170 X25 N180 TRAFOOF N190 DIAMON Diameter dimensioning N200 G40 Tool radius compensation off N210 G0 X80 Z100 Retraction in rapid traverse N220 M30 End of program Description Without groove wall offs...

Page 67: ...idth corresponds exactly to the tool radius Grooves in parallel to the periphery transverse grooves are not parallel at the beginning and end With additional linear axis and groove wall offset transformation type 514 On a machine with a second linear axis this transformation variant makes use of redundancy in order to perform improved tool compensation The following conditions then apply to the se...

Page 68: ...ect TRC 7 Approach block position TRC and approach groove side 8 Groove center line contour 9 Deselect TRC 10 Retraction block retract TRC and move away from groove side 11 Positioning 12 Deselect OFFN 13 TRAFOOF 14 Re select original coordinate shift frame Special features TRC selection TRC is not programmed in relation to the groove side but relative to the programmed groove center line To preve...

Page 69: ...but not for direct workpiece machining All the axes can be traversed simultaneously on a straight path For each axis the maximum speed rapid traverse is defined in machine data If only one axis traverses it uses its rapid traverse If two or three axes are traversed simultaneously the path velocity e g the resulting velocity at the tool tip must be selected such that the maximum possible path veloc...

Page 70: ...s G1 G2 G3 CIP and CT and is retained until a new F word is written Programming F Note For integer values the decimal point is not required e g F300 Unit of measure for F with G94 G95 The dimension unit for the F word is determined by G functions G94 F as the feedrate in mm min G95 Feedrate F in mm spindle revolutions only meaningful when the spindle is running Note This unit of measure applies to...

Page 71: ... See the illustration for linear interpolation in three axes using the example of a slot Programming example N05 G0 G90 X40 Y48 Z2 S500 M3 The tool traverses in rapid traverse on P1 three axes concurrently spindle speed 500 rpm clockwise N10 G1 Z 12 F100 Infeed on Z 12 feed 100 mm min N15 X20 Y18 Z 10 Tool travels on a straight line in space on P2 N20 G0 Z100 Retraction in rapid traverse N25 X 20 ...

Page 72: ...red circle can be given in various ways See the following illustration for possibilities of circle programming with G2 G3 using the example of the axes X Y and G2 G2 G3 remains active until canceled by another instruction from this G group G0 G1 The path velocity is determined by the programmed F word Programming G2 G3 X Y I J End point and center point G2 G3 CR X Y Circle radius and end point G2 ...

Page 73: ...erwise an alarm message is issued Information Full circles in a block are only possible if the center point and the end point are specified For circles with radius specification the arithmetic sign of CR is used to select the correct circle It is possible to program two circles with the same starting and end points as well as with the same radius and the same direction The negative sign in front o...

Page 74: ... N10 N10 G2 X50 Y40 I10 J 7 End point and center point Note Center point values refer to the circle starting point Programming example End point and radius specification N5 G90 X30 Y40 Starting point circle for N10 N10 G2 X50 Y40 CR 12 207 End point and radius Note With a negative leading sign for the value with CR a circular segment larger than a semi circle is selected ...

Page 75: ...e angle N5 G90 X30 Y40 Starting point circle for N10 N10 G2 X50 Y40 AR 105 End point and aperture angle Programming example Definition of center point and aperture angle N5 G90 X30 Y40 Starting point circle for N10 N10 G2 I10 J 7 AR 105 Center point and aperture angle Note Center point values refer to the circle starting point ...

Page 76: ...points of the circle instead of center point or radius or aperture angle then it is advantageous to use the CIP function The direction of the circle results here from the position of the intermediate point between starting and end points The intermediate point is written according to the following axis assignment I1 for the X axis J1 for the Y axis K1 for the Z axis CIP remains active until cancel...

Page 77: ...CT Functionality With CT and the programmed end point in the current plane G17 through G19 a circle is generated which is connected tangentially to the previous path segment circle or straight line in this plane This defines the radius and center point of the circle from the geometric relationships of the previous path section and the programmed circle end point See the following illustration for ...

Page 78: ...URN Opening angle and end point G2 G3 AP RP TURN Polar coordinates circle around the pole See the following illustration for helical interpolation Programming example N10 G17 X Y plane Z standing vertically on it N20 G0 Z50 N30 G1 X0 Y50 F300 Approach starting point N40 G3 X0 Y0 Z33 I0 J 25 TURN 3 Helix M30 8 4 5 Feedrate override for circles CFTCP CFC Functionality For activated tool radius compe...

Page 79: ...r Fprog rcont rtool rcont rcont Radius of the circle contour rtool Tool radius Programming example N10 G42 G1 X30 Y40 F1000 Tool radius compensation ON N20 CFC F350 Feedrate override with circle ON N30 G2 X50 Y40 I10 J 7 F350 Feed value acts on contour N40 G3 X70 Y40 I10 J6 F300 Feed value acts on contour N50 CFTCP Feedrate override OFF programmed feedrate value acts at the milling cutter center p...

Page 80: ...ned N10 G54 G0 G90 X10 Y10 Z5 S600 M3 Approach starting point clockwise spindle rotation N20 G33 Z 25 K0 8 Tapping end point 25 mm N40 Z5 K0 8 M4 Retraction counter clockwise spindle rotation N50 G0 X30 Y30 Z20 N60 M30 Axis velocity With G33 threads the velocity of the axis for the thread lengths is determined on the basis of the spindle speed and the thread pitch The feedrate F is not relevant It...

Page 81: ... M3 Approach starting point clockwise spindle rotation N20 G63 Z 25 F480 Tapping end point 25 mm N40 G63 Z5 M4 Retraction counter clockwise spindle rotation N50 X30 Y30 Z20 M30 8 5 3 Thread interpolation G331 G332 Functionality This requires a position controlled spindle with a position measuring system By using G331 G332 the threads can be tapped without compensating chuck if the dynamic properti...

Page 82: ...ll result in an alarm Programming example metric thread 5 lead as per table 0 8 mm rev hole already premachined N5 G54 G0 G90 X10 Y10 Z5 Approach starting point N10 SPOS 0 Spindle in position control N20 G331 Z 25 K0 8 S600 Tapping K positive clockwise of the spindle end point Z 25 mm N40 G332 Z5 K0 8 Retraction N50 G0 X30 Y30 Z20 N60 M30 8 6 Fixed point approach 8 6 1 Fixed point approach G75 Fun...

Page 83: ...oint is to be approached simultaneously Each axis is traversed with the maximum axial velocity Programming example N05 G75 FP 1 Z 0 Approach fixed point 1 in Z N10 G75 FP 2 X 0 Y 0 Approach fixed point 2 in X and Y e g to change a tool N30 M30 End of program Note The programmed position values for X Y Z any value here 0 are ignored but must still be written 8 6 2 Reference point approach G74 Funct...

Page 84: ...plied to braking procedures See the following illustration for basic course of the path velocity when using BRISK SOFT Programming BRISK Jerking path acceleration SOFT Jerk limited path acceleration Programming example N10 SOFT G1 X30 Z84 F650 Jerk limited path acceleration N90 BRISK X87 Z104 Continuing with jerking path acceleration 8 7 2 Exact stop continuous path control mode G9 G60 G64 Functio...

Page 85: ...hed the Exact stop window coarse value in the machine data The selection of the exact stop window has a significant influence on the total time if many positioning operations are executed Fine adjustments require more time See the following illustration for exact stop window coarse or fine in effect for G60 G9 Programming example N5 G602 Exact stop window coarse N10 G0 G60 X20 Exact stop modal N20...

Page 86: ...30 Continuous path control mode continues to be active N30 G60 Z50 Switching over to exact stop M30 Look ahead velocity control In the continuous path control mode with G64 the control system determines the velocity control for several NC blocks in advance automatically This enables acceleration and deceleration across multiple blocks with approximately tangential transitions For paths that consis...

Page 87: ...pindle speed S directions of rotation Functionality The spindle speed is programmed in revolutions per minute under the address S provided that the machine possesses a controlled spindle The direction of rotation and the start or end of the movement are specified via M commands also see Section Miscellaneous function M Page 103 M3 Spindle clockwise M4 Spindle counter clockwise M5 Spindle stop Note...

Page 88: ...ements in the same block This block is ended when both movements are finished Programming SPOS Absolute position 0 360 degrees SPOS ACP Absolute dimensions approach position in positive direction SPOS ACN Absolute dimensions approach position in negative direction SPOS IC Incremental dimensions leading sign determines the traversal direction SPOS DC Absolute dimensions approach position directly o...

Page 89: ...us and chamfer are programmed in one block only the radius is inserted regardless of the programming sequence Angle ANG If only one end point coordinate of the plane is known for a straight line or for contours across multiple blocks the cumulative end point an angle parameter can be used for uniquely defining the straight line path The angle is always referred to the abscissa of the current plane...

Page 90: ...rounding RND elements into a contour corner If you wish to round several contour corners sequentially by the same method use Modal rounding RNDM You can program the feedrate for the chamfer rounding with FRC non modal or FRCM modal If FRC FRCM is not programmed the normal feedrate F is applied Programming CHF Insert chamfer value Length of chamfer CHR Insert chamfer value Side length of the chamfe...

Page 91: ...M is written in the block with axis movements leading to the corner The programmed value for chamfer and rounding is automatically reduced if the contour length of an involved block is insufficient No chamfer rounding is inserted if more than three blocks in the connection are programmed that do not contain any information for traversing in the plane or a plane change is carried out F FRC FRCM are...

Page 92: ... Y100 N10 G1 X85 CHF 5 Insert chamfer with chamfer length of 5 mm N20 X70 Y70 N30 G0 X60 Y60 N100 G1 X50 CHR 7 Insert chamfer with leg length of 7 mm N110 X40 Y40 N200 G1 FRC 200 X30 CHR 4 Insert chamfer with feedrate FRC N210 X20 Y20 M30 Rounding RND or RNDM A circle contour element can be inserted with tangential connection between the linear and circle contours in any combination See the follow...

Page 93: ...tionality When creating programs for machining workpieces it is not necessary to take into account the tool length or the tool radius You program the workpiece dimensions directly for example following the drawing You enter the tool data separately in a special data section Simply call the required tool with its offset data in the program and enable the tool radius compensation if necessary The co...

Page 94: ...n start a block with the new T word in MDA mode Programming T Tool number 1 32 000 T0 no tool The control system can store a maximum of 64 tools Programming example Tool change without M6 N10 T1 Tool 1 N70 T588 Tool 588 Tool change with M6 N10 T14 Preselect tool 14 N15 M6 Perform tool change thereafter T14 is active 8 10 3 Tool compensation number D Functionality It is possible to assign 1 to 9 da...

Page 95: ...6 G0 Z For G17 Z is length offset axis the length offset compensation is overlaid here N20 G0 Z D2 D2 for tool 1 is active for G17 Z is length offset axis the difference of the D1 D2 length offset is overlaid here N50 T4 T4 tool preselection note T1 with D2 is still active N55 D3 M6 Tool change T4 is active with the appropriate D3 Contents of a compensation memory Enter the following in the offset...

Page 96: ...ation for effect of the offsets with the tool type cutter 8 10 4 Selecting the tool radius compensation G41 G42 Functionality The control system is working with tool radius compensation in the selected plane G17 to G19 A tool with a corresponding D number must be active The tool radius compensation is activated by G41 G42 The control system automatically calculates the required equidistant tool pa...

Page 97: ...erpolation G0 G1 Program both axes of the plane e g with G17 X Y If you only specify one axis the second axis is automatically completed with the last programmed value See the following illustration for compensation to the right left of the contour Starting the compensation The tool travels in a straight line directly to the contour and is positioned perpendicular to the path tangent at the starti...

Page 98: ...tour The contour description however may be interrupted by 5 blocks which lie between them and do not contain any specifications for the contour path in the plane e g only an M command or infeed motions Programming example N10 T1 N20 G17 D2 F300 Correction number 2 feed 300 mm min N25 X0 Y0 P0 starting point N30 G1 G42 X11 Y11 Selection right of contour P1 N31 X20 Y20 Starting contour circle or st...

Page 99: ...e following illustration for corner behavior at an internal corner Transition circle G450 The tool center point travels around the workpiece external corner in an arc with the tool radius In view of the data for example as far as the feedrate value is concerned the transition circle belongs to the next block containing traversing movements Point of intersection G451 For a G451 intersection of the ...

Page 100: ...tically to the tangent at the end point If G40 is active the reference point is the tool center point Subsequently when deselected the tool tip approaches the programmed point Always select the end point of the G40 block such that collision free traversing is guaranteed Programming G40 X Y Tool radius compensation OFF Note The compensation mode can only be deselected with linear interpolation G0 G...

Page 101: ...ffect from the block in which the new D number is programmed Its complete modification is only achieved at the end of the block In other words The modification is traversed continuously over the entire block also for circular interpolation Change of the compensation direction The compensation direction G41 G42 can be changed without writing G40 The last block with the old compensation direction en...

Page 102: ... transition circle This prevents long idle motions 8 10 8 Example of tool radius compensation See the following illustration for example of tool radius compensation Programming example N1 T1 Tool 1 with offset D1 N5 G0 G17 G90 X5 Y55 Z50 Approach starting point N6 G1 Z0 F200 S80 M3 N10 G41 G450 X30 Y60 F400 Compensation to the left of the contour transition circle N20 X40 Y80 N30 G2 X65 Y55 I0 J 2...

Page 103: ...amped up for M3 M4 For M5 however the spindle standstill is not waited for The axis movements already begin before the spindle stops default setting The remaining M functions are output to the PLC with the traversing movements If you would like to program an M function directly before or after an axis movement insert a separate block with this M function Note The M function interrupts the G64 cont...

Page 104: ...ues to the arithmetic parameters R R0 Indirect programming Assign a value to the arithmetic parameter R whose number can be found e g in R0 X R0 Assign arithmetic parameters to the NC addresses e g for the X axis Value assignments You can assign values in the following range to the R parameters 0 000 0001 9999 9999 8 decimal places arithmetic sign and decimal point The decimal point can be omitted...

Page 105: ...Result the same as block N40 N60 R15 SQRT R1 R1 R2 R2 Meaning N70 R1 R1 The new R1 is the negative old R1 Programming example Assign R parameters to the axes R1 40 R2 10 R3 20 R4 45 R5 30 N10 G1 G90 X R1 Z R2 F300 Separate blocks traversing blocks N20 Z R3 N30 X R4 N40 Z SIN 25 3 R5 With arithmetic operations M30 Programming example Indirect programming N10 R1 5 Assigning R1 directly value 5 integ...

Page 106: ...F INT PVAR5 n One dimensional field type INT n integer DEF INT PVAR6 n m Two dimensional field type INT n m integer Example DEF INT PVAR7 3 Field with 3 elements of the type INT Within the program the individual field elements can be reached via the field index and can be treated like individual variables The field index runs from 0 to a small number of the elements Example N10 PVAR7 2 24 The thir...

Page 107: ...iggered Example A_DBB 1 1 A_DBB 2 2 A_DBB 3 3 STOPRE A_DBB 4 4 8 14 Program jumps 8 14 1 Unconditional program jumps Functionality NC programs process their blocks in the sequence in which they were arranged when they were written The processing sequence can be changed by introducing program jumps The jump destination can be a block with a label or with a block number This block must be located wi...

Page 108: ... label jump label or block number IF Introduction of the jump condition Condition Arithmetic parameter arithmetic expression for formulating the condition Comparison operations Operators Meaning Equal to Not equal to greater than less than greater than or equal to less than or equal to The comparison operations support formulating of a jump condition Arithmetic expressions can also be compared The...

Page 109: ...g points on a circle segment Existing conditions Start angle 30 in R1 Circle radius 32 mm in R2 Position spacing 10 in R3 Number of points 11 in R4 Position of circle center in Z 50 mm in R5 Position of circle center in X 20 mm in R6 See the following illustration for linear approach of points on a circle segment Programming example N10 R1 30 R2 32 R3 10 R4 11 R5 50 R6 20 Assignment of initial val...

Page 110: ...ey are always at the start of a block If a block number is also present the label is located after the block number Labels must be unique within a program Programming example N10 LABEL1 G1 X20 F100 LABEL1 is the label jump destination N20 G0 X10 Y10 TR789 G0 X10 Z20 TR789 is the label jump destination N30 G0 X30 Z30 No block number existing N100 G0 X40 Z40 Block number can be jump target M30 8 15 ...

Page 111: ...ng illustration for example of sequence when calling a subroutine twice Subroutine name The program is given a unique name allowing it to be selected from several subroutines When you create the program the program name may be freely selected provided the following conventions are observed The same rules apply as for the names of main programs Example LRAHMEN7 It is also possible to use the addres...

Page 112: ...ling program ensure that all modal functions are set the way you need them to be Please make sure that the values of your arithmetic parameters used in upper program levels are not inadvertently changed in lower program levels When working with SIEMENS cycles up to 4 program levels are needed 8 15 2 Calling machining cycles Functionality Cycles are technology subroutines realizing a certain machin...

Page 113: ...e external subroutine EXTCALL Function With the EXTCALL command you can reload and execute programs stored on an external USB memory stick Machine data The following machine data is used for the EXTCALL command MD10132 MN_MMC_CMD_TIMEOUT Monitoring time for the command in part program MD18362 MN_MM_EXT_PROG_NUM Number of program levels that can be processed simultaneously from external SD42700 SC_...

Page 114: ...0 M17 8 16 Timers and workpiece counters 8 16 1 Runtime timer Functionality The timers are prepared as system variables A that can be used for monitoring the technological processes in the program or only in the display These timers are read only There are timers that are always active Others can be deactivated via machine data Timers always active AN_SETUP_TIME Time since the last control power u...

Page 115: ...es is measured in all NC programs between program start and end without rapid traverse active and with the tool active default setting The measurement is interrupted when a dwell time is active The timer is automatically set to zero after each power up of the control system Programming example N10 IF AC_CUTTING_TIME R10 GOTOF WZZEIT Tool operation time limit value G0 X20 Y20 N80 WZZEIT G0 X30 Y30 ...

Page 116: ...AL_PARTS Total number of workpieces produced total actual The counter specifies the total number of all workpieces produced since the start time The counter is set to zero automatically upon every booting of the control system AC_ACTUAL_PARTS Number of actual workpieces actual This counter registers the number of all workpieces produced since the starting time When the workpiece setpoint is reache...

Page 117: ...mpensation TRC The G41 and G42 commands determine the approach retraction direction to the left or right of the contour The approach retraction path straight line quarter or semi circle is selected using a group of G commands To parameterize this path circle radius length approach straight line special addresses can be used this also applies to the feedrate of the infeed motion The infeed motion c...

Page 118: ... using the example of G42 or retraction using G41 and completion with G40 Programming example Approach retraction along a straight line in a plane N10 T1 G17 Activate tool X Y plane N20 G0 X20 Y20 Approach P0 N30 G42 G147 DISR 8 F600 X4 Y4 Approach point P4 programmed N40 G1 X40 Continue in the contour N50 Y12 N100 G41 G1 X15 Y15 N110 X4 Y4 P4 contour end point N120 G40 G148 DISR 8 F700 X8 Y8 Retr...

Page 119: ... directions for G41 G42 will be changed Controlling the infeed motion using DISCL and G340 G341 DISCL specifies the distance of point P2 from the machining plane see following figure In the case DISCL 0 the following will apply With G340 The whole approach motion consists only of two blocks P1 P2 and P3 are identical The approach contour is generated from P3 to P4 With G341 The whole approach moti...

Page 120: ...d in the plane Z 30 then lowering to the depth P2 P3 with Z 3 DISCL The contour is reached at point X40 Y 10 in the depth Z 0 P4 along a helix curve at a feedrate of 500 mm min Approach and retraction velocities Velocity of the previous block e g G0 All motions from P0 up to P2 are executed at this speed i e the motion parallel to the machining plane and the part of the infeed motion up to the saf...

Page 121: ...ed the contour ends at P2 The positions on the axes that constitute the machining plane result from the retraction contour The axis component perpendicular to this is defined by DISCL With DISCL 0 the motion will run completely in the plane If in the SAR block only the axis is programmed vertically to the machining plane the contour will end at P1 The positions of the remaining axes will result as...

Page 122: ...Programming cycles Call and return conditions The G functions effective prior to the cycle call and the programmable offsets remain active beyond the cycle The machining level G17 G18 G19 must be defined before calling the cycle A cycle operates in the current plane with First axis of the plane abscissa Second axis of the plane ordinate Drilling axis infeed axis third axis standing vertically to t...

Page 123: ...ing parameters can be transferred R parameters only numerical values Constants If R parameters are used in the parameter list they must first be assigned values in the calling program Proceed as follows to call the cycles With an incomplete parameter list or By omitting parameters If you want to exclude the last transfer parameters that have to be written in a call you can prematurely terminate th...

Page 124: ...lues directly numerical values or indirectly R parameters for example R27 or expressions consisting of R parameters for example R27 10 If numerical values are entered then the control system automatically performs a check to see whether the value lies within the permitted range 4 Use this key to select values for some parameters that may have only a few values for selection 5 For drilling cycles i...

Page 125: ...ve a different meaning and effect in the individual cycles They are therefore programmed in each cycle separately 9 4 2 Requirements Call and return conditions Drilling cycles are programmed independently of the actual axis names The drilling position must be approached in the higher level program before the cycle is called The required values for feedrate spindle speed and direction of spindle ro...

Page 126: ...te RFP REAL Reference plane absolute SDIS REAL Safety clearance enter without sign DP REAL Final drilling depth absolute DPR REAL Final drilling depth relative to the reference plane enter without sign Function The tool drills at the programmed spindle speed and feedrate to the entered final drilling depth Sequence Position reached prior to cycle start The drilling position is the position in the ...

Page 127: ...the cycle DP and DPR final drilling depth The final drilling depth can be specified either absolute DP or relative DPR to the reference plane With relative specification the cycle will calculate the resulting depth automatically using the positions of reference and retraction planes Note If a value is entered both for DP and for DPR the final drilling depth is derived from DPR If this differs from...

Page 128: ...G90 F180 S300 M03 Specification of technology values N80 X90 Approach next position N90 CYCLE81 110 100 2 65 Cycle call with relative final drilling depth and safety clearance N100 M02 End of program 9 4 4 Drilling counterboring CYCLE82 Programming CYCLE82 RTP RFP SDIS DP DPR DTB Parameters Parameter Data type Description RTP REAL Retraction plane absolute RFP REAL Reference plane absolute SDIS RE...

Page 129: ...te G1 programmed prior to the cycle call Dwell time at final drilling depth Retraction to the retraction plane with G0 Explanation of the parameters For the parameters RTP RFP SDIS DP DPR refer to Section Drilling centering CYCLE81 Page 126 DTB dwell time The dwell time to the final drilling depth chip breakage is programmed under DTB in seconds Programming example1 Drilling_counterboring The prog...

Page 130: ...ilable drilling cycles 3 Press this softkey from the vertical softkey bar 4 Press this softkey to open the window for CYCLE82 Parameterize the cycle as desired 5 Confirm your settings with this softkey The cycle is then automatically transferred to the program editor as a separate block 9 4 5 Deep hole drilling CYCLE83 Programming CYCLE83 RTP RFP SDIS DP DPR FDEP FDPR DAM DTB DTS FRF VARI AXN MDEP...

Page 131: ... value for chip breakage VARI 0 Values 0 if traction value 0 retraction value 1mm set DTD REAL Dwell time at final drilling depth Values 0 in seconds 0 in revolutions 0 value same as DTB DIS1 REAL Programmable limit distance for reinsertion in the drill hole for chip removal VARI 1 Values 0 programmable value applies 0 automatic calculation Function The tool drills at the programmed spindle speed ...

Page 132: ...retraction plane with G0 See the following illustration for parameters for CYCLE83 Deep hole drilling with chip breakage VARI 0 Approach of the reference plane brought forward by the safety clearance by using G0 Traversing to the first drilling depth with G1 the feedrate for which is derived from the feedrate defined with the program call which is subject to parameter FRF feedrate factor Dwell tim...

Page 133: ...ng only once and will therefore drill only once DTB dwell time The dwell time to the final drilling depth chip breakage is programmed under DTB in seconds DTS dwell time The dwell time at the starting point is only performed if VARI 1 chip removal FRF feedrate factor With this parameter you can specify a reduction factor for the active feedrate which only applies to the approach to the first drill...

Page 134: ...e chip breaking The final drilling depth and the first drilling depth are entered as absolute values In the second cycle call a dwell time of 1 s is programmed Machining type chip removal is selected the final drilling depth is relative to the reference plane The drilling axis in both cases is the Z axis N10 G0 G17 G90 F50 S500 M4 Specification of technology values N20 D1 T12 Approach retraction p...

Page 135: ...e to the reference plane enter without sign DTB REAL Dwell time at thread depth chip breakage SDAC INT Direction of rotation after end of cycle Values 3 4 or 5 for M3 M4 or M5 MPIT REAL Thread lead as a thread size signed Range of values 3 for M3 to 48 for M48 the sign determines the direction of rotation in the thread PIT REAL Thread lead as a value signed Range of values 0 001 2000 000 mm the si...

Page 136: ...the boring operation is technically able to be operated in the position controlled spindle operation Sequence Position reached prior to cycle start The drilling position is the position in the two axes of the selected plane The cycle creates the following sequence of motions Approach of the reference plane brought forward by the safety clearance by using G0 Oriented spindle stop value in the param...

Page 137: ...the spindle speed for the tapping block with G331 SST1 retraction speed The speed for retraction from the tapped hole is programmed under SST1 If this parameter is assigned the value zero retraction is carried out at the speed programmed under SST AXN tool axis The identifiers have the following meanings AXN 1 1st axis of the current plane AXN 2 2nd axis of the current plane AXN 3 3rd axis of the ...

Page 138: ...ad M5 is tapped N10 G0 G90 T11 D1 Specification of technology values N20 G17 X30 Y35 Z40 Approach drilling position N30 CYCLE84 20 0 3 15 1 3 6 0 500 500 3 0 0 0 5 0 Cycle call parameter PIT has been omitted no value is entered for the absolute depth or the dwell time spindle stop at 90 degrees speed for tapping is 200 speed for retraction is 500 N40 M02 End of program Programming example 2 Rigid ...

Page 139: ...illing depth absolute DPR REAL Final drilling depth relative to the reference plane enter without sign DTB REAL Dwell time at thread depth chip breakage SDR INT Direction of rotation for retraction Values 0 automatic direction reversal 3 or 4 for M3 or M4 SDAC INT Direction of rotation after end of cycle Values 3 4 or 5 for M3 M4 or M5 ENC INT Tapping with without encoder Values 0 with encoder 1 w...

Page 140: ...ng position is the position in the two axes of the selected plane The cycle creates the following sequence of motions Approach of the reference plane brought forward by the safety clearance by using G0 Tapping to the final drilling depth Dwell time at tapping depth parameter DTB Retraction to the reference plane brought forward by the safety clearance Retraction to the retraction plane with G0 Seq...

Page 141: ...modally see Section Graphical cycle support in the program editor Page 124 it requires a direction of rotation for tapping further threaded holes This is programmed in parameter SDAC and corresponds to the direction of rotation programmed before the first call in the higher level program If SDR 0 the value assigned to SDAC has no meaning in the cycle and can be omitted in the parameterization ENC ...

Page 142: ...With G17 AXN 1 Corresponds to X AXN 2 Corresponds to Y AXN 3 Corresponds to Z Using AXN number of the drilling axis to program the drilling axis enables the drilling axis to be directly programmed AXN 1 1st axis of the current plane AXN 2 2nd axis of the current plane AXN 3 3rd axis of the current plane For example to machine a hole in the G17 plane with Z axis you program G17 AXN 3 Programming ex...

Page 143: ...s MPIT and PIT have been omitted N50 M02 End of program Programming example Tapping with encoder In this program a thread is tapped with encoder at position X35 Y35 in the XY plane The drilling axis is the Z axis The lead parameter must be defined automatic reversal of the direction of rotation is programmed A compensating chuck is used in machining N10 G90 G0 T11 D1 S500 M4 Specification of techn...

Page 144: ...d final drilling depth The inward and outward movement is performed at the feedrate assigned to FFR and RFF respectively Sequence Position reached prior to cycle start The drilling position is the position in the two axes of the selected plane The cycle creates the following sequence of motions Approach of the reference plane brought forward by the safety clearance by using G0 Traversing to the fi...

Page 145: ...pper edge is at Y102 N10 T11 D1 G1 F200 M3 S200 N20 G18 Z70 X50 Y105 Approach drilling position N30 CYCLE85 105 102 2 25 300 450 Cycle call no dwell time programmed N40 M02 End of program 9 4 9 Boring CYCLE86 Programming CYCLE86 RTP RFP SDIS DP DPR DTB SDIR RPA RPO RPAP POSS Parameters Parameter Data type Description RTP REAL Retraction plane absolute RFP REAL Reference plane absolute SDIS REAL Sa...

Page 146: ...the reference plane brought forward by the safety clearance by using G0 Traversing to final drilling depth with G1 and the feedrate programmed prior to the cycle call Dwell time to final drilling depth Oriented spindle stop at the spindle position programmed under POSS Traverse retraction path in up to three axes with G0 Retraction in the drilling axis to the reference plane brought forward by the...

Page 147: ...gram the spindle position for the oriented spindle stop in degrees which is performed after the final drilling depth has been reached Note It is possible to stop the active spindle with orientation The angular value is programmed using a transfer parameter CYCLE86 can be used if the spindle to be used for the drilling operation is technically able to execute the SPOS command Programming example Se...

Page 148: ... feedrate to the entered final drilling depth During drilling 3 a spindle stop without orientation M5 is generated after reaching the final drilling depth followed by a programmed stop M0 Pressing the following key continues the retraction movement at rapid traverse until the retraction plane is reached Sequence Position reached prior to cycle start The drilling position is the position in the two...

Page 149: ... M3 M4 are generated alarm 61102 No spindle direction programmed is generated and the cycle is aborted Programming example Third drilling CYCLE87 is called at position X70 Y50 in the XY plane The drilling axis is the Z axis The final drilling depth is specified as an absolute value The safety clearance is 2 mm N10 G0 G17 G90 F200 S300 Specification of technology values N20 D3 T3 Z113 Approach retr...

Page 150: ...feedrate to the entered final drilling depth When drilling with stop a spindle stop without orientation M5 and a programmed stop M0 are generated when the final drilling depth is reached Pressing the following key traverses the outward movement at rapid traverse until the retraction plane is reached Sequence Position reached prior to cycle start The drilling position is the position in the two axe...

Page 151: ...ed at position X80 Y90 in the XY plane The drilling axis is the Z axis The safety clearance is programmed with 3 mm the final drilling depth is specified relative to the reference plane M4 is active in the cycle N10 G17 G90 F100 S450 Specification of technology values N20 G0 X80 Y90 Z105 Approach drilling position N30 CYCLE88 105 102 3 72 3 4 Cycle call with programmed spindle direction M4 N40 M02...

Page 152: ...ence of motions Approach of the reference plane brought forward by the safety clearance by using G0 Traversing to final drilling depth with G1 and the feedrate programmed prior to the cycle call Dwell time to final drilling depth Retraction up to the reference plane brought forward by the safety clearance using G1 and the same feedrate value Retraction to the retraction plane with G0 Explanation o...

Page 153: ...of drilling holes in the plane The link to a drilling process is established via the modal call of this drilling cycle before the drilling pattern cycle is programmed 9 5 1 Requirements Drilling pattern cycles without drilling cycle call Drilling pattern cycles can also be used for other applications without prior modal call of a drilling cycle because the drilling pattern cycles can be parameteri...

Page 154: ...rence point on the straight line absolute SPCO REAL Second axis of the plane ordinate of this reference point absolute STA1 REAL Angle to the first axis of the plane abscissa Range of values 180 STA1 180 degrees FDIS REAL Distance from the first hole to the reference point enter without sign DBH REAL Distance between the holes enter without sign NUM INT Number of holes Function This cycle can be u...

Page 155: ...ered under STA1 in degrees FDIS and DBH distance The distance of the first hole and the reference point defined under SPCA and SPCO is programmed with FDIS The parameter DBH contains the distance between any two holes NUM number The NUM parameter is used to define the number of holes Programming example Row of holes Use this program to machine a row of holes consisting of five tapped holes arrange...

Page 156: ... starting with the fifth hole in the row N90 MCALL Deselect modal call N100 M02 End of program Programming example Grid of holes Use this program to machine a grid of holes consisting of five rows with five holes each which are arranged in the XY plane with a spacing of 10 mm between them The starting point of the grid is at X30 Y20 The example uses R parameters as transfer parameters for the cycl...

Page 157: ... call N90 G90 G0 X30 Y20 Z105 Approach starting position N100 M02 End of program 9 5 3 Circle of holes HOLES2 Programming HOLES2 CPA CPO RAD STA1 INDA NUM Parameters Parameter Data type Description CPA REAL Center point of circle of holes absolute first axis of the plane CPO REAL Center point of circle of holes absolute second axis of the plane RAD REAL Radius of circle of holes enter without sign...

Page 158: ...for the radius STA1 and INDA starting and incremental angle These parameters define the arrangement of the holes on the circle of holes The STA1 parameter defines the angle of rotation between the positive direction of the first axis abscissa in the workpiece coordinate system active before the cycle was called and the first hole The INDA parameter contains the angle of rotation from one hole to t...

Page 159: ...90 F140 S170 M3 T10 D1 Specification of technology values N20 G17 G0 X50 Y45 Z2 Approach starting position N30 MCALL CYCLE82 2 0 2 30 0 Modal call of the drilling cycle without dwell time DP is not programmed N40 HOLES2 70 60 42 33 0 4 Call of the circle of holes cycle the incremental angle is calculated in the cycle since the parameter INDA has been omitted N50 MCALL Deselect modal call N60 M02 E...

Page 160: ...2 Y2 X3 Y3 X4 Y4 Parameters Parameter Data type Description PSYS INT Internal parameter only the default value 111111111 is possible PSYS INT Internal parameter only the default value 111111111 is possible X0 REAL First position in the X axis Y0 REAL First position in the Y axis X1 REAL Second position in the X axis Y1 REAL Second position in the Y axis X2 REAL Third position in the X axis Y2 REAL...

Page 161: ...G17 at the Positions X20 Y20 X40 Y25 X30 Y40 N10 G90 G17 Absolute dimension data X Y plane N20 T10 Selects the tool N30 M06 Tool change S800 M3 Spindle speed clockwise rotation of the spindle M08 F140 Feedrate Coolant on G0 X0 Y0 Z20 Approach starting position MCALL CYCLE82 2 0 2 5 5 0 Modal call of the drilling N40 CYCLE802 111111111 111111111 20 20 40 25 30 40 call cycle positions N50 MCALL Dese...

Page 162: ... first figure being machined Slot No other figure being machined Circumferential slot No last figure being machined In each case No stands for the number of the figure that is currently being machined These message do not interrupt the program execution and continue to be displayed until the next message is displayed or the cycle is completed 9 6 2 Face milling CYCLE71 Programming CYCLE71 _RTP _RF...

Page 163: ... plane in one direction 2 parallel to the second axis of the plane in one direction 3 parallel to the first axis of the plane with alternating direction 4 parallel to the second axis of the plane with alternating direction _FDP1 REAL Overrun travel in the direction of the plane infeed incremental enter without sign Function Use CYCLE71 to mill any rectangular surface The cycle differentiates betwe...

Page 164: ...the maximum possible width infeed occurs The tool center point therefore does not always travel exactly on the edge only if _MIDA cutter radius The dimension by which the tool traverses outside the edge is always equal to the cutter diameter _MIDA even if only one surface cut is performed i e area width overrun is less than _MIDA The other paths for width infeed are calculated internally so as to ...

Page 165: ...the maximum infeed width when machining in a plane Analogously to the known calculation method for the infeed depth equal distribution of the total depth with maximum possible value the width is distributed equally maximally with the value programmed under _MIDA If this parameter is not programmed or has value 0 the cycle will internally use 80 of the milling tool diameter as the maximum infeed wi...

Page 166: ...axis of the plane unidirectional 2 parallel to the second axis of the plane unidirectional 3 parallel to the first axis of the plane with alternating direction 4 parallel to the second axis of the plane with alternating direction If a different value is programmed for the parameter _VARI the cycle is aborted after output of alarm 61002 Machining type defined incorrectly Note A tool compensation mu...

Page 167: ...0 Z20 Approach start position N30 CYCLE71 10 0 2 11 100 100 60 40 10 6 10 5 0 4000 31 2 Cycle call N40 G0 G90 X0 Y0 N50 M02 End of program 9 6 3 Contour milling CYCLE72 Programming CYCLE72 _KNAME _RTP _RFP _SDIS _DP _MID _FAL _FALD _FFP1 _FFD _VARI _RL _AS1 _LP1 _FF3 _AS2 _LP2 Parameters Parameter Data type Description _KNAME STRING Name of contour subroutine _RTP REAL Retraction plane absolute _R...

Page 168: ...tion of the approach direction path enter without sign UNITS DIGIT Values 1 Straight tangential line 2 Quadrant 3 Semi circle TENS DIGIT Values 0 Approach to the contour in the plane 1 Approach to the contour in a spatial path _LP1 REAL Length of the approach travel with straight line or radius of the approach arc with circle enter without sign The following parameters can be selected as options _...

Page 169: ...tour blocks start and end point since the contour subroutine is called directly internally in the cycle See the following illustration for path milling 1 See the following illustration for path milling 2 Functions of the cycle Selection of roughing single pass traversing parallel to contour taking into account a finishing allowance if necessary at several depths until the finishing allowance is re...

Page 170: ...ng feed for the surface machining by the retraction amount Retraction with G0 G1 and feedrate for intermediate paths _FF3 depending on the programming Retraction to the depth infeed point with G0 G1 and _FF3 This sequence is repeated on the next machining plane up to finishing allowance in the depth Upon completion of roughing the tool stands above the point calculated internally in the control sy...

Page 171: ... does not yet exist specify a name and then press the following softkey A program with the entered name is created and the program automatically jumps to the contour editor Use the following softkey to confirm your input and return to the screen form for this cycle Defining the contour as a section of the called program KNAME name of the starting label name of the end label Input If the contour is...

Page 172: ...en using G40 the approach or retraction travel is the distance from the tool center point to the start or end point of the contour _VARI machining type Use the parameter _VARI to define the machining type If a different value is programmed for the parameter _VARI the cycle is aborted after output of alarm 61002 Machining type defined incorrectly _RL bypassing the contour With the parameter _RL you...

Page 173: ...se the parameter _FF3 to define a retraction feedrate for intermediate positions in the plane in the open if the intermediate motions are to be carried out with feedrate G01 If no feedrate value is programmed the intermediate motions with G01 are carried out at surface feedrate Note A tool compensation must be programmed before the cycle is called Otherwise the cycle is aborted and alarm 61000 No ...

Page 174: ...ed 400 mm min _VARI Machining type 111 Roughing up to finishing allowance intermediate paths with G1 for intermediate paths retraction in Z to _RFP _SDIS Parameters for approach _RL G41 left of the contour i e external machining 41 _LP1 Approach and retraction in a quadrant in the plane 20 mm radius _FF3 Retraction feedrate 1000 mm min N10 T3 D1 T3 Milling cutter with radius 7 N20 S500 M3 F3000 Pr...

Page 175: ...edrate and spindle speed N30 G17 G0 G90 X100 Y200 Z250 G94 Approach start position N40 CYCLE72 PIECE245 PIECE245E 250 200 3 175 10 1 1 5 800 400 11 41 2 20 1000 2 20 Cycle call N50 X100 Y200 N60 M2 N70 PIECE245 Contour N80 G1 G90 X150 Y160 N90 X230 CHF 10 N100 Y80 CHF 10 N110 X125 N120 Y135 N130 G2 X150 Y160 CR 25 N140 PIECE245E End of contour N150 M2 Programming example 3 Proceed through the foll...

Page 176: ... 6 Press this softkey to confirm the settings 7 Select a desired machining direction and shape with the corresponding softkey Specify the corresponding coordinates according to the drawings The selected direction appears on the top left of the screen and the corresponding descriptive text is given in the information line at the bottom of the screen 8 Press this softkey to confirm the settings 9 Se...

Page 177: ...ius enter without sign PA REAL Reference point of spigot abscissa absolute PO REAL Reference point of spigot ordinate absolute STA REAL Angle between longitudinal axis and first axis of plane MID REAL Maximum depth infeed incremental enter without sign FAL REAL Final machining allowance at the margin contour incremental FALD REAL Finishing allowance at the base incremental enter without sign FFP1 ...

Page 178: ...n to the starting point in the machining plane at this height The starting point is defined with reference to 0 degrees of the abscissa The tool is fed to the safety clearance SDIS at rapid traverse with subsequent traversing to the machining depth at feedrate To approach the spigot contour the tool travels along a semi circular path The milling direction can be determined either as up cut milling...

Page 179: ... to define the form of a slot in the plane The spigot is always dimensioned from the center The length LENG always refers to the abscissa with a plane angle of 0 degrees PA PO reference point Use the parameters PA and PO to define the reference point of the spigot along the abscissa and the ordinate This is the spigot center point STA angle STA specifies the angle between the first axis of the pla...

Page 180: ...ive tool number 0 is output Internally in the cycle a new current workpiece coordinate system is used which influences the actual value display The zero point of this coordinate system is to be found in the pocket center point At the end of the cycle the original coordinate system is active again Programming example Spigot Use this program to machine in the XY plane a spigot that is 60 mm long 40 ...

Page 181: ... PO REAL Center point of spigot ordinate absolute MID REAL Maximum depth infeed incremental enter without sign FAL REAL Final machining allowance at the margin contour incremental FALD REAL Finishing allowance at the base incremental enter without sign FFP1 REAL Feedrate on contour FFD REAL Feedrate for depth infeed or spatial infeed CDIR INT Milling direction enter without sign Values 0 Down cut ...

Page 182: ...le direction If the spigot is bypassed once the contour is left along a semi circle in the plane and the tool is fed to the next machining depth The contour is then reapproached along a semi circle and the spigot traversed once This process is repeated until the programmed spigot depth is reached Then the retraction plane RTP is approached at rapid traverse rate Depth infeed Feeding to the safety ...

Page 183: ...lly calculated radius of the approach semi circle depends on this dimension Note A tool compensation must be programmed before the cycle is called Otherwise the cycle is canceled and alarm 61009 Active tool number 0 is output Internally in the cycle a new current workpiece coordinate system is used which influences the actual value display The zero point of this coordinate system is to be found in...

Page 184: ... RAD REAL Radius of the circle enter without sign STA1 REAL Starting angle INDA REAL Incrementing angle FFD REAL Feedrate for depth infeed FFP1 REAL Feedrate for surface machining MID REAL Maximum infeed depth for one infeed enter without sign Note The cycle requires a milling cutter with an end tooth cutting across center DIN844 Function Use this cycle to machine long holes located on a circle Th...

Page 185: ...eedrate programmed under FFP1 The infeed to the next machining depth calculated using G1 internally in the cycle and using feedrate is performed at each reversal point until the final depth is reached Retraction to the retraction plane using G0 and approach to the next long hole on the shortest path After the last long hole has been machined the tool is moved with G0 to the position in the machini...

Page 186: ...nter point and radius You define the position of the circle in the machining plane by the center point CPA CPO and the radius RAD Only positive values are permitted for the radius STA1 and INDA starting and incremental angle The arrangement of the long holes on the circle is defined by these parameters If INDA 0 the indexing angle is calculated from the number of long holes so that they are equall...

Page 187: ...ing position N30 LONGHOLE 5 0 1 23 4 30 40 45 20 45 90 100 320 6 Cycle call N40 M02 End of program 9 6 7 Slots on a circle SLOT1 Programming SLOT1 RTP RFP SDIS DP DPR NUM LENG WID CPA CPO RAD STA1 INDA FFD FFP1 MID CDIR FAL VARI MIDF FFP2 SSF FALD STA2 DP1 Parameter Parameter Data type Description RTP REAL Retraction plane absolute RFP REAL Reference plane absolute SDIS REAL Safety clearance enter...

Page 188: ...edrate for finishing SSF REAL Speed when finishing FALD REAL Finishing allowance at the slot base enter without sign STA2 REAL Maximum insertion angle for oscillation movement DP1 REAL Insertion depth per revolution for helix incremental Note The cycle requires a milling cutter with an end tooth cutting across center DIN844 Function The cycle SLOT1 is a combined roughing finishing cycle Use this c...

Page 189: ...ng allowance at the slot edge with feedrate value FFP1 Then finishing with feedrate value FFP2 and spindle speed SSF along the contour according to the machining direction programmed under CDIR The depth infeed is always carried out at the same position in the machining plane until the end depth of the slot is reached Retract tool to the retraction plane and move to the next slot with G0 After the...

Page 190: ...ber of slots so that they are arranged equally around the circle FFD and FFP1 feedrate for depth and surface The feedrate FFD is active for all infeed movements perpendicular to the machining plane The feedrate FFP1 is active for all movements in the plane traversed at feedrate when roughing MID infeed depth Use this parameter to define the maximum infeed depth The depth infeed is performed by the...

Page 191: ...the infeed depth when inserting to the helical path STA2 insertion angle Use the STA2 parameter to define the radius of the helical path relative to the tool center point path or the maximum insertion angle for the reciprocating motion Vertical insertion The vertical depth infeed always takes place at the same position in the machining plane as long as the slot is reached by the end depth Insertio...

Page 192: ...pletely Infeed during finishing is to be performed directly to the pocket depth and the same feedrate and speed are to be used See the following programming example for grooves N10 G17 G90 T1 D1 S600 M3 Specification of technology values N20 G0 X20 Y50 Z5 Approach starting position N30 SLOT1 5 0 1 23 4 30 15 40 45 20 45 90 100 320 6 2 0 5 0 0 Cycle call VARI MIDF FFP2 and SSF parameters omitted N4...

Page 193: ...t sign STA1 REAL Starting angle INDA REAL Incrementing angle FFD REAL Feedrate for depth infeed FFP1 REAL Feedrate for surface machining MID REAL Maximum infeed depth for one infeed enter without sign CDIR INT Milling direction for machining the circumferential slot Values 2 for G2 3 for G3 FAL REAL Finishing allowance at the slot edge enter without sign VARI INT Machining type Values 0 complete m...

Page 194: ...d hole After a circumferential slot is machined completely the tool is retracted to the retraction plane and the next slot is machined with G0 After the last slot has been machined the tool is moved with G0 to the end position in the machining plane which is specified in the diagram below and the cycle is ended Explanation of the parameters For an explanation of the parameters RTP RFP and SDIS ref...

Page 195: ...aborted and alarm 61000 No tool compensation active is output If incorrect values are assigned to the parameters that determine the arrangement and size of the slots and thus cause mutual contour violation of the slots the cycle is not started The cycle is aborted and the error message 61104 Contour violation of slots elongated holes is output During the cycle the workpiece coordinate system is of...

Page 196: ... 0 Cycle call Reference plane SDIS retraction plane means Lowering in the infeed axis with G0 to reference plane SDIS no longer applicable parameters VAR MIDF FFP2 and SSF omitted N40 M02 End of program Programming example 2 Slots2 Proceed through the following steps 1 Select the desired operating area 2 Open the vertical softkey bar for available milling cycles 3 Press this softkey from the verti...

Page 197: ...f the plane _STA REAL Angle between the pocket longitudinal axis and the first axis of the plane enter without sign Range of values 0 STA 180 _MID REAL Maximum infeed depth enter without sign _FAL REAL Finishing allowance at the pocket edge enter without sign _FALD REAL Finishing allowance at the base enter without sign _FFP1 REAL Feedrate for surface machining _FFD REAL Feedrate for depth infeed ...

Page 198: ...r solid machining the maximum infeed width in the plane can be programmed Finishing allowance also for the pocket base There are three different insertion strategies vertically to the pocket center along a helical path around the pocket center oscillating at the pocket central axis Shorter approach paths in the plane for finishing Consideration of a blank contour in the plane and a blank dimension...

Page 199: ...nfeed depth programmed under _MID is executed in a block containing G0 or G1 Insertion at a helical path means that the cutter center point traverses along the helical path determined by the radius _RAD1 and the depth per revolution _DP1 The feedrate is also programmed under _FFD The direction of rotation of this helical path corresponds to the direction of rotation with which the pocket will be m...

Page 200: ... the infeed is carried out vertically to the pocket center point as long as it is possible in order not to traverse extensive insertion paths in the open Solid machining of the pocket is carried out starting from the top downwards Explanation of the parameters For an explanation of the parameters _RTP _RFP and _SDIS refer to Section Drilling centering CYCLE81 Page 126 For an explanation of the _DP...

Page 201: ...ntinued _FALD finishing allowance at the base When roughing a separate finishing allowance is taken into account at the base _FFD and _FFP1 feedrate for depth and surface The feedrate _FFD is effective when inserting into the material The feedrate _FFP1 is active for all movements in the plane traversed at feedrate when machining _CDIR milling direction Use this parameter to specify the machining ...

Page 202: ...the infeed depth when inserting to the helical path A tool compensation must be programmed before the cycle is called Otherwise the cycle is aborted and alarm 61000 No tool compensation active is output Internally in the cycle a new current workpiece coordinate system is used which influences the actual value display The zero point of this coordinate system is to be found in the pocket center poin...

Page 203: ...without sign _FALD REAL Finishing allowance at the base enter without sign _FFP1 REAL Feedrate for surface machining _FFD REAL Feedrate for depth infeed _CDIR INT Milling direction enter without sign Values 0 Down cut milling in the spindle direction 1 Conventional milling 2 With G2 independent of spindle direction 3 With G3 _VARI INT Machining type UNITS DIGIT Values 1 roughing 2 finishing TENS D...

Page 204: ... out according to the selected insertion strategy taking into account the programmed blank dimensions Sequence of motions when finishing Finishing is performed in the order from the edge until the finishing allowance on the base is reached and then the base is finished If one of the finishing allowances is equal to zero this part of the finishing process is skipped Finishing on the edge While fini...

Page 205: ...enter point Circular pockets are always dimensioned across the center _VARI machining type Use the parameter _VARI to define the machining type Possible values are Units digit 1 roughing 2 finishing Tens digit infeed 0 vertically to pocket center with G0 1 vertically to pocket center with G1 2 along a helical path If a different value is programmed for the parameter _VARI the cycle is aborted afte...

Page 206: ... omitted N40 M02 End of program 9 6 11 Thread milling CYCLE90 Programming CYCLE90 RTP RFP SDIS DP DPR DIATH KDIAM PIT FFR CDIR TYPTH CPA CPO Parameters Parameter Data type Description RTP REAL Retraction plane absolute RFP REAL Reference plane absolute SDIS REAL Safety clearance enter without sign DP REAL Final drilling depth absolute DPR REAL Final drilling depth relative to the reference plane e...

Page 207: ...een the positive abscissa and the positive ordinate in the current level i e in the first quadrant of the coordinate system For thread milling with G3 the start position lies between the positive abscissa and the negative ordinate namely in the fourth quadrant of the coordinate system The distance from the thread diameter depends on the size of the thread and the tool radius used The cycle creates...

Page 208: ... the center point of the thread using G0 Retraction to the retraction plane along the applicate using G0 Thread from bottom to top For technological reasons it can also be reasonable to machine a thread from bottom to top In this case the retraction plane RTP will be behind the thread depth DP This machining is possible but the depth specifications must be programmed as absolute values and the ret...

Page 209: ...ify the value for the machining direction of the thread If the parameter has an illegal value the following message will appear Wrong milling direction G3 is generated In this case the cycle is continued and G3 is automatically generated TYPTH thread type The parameter TYPTH is used to define whether you want to machine an external or an internal thread CPA and CPO center point These parameters ar...

Page 210: ...E832 Programming CYCLE832 TOL TOLM 1 Parameters Parameter Data type Description TOL REAL Tolerance of machining axes TOLM INT Machining type selection 0 Deselect 1 Finishing 2 Semi finishing 3 Roughing PSYS INT Internal parameter only the default value 1 is possible Function Use CYCLE832 to machine free form surfaces that involve high requirements for velocity precision and surface quality This cy...

Page 211: ...gain with regard to alarm responses and cancel criteria The error text that is displayed together with the alarm number gives you more detailed information on the error cause Alarm number Clearing criterion Alarm response 61000 61999 NC_RESET Block preparation in the NC is aborted 62000 62999 Clear key The block preparation is interrupted the cycle can be continued with the following key after the...

Page 212: ...0 40 00000 100 00000 80 00000 5 00000 30 00000 0 20000 1500 00000 31 CYCLE71 20 00000 2 00000 2 00000 0 00000 50 00000 40 00000 100 00000 80 00000 2 00000 30 00000 0 20000 1500 00000 12 T2 M06 S4000M3 CYCLE76 20 00000 0 00000 2 00000 10 00000 90 00000 70 00000 1 00000 0 00000 0 00000 3 00000 0 50000 1200 00000 1000 00000 0 1 100 00000 80 00000 POCKET4 20 00000 0 00000 2 00000 5 00000 20 00000 0 00...

Page 213: ...00000 5 00000 0 00000 0 00000 28 00000 0 00000 180 00000 300 00000 500 00000 2 00000 3 0 10000 0 5 00000 500 00000 5000 00000 500 00000 T11 M06 S1200M3 MCALL CYCLE83 20 00000 0 00000 2 00000 10 00000 0 00000 5 00000 5 00000 1 00000 0 10000 1 00000 0 3 2 00000 1 00000 0 10000 1 00000 X 35Y 25 X35Y 25 X 35Y25 X35Y25 MCALL T14 M06 M05 MCALL CYCLE84 20 00000 0 00000 2 00000 8 00000 0 00000 0 10000 5 1...

Page 214: ...G00 Z50 N135 SUPA G00 Z300 D0 N140 SUPA G00 X300 Y300 N145 T4 D1 N150 MSG Please change to Tool No 4 N155 M05 M09 M00 N160 S5000 M3 N165 POCKET4 50 00000 0 00000 2 00000 5 00000 22 00000 38 00000 70 00000 2 50000 0 20000 0 20000 300 00000 250 00000 0 21 10 00000 0 00000 5 00000 2 00000 0 50000 N170 S5500 M3 N175 POCKET4 50 00000 0 00000 2 00000 5 00000 22 00000 38 00000 70 00000 2 50000 0 20000 0 ...

Page 215: ...05 MSG Please change to Tool No 6 N310 M05 M09 M00 N315 S6000 M3 N320 G00 Z50 X36 Y24 1 N325 MCALL CYCLE82 50 00000 3 00000 2 00000 5 00000 0 00000 0 20000 N330 HOLES2 36 00000 24 10000 10 00000 90 00000 60 00000 6 N335 X36 Y24 1 N340 MCALL Modal Call OFF N345 SUPA G00 Z300 D0 N350 SUPA G00 X300 Y300 N355 T7 D1 N360 MSG Please change to Tool No 7 N365 M05 M09 M00 N370 S6000 M3 N375 MCALL CYCLE83 5...

Page 216: ...0 Y0 N60 G0 Z2 N70 CYCLE71 50 00000 1 00000 2 00000 0 00000 25 00000 25 00000 50 00000 50 00000 0 00000 1 00000 0 00000 400 00000 11 N80 S4500 N90 CYCLE71 50 00000 1 00000 2 00000 0 00000 25 00000 25 00000 50 00000 50 00000 0 00000 1 00000 0 00000 400 00000 32 N100 G0 Z100 N110 T2 D1 ENDMILL D8 N120 M6 N130 S4000 M3 N140 M8 G0 X 13 Y16 N150 G0 Z2 _ANF N160 POCKET3 50 00000 0 00000 2 00000 5 00000 ...

Page 217: ...T4 50 00000 0 00000 2 00000 5 00000 7 50000 0 00000 0 00000 2 50000 0 10000 0 10000 300 00000 200 00000 0 21 2 00000 4 00000 1 00000 S4500 M3 POCKET4 50 00000 0 00000 2 00000 5 00000 7 50000 0 00000 0 00000 5 00000 0 10000 0 10000 300 00000 200 00000 0 12 2 00000 4 00000 1 00000 G0 Z100 T3 D1 DRILL D3 M6 S5000 M3 G0 X0 Y0 MCALL CYCLE81 50 00000 0 00000 2 00000 5 00000 0 00000 HOLES2 0 00000 0 0000...

Page 218: ...1 42 1 4 00000 300 00000 1 4 00000 T4 D1 ENDMILL D10 M6 S4000 M3 G0 X55 Y 15 G0 Z2 G1 F300 Z 8 G42 G1 Y 15 X50 G1 X44 Y 2 RND 2 G1 Y0 X 22 G40 Y30 M30 Subroutine name SUB_PART_2 Subroutine content G17 G90 G0 X3 Y3 G2 X3 27 Y 40 91 I AC 52 703 J AC 19 298 G3 X46 27 Y 47 I AC 38 745 J AC 54 722 G1 X42 Y 8 X3 Y3 M2 end of contour A Appendix A 1 Creating a new cutting edge Note You can load the machin...

Page 219: ... cutting edge to zero Delete the selected cutting edge A 2 Calibrating the tool probe Overview To be able to measure your tools automatically you must first determine the position of the tool probe based on the machine zero position Operating sequences Setting the probe data 1 Select the desired operating area 2 Switch to JOG mode 3 Open the lower level menu for tool measurement 4 Open the auto to...

Page 220: ... surface of the tool probe You can use the following vertical softkey to choose whether to calibrate the tool length and diameter or to calibrate the tool length only 7 Press this key to start the calibration process The calibrating tool traverses automatically at the measurement feedrate to the probe and gets back again The position of the tool probe is determined and saved in an internal data ar...

Page 221: ... a way that the collision can be avoided when the probe is traversing 7 Press this key on the MCP The tool traverses at the measurement feedrate to the probe and gets back The tool length is calculated and entered in the tool list with the cutting edge position and tool radius or diameter taken into consideration as well Note that if several axes move simultaneously no offset data can be calculate...

Page 222: ...e active scaling factors the mirror status display and the total of all active work offsets 3 Use the cursor keys to position the cursor bar in the input fields to be modified and enter the values 4 Confirm your entries The changes to the work offsets are activated immediately A 5 Entering modifying the setting data Entering modifying the setting data Operating sequence 1 Select the desired operat...

Page 223: ...s selected A limitation of the spindle speed in the Max G26 Min G25 fields can only be performed within the limit values defined in the machine data For thread cutting a start position for the spindle is displayed as the start angle A multiple thread can be cut by changing the angle when the thread cutting operation is repeated Setting the time counter Operating sequence 1 Select the desired opera...

Page 224: ...tpoint Processing time in seconds The number of all workpieces produced since the starting time The time since the last control power up with default values cold restart in minutes The total run time of NC programs in AUTO mode and the run time of all programs between NC start and end of program RESET The timer is set to zero with each power up of the control system The time since the last normal ...

Page 225: ...set or query these global parameters in any program as required Operating sequence 1 Select the desired operating area 2 Open the list of R parameters 3 Use the cursor keys to navigate in the list and enter the values in the input fields to be modified Note You can search for your desired R variable with the following softkey By default the function searches the R number You can press the followin...

Page 226: ...s the display to the relative coordinate system You can set the reference point in this coordinate system For detailed information refer to Section Setting the relative coordinate system REL Page 227 Opens the workpiece measurement window where you determine the work offset data For detailed information about this window refer to Section Setting up the workpiece Page 25 Opens the tool measurement ...

Page 227: ...the current position of the axes in the selected coordinate system Displays the distance traversed by each axis in JOG mode from the interruption point in the condition of program interruption For detailed information about program interruption refer to Section Starting and stopping interrupting a part program Page 42 Displays the currently active tool number T with the current cutting edge number...

Page 228: ...es to zero A 8 2 Face milling Functionality Use this function to prepare a blank for the subsequent machining without creating a special part program Operating sequence 1 Select the desired operating area 2 Switch to JOG mode 3 Open the face milling window 4 Move the cursor keys to navigate in the list and enter the desired values for the selected parameters see table below for the parameter descr...

Page 229: ... or finishing Work offset to be activated X Y Z position of the blank Retraction plane Cutting dimension in the X Y Z direction specified in increments Safety distance Cutting length in the X Y Z direction specified in increments relative to the workpiece edge Path feedrate Stock allowance in the Z direction Spindle speed A 8 3 Setting the JOG data Operating sequence 1 Select the desired operating...

Page 230: ...elp system from any operating area The help system Press this key or the key combination ALT H to call the help system from any operating area If a context sensitive help exists Window opens otherwise Window opens Calls the context sensitive help for the current topic Current operating window NC drive alarms selected in the alarm specific operation area Machine data or setting data selected Drive ...

Page 231: ...ms out the current view Zooms the current view to page width Jumps to the desired page Searches for a term in the current topic Continues search for the next term that matches the search criteria Exits the help system Keys for handling Window Expands hierarchical topics Collapses hierarchical topics Navigates upwards through the hierarchical topics Navigates downwards through the hierarchical topi...

Page 232: ...t page 5 Press this softkey to enter the previous page 6 Press either key to return to the main screen of the operation wizard 7 Press one of the following five operating area keys to exit the main screen of the operation wizard A 11 Editing Chinese characters The program editor and PLC alarm text editor both allow you to edit the simplified Chinese characters on the Chinese variant of the HMI Edi...

Page 233: ...r operating area using this key on the PPU except in MDA mode For calculating the four basic arithmetic operations are available as well as the functions sine cosine squaring and square root A bracket function is provided to calculate nested terms The bracket depth is unlimited If the input field is already occupied by a value the function will accept this value into the input line of the pocket c...

Page 234: ...e in degrees in front of the input cursor is replaced by the cos X value Q Square function The X value in front of the input cursor is replaced by the X2 value R Square root function The X value in front of the input cursor is replaced by the X value Bracket function X Y Z Calculation examples Task Input Result 100 67 3 100 67 3 301 sin 45_ 45 S 0 707107 cos 45_ 45 O 0 707107 42 4 Q 16 4 4 R 2 34 ...

Page 235: ...ftkey to calculate the abscissa and ordinate values of the point The abscissa is the first axis and the ordinate is the second axis of the plane The abscissa value is displayed in the input field from which the calculator function has been called and the value of the ordinate is displayed in the next input field If the function is called from the part program editor the coordinates are saved with ...

Page 236: ...nput field from which the calculator function has been called and the value of the ordinate is displayed in the next input field If the function is called from the part program editor the coordinates are saved with the axis names of the selected basic plane Calculating the Cartesian coordinates 1 Activate the calculator when you are in any input screen 2 Open the lower level menu for contour eleme...

Page 237: ...he PP coordinates angle A EP abscissa ordinate and L length in the respective input fields The following values of the straight line are known Straight line 1 Starting point and slope angle Straight line 2 Length and one end point in the Cartesian coordinate system 5 Press this softkey to calculate the missing end point The abscissa value is displayed in the input field from which the calculator f...

Page 238: ...tour editor FKE calculates any missing parameters for you as soon as they can be obtained from other parameters You can link together contour elements and transfer to the edited part program Contour editor FKE Proceed through the following steps to open the contour editor window 1 Select the desired operating area 2 Enter the desired program folder 3 Select a program file and press this key to ope...

Page 239: ...e a picture detail to display When you deactivate this softkey the input focus is positioned in the contour chain again Exits the contour editor and returns to the program editor window without transferring the last edited values to the main program If you press this softkey help graphics are displayed in addition to the relevant parameter Pressing the softkey again exits the help mode Saves the s...

Page 240: ...tour begin at a position which you already know and enter it as the starting point Operating sequence 1 Select the desired operating area 2 Enter the desired program folder 3 Select a program file and press this key to open it in the program editor 4 Press this softkey to open the contour editor window 5 Use the cursor keys on the PPU to switch between different input fields 6 Press this softkey o...

Page 241: ...rns to the program editor with the last edited values transferred to the system Further softkey functions The following softkeys are available in corresponding contour element window for programming the contour elements on the basis of pre assigned parameters Tangent to preceding element This softkey presets the angle α2 to a value of 0 The contour element has a tangential transition to the preced...

Page 242: ...selected a desired dialog pressing this softkey allows you to store the contour element and return to the main screen You can then program the next contour element Append contour element Use the cursor keys to select the element in front of the end marker Use the softkeys to select the contour element of your choice and enter the values you know in the input screen for that element Confirm your in...

Page 243: ...ghlighted in red Then press this softkey and confirm the query Close the contour By pressing this softkey you can close the contour from the actual position with a straight line to the starting point Undo an input By selecting this softkey you can return to the main screen without transferring the last edited values to the system Contour symbol colors The meaning of the symbol colors in the contou...

Page 244: ...The following additional parameters are displayed after you press this softkey Parameter Description L Length of the straight line α1 Pitch angle with reference to Y axis Parameters for programming circular arcs Direction of rotation of the circular arc clockwise or counter clockwise Absolute abs incremental inc positions of circle center point in Y I and X K directions Radius of circle The contou...

Page 245: ...ys proposed even if preceding elements were assigned no transition Contour chain Once you complete or cancel the programming of a contour element you can navigate around the contour chain left on the main screen using the cursor keys The current position in the chain is color highlighted The elements of the contour and pole if applicable are displayed in the sequence in which they were programmed ...

Page 246: ... be entered in polar coordinates Further notes If the straight line that was generated with close contour is linked to the start element of the contour with a radius or chamfer the radius or chamfer must be specified explicitly as follows Close contour input key enter radius chamfer accept element The result then corresponds exactly to what would occur if the closing element were to be entered wit...

Page 247: ...ment to have been entered as polar In contour programming the contour calculator converts the Cartesian coordinates of the preceding end point using the definitive pole into polar coordinates This also applies if the preceding element has been given in polar coordinates since this could relate to another pole if a pole has been inserted in the meantime Pole change example Figure A 1 pole change mi...

Page 248: ...For more information refer to the Programming and Operating Manual Milling Part 2 A 14 7 Programming example for milling Example 1 The following diagram shows a programming example for the Free contour programming function Starting point X 5 67 abs Y 0 abs machining plane G17 The contour is programmed in a counter clockwise direction Operating sequence 1 Select the desired operating area 2 Enter t...

Page 249: ...ter the parameters for this element and press this softkey to confirm X 43 972 inc α1 125 10 Press this softkey to select a contour element of straight line in any direction 11 Enter the parameters for this element and press this softkey to confirm X 43 972 inc α1 55 12 Press this softkey to select a contour element of straight horizontal line 13 Enter the parameters for this element and press thi...

Page 250: ... can see the programmed contour in the graphics window Example 2 Starting point X 0 abs Y 0 abs machining plane G17 The contour is programmed in the clockwise direction with dialog selection Operating sequence 1 Select the desired operating area 2 Enter the desired program folder ...

Page 251: ...s for this element and press this softkey to confirm Y 104 abs 8 Press this softkey to select a contour element of circular arc 9 Enter the parameters for this element and press this softkey to select the desired contour characteristics Direction of rotation clockwise R 79 I 0 abs β2 30 10 Press this softkey to confirm 11 Press this softkey to select a contour element of circular arc 12 Enter the ...

Page 252: ...ess this softkey to select a contour element of straight vertical line 18 Enter the parameters for this element and press this softkey to confirm α1 90 RND 5 19 Press this softkey to select a contour element of circular arc 20 Enter the parameters for this element and press this softkey to select the desired contour characteristics Direction of rotation clockwise R 25 X 0 abs Y 0 abs I 0 abs 21 Pr...

Page 253: ...1 Select the desired operating area 2 Enter the desired program folder 3 Select a program with cursor keys and press this key to open the program in the program editor 4 Press this softkey to open the contour editor 5 Define a start point with the following parameters and press this softkey to confirm Programming plane G17 X 0 abs Y 5 7 abs 6 Press this softkey to select a contour element of circu...

Page 254: ...s this softkey to select the desired contour characteristics Direction of rotation clockwise R 2 J 4 65 abs 13 Press this softkey to confirm 14 Press this softkey to select a contour element of circular arc 15 Enter the parameters for this element and press this softkey to select the desired contour characteristics Direction of rotation counter clockwise R 3 2 I 11 5 abs J 0 abs 16 Press this soft...

Page 255: ...er the parameters for this element and press this softkey to select the desired contour characteristics L 5 25 Press this softkey to confirm 26 Press this softkey to select a contour element of straight vertical line 27 Enter the parameters for this element and press this softkey to confirm Y 5 7 abs 28 Press this softkey to select a contour element of straight horizontal line 29 Enter the paramet...

Page 256: ... A word can also contain several address letters In this case however the numerical value must be assigned via the intermediate character Example CR 5 23 Additionally it is also possible to call G functions using a symbolic name For more information refer to Section List of instructions Page 258 Example SCALE Enable scaling factor Extended address With the following addresses the address is extend...

Page 257: ...ot use Main block end of label Reserved do not use Assignment part of equation Reserved do not use skip System variable identifiers Multiplication Reserved do not use Addition and positive sign Reserved do not use Subtraction minus sign Non printable special characters LF End of block character Blank Separator between words blank Tab character Reserved do not use A 17 Block format Functionality A ...

Page 258: ...tents of the remaining block in the current block display Messages Messages are programmed in a separate block A message is displayed in a special field and remains active until a block with a new message is executed or until the end of the program is reached Up to 65 characters can be displayed in message texts A message without message text cancels a previous message MSG THIS IS THE MESSAGE TEXT...

Page 259: ...terpolation at feedrate G1 X Y Z F in polar coordinates G1 AP RP F or with additional axis G1 AP RP Z F e g with G17 axis Z G2 Circular interpolation in clockwise direction in conjunction with a third axis and TURN also helix interpolation see under TURN G2 X Y I J F End point and center point G2 X Y CR F Radius and end point G2 AR I J F Aperture angle and center point G2 AR X Y F Aperture angle a...

Page 260: ...hine axis identifier G147 SAR Approach with a straight line G147 G41 DISR DISCL FAD F X Y Z G148 SAR Retract with a straight line G148 G40 DISR DISCL FAD F X Y Z G247 SAR Approach with a quadrant G247 G41 DISR DISCL FAD F X Y Z G248 SAR Retract with a quadrant G248 G40 DISR DISCL FAD F X Y Z G347 SAR Approach with a semicircle G347 G41 DISR DISCL FAD F X Y Z G348 SAR Retract with a semicircle G348...

Page 261: ... tool length G18 Z X plane G19 Y Z plane Compensation axis G40 Tool radius compensation OFF 7 Tool radius compensation modally effective G41 Tool radius compensation left of contour G42 Tool radius compensation right of contour G500 Settable work offset OFF 8 Settable work offset modally effective G54 1 Settable work offset G55 2 Settable work offset G56 3 Settable work offset G57 4 Settable work ...

Page 262: ... in space SAR 44 Path segmentation with SAR modally effective G341 Approach and retraction in the plane SAR G290 SIEMENS mode 47 External NC languages modally effective G291 External mode H H0 to H9999 H function 0 0000001 9999 9999 8 decimal places or with specification of an exponent 10 300 10 300 Value transfer to the PLC meaning defined by the machine manufacturer H0 H9999 e g H7 23 456 I Inte...

Page 263: ...End of program as M2 Can be found in the last block of the processing sequence M17 End of subroutine Can be found in the last block of the processing sequence M3 CW rotation of spindle M4 CCW rotation of spindle M5 Spindle stop M6 Tool change Only if activated with M6 via the machine control panel otherwise change directly using the T command M40 Automatic gear stage changeover M41 to M45 Gear sta...

Page 264: ...t in the range 180 to 180 degrees R40 ATAN2 30 5 80 1 R40 20 8455 degrees SQRT Square root R6 SQRT R7 POT Square R12 POT R13 ABS Absolute value R8 ABS R9 TRUNC Truncate to integer R10 TRUNC R11 LN Natural logarithm R12 LN R9 EXP Exponential function R13 EXP R1 RET Subroutine end Used instead of M2 to maintain the continuous path control mode RET separate block S Spindle speed 0 001 99 999 999 Unit...

Page 265: ...oint coordinate of the plane is known or if the complete end point is known with contour ranging over several blocks N10 G1 G17 X Y N11 X ANG or contour over several blocks N10 G1 G17 X Y N11 ANG N12 X Y ANG AP Polar angle 0 359 99999 Specification in degrees traversing in polar coordinates definition of the pole in addition Polar radius RP See G0 G1 G2 G3 G110 G111 G112 AR Aperture angle for circ...

Page 266: ...gid tapping N10 CYCLE84 separate block CYCLE840 Tapping with compensating chuck N10 CYCLE840 separate block CYCLE85 Reaming 1 N10 CYCLE85 separate block CYCLE86 Boring N10 CYCLE86 separate block CYCLE87 Drilling with stop 1 N10 CYCLE87 separate block CYCLE88 Drilling with stop 2 N10 CYCLE88 separate block CYCLE89 Reaming 2 N10 CYCLE89 separate block CYCLE802 Arbitrary positions N10 CYCLE802 separa...

Page 267: ...47 G348 DISR Approach retraction distance or radius SAR G147 G148 Distance of the cutter edge from the starting or end point of the contour G247 G347 G248 G348 Radius of the tool center pointpath See G147 G148 G247 G248 G347 G348 FAD Velocity for the infeed SAR Speed takes effect after the safety clearance is reached for the infeed note G340 G341 See G147 G148 G247 G248 G347 G348 FRC Non modal fee...

Page 268: ...nd PLC AA_MM ax is Measurement result for an axis in the machine coordinate system Axis Identifier of an axis X Y Z traversing when measuring N10 R1 AA_MM X AA_MW ax is Measurement result for an axis in the workpiece coordinate system Axis Identifier of an axis X Y Z traversing when measuring N10 R2 AA_MW X A _ _TI ME Timer for runtime AN_SETUP_TIME AN_POWERON_TI ME AC_OPERATING_ TIME AC_CYCLE_TIM...

Page 269: ...ontour blocks special FRC feed possible N10 X Y RND 4 5 N11 X Y RNDM Modal rounding 0 010 99 999 999 0 Inserts roundings with the specified radius value tangentially at the following contour corners special feedrate possible FRCM Modal rounding OFF N10 X Y RNDM 7 3 modal rounding ON N11 X Y N100 RNDM 0 modal rounding OFF RP Polar radius 0 001 99 999 999 Traversing in polar coordinates pole specifi...

Page 270: ... 0 999 In conjunction with circular interpolation G2 G3 in a plane G17 to G19 and infeed motion of the axis vertical to this plane N10 G0 G17 X20 Y5 Z3 N20 G1 Z 5 F50 N30 G3 X20 Y5 Z 20 I0 J7 5 TURN 2 total of three full circles TRACYL Milling of the peripheral surface Kinematic transformation available only if configured accordingly TRACYL 20 4 Separate block Cylinder diameter 20 4 mm TRACYL 20 4...

Reviews: