background image

Troubleshooting

Samsung Electronics

Service Manual

7-1

7

7

7. Troubleshooting

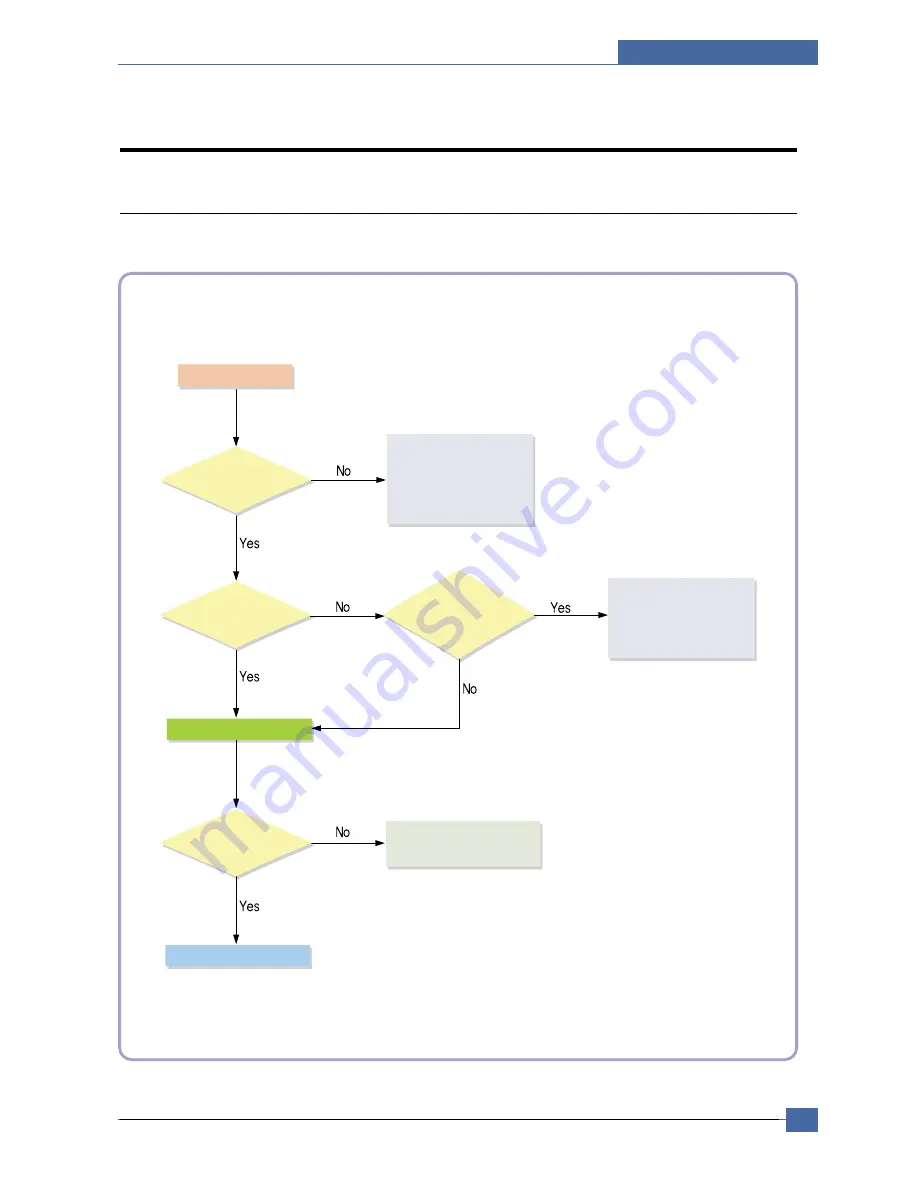
7.1 Procedure of Checking the Symptoms  

Before attempting to repair the printer first obtain a detailed description of the problem from the customer.

Power On

- No Power
- Power Module error
- Main PBA error
- LCD Panel error

Refer to "Solution
of Image Problem"

OP Panel

ON?

Ready or

Power save

Indicate

Error Massage

Refer to

Error Massage

<Chapter 6.9>

Test Print

END

printing

Quality is

Nomal?

Summary of Contents for CLX 3160FN - Color Laser - All-in-One

Page 1: ...y not Expansion 5 Default Driver SPL C Samsung Printer Language Color 6 USB USB 2 0 USB host Scan to USB Direct print 7 Network Ethernet 10 100 Base TX 8 Consumable 6 C M Y K toner Imaging Unit Waste toner box K toner CLX K3160A C toner CLX C3160A M toner CLX M3160A Y toner CLX Y3160A Imaging unit CLP R300A common with CLP 300 Waste toner box CLP W300A common with CLP 300 CMY Rainbow kit CLX P3160...

Page 2: ... 1 2 2 Product General Specifications 2 2 2 3 Model Comparison Table 2 14 3 System Overview 3 1 System Structure 3 1 3 2 Main PBA Description 3 14 3 3 CRUM 3 30 3 4 General Description 3 32 4 S W Structure and Descriptions 4 1 Overview 4 1 4 2 Architecture 4 1 4 3 Data and Control Flow 4 2 4 4 Alarm Shortage 4 4 4 5 Error status 4 4 4 6 CRUM Overview 4 5 4 7 FW Upgrade 4 5 4 8 Initailize Flow 4 6 ...

Page 3: ... Left Right 5 9 5 10 ADF Ass y 5 10 5 11 Platen Ass y 5 12 5 12 Middle Cover Ass y 5 17 5 13 Fuser Ass y 5 19 5 14 HVPS 5 21 5 15 LIU Unit 5 22 5 16 Shield Main Lower with Main PBA 5 23 5 17 Main Drive Ass y 5 24 5 18 SMPS 5 25 5 19 Regi Roller 5 26 5 20 Feed Roller 5 28 5 21 Pick Up Roller 5 29 5 22 Exit Roller Unit 5 32 5 23 LSU 5 34 5 24 MP Unit 5 34 6 Alignment and Adjustmens 6 1 Control Panel...

Page 4: ...1 7 2 Solving other problems 7 2 8 Exploded Views Parts List 8 1 Main 8 2 8 2 Middle Cover 8 3 8 3 Front Cover 8 4 8 4 Right Cover 8 5 8 5 Round Cover 8 6 8 6 Rear Cover 8 7 8 7 Cover Platen 8 8 8 8 Platen Ass y 8 9 8 9 OPE CLX 3160FN 8 10 OPE CLX 3160N 8 11 8 10 Scan Ass y 8 12 8 11 ADF Ass y 8 13 8 12 ADF Lower 8 14 8 13 ADF Motor 8 15 8 14 Frame 8 16 8 15 Main Driver 8 18 8 16 LSU Cover 8 20 8 ...

Page 5: ...am 9 1 Block Diagram 9 1 10 Connection Diagram 10 1 Connection Diagram 10 1 11 Reference Information 11 1 Tools for Troubleshooting 11 1 11 2 Acronyms and Abbreviations 11 2 11 3 Select a location for the printer 11 4 11 4 A4 ISO 19752 Standard Pattern 11 5 11 5 Wireless LAN 11 6 10 1 ...

Page 6: ...uman access to laser radiation above a Class I level during normal operation user maintenance or prescribed service condition Warning Never operate or service the printer with the protective cover removed from Laser Scanner assembly The reflected beam although invisible can damage your eyes When using this product these basic safety pre cautions should always be followed to reduce risk of fire ele...

Page 7: ... or removing the power connector The power connector must be inserted com pletely otherwise a poor contact could cause overheating possibly leading to a fire When removing the power connector grip it firmly and pull 7 Take care of the power cable Do not allow it to become twisted bent sharply round corners or other wise damaged Do not place objects on top of the power cable If the power cable is d...

Page 8: ...rry out the following procedures before dismantling the printer or replacing any parts 1 Check the contents of the machine memory and make a note of any user settings These will be erased if the mainboard or network card is replaced 2 Ensure that power is disconnected before servicing or replacing any electrical parts 3 Disconnect printer interface cables and power cables 4 Only use approved spare...

Page 9: ...ou can get harm 3 When you move the printer This printer weighs 19 95kg including toner cartridge and cassette Use safe lifting and handling techniques Use the lifting handles located on each side of the machine Back injury could be caused if you do not lift care fully 4 Ensure the printer is installed safely The printer weighs 19 95Kg ensure the printer is installed on a level surface capable of ...

Page 10: ...ctrical charges sufficient to damage ESDs 5 Do not use Freon propelled chemicals When sprayed these can generate electrical charges sufficient to dam age ESDs 6 Do not remove a replacement ESD from its protective packaging until immediately before installing it Most replacement ESDs are packaged with all leads shorted together by conductive foam aluminum foil or a compa rable conductive material 7...

Page 11: ...d 16ppm B W 4ppm color print copy Consumables Black toner 2K sheet CMY toner 1K sheet Paper handling 1sheet Manual slot 150 sheet Semi cassette 250 sheet cassette option Interface USB 2 0 Ethernet 10 100 Base TX USB host PictBridge 2 Concept Small size Color laser MFP A4 Color laser MFP Target user Small office small business CLX 3160N 3in1 SPL CLX 3160FN 4in1 SPL Black only printing function Auto...

Page 12: ...AX 2400 x 600 dpi class 1200 x 600 dpi default 600 x 600 dpi Color B W default 600 x 600 dpi Color B W CLX 3160 Series CLX 3160N Spec CLX 3160FN Spec 2 2 Product General Specifications 2 2 1 General Print Engine MPU Samsung CHORUSm 300MHz Samsung CHORUSm 300MHz Memory Std 128 MB 128 MB Max 128 MB 128 MB Memory Expansion N A N A Printer Languages SPL C Samsung Printer Language Color SPL C Samsung P...

Page 13: ...n driver TWAIN Yes Yes WIA Yes Win XP only Yes Win XP only Application Network Scan Client Yes multi folder Yes multi folder PC FAX N A Yes Mono Send only Included in SmarThru4 PSU USB only USB only Status Monitor or USB Network Default Install USB Network Default Install Virtual panel Network Management Set IP SWAS SWS Linux Mac Not support Set IP SWAS SWS Linux Mac Not support SWAS SWS Iexplorer...

Page 14: ...600 x 1200dpi Enhanced 4800dpi x 4800dpi 4800dpi x 4800dpi Halftone 256levels 256levels Scan Size Max Document Width Max 216mm 8 5inch Max 216mm 8 5inch Effiective Scan Width Max 208mm 8 2inch Max 208mm 8 2inch Scan Depth Color 24bits 24bits Mono 1bit for Linearity Halftone 1bit for Linearity Halftone 8Bits for Gray scale 8Bits for Gray scale Compatibility Windows Windows Windows 98 Me 2000 XP Win...

Page 15: ...104 A5 A4 141 A5 A4 141 25 50 150 200 400 25 50 150 200 400 Custom 25 400 Custom 25 400 Original Type Text Scan 600x300dpi Printing 600x600dpi Scan 600x300dpi Printing 600x600dpi Text Photo Scan 600x300dpi Printing 600x600dpi Scan 600x300dpi Printing 600x600dpi Photo Platen Scan 600x600dpi Platen Scan 600x600dpi Printing 1200x1200dpi Printing 1200x1200dpi ADF Scan 600x300dpi ADF Scan 600x300dpi Pr...

Page 16: ...e N A 5sec LTR ADF S Fine N A 6sec LTR ADF Multiple page scan speed N A 20 ppm LTR Telephone Features Handset N A No On hook Dial N A Yes Search N A Yes Phone Book 1 Touch Dial N A 30 Speed Dial N A 240 locations TAD I F N A Yes Tone Pulse N A Selectable in Tech Mode Pause N A Yes Auto Redial N A Yes Last Number Redial N A Yes Distinctive Ring N A Yes Caller ID N A No External Phone Interface N A ...

Page 17: ... A Yes Battery Backup N A Yes Up to 43 hours target Rx fax duplex print out N A No Receive Mode N A Fax TEL Ans Fax Capacity N A 4MB 320 Pages Mono Optional Memory N A No Max locations to store to 1 Group Dial N A 240 locations Fax Forward to FAX N A Yes On Off both Sent and Received Fax Forward to e mail N A No Broadcasting N A up to 249 locations Cover page N A No Delayed fax N A Yes Tx only Mon...

Page 18: ...on sensor Paper detection sensor Standard Cassette Tray Semi cassette type Capacity 150 sheets 75g 150 sheets 75g Media sizes 76 x 127 mm 3 x 5 216 x 356 mm 76 x 127 mm 3 x 5 216 x 356 mm 8 5 x 14 8 5 x 14 Media types Envelopes Labels Card stock Envelopes Labels Card stock Transparency mono only Papers Pre Transparency mono only Papers Pre printed recycled printed recycled Media weight 16 43lb 60 ...

Page 19: ...eight N A N A ADF Paper Weight 12 5 28lb Non Coating 12 5 28lb Non Coating Capacity 50 sheets 20lb 75 g 50 sheets 20lb 75 g Document Size Width 142 216mm 5 6 8 5 Width 142 216mm 5 6 8 5 Length 148 356mm 5 8 14 0 Length 148 356mm 5 8 14 0 Dimension 460 W x 3430 D x 95 H mm 460 W x 343 D x 95 H mm Weight 5 6kg 5 6kg CLX 3160 Series CLX 3160N Spec CLX 3160FN Spec ...

Page 20: ...e Electronic key CRUM Unique Electronic key CRUM Sensor None that would be traced via software None that would be traced via software Replace method 6 steps for install replacing 6 steps for install replacing Waste Toner Bottle Yield 1 250 sheets Full Color Std Image or 1 250 sheets Full Color Std Image or 5 000 images 5 000 images Key N A N A FRU No of FRUs 4 ITB Fuser T2 roller Pick up roller 4 ...

Page 21: ... count color mono Imaging unit life Imaging unit life Fuser lifeTransfer roller life Fuser lifeTransfer roller life Transfer unit life Transfer unit life Toner image count CMYK Toner image count CMYK Tray roller life Tray roller life Cartridge Coverage Machine Installed date Cartridge Coverage Machine Installed date Test Print Configuration Sheet Configuration Sheet Network Configuration Sheet Net...

Page 22: ...PTS BAM Blue Angel PTS BAM Safety Europe TUV GS SEMKO IEC950 Europe TUV GS SEMKO IEC950 EN60950 CB EN60950 CB EMC EMI FCC Class B FCC Class B CE class B CE class B Emission Ozone 0 0 Dust 0 0 Styrene 0 0 VOC 0 0 Dimension Set mm 460 W x429 D x486 H 460 W x429 D x486 H W x D x H Set Packing 610 W x570 D x638 H 610 W x570 D x638 H Weight Set with consumables 19 5 Kg 19 5 Kg Set Packing 26 0 Kg 26 0 ...

Page 23: ...X 3160FN Spec 2 2 11 Options In Box Set C M Y K to be installed Power cord USB cable China Korea India Russia Set up CD Driver manual Application N W CD SyncThru manual Quick installation Guide sheet Warranty book Set C M Y K to be installed Power cord USB cable China Korea India Russia Set up CD Driver manual Application N W CD SyncThru manual Quick installation Guide sheet Warranty book CLX 3160...

Page 24: ...Samsung Electronics Service Manual Product Specifications 2 14 2 3 Model Comparison Table Canon Ricoh Samsung MF8170C CLX 3160FN ...

Page 25: ...e main components 3 1 System Structure 3 1 1 Main Parts of System ITB Intermediate Transfer Belt Toner Kits Y M C K Fuser Developers Y M C K 2nd Transfer Roller OPC Organic Photo Conductor Paper Cassette Output 1stTransfer Roller Paper Cassette Input Engine Part 1 2 3 4 6 7 8 9 5 Dev Y Dev M Dev C Dev K Dev Y Dev M Dev C Dev K 3 4 5 6 7 9 8 1 2 ...

Page 26: ...g Device Thermostat Critical Temperature Detecting Device Fusing Temp 180 H W Protection Temp 185 ITB Intermediate Transfer Belt 1st Transfer Roller The life span Print over 100 000 Images The ITB unit includes 1st Transfer Roller OPC Organic Photo Conductor Developer The life span Print over 44 000 Images Both Imagine Unit consists of 4 kinds of Developer OPC and Deve Main Frame Toner Kits The li...

Page 27: ...w Samsung Electronics Service Manual 3 3 3 1 2 Scanner ADF 3 in 1 CLX 3160N 4 in 1 CLX 3160FN Scanning Method Color CCD 600 x 1200 dpi Scan speed SDMP 28cpm MDSP 20cpm Roller Exit Roller Feed Roller ADF Roller Pickup ...

Page 28: ...ement Solution and is roughly composed of two kinds Chip Solution CX86710 SFX336 Existing Modem Chip which adds SSD System Side Device for interfacing between LSD and DIB of FM336Plus Core CX20493 LSD LIU Line Interface Unit Chip which is controlled by SSD and satisfies each PSTN Requirements by modulating internal Configuration with connecting Tel Line ...

Page 29: ...0 bit deletion ITU CRC 16 or CRC 32 check sum error detection FSK flag pattern detection during high speed receiving Tone modes and features Programmable single or dual tone generation DTMF receiver Tone detection with three programmable tone detectors Receive dynamic range 0 dBm to 43 dBm for V 17 V 29 V 27 ter and V 21 Channel 2 9dBm to 43 dBm for V 34 half duplex Digital speaker output to monit...

Page 30: ...ansformer transfer Clock by separating Primary and Secondary and amplifies Clock Level to LSD by Coil Turns Ratio 1 1 16 Clock Clock is supplied by transformer from SSD to LSD and there is PWROUT to adjust output impedance of Clock Out Driver is inside SSD and CLKSHIGH Resistor to adjust duty of HLPWR Resistor and Clock Clock from SSD to LSD has Differential structure of 180 phase difference for N...

Page 31: ...m Line Code Color Black ON HOOK state Characteristic 1 DC Resistance DP Dial Mode Direct Current 30mA 50 300ohm DTMF Dial Mode Direct Current 20mA 50 540ohm 2 Ring Sensitivity Ring detection Voltage 40Vrms 150Vrms condition Current 25mA Frequency 15Hz product Margin 30Vrms 150Vrms Ring detection Frequency 15 3Hz 68Hz condition Voltage 45Vrms Current 25mA product Margin 15Hz 70Hz Ring detection Cur...

Page 32: ...ater Scan Image Control Specification Minimum Scan Line Time 0 7062ms Scan Resolution Max 600DPI Scan Width 216mm main function Internal 12bit ADC White Shading Correction Gamma Correction CCD Interface 256 Gray Scale 3 CCD Operating Part CCD Image sensor use 5V and Inverter uses 24V CCD Maximum Operating Frequency 10MHz CCD Line time 0 7062ms White Data output Voltage 0 7V 0 5V Mono Copy 0 75ms l...

Page 33: ...P Process Structure of EP Process Charger Developer Laser Scanning Unit OPC ITB Unit Eraser Blade Blade Media Path P2 Image on Media P1 Image on OPC Charger Developer Laser Scanning Unit OPC ITB Unit Eraser Blade Blade Media Path P2 Image on Media P1 Image on OPC ...

Page 34: ...tivity 10 5 ohm cm Applied voltage 1 1kV Charge acceptance 520V OPC coating thickness 21um OPC diameter 60mm Non eraser system 1 Organic Photoconductor is charged to uniform voltage by conductive roll charging method 2 No ozone is produced because corona is not used 3 Charger roll is cleaned with cleaning roll 4 Toner remained on OPC after T1 process is cleaned by cleaning blade and retrieved into...

Page 35: ...e is being used to develop toner into latent image on OPC because non contact developing method is adopted 3 Y M C and K Images are sequentially developed onto OPC and transferred onto Intermediate Transfer Belt hereafter ITB to form a color image on ITB 4 Toner Bottles are used to supply toner into developer compartment 5 Toner level is being sensed to control toner supply from toner bottle to de...

Page 36: ... also positive to get color image moved onto media 3 Toner remained on ITB after T2 process is cleaning by ITB cleaning blade and collected and 4 Transported and retrieved into waste toner box by auger and belt driving system 5 T2 Roll is engaged when color image is being transferred onto media Otherwise it is disengaged Clutch is used for driving T2 Roll engagement and disengagement Fusing 3 Roll...

Page 37: ...lution 600 x 600 dpi Copy Quality H x V Text 600 x 300 dpi default User selectable via Content button Text Photo 600 x 300 dpi Photo 600 x 600 dpi Supported Media Types Plain Label Cardstock Transparency Copy Speed Platen SDMP 30cpm Letter SDMP Single Document ADF SDMP 30cpm Letter Multiple Printout ADF MDSP 20cpm A4 Text or Text Photo MDSP Multiple Document 10cpm A4 Photo Single Printout Reduce E...

Page 38: ...Samsung Electronics Service Manual System Overview 3 14 3 2 Main PBA Description 3 2 1 Print Board Assembled PBA Pictures 1 Top View of Main Controller 2 Bottom View of Main Controller ...

Page 39: ...System Overview Samsung Electronics Service Manual 3 15 4 Bottom View of SMPS 3 Top View of SMPS ...

Page 40: ...Samsung Electronics Service Manual System Overview 3 16 6 Bottom View of HVPS 5 Top View of HVPS ...

Page 41: ...System Overview Samsung Electronics Service Manual 3 17 8 Bottom View of OPE 7 Top View of OPE ...

Page 42: ...Samsung Electronics Service Manual System Overview 3 18 10 Bottom View of FAX 9 Top View of FAX ...

Page 43: ...System Overview Samsung Electronics Service Manual 3 19 12 Bottom View of ADF 11 Top View of ADF ...

Page 44: ...Samsung Electronics Service Manual System Overview 3 20 14 Bottom View of Joint B D 13 Top View of Joint B D ...

Page 45: ...m Main Control SoC USB Connector RJ45 SDRAM Network Physical Chip EEPROM 64Kbit Flash Memory OSC5 12MHz OSC2 12MHz OSC6 12MHz OSC4 25MHz USB2 0 Device CHORUSm Main Control SoC USB Connector RJ45 SDRAM Network Physical Chip EEPROM 64Kbit Flash Memory OSC5 12MHz OSC2 12MHz OSC6 12MHz OSC4 25MHz ...

Page 46: ...ine to print image Function Process 0 13um Technology Package 496 PBGA CPU Core ARM 920T 300MHz Cache I Cache 16KB D Cache 16KB System Bus 32 bit width 100MHz SDRAM Controller 32 bit width 100MHz operation 5 Banks Up to 128MB Address space per Bank Programmable Timing to Control SDRAM A C Characteristics Support Self Refresh for Data Retention ROM Controller 32 bit width 4 Banks Up to 16MB Address...

Page 47: ...0dpi CIS CCD Interface Color Mono grey image Binary image scan support 600dpi Color Mono Copy support Image Processing for High End MFP Digital Copier MH MR MMR CODEC for Fax Scan image A4 1200dpi processing Copy image A4 600dpi processing MAC Controller 10 100Mbps Full IEEE 802 3 compatibility PPI Controller IEEE1284 compliant parallel port interface DMA Based or Interrupt Based operation GEU Con...

Page 48: ...Samsung Electronics Service Manual System Overview 3 24 CHORUSm Internal Block Diagram ...

Page 49: ...con nected to host through physical layer chip outside and thus receives print job from host STE100P is used for physi cal layer chip 6 EEPROM Block System EEPROM is controlled by the I2C controller built in CHORUSm connected to the other non volatile memory on I2C bus It works at the speed of 400KHz This system EEPROM contains all drive information and production information necessary for the ope...

Page 50: ...2 PWM Control PWM Controller built in CHORUSm controls the parts that require PWM for normal printing such as BLDC drive speed and HVPS high voltage level etc 13 ADC Control It is controlled by ADC Controller built in CHORUSm and is used for perception of charged voltage and current 1st and 2nd transfer voltage and current fusing temperature used up toner and toner amount and interior temperature ...

Page 51: ... and AC Heat Control part which supplies power to Fuser Standard TYPE III is used 1 DC Output Main Controller PBA OP Panel BLDC Sensors Clutches Other PBAs 2 AC Output Fuser Unit Heat Lamp Thermostat 3 Output Voltage CON2 To Main PBA CON1 CON3 AC Input Fuser AC CHANNEL 5 0V 24V 24VF V_out 5 0V 5 24 0V 15 10 24 0V 15 10 Load MicroController LSU MOTOR CLUTCH CMOS LOGIC HVPS ...

Page 52: ...age Power Supply PBA HVPS PBA generates high voltage of charger supply T1 and T2 which is supplied to Developer ensuring optimum con dition for image formation HVPS receives input of 24V and generates high voltage supplying it to Toner OPC Cartridge ITB Unit and Transfer Roller ...

Page 53: ...and the image will be blurred 4 T2 Cleaning Voltage Clean T2 Function prevent reverse side of paper from being dirtied by recovering the negatively charged toner remaining at Transfer Roller and sending it onto ITB Output voltage with no feedback control output fixed voltage 1300V 15 ERROR type reverse side of paper will be dirtied 5 Supplying Voltage Supply AC DC Function voltage that makes toner...

Page 54: ... It runs with the setting of default development parameter Image quality will be degraded for the lack of appropriate respond to the change of time and environment 3 Service Response It is possible to response appropriately for the information of cartridge life is saved at Back Up Area Process after CRU life expiration 1 Record the information of End of Life 2 Copy the information of Operating Are...

Page 55: ...System Overview Samsung Electronics Service Manual 3 31 CRUM Position Cap Agitator Washer Bottle Agitator Seal CRUM Coupling Cap CRUM ...

Page 56: ...he world smallest and lightest color laser printer This model has 16ppm B W print speed and 4ppm color print speed 2400 x 600 dpi class optical 600 x 600 dpi color laser printer 3 4 1 Controller The video controller board is located on the right side of the printer Basic Memory is 32 Mbytes SDRAM Field F W upgradeable FLASH ROM firmware for controller 1024 byte EEPROM Printing Resolution Native 60...

Page 57: ...ion will be provided separately 3 4 6 OP Panel 4in1 OP panel FAX COPY SCAN PRINTER 3in1 OP panel COPY SCAN PRINTER 16 x 2 LINE CHARACTER LCD MODE FAX COPY SCAN KEY TYPE CARBON COATING S W 3 4 7 Periodic Replacing Parts Samsung shall specify parts requiring replacement and the frequency of replacement The parts identified may be deemed customer replaceable parts Periodic replacement parts shall be ...

Page 58: ... LOW OUT Behavior for consumables The consumable low and out behavior on CLX 3160 Series engine is specified by SEC FP Device for life end Law 90 Life 100 Hard stop Reset to 0 message detection Toner CRUM Yes Yes Yes 115 No Imaging Kit CRUM Yes Yes No No Fuser No Yes Yes No Yes T2 Roller No Yes Yes No Yes Pick up No No No No No 3 4 8 Power Switch The Switch is located at rear side of printer and m...

Page 59: ...guage which printer can understand and transfers data to spooler 3 Stand alone Application that offers the various printing application DMS Document Management System RCP Remote Control Panel Printer Status Monitor Network Management in Window system 4 Web based Application that offers the same functions as Stand alone Application and RDC Remote Diagnosis Control in Web environment Firmware is mad...

Page 60: ...ional functions management of printing job printer administration Status monitor to monitoring the printer status by real time in Web independent environment on OS 3 Stand alone Application that is a similar Window software as same as above 2 4 Port Monitor that manages the network communication between spooler and Network Interface Card or various additional application and Network Interface Card...

Page 61: ...port or USB port Kernel receives this data from Host and then select emulation fit to data and start selected one After emulation job end Kernel sends the output bit map data to Engine using Printer Video Controller by clock type for LSU Engine print the received data to required paper with the sequential developing process 2 Case of using Network Interface Card After user start to print the wante...

Page 62: ...de Printer Jam In Exit Area 4 Cover Cover Open Message toggles between Cover Open and Install Transfer Belt SCF Cove Open 5 Service Call Unrecoverable Error Engine LSU Error Main Motor Error Dev Motor Error Engine Fuser Over Low Heat Error Rear Fan Error Left Fan Error SMPS Fan Error 6 Others Memory Overflow Error Ready IP Conflict Toner C M Y K Transfer Belt Fuser Pickup Rollers MP Tray1 Tray2 90...

Page 63: ...tion Model Name Supplier ID Serial Number Company ID MFG Date Capacity Page Count Toner Cartridge and Transfer Belt Indicates how many pages are printed by using the consumable Dot Count Toner Cartridge Only Indicates how many dots are printed by using the toner cartridge 4 7 FW Upgrade Via USB or Network SWS SWAS You can upgrade F W via USB or Network whenever the printer is Ready Via Using F W D...

Page 64: ...Samsung Electronics Service Manual S W Structure and Descriptions 4 6 4 8 Initailize Flow ...

Page 65: ...S W Structure and Descriptions Samsung Electronics Service Manual 4 7 ...

Page 66: ...machine note the cable routing that will be affected Whenever servicing the machine you must perform as follows 1 Check to verify that documents are not stored in memory 2 Be sure to remove the toner cartridge before you disassemble parts 3 Unplug the power cord 4 Use a flat and clean surface 5 Replace only with authorized components 6 Do not force plastic material components 7 Make sure all compo...

Page 67: ... pressure to the left side of the Cover Upper Left and pull it in the direction of arrow as shown below 3 Apply light pressure to the right side of the Cover Upper Right and pull it in the direction of arrow as shown below ADF Ass y 1 2 Cover Upper Right 2 1 Cover Upper Left 5 2 Cover Upper Left Right ...

Page 68: ...al 5 3 5 3 Front Cover 1 Open the Cover 2 To remove the Front Cover first pull the Rib below the right side of the Front Cover with a light pressure to the upside and then release the Front Cover in the direction of arrow as shown below Front Cover 1 2 1 2 Rib ...

Page 69: ... open handle as shown below 2 Extend the Top Handle on the OPC DEV Unit and then use it to pull the OPC DEV Unit out of the machine completely OPC DEV Unit Top Handle Notice 1 Do not touch the green surface on the OPC DEV Unit with your hands or any other material Use the handle on it to avoid touching this area 2 Be careful not to scratch the surface of the OPC DEV Unit ...

Page 70: ... remove OPC DEV Unit Refer to 5 4 2 For easy dissembly first pull the ITB Unit in the direc tion of arrow and then take out the ITB Unit as shown below 2 1 1 ITB Unit Notice 1 Do not grab the ITB Belt of the ITB Unit it may cause a malfunction due to a foreign object 2 Be careful not to scratch the surface of the ITB Belt ...

Page 71: ...bber part of the T2 Roller Unit it may cause a malfunction due to a foreigen object Hold the both side of the T2 Roller Unit when replacing it 5 6 T2 Roller Unit Open Button Rear Cover 2 1 Holder Transfer Unit T2 Roller Unit 1 Remove the seven screws securing the Round Cover and then release the Round Cover from the machine completely as shown below 2 Open the Rear Cover refer to 5 5 1 and then re...

Page 72: ... Refer to 5 2 2 Remove the two screws securing the OPE Unit to the Platen Ass y 3 Apply light pressure to the front of the OPE Unit and pull it in the direction of arrow as shown below 4 Unplug the three connectors from the OPE PBA as shown below 5 Remove the nine screws securing the OPE PBA to the OPE Cover LCD Cover OPE PBA OPE Cover OPE Unit ...

Page 73: ...OPE Cover 7 Remove the Lens and Keys from the OPE Cover 8 If necessary remove the NEVI Cover 9 For easy disassembly release the Battery NIH LED Lens Onetouch FAX Menu Mode Copy Tel On Hook Start Black Stop Clear Start Color Battery NIH Onetouch Menu Tel_Copy Mode NEVI Cover Sheet One Touch Label One Touch ...

Page 74: ...ght pressure to the bottom of the Right Side Cover and pull it to the right side in the direction of arrows as shown below 4 Remove the two screws securing the Left Side Cover as shown below 5 Apply light pressure to the bottom of the Left Side Cover and pull it to the left side in the direction of arrows as shown below Notice Be careful not to damage the hooks when remove the Side Cover Left Righ...

Page 75: ...the eight screws securing the ADF Engine part to the Cover Platen and then release the ADF Engine part in the direction of arrow At that time the TX Stacker automatically release it self at right side as shown below 4 Remove the two screws securing the ADF Harness to the Cover Connector and then take care to thread the ADF Harness through the Cover Platen 5 10 ADF Ass y ADF Ass y ADF Engine part T...

Page 76: ...crewdriver as shown below 8 Unplug the ADF Motor connector and remove four screws securing the ADF Motor Ass y and then remove the one screw securing the Ground Cable as shown below Then take out the ADF Motor Ass y Notice 1 When working on the ADF Motor Ass y take care not to contaminate any of the rubber surfaces with grease 2 Before removing the ADF Engine part take great care to note the posit...

Page 77: ...the cables CCD Scan Ground from the Harness Guide and then apply light pressure to the top of the Harness Guide and pull it to the right side in the direction of arrow as shown below 4 First release the OPE Harness in the direction of arrow and then remove the one screw securing the Ground Cable as shown below 5 Unplug the two connectors Scan Out Full and CCD Cable and then lift the Platen Ass y i...

Page 78: ...elease the six hooks securing the Scan Upper to the Scan Lower and remove it as shown below 8 Remove the CCD Cable as shown below Notice You should connector remove the CCD Cable vertically to avoid the CCD Cable pin damage 9 Pull up the CCD Shaft and take out the CCDM Scan Upper Scan Lower CCD Cable Core CCDM CCD Shaft ...

Page 79: ...ring the Scan Motor Ass y and then unplug the connector from the Joint PBA 12 If necessary remove the two screws securing the Scan Motor and remove it as shown below 13 To remove the ADF Lower Harness first unlatch the hooks in the direction of arrow and then Unplug the connector from the Joint PBA as shown below Scan Motor Gear Bracket Ass y ADF Lower Harness 1 2 1 Belt Spring Scan Motor Ass y ...

Page 80: ...ctor from the Joint PBA 15 Unlatch the Open Sensor and remove it as shown below 16 Remove the two screws securing the Joint PBA and remove it as shown below 17 The connectors are located as shown below Joint PBA Joint PBA Drawer Main PBA Motor Cover Open In Full Open Sensor Sensor Lever Open Sensor ...

Page 81: ...he CCD Home Sensor as shown below Caution Reassembling CCDM 1 When refitting the Scanner Belt and Belt Spring take care to relocate the tension spring as close to the right side of the CCDM as is possible as shown below 2 When refitting the Scan Upper Cover take care to ensure that the Cover Open Switch is not trapped CCD Holder CCD Home Sensor Harness ...

Page 82: ...ee connectors USB Speaker Fan as shown below 3 Remove the five screws securing the Middle Cover Ass y and then lift the Middle Cover Ass y as shown below 4 Remove the two screws securing the USB Host PBA and remove it 5 Remove the one screw securing the Speaker and then release the Speaker as shown below 5 12 Middle Cover Ass y DC Fan Speaker USB Host Middle Cover Ass y USB Host PBA Harness Speake...

Page 83: ...l Disassembly and Reassembly 5 18 6 If necessary apply light pressure to the both side of the Jam Cover and pull it in the direction of arrow as shown below 7 Pull the DC Fan from the Middle Cover Ass y as shown below Jam Cover DC Fan ...

Page 84: ...Ass y as shown below 3 To remove the Fuser Ass y first pull the Holder in the direction of arrow and then take out the Fuser Ass y as shown below 4 To remove the Thermostat first release the Link1 Harness below the both side of the Thermostat and then remove the two screws securing the Thermostat and remove it as shown below 5 Remove the one screw securing the Thermistor and release it as shown be...

Page 85: ...h side of the Halogen Lamp and then remove the Release Lever L R in the direction of arrow 9 Take out the Halogen Lamp in the direction of arrow and then release the Heat Roller as shown below Notice Be careful not to damage or contaminate the surface of the roller when assembling and disassembling the Heat Roller 10 Release the Pressure Shaft Roller and Pressure Roller in the direction of arrow a...

Page 86: ... 14 HVPS 1 Before you remove the HVPS you should remove Side Cover Left Refer to 5 8 2 Remove the six screws securing the HVPS and then unplug the all connectors as shown below Notice Be aware of the Terminals TR S to ensure they are not lost HVPS Terminal S Terminal TR ...

Page 87: ...t you should remove Side Cover Right Refer to 5 9 Harness Guide Refer to 5 11 3 2 Unplug the Film Cable from the LIU PBA 3 Remove the three screws securing the LIU Unit and remove it as shown below 4 If necessary remove the LIU PBA from the Supporters as shown below Film Cable Supporter LIU PBA Sheet LIU LIU Unit ...

Page 88: ...uring the Shield Main Lower with Main PBA and remove it 4 If necnsary remove the four screws securing the Main PBA and remove it as shown below 5 The connectors are located as shown below Shield Main Lower with Main PBA Main PBA Shield Main Lower Line USB Fuser Clutch BLDC Scan CCDM USB Host ITB Clutch DEV_Sol LIU DEV_Home Panel SMPS HVPS Cover LSU SCF DEV ITB Regi Empty Regi_Clutch Pick Up Main P...

Page 89: ... Refer to 5 16 2 Release the Harness and Cable from the Cable Clamp as shown below 3 Remove the nine screws securing the Main Drive Ass y and remove it as shown below Notice The eight screws have numbers stamped into the Main Drive Ass y base plate When refitting the Main Drive Ass y tighten the screws the order they are numbered 5 17 Main Drive Ass y Cable Clamp Main Drive Ass y ...

Page 90: ...ug the all connectors Main PBA Inlet Fuser_AC from the SMPS as shown below 3 Remove the four screws securing the SMPS and remove it 4 If necessary first remove the Shield Main Lower refer to 5 16 and Main Drive Ass y refer to 5 17 and then remove the one screw securing the Shield SMPS and remove it in the direction of arrow Shield SMPS Main Inlet Fuser_AC SMPS ...

Page 91: ...Regi Clutch as shown below 3 Remove the E ring below the both side of the Regi Roller as shown below 4 Take off the Sheet and then remove the Regi Pulley as shown below 5 To remove the Regi Roller first slide the left side to right side and then take out the left side as shown below Notice Do not grab the rubber part of the Regi Roller it may cause a malfunction due to a foreigen object Clutch Pla...

Page 92: ...Disassembly and Reassembly Samsung Electronics Service Manual 5 27 6 Pull the Feed Idle Shaft Feed Idle Shaft ...

Page 93: ...r and then remove the E ring from the Feed Shaft as shown below Notice Be aware of the E ring and Spring to ensure they are not lost 4 To remove the Feed Roller first pull the Feed Roller from the Bush and then take out the Feed Roller and Feed Shaft as shown below Notice Do not grab the rubber part of the Feed Roller it may cause a malfunction due to a foreigen object Belt Feed Pully Feed Gear 2 ...

Page 94: ...ove the three screws securing the Pick Up Plate with Pick Up Guide and then release the Pick Up Plate in the direction of arrow 4 If necessary remove the two screws securing the Pick Up Plate and remove it from the Pick Up Guide as shown below 5 If necnssary pull the Pad Holder from the Pick Up Guide as shown below Notice 1 Be aware of the Springs to ensure they are not lost 2 Clean the surface of...

Page 95: ...o that it s slide the right to left from the Pick Up Shaft and then slide the Pick Up Roller Unit left side to right side and take out the left side as shown below 8 When if only remove the Pick Up Rubber first pull the Pick Up Rubber with Housing U from the Housing B in the direction of arrow and then release the Pick Up Rubber from the Housing U as shown below 9 Remove the one screw securing the...

Page 96: ...Disassembly and Reassembly Samsung Electronics Service Manual 5 31 10 Remove the one screw securing the Cam Holder and remove it Cam Holder ...

Page 97: ...uts securing the Fuser Terminal Unit and remove it as shown below 3 For easy disassembly remove the one screw secur ing the Exit Sensor and remove it 4 Remove the three screws securing the Exit Roller Unit 5 First unlatch the lock device below the both side of the Exit Frame using a flat blade screwdriver and then pull the Exit Roller Unit as shown below Exit Roller Unit Lock Device Fuser Terminal...

Page 98: ... Manual 5 33 6 Remove the Holder Bearing with Roller Exit F Down from the both side of the Exit Frame as shown below and then remove the Roller Exit Main and Holder Exit F Down Holder Exit F Down Roller Exit Main Holder Bearing Exit Roller Exit Gear 1 2 1 ...

Page 99: ...ide of the LSU Cover Unit and remove it in the direction of arrow 3 Unplug the two connectors and then remove the four screws securing the LSU and remove it in the direction of arrow LSU Cover LSU 5 24 MP Unit 1 Before you remove the MP Unit you should remove Cassette Unit Refer to 5 3 1 2 Down the MP Unit as shown below 3 Apply light pressure to the both side of the MP Unit and pull it in the dir...

Page 100: ... Display Shows the current status and prompts during an operation 10 Menu Enters Menu mode and scrolls through the available menus 11 Scroll buttons Scroll through the options available in the selected menu and increase or decrease values 12 OK Confirms the selection on the screen 13 Back Sends you back to the upper menu level 14 Status Shows the status of your machine 15 Darkness Adjusts the docu...

Page 101: ...hine 9 Darkness Adjusts the document brightness for the current copy job 10 Original Type Selects the document type for the current copy job 11 Reduce Enlarge Makes a copy smaller or larger than the original 12 USB Print Allows you to directly print files stored on a USB Memory device when it is inserted into the USB memory port on the front of your machine 13 Number keypad Dials a number or enter...

Page 102: ...ing data from the computer When the backlight fast blinks the machine is printing data Red On The toner cartridge is totally exhausted Remove the old toner cartridge and install a new one A paper jam has occurred To solve the problem The front cover is open Close the front cover There is no paper in the tray Load paper in the tray The machine has stopped due to a major error Check the display mess...

Page 103: ...aring document jams When an original jams while passing through the ADF Document Jam appears on the display 1 Remove any remaining pages from the ADF 2 Open the ADF cover 3 Pull the jammed paper gently out of the ADF 4 Close the ADF cover Then load the removed pages if any back into the ADF ...

Page 104: ...o remove the misfed paper from the document output tray 3 Close the scanner lid Then load the removed pages back into the ADF 6 3 1 2 Roller misfeed 1 Open the scanner lid 2 Seize the misfed paper and remove the paper from the feed area by carefully pulling it to the right using both hands 3 Close the scanner lid Then load the removed pages back into the ADF ...

Page 105: ...1 1 Open and close the front cover The jammed paper is automatically ejected from the machine If the paper does not exit go to the next step 2 Pull the tray 1 open 3 Remove the jammed paper by gently pulling it straight out If the paper does not move when you pull or if you do not see the paper in this area check the paper exit area 4 Insert the tray 1 into the machine until it snaps into place Pr...

Page 106: ...onal tray 2 open 2 Remove the jammed paper from the machine If the paper does not move when you pull or if you do not see the paper in this area go to the next step 3 Open the jam cover in the optional tray 2 4 Pull the jammed paper out in the direction shown 5 Close the jam cover Printing automatically resumes ...

Page 107: ...ace Printing automatically resumes 6 3 2 4 In the paper exit area 1 Open and close the front cover The jammed paper is automatically ejected from the machine 2 Gently pull the paper out of the output tray If you do not see the jammed paper or if there is any resistance when you pull stop and go to the next step 3 Open the rear cover 4 If you see the jammed paper pull it straight up Skip to step 8 ...

Page 108: ...Alignment and Adjustmens Samsung Electronics Service Manual 6 9 5 Open the fuser door 6 Locate the jammed paper and pull it out ...

Page 109: ... diagram Menus available in Fax Copy or Scan mode vary 6 4 2 Changing the display language To change the language that appears on the control panel follow these steps 1 Press Menu until System Setup appears on the bottom line of the display and press OK 2 Press OK when Machine Setup appears 3 Press the Scroll buttons until Language appears and press OK 4 Press the Scroll buttons until the language...

Page 110: ...uttons to move the cursor under the digit you want to correct and enter a new number 5 To select AM or PM for 12 hour format press the or button or any number button When the cursor is not under the AM or PM indicator pressing the or button immediately moves the cursor to the indicator You can change the clock mode to 24 hour format e g 01 00 PM as 13 00 For details see the next section 6 Press OK...

Page 111: ...ephone line through the speaker such as a dial tone or a fax tone With this option set to Comm which means Common the speaker is on until the remote machine answers You can adjust the volume level using On Hook Dial Ringer CLX 3160FN only Adjusts the ringer volume For the ringer volume you can select Off Low Mid and High Speaker ringer key sound and alarm sound 1 Press Menu until System Setup appe...

Page 112: ...ess 6 labeled with MNO Each time you press 6 the display shows a different letter M N O and finally 6 You can enter special characters such as space plus sign and etc For details see the below section 2 To enter additional letters repeat step 1 If the next letter is printed on the same button move the cursor by pressing the right Scroll button and then press the button labeled with the letter you ...

Page 113: ... Press OK when Machine Setup appears 3 Press the Scroll buttons until Power Save appears and press OK 4 Press the Scroll buttons until On appears and press OK 5 Press the Scroll buttons until the time setting you want appears and press OK 6 Press Stop Clear to return to Standby mode Scan Power Save mode Scan Power Save mode allows you to save power by turning off the scan lamp The scan lamp under ...

Page 114: ...or occurs while processing data from the computer and the data flow stops the machine waits the specified time and then cancels printing if data flow does not resume 1 Press Menu until System Setup appears on the bottom line of the display and press OK 2 Press OK when Machine Setup appears 3 Press the Scroll buttons until Job Timeout appears and press OK 4 Press the Scroll buttons until the time s...

Page 115: ...a the following programs that came with your machine SyncThruTM Web Admin Service A web based printer management solution for network administrators SyncThruTM Web Admin Service provides you with an efficient way of managing network devices and lets you remotely monitor and troubleshoot network printers from any site with corporate intranet access SyncThruTM Web Service A web server embedded to yo...

Page 116: ...by the system administrator Dynamic addressing via BOOTP DHCP default A TCP IP address is assigned automatically by the server Note Before configuring TCP IP you need to set the network protocol to TCP IP Static addressing To enter a TCP IP address from your machine s control panel take the following steps 1 Press Menu until Network appears on the bottom line of the display and press OK 2 Press OK...

Page 117: ...ng steps 1 Press Menu until Network appears on the bottom line of the display 2 Press OK when TCP IP appears 3 Press the Scroll buttons until DHCP or BOOTP appears and press OK 4 Press Stop Clear to return to Standby mode 6 5 4 Setting Ethernet speed You can select the communication speed for Ethernet connections 1 Press Menu until Network appears on the bottom line of the display and press OK 2 P...

Page 118: ...r Setting appears and press OK 3 Press OK when Yes appears to restore the network configuration 4 Power the machine off and back on 6 5 6 Printing a network configuration page The Network Configuration page shows how the network interface card on your machine is configured 1 Press Menu until Network appears on the bottom line of the display and press OK 2 Press the Scroll buttons until Network Inf...

Page 119: ... Printing a Document in Windows 1 Click the Windows Start menu 2 For Windows 98 Me NT 4 0 2000 select Settings and then Printers For Windows XP select Printers and Faxes 3 Select the Samsung MFP CLX 3160 Series printer 4 Click the right mouse button on the printer icon and For Windows 98 Me select Properties For Windows 2000 XP select Printing Preferences For Windows NT 4 0 select Document Default...

Page 120: ...age You can print a configuration page from the printer s control panel Use the configuration page to view the current settings to help troubleshoot problems To print a configuration page In ready mode press and hold the Stop button on the control panel for 5 seconds A configuration page prints out ...

Page 121: ...oller Period Phenomenon 1 OPC Drum 188 5 mm White and Black Spots 2 Charge Roller 37 7mm Black Spot and line and Periodic Band 3 Supply Roller 47 5mm Periodic Band by little difference of density 4 Developing Roller 26 0mm White Spot Horizontal black band 5 1st Transfer Roller 32 7mm Ghost Damaged Image by abnormal tranfer 6 2nd Transfer Roller 57 5mm Ghost Damaged Image by abnormal tranfer 7 86 6...

Page 122: ...e tech mode the technician can check the machine and perform various test to isolate the cause of a malfunction While in Tech mode the machine still performs all normal operations To enter the Tech mode To enter the Tech mode press in sequence and the LCD briefly displays TECH the machine has entered service tech mode ...

Page 123: ...Samsung Electronics Service Manual Alignment and Adjustmens 6 24 6 8 2 Setting up System in Tech Mode ...

Page 124: ...ow the set value You can select the rate between 5 and 10 CLEAR ALL MEMORY The function resets the system to factory default settings This function is used to reset the system to the initial value when the product is functioning abnor mally All the values are returned to the default values and all the information which was set by the user will be erased Method 1 Select the MEMORY CLEAR at the TECH...

Page 125: ...r upgrade Save the files in the same folder 2 In the DOS input as below and push the enter key Then it will be automatically upgraded 3 There are two commands for the conditions of product When the product is in idle condition down rom file When the product is in Ready condition TECH MODE DATA SETUP FLASH UPGRADE LOCAL copy b rom file lpt1 4 Do not turn off the power while upgrading process 2 Remo...

Page 126: ...es all of the Copy Setup options to the factory default Fax Setup Restores all of the Fax Setup options to the factory default Fax Feature Cancels all of the scheduled fax jobs in the machine s memory As below item you can selectively clear information stored in your machine s memory Advanced Fax Restores all of the Advanced Fax setting options to the factory default Sound Volume Resets the sound ...

Page 127: ...pgrade Save the files in the same folder 2 In the DOS input as below and push the enter key Then it will be automatically upgraded 3 There are two commands for the conditions of product When the product is in idle condition down rom file When the product is in Ready condition TECH MODE DATA SETUP FLASH UPGRADE LOCAL copy b rom file lpt1 4 Do not turn off the power while upgrading process 3 2 Remot...

Page 128: ...enter the new password TECH MODE DATA SETUP NOTIFY TONER RDS RDS Password 7 If you are to enable the RDS system Notify Toner option should be Off 4 3 Call setup Release In order to perform any RDS activity on a Customer MFP the SVC will have to setup a call to it On successful completion of call setup one or more RDS functions can be executed before call release is manually initiated When connecti...

Page 129: ...is feature to test the machine S ROM The result and the software version appear in the LCD display FLASH VER 1 00 V ENGINE VER 1 00V PATTERN TEST Using this pattern printout you can check if the printer mechanism is functioning properly It is needed in the production progress Service person doesn t need to use it SHADING TEST The function is to get the optimum scan quality by the specific characte...

Page 130: ...p 3 T 30 protocol during the most recent sending or receiving operation Use this list to check for send and receive errors If a communication error occurs while the machine is in TECH mode the protocol list will print automatically OTHER ITEM This list provides a list of the user system data settings and tech mode settings Component Check ...

Page 131: ...Unit is ready to print On the other case Laser Error 13 LD Test Diode On is displayed when the laser diode is on Diode On Off On the other case Diode Off is displayed 21 Feed Sen Test These Functions are considered to check the present Sensor Off to Sensor On 22 Exit Sen Test state normal or not of the Sensors 23 Cover Sen Test After the cover is open touch the sensor and confirm Cover Open to Cov...

Page 132: ...achine it will start a scan and page count The time the machine was first used is remembered These settings are are remembered after memory delete Clear All Memory Method Press MENU 1 9 3 in sequence Firmware version is displayed on LCD Press 1 in the number keypad The LCD display shows Updated date Press 2 in the number keypad The LCD display shows Product first use date Display OS 1 00 86 07 11 ...

Page 133: ...oblem in the fuser unit The loaded original has jammed in the ADF The front cover or rear cover is not securely latched You entered an unavailable item There is a problem in the cooling fan of the machine You have tried to select a group location number where only a single location number can be used such as when adding locations for a Multiple Send operation Replace the color toner cartridge with...

Page 134: ...ion but there are no jobs stored The output tray of the machine is full of paper Paper has jammed in the feeding area of the tray Paper has jammed in the paper exit area Power has turned off then on and the machine s memory has not been back up Install the color toner cartridge Install the part into your machine Install the a Samsung genuine color toner cartridge designed for your machine Install ...

Page 135: ...Paper has jammed in the optional tray 2 The engine in your machine is checking some problems detected A problem has occurred in the transfer belt in the machine There is no paper in the tray 1 There is no paper in the optional tray 2 Replace the toner cartridge with a new one Replace the part with a new one Call for service Replace to maintenance part You can press OK to immediately redial or Stop...

Page 136: ...pting to repair the printer first obtain a detailed description of the problem from the customer Power On No Power Power Module error Main PBA error LCD Panel error Refer to Solution of Image Problem OP Panel ON Ready or Power save Indicate Error Massage Refer to Error Massage Chapter 6 9 Test Print END printing Quality is Nomal ...

Page 137: ...move any obstructions from inside the machine Paper has not been loaded correctly Remove paper from the tray and reload it correctly There is too much paper in the tray Remove excess paper from the tray The paper is too thick Use only paper that meets the specifications required by the machine If an original does not feed into the machine the ADF rubber pad may require to be replaced The paper kee...

Page 138: ...nt to the correct port If the computer has more than one port make sure that the machine is attached to the correct one The machine may be configured incorrectly Check the printer properties to ensure that all of the print settings are correct The printer driver may be incorrectly installed The machine is malfunctioning Repair the printer software See the Software Section Check the display message...

Page 139: ...wrong garbled or incomplete The wrong printer driver was selected Check the application s printer selection menu to ensure that your machine is selected The software application is malfunctioning Try printing a job from another application The operating system is malfunctioning Exit Windows and reboot the computer Turn the machine off and then back on again The file may have blank pages Check the ...

Page 140: ...gested solutions AaBbCc AaBbCc AaBbCc AaBbCc AaBbCc Toner specks The paper may not meet specifications for example the paper is too moist or too rough The transfer roller may be dirty Clean the inside of your machine The paper path may need cleaning AaBbCc AaBbCc AaBbCc AaBbCc AaBbCc Dropouts If faded areas generally rounded occur randomly on the page A single sheet of paper may be defective Try r...

Page 141: ...may have toner on them If the defects occur on the back of the page the problem will likely correct itself after a few more pages The fusing assembly may be damaged Contact a service representative AaBbCc AaBbCc AaBbCc AaBbCc AaBbCc Background scatter Background scatter results from bits of toner distributed on the printed page The paper may be too damp Try printing with a different batch of paper...

Page 142: ...url Turn the stack of paper over in the tray Also try rotating the paper 180 in the tray Wrinkles or creases Ensure that the paper is loaded properly Check the paper type and quality Turn the stack of paper over in the paper tray Also try rotating the paper 180 in the tray Back of printouts aredirty Check for leaking toner Clean the inside of the machine AaBbCc AaBbCc AaBbCc AaBbCc AaBbCc Solid Co...

Page 143: ... some character voids are normal You may be printing on the wrong surface of the paper Remove the paper and turn it around The paper may not meet paper specifications A Horizontal stripes If horizontally aligned black streaks or smears appear The toner cartridge may be installed improperly Remove the cartridge and reinsert it The toner cartridge may be defective Remove the toner cartridge and inst...

Page 144: ...easily Replace the paper in the tray with paper from a new package In high humidity areas do not leave paper in the machine for extended periods of time Frequent copy paper jams occur Fan the stack of paper then turn it over in the tray Replace the paper in the tray with a fresh supply Check adjust the paper guides if necessary Ensure that the paper is the proper paper weight 75 g m 2 20 lb bond p...

Page 145: ... printed Graphics are scanned more slowly than text Communication speed slows in scan mode because of the large amount of memory required to analyze and reproduce the scanned image Set your computer to the ECP printer mode through BIOS setting It will help to increase the speed For details about how to set BIOS refer to your computer user s guide Message appears on your computer screen Device can ...

Page 146: ... system Supporting operating systems are Windows 98 Me NT 4 0 2000 XP 2003 7 2 7 Fax problems CLX 3160FN only The machine is not working there is no display and the buttons are not working Unplug the power cord and plug it in again Ensure that there is power to the electrical outlet Condition Suggested solutions No dial tone sounds Check that the phone line is connected properly Check that the pho...

Page 147: ...o store the fax If the display shows the Memory Full message delete from memory any faxes you no longer need and then try again to store the fax Blank areas appear at the bottom of each page or on other pages with a small strip of text at the top You may have chosen the wrong paper settings in the user option setting For details about paper settings File in Use message appears during installation ...

Page 148: ...application has special print option such as oraw If oraw is specified in the command line parameter then remove it to print properly For Gimp front end select print Setup printer and edit command line parameter in the command item Condition Suggested solutions The machine does not appear on the scanners list Check if your machine is attached to your computer Make sure that it is connected properl...

Page 149: ...age LPP and MFP driver on the same machine simultaneously Since both Linux Printer Package and MFP driver make a symbolic link to lpr printing command which is commonly used on Unix clones it is not recommended to use both package on the same machine If you still want to use both packages simultaneously please install the LPP first If you want to uninstall only one of them please uninstall both pa...

Page 150: ...r You should change the Print Method option to Print as Image when you print from Acrobat Reader Condition Suggested solutions The document has printed but the print job has not disappeared from the spooler in Mac OS 10 3 2 Update your Mac OS to OS 10 3 3 or higher 7 2 10 Common Macintosh problems CLX 3160FN only ...

Page 151: ... 8 6 Rear Cover 8 7 8 7 Cover Platen 8 8 8 8 Platen Ass y 8 9 8 9 OPE CLX 3160FN 8 10 OPE CLX 3160N 8 11 8 10 Scan Ass y 8 12 8 11 ADF Ass y 8 13 8 12 ADF Lower 8 14 8 13 ADF Motor 8 15 8 14 Frame 8 16 8 15 Main Driver 8 18 8 16 LSU Cover 8 20 8 17 ITB Unit 8 21 8 18 OPC DEVE 8 22 8 19 Fuser Ass y 8 24 8 20 Cassette 8 25 8 Exploded Views and Parts List Contents ...

Page 152: ...Samsung Electronics Service Manual Exploded Views Parts List 8 2 8 1 Main 0 8 2 24 21 20 7 40 9 10 11 12 16 13 19 27 18 28 5 6 1 26 25 22 15 14 4 3 23 17 29 30 37 31 32 33 34 35 36 39 38 ...

Page 153: ...Exploded Views Parts List Samsung Electronics Service Manual 8 3 8 2 Middle Cover 0 10 9 8 8 11 12 1 2 3 4 14 5 6 7 13 ...

Page 154: ...Samsung Electronics Service Manual Exploded Views Parts List 8 4 8 3 Front Cover 0 2 1 ...

Page 155: ...Exploded Views Parts List Samsung Electronics Service Manual 8 5 8 4 Right Cover 0 1 2 3 ...

Page 156: ...Samsung Electronics Service Manual Exploded Views Parts List 8 6 8 5 Round Cover 0 1 2 ...

Page 157: ...Exploded Views Parts List Samsung Electronics Service Manual 8 7 8 6 Rear Cover 0 2 7 1 5 4 9 9 8 3 6 8 10 ...

Page 158: ...Samsung Electronics Service Manual Exploded Views Parts List 8 8 8 7 Cover Platen 0 1 1 1 1 2 1 3 1 4 1 5 2 3 4 4 5 6 7 7 5 8 9 ...

Page 159: ... 9 8 8 Platen Ass y 0 1 1 1 1 1 2 1 1 3 1 1 4 1 1 1 1 1 5 1 1 6 1 2 1 5 1 5 1 4 1 3 2 2 2 6 2 2 2 2 5 2 2 4 2 2 3 2 2 2 2 2 1 2 2 7 2 3 2 4 2 5 2 10 2 12 2 11 2 13 2 14 2 9 2 8 2 7 2 6 2 1 2 13 2 15 2 18 2 19 1 1 4 2 16 1 2 16 2 2 16 2 22 2 23 2 24 2 17 2 20 2 21 ...

Page 160: ...Samsung Electronics Service Manual Exploded Views Parts List 8 10 8 9 OPE CLX 3160FN 1 2 5 4 9 10 6 16 7 14 12 13 15 18 8 17 20 19 22 21 3 23 11 24 24 24 24 0 ...

Page 161: ...Exploded Views Parts List Samsung Electronics Service Manual 8 11 8 9 OPE CLX 3160N 0 2 1 9 11 12 18 10 15 13 16 17 7 17 17 17 17 17 3 14 8 6 4 5 ...

Page 162: ...Samsung Electronics Service Manual Exploded Views Parts List 8 12 8 10 Scan Ass y 0 1 3 2 4 6 7 5 ...

Page 163: ...msung Electronics Service Manual 8 13 8 11 ADF Ass y 0 5 7 5 1 5 2 5 3 5 2 3 3 1 3 2 3 2 5 3 2 2 3 2 1 3 2 4 3 2 3 3 3 2 1 6 4 4 1 4 18 4 2 4 3 4 6 4 4 4 12 4 10 4 11 4 9 4 15 4 5 4 17 4 8 4 8B 4 8A 4 7 4 13 4 14 4 15 4 16A 4 16B ...

Page 164: ...Samsung Electronics Service Manual Exploded Views Parts List 8 14 8 12 ADF Lower 1 17 5 5 5 16 18 12 11 4 13 6 6 6 6 14 20 2 24 9 10 8 19 2 15 7 3 22 23 8 7 21 ...

Page 165: ...Exploded Views Parts List Samsung Electronics Service Manual 8 15 8 13 ADF Motor 1 20 11 2 22 13 19 6 12 3 21 2 6 9 18 15 16 5 17 6 6 19 6 6 7 17 4 19 14 10 8 ...

Page 166: ...Samsung Electronics Service Manual Exploded Views Parts List 8 16 8 14 Frame 1 0 22 23 24 25 26 28 27 19 7 17 35 34 33 29 30 31 32 1 2 3 4 5 3 2 21 6 7 8 8 11 13 14 9 12 10 11 15 17 16 8 18 20 80 81 ...

Page 167: ... 8 17 Frame 2 0 50 51 52 53 54 55 56 57 58 58 1 58 2 58 3 59 67 67 1 67 2 67 3 67 4 67 5 67 2 68 68 1 68 2 68 3 68 5 68 4 69 45 1 45 2 45 3 45 45 5 60 61 62 63 64 65 63 66 66 36 37 38 39 40 41 42 43 43 42 44 70 71 72 73 73 74 75 76 77 78 79 79 1 79 2 11 45 4 80 ...

Page 168: ...Samsung Electronics Service Manual Exploded Views Parts List 8 18 8 15 Main Driver 1 0 31 30 29 32 36 34 25 26 27 27 28 37 35 20 7 19 15 2 14 17 16 18 13 12 1 2 3 4 5 8 21 22 23 24 7 6 9 10 11 33 ...

Page 169: ...Exploded Views Parts List Samsung Electronics Service Manual 8 19 Main Driver 2 49 11 23 28 38 42 43 50 49 48 47 49 47 45 46 44 41 42 52 40 39 ...

Page 170: ...Samsung Electronics Service Manual Exploded Views Parts List 8 20 8 16 LSU Cover 0 1 2 5 4 6 3 ...

Page 171: ...vice Manual 8 21 8 17 ITB Unit 0 9 26 14 9 17 29 13 72 64 61 51 6 25 60 6 6 56 20 59 24 58 41 54 48 52 32 7 22 5 16 50 6 38 38 43 37 37 36 34 68 33 53 40 76 6 6 6 27 31 55 46 57 15 47 6 49 30 35 28 65 44 39 18 42 8 8 62 39 7 7 27 40 45 23 10 6 19 21 6 ...

Page 172: ...Samsung Electronics Service Manual Exploded Views Parts List 8 22 8 18 OPC DEVE 3 0 2 11 5 14 12 13 15 10 9 2 6 16 ...

Page 173: ...Exploded Views Parts List Samsung Electronics Service Manual 8 23 5 4 19 12 24 7 21 22 28 27 20 13 27 2 29 18 16 12 9 25 14 8 1 17 3 8 18 10 ...

Page 174: ...g Electronics Service Manual Exploded Views Parts List 8 24 8 19 Fuser Ass y 0 15 23 32 33 41 34 21 20 19 17 25 16 2 18 24 14 10 11 42 22 40 13 12 8 9 25 36 24 35 28 6 39 3 5 4 30 31 1 29 24 24 7 37 38 26 27 ...

Page 175: ...Exploded Views Parts List Samsung Electronics Service Manual 8 25 8 20 Cassette 0 1 4 2 3 5 8 9 10 11 12 13 14 14 15 16 17 17 18 19 ...

Page 176: ...0 WIRE HARNESS UL1 SA 8 1 27 JC39 00484A CBF HARNESS SMPS CLP 300 WIRE HARNESS UL SA 8 1 28 3903 000085 CBF POWER CORD DT US BP3 YES I IEC C13 C C0022 SA 8 1 29 JC63 00934A COVER M_LEFT UPPER SCX 5530FN HIPS 2 5 9 Z4309 SA 8 1 30 JC63 00933A COVER M_RIGHT UPPER SCX 5530FN HIPS 2 5 Z4310 SA 8 1 31 JC63 01030A SHIELD P LIU CLX 3160FN SECC T0 8 W96 9 SA 8 1 32 6103 001049 SUPPORTER DASS T4N L30 8 NTR...

Page 177: ... M_STACKER TX SCX 5530FN HIPS 266 SNA 8 7 1 2 JC61 01609A GUIDE M_DOCU L SCX 5530FN HIPS 128 5 6 SNA 8 7 1 3 JC61 01610A GUIDE M_DOCU R SCX 5530FN HIPS 128 60 SNA 8 7 1 4 JF70 10616A IPR WASHER SPRING CU CF3400 SUS301 CSP Z4346 SA 8 7 1 5 JG66 40003A GEAR PINION SF4000 POM WHT M1 Z16 O1127 SA 8 7 2 JC63 00984A COVER M_PLATEN SCX 5530FN ABS 339 03 4 SNA 8 7 3 JC63 00209B SHEET WHITE SPONGE SCX 4216...

Page 178: ... 4 SA 8 8 2 18 JC61 00894B HOLDER M_CCD SCX 4720F XRX HIPS 2 43 6 3 Z4342 SA 8 8 2 19 JC39 00566A CBF HARNESS DRAW_JOIN CLX 3160 WIRE HARN SA 8 8 2 20 JB70 00154A ICT INSERT SHAFT SCX 1110 XRX SUM24L 5 SNA 8 8 2 21 JC68 01702A LABEL CAUTION SCX 5530FN WHITE PET 0 0 SNA 8 8 2 21 JC68 01825A LABEL CAUTION CLP 300 SEC WHITE POLY W SNA 8 8 2 22 JC92 01798A PBA SUB JOINT CLX 3160 SEC KOREA IRIS SA 8 8 ...

Page 179: ...IN Z4377 SA 8 11 4 8 JB75 00300A MEC PICK UP ROLLER ASSY SCX 1110F XRX XE Z4378 SA 8 11 4 8A JB72 00823A PMO SLEEVE PICK UP SCX 1110F POM BLK Z4379 SA 8 11 4 8B JB73 00055A RMO PICKUP ROLLER SCX 1110F XRX EPDM RUB SNA 8 11 4 9 JB72 00821A PMO ADF COLAR SCX 1110F POM NTR Z4380 SA 8 11 4 10 JB61 70904A SPRING ETC CLUTCH AMUNDSEN SWRS82A D11 4 Z4381 SA 8 11 4 11 JB72 00817A PMO ADF CLUTCH SCX 1110F P...

Page 180: ...8 SA 8 13 17 JC66 00456A GEAR 40 21 ADF SCX 4216F POM M0 6 Z40 21 SA 8 13 18 JC66 00457A GEAR SWING 31 20 ADF SCX 4216F POM M0 6 Z4367 SA 8 13 19 JC66 00458A GEAR IDLE 35 ADF SCX 4216F POM M0 6 Z35 Z4366 SA 8 14 1 JC61 01443A FRAME M BASE GOGH CLP 300 PC ABS NH 1000 Z4550 SNA 8 14 2 JC61 40001A FOOT ML80 ML 80 NBR GRAY F0003 SA 8 14 3 JC66 00050A CAM CATCH ML 9400W POM 34 18 7 WHITE S C0004 SA 8 1...

Page 181: ...JC61 01548A HOLDER M CAM CLP 300 POM DE8903 T2 0 1 Z4559 SNA 8 14 62 JC66 01120A SHAFT FEED IDLE CLP 300 SUM22 NI L237 D8 Z4560 SNA 8 14 64 JC66 01307A ROLLER REGI CLX 3160FN SUM22 EPDM D6 0 D SNA 8 14 67 JC97 02647A MEA UNIT PICKUP ROLL CLP 300 SEC EXPORT SA 8 14 67 1 JC66 01080A SHAFT P PICKUP CLP 300 SECC L286 T1 2 Z4575 SNA 8 14 67 2 JC66 01105A CAM M PICK UP CLP 300 POM M90 44 WHI Z4576 SNA 8...

Page 182: ...HAFT M ITB CLEAN CAM CLP 300 POM L44 D2 Z4447 SA 8 15 38 JC31 00041A MOTOR DC DEVE DRIVE 50M843A152 CLP 600 2 M0024 SA 8 15 41 JC61 01458A BRACKET M DEVE CAM CLP 300 PC ABS T2 5 W Z4537 SNA 8 15 43 JC67 00130A CAP M PUSH COUPLING CLP 300 POM T2 0 D13 Z4450 SA 8 15 44 JC97 01788B MEA UNIT CLUTCH DEV CLP 300 WORLD M0 6 Z4451 SA 8 15 45 JC66 01066A SHAFT M DEVE CAM CLP 300 POM L116 D18 3 Z4452 SA 8 1...

Page 183: ...9A SEAL BLADE ITB LEFT CLP 300 POLYURETHANE Z4662 SNA 8 17 41 JC62 00232A SEAL TOP ITB CLP 300 POLYURETHANE 10T Z4663 SNA 8 17 42 JC62 00257A SEAL FRAME WASTE ITB CLP 300 PORON LE 20 Z4664 SNA 8 17 43 JC62 00258A SEAL WASTE OPC CLP 300 PORON LE 20 T0 Z4665 SNA 8 17 44 JC62 00281A SEAL HOUSING ITB L CLP 300 PORON LE 20 B Z4666 SNA 8 17 45 JC62 00282A SEAL HOUSING ITB R CLP 300 PORON LE 20 B Z4667 S...

Page 184: ...LD Z4622 SNA 8 19 1 JC61 01474A FRAME M UPPER FUSER CLP 300 PET GF30 BN Z4585 SNA 8 19 2 JC61 01475A FRAME M LOWER FUSER CLP 300 PET GF30 BN Z4586 SNA 8 19 3 JC66 01078A ROLLER HEAT CLP 300 AL5052 RUBBER D27 5 Z4587 SNA 8 19 4 JC66 00669A GEAR FUSER SCX 5315F PPS OFL4036 1 34 P Z4481 SA 8 19 5 JC66 10902A BEARING H R L ML 165 PPS RBA313N ID26 B1019 SA 8 19 6 JC72 00814A PMO BEARING H R F SCX 5100 ...

Page 185: ...2 SA N A JC68 00761A MANUAL PRC COMMON SEA ENGLISH USA MOJO 1 SNA N A JC68 01706A MANUAL INSTALL CLX 3160 M150 420 M SNA N A JC96 03613A ELA UNIT TONER TANK Y CLP 300 SEC EXPORT Z4499 SNA N A JC96 03614A ELA UNIT TONER TANK M CLP 300 SEC EXPORT Z4498 SNA N A JC96 03615A ELA UNIT TONER TANK C CLP 300 SEC EXPORT Z4497 SNA N A JC96 03616A ELA UNIT TONER TANK K CLP 300 SEC EXPORT Z4500 SNA N A JC96 04...

Page 186: ...0275A S W APPLICATION CD CLX 3160 PRT DRV 1 SNA N A JC61 01487A PLATE P GROUND SCF CLP 300 SUS 304 CSP T SNA N A JC61 01570A GUIDE M PAPER CLP 300 POM M90 44 T2 0 15 Z4574 SNA N A JC61 01675A SPRING ETC AUGER CLP 300 SUS304 Ë1 2 S SNA N A JC61 01676A SPRING ETC AUGER K CLP 300 SWP B Ë1 2 IS SNA N A JC61 01677A SPRING ETC RETURN CLP 300 SUS304 Ë0 65 S SNA N A JC61 01685A SPRING ETC DUMMY CLP 600 SU...

Page 187: ...NA N A JC68 01344C MANUAL WARRANTY CARD COMMON SAMSUNG FREN SNA N A JC68 01381B LABEL R PPID DEVE COMMON DELL ART 0 05 SNA N A JC68 01563A MANUAL 800 SEC CARD COMMON XAA ENGLISH E SNA N A JC68 01579A MANUAL NETWORK GUIDE CLP 600N SEC COMM SNA N A JC68 01584A LABEL P BLANK 90 25 CLP 510 SEE ART 100 D2120 SA N A JC68 01695A LABEL POP CLX 3160FN HOLOGRAM PAPER 0 SNA N A JC68 01696A LABEL POP CLX 3160...

Page 188: ...MOS LOGIC 74LCX14 SCHMITT INVERTER T SNA N A 0803 000634 IC TTL 74LS07 BUFFER DRIVER SOP 14 150MI SA N A 0904 001865 IC USC OTG242LP 16BIT LQFP 64P 10 0X10 0 SA N A 0904 001989 IC USC ISP1582BS HVQFN56 56P 8X8X0 85M SA N A 1006 001316 IC LINE DRIVER FIN1047M SOP 16P 10X6MM SNA N A 1105 001379 IC DRAM K4S561632 256MBIT 4X4MX16BIT T SA N A 1106 001228 IC SRAM 6R1016 64KX16BIT TSOP 44P 400MIL SA N A ...

Page 189: ...TP 1608 SNA N A 2007 007297 R CHIP 110ohm 1 1 10W TP 1608 SNA N A 2007 007998 R CHIP 348KOHM 1 1 4W TP 3216 SNA N A 2007 008371 R CHIP 280Kohm 1 1 10W TP 1608 SNA N A 2007 008473 R CHIP 59Kohm 1 1 10W TP 1608 SA N A 2007 008510 R CHIP 237KOHM 1 1 4W DA TP 3216 SA N A 2011 001094 R NET 39OHM 5 1 16W L CHIP 8P TP SA N A 2011 001261 R NET 33ohm 5 1 16W L CHIP 8P TP 2 0x1 SA N A 2203 000041 C CER CHIP...

Page 190: ... CBF HARNESS DEVE_ITB CLP 300 WIRE HARNES SNA N A JC39 00580A CBF HARNESS DEVE_HOME CLP 300 WIRE HARNE SA N A JC39 00607A HARNESS REGI_EMT_MP CLX 3160 HARNESS UL1 SA N A JC41 00300B PCB MAIN CLP 300 FR 4 6L 1 3 1 6T SNA N A JC41 00318A PCB MODEM SCX 5530FN FR4 2 1 6T 114 5 SNA N A JC60 00014A FLANGE M DRUM OPC CLP 300 PC LF1025 W11 SNA N A JC60 00015A SPACER M DR G CLP 300 KL4540 ID6 03 OD SNA N A...

Page 191: ... A JC62 00236A SEAL DEVE FRONT CLP 300 PET FILM 0 075 SNA N A JC62 00240A SEAL AUGER CLP 300 PORON BLACK T5 0 ID4 SNA N A JC62 00241A SEAL COVER DUCT CLP 300 PE FOAM T2 0 W SNA N A JC62 00256A SEAL FRAME WASTE OPC CLP 300 PORON LE 20 SNA N A JC62 00260A SEAL CAP CRUM CLP 300 Polyurethane Foam SNA N A JC62 00262A SEAL WASTE CLP 300 PE FORM T3 0 W4 L13 SNA N A JC62 00269A SEAL COVER FRONT CLP 300 PE...

Page 192: ...A JC66 01101A SHAFT M AUGER TONER C CLP 300 ABS GF20 SNA N A JC66 01102A SHAFT M AUGER TONER K CLP 300 ABS GF20 SNA N A JC66 01107A GEAR AUGER SUPPLY CLP 300 POM DE588P M0 SNA N A JC66 01109A GEAR AUGER TONER CLP 300 POM DE588P M0 5 SNA N A JC66 01121A LEVER M T2 HOLDER R CLP 300 ABS GF20 T2 SNA N A JC66 01122A LEVER M T2 HOLDER L CLP 300 ABS GF20 T2 SNA N A JC66 01123A GEAR AUGER OPC CLP 300 POM ...

Page 193: ...T SA N A 0407 000101 DIODE ARRAY DA204K 20V 100mA C2 3 SOT 23 SA N A 0601 001138 LED IR ROUND 5mm 150mW 4V 950nm BK SNA N A 0601 001908 LED ROUND RED 3MM 630NM 3 2X4 6MM SNA N A 0603 001021 PHOTO TR NPN 20V 5V 20mA 75mW TP SA N A 1103 001366 IC EEPROM 34C02 2KBIT 256X8BIT SOP 8P 5X SNA N A 2001 000831 R CARBON 510OHM 5 1 4W AA TP 2 4X6 4MM SA N A 2005 000419 R WIRE WOUND NON 0 33ohm 1 1W AA TP 4 3...

Page 194: ...hm 5 1 10W TP 1608 SA N A 2007 000078 R CHIP 1Kohm 5 1 10W TP 1608 SA N A 2007 000084 R CHIP 4 7Kohm 5 1 10W TP 1608 SA N A 2007 000119 R CHIP 560ohm 5 1 10W TP 1608 SA N A 2007 000120 R CHIP 680ohm 5 1 10W TP 1608 SA N A 2007 000122 R CHIP 1 2Kohm 5 1 10W TP 1608 SA N A 2007 000402 R CHIP 150ohm 5 1 10W TP 1608 SA N A 2007 000839 R CHIP 39ohm 5 1 10W TP 1608 SA N A 2007 000939 R CHIP 47Kohm 1 1 1...

Page 195: ... SA N A 2001 000864 R CARBON 56KOHM 5 1 8W AA TP 1 8X3 2MM SA N A 2001 001031 R CARBON 91KOHM 5 1 8W AA TP 1 8X3 2MM SA N A 2007 000070 R CHIP 0ohm 5 1 10W TP 1608 SA N A 2007 000090 R CHIP 10Kohm 5 1 10W TP 1608 SA N A 2007 000094 R CHIP 22Kohm 5 1 10W TP 1608 SA N A 2007 000096 R CHIP 30Kohm 5 1 10W TP 1608 SA N A 2007 000729 R CHIP 300ohm 5 1 10W TP 1608 SA N A 2201 000119 C CERAMIC DISC 100NF ...

Page 196: ...Block Diagram Service Manual 9 1 Samsung Electronics 9 9 9 Block Diagram ...

Page 197: ...Connection Diagram Service Manual 10 1 Samsung Electronics 10 10 10 Connection Diagram ...

Page 198: ...ard For general home use for medical service Cleaning Equipments Standard An IPA Isopropyl Alcohol dry wipe tissue or a gentle neutral detergent and lint free cloth Vacuum Cleaner Spring Hook Standard For general use Software Driver installation CD ROM 1 11 1 11 Reference Information This chapter contains the tools list list of abbreviations used in this manual and a guide to the location space re...

Page 199: ...M decibel milliwatt DC direct current DCU Diagnostic Control Unit DPI Dot Per Inch DRAM Dynamic Random Access Memory DVM Digital Voltmeter DPI Dot Per Inch DRAM Dynamic Random Access Memory ECP Enhanced Capability Port EEPROM Electronically Erasable Programmable Read Only Memory EMI Electro Magnetic Interference EP electrophotographic EPP Enhanced Parallel Port FCOT First Copy Out Time F W firmwar...

Page 200: ...ommand Language 5Ce Color PCL6 Printer Command Language 6 PDF Portable Document Format PDL Page Description Language Ping Packet internet or Inter Network Groper PPD Postscript Printer Discription PPM Page Per Minute PS Post Script PS3 Post Script Level3 PTL Pre Transfer Lamp PTB Paper Transfer Belt PWM Pulse Width Moduration Q ty Quantity RAM Random Access Memory RCP Remote Control Panel ROM Read...

Page 201: ...nough room to open the printer trays covers and allow for proper ventilation see diagram below Provide the proper environment A firm level surface Away from the direct airflow of air conditioners heaters or ventilators Free of extreme fluctuations of temperature sunlight or humidity Clean dry and free of dust ...

Page 202: ...Reference Information Samsung Electronics Service Manual 11 5 11 4 A4 ISO 19752 Standard Pattern This test page is reproduced at 70 of the normal A4 size ...

Page 203: ...ted mark of Wi FiTM The Wi FiTM is a registered trademark of WECA Wireless Ethernet Compatibility Alliance Over 50 of a wireless LAN companies are member of it The most of main wireless networking companies are attending and the main companies are Lucent technologies Cisco Intel Symbol 3Com Enterasys Cabletron Compaq IBM Nokia Dell Philips Samsung elec tronic Sony Intersil and so on This mark cert...

Page 204: ...s Co Ltd September 2006 Printed in Korea VERSION NO 1 00 CODE JC 0175C This service manual is a property of Samsung Electronics Co Ltd Any unauthorized use of Manual can be punished under applicable international and or domestic law ...

Reviews: