18
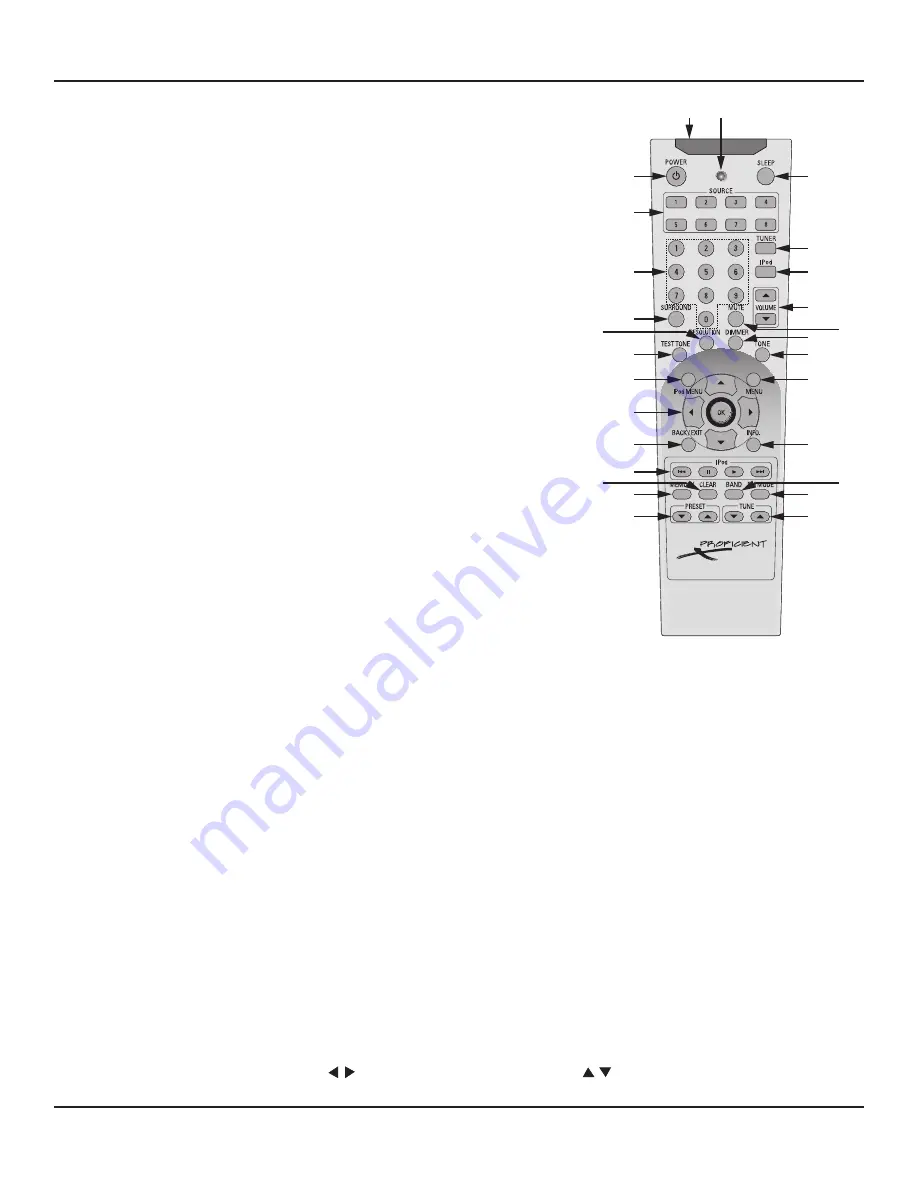
M80 REMOTE FEATURES
40 66
41
42
43
44
45
46
47
48
49
50
51 52
53
54
55 56
57
58
59
60
62
63
64
65
61
M80 REMOTE FEATURES
40. LENS -
Infrared commands that control the M80 are output from LEDs hid-
den behind this lens. The lens should always be pointed directly at the IR
Sensor on the M80 Front Panel (Item 8, Page 11) when pressing buttons on
the remote for armchair control. The remote can control the M80 up to 40
feet away.
41. POWER (M80 OFF) -
With the M80 ON, (ON/Standby button backlight
blue). Press this button to turn the M80 OFF (ON/Standby button backlight
red).
42. SOURCE SELECT BUTTONS (M80 ON/Source Select) -
With the M80 in
Standby, (ON/Standby button backlight red), press one of these buttons
to turn the M80 ON and select the desired source. With the M80 power
ON, press one of these buttons to select a desired source. The Front Panel
Display will indicate the selected source.
43. NUMERIC BUTTONS -
With the AM or FM Tuner selected, in Preset Mode
(press OK button until PRESET appears on the Front Panel Display), press
these buttons to select programmed tuner preset channels. Channels can
be tuned directly by first selecting a Band (AM/FM) then pressing the OK
button until TUNE appears on the Front Panel Display followed by the chan-
nel frequency (94.7, 95.5, etc).
With an optional external XM Ready Tuner connected to the XM Port on the
Rear Panel and selected, in All Channel Search, (press the Menu button until
ALL CH SEARCH appears on the Front Panel Display), press these buttons for
direct numeric tuning of all XM Channels. In Preset Search, (press the Menu
button until PRESET SEARCH appears on the Front Panel Display), press
these buttons for direct numeric tuning of programmed XM Preset Chan-
nels.
Diagram 3
M80 Remote Control Features
44. SURROUND -
Press this button repeatedly to review and select audio surround modes (Listening Modes). All Listening Modes
are not available for all sources. Available Listening Modes are determined by speaker configuration (5.1 vs 7.1), source con-
nections (analog vs digital) and the encoding or non-encoding of the audio content being played.
45. RESOLUTION -
Press this button to open or close the Video Format/Resolution to Display screen. Available resolutions: Auto,
480i, 480p, 720p, 1080i, 1080p.
Note:
Resolution to Display should typically be set to Auto. If a resolution is selected that is not compatible with the connect-
ed Main Room Video Display, and the screen has no picture, wait 30 seconds and the last compatible setting will be restored
automatically.
46. TEST TONE -
With the On Screen Display (OSD) open to Setup Menu/Speaker Setup/Speaker Levels press this button to gen-
erate the Test Tone for manual speaker level calibration. Improperly calibrated speaker output levels will reduce the ‘focus’ of
the audio surround effects. See section:
Speaker Setup/Manual Speaker Setup/Speaker Levels
for additional information.
47. iPOD MENU -
With the iPod Now Playing screen selected, press this button to show the On-Screen Display (OSD) iPod Menu
on the Main Room Video Display. Press this button anywhere in the iPod Menu to step back in Menu navigation. The iPod
Menu is output on the Composite, S, Component and HDMI Video Monitor OUTs. A Menu Timeout from 5 to 60 seconds, in
five second increments, or Off (no timeout) can be set in iPod Setup that will return the OSD to the Now Playing screen if the
iPod Menu button is pressed while the Now Playing screen is active. iPod Menu does not output to the Zone 2 Video Display.
48. CURSOR ARRAY/OK -
After pressing the Main Menu button on the M80 Front Panel or Menu button on the M80 Remote,
press these buttons to navigate the On-Screen Display (OSD) for control, Source Setup and receiver configuration.
With the
AM/FM or XM Tuner selected press the buttons to tune channels. Press the
buttons to select Preset Channels. For
AM/FM, press OK to select TUNE or PRESET Mode. With an iPod/iPod Dock connected to the MDP Port on the M80 Rear Panel,
Summary of Contents for M80
Page 1: ...Audio Systems M80 7 1 Channel Surround A V Receiver Installation User Guide ...
Page 7: ...7 notes ...
Page 107: ...107 notes ...


