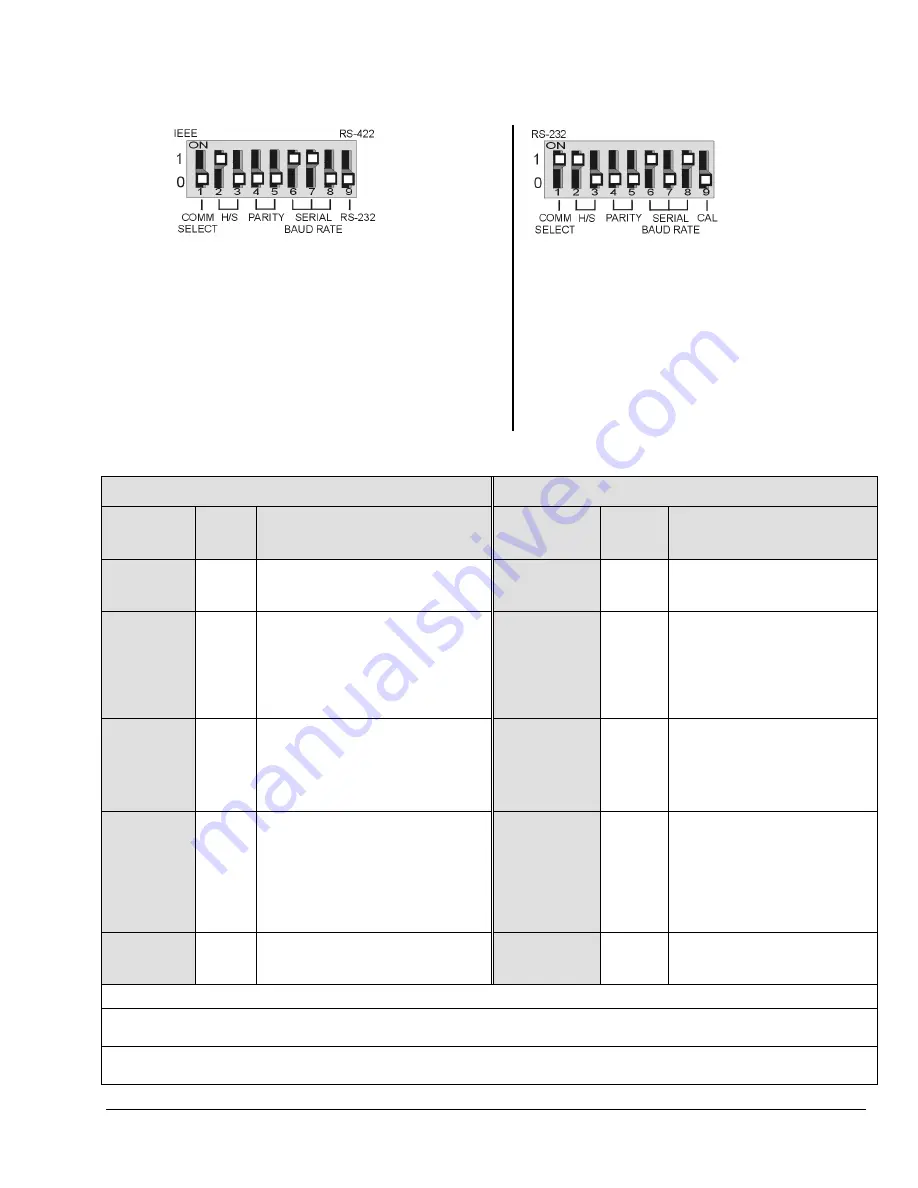
Hardware
3-7
Steps for RS-232/422 Configuration
Standard Units,
Only
Early Production Units,
Only
1. Turn the ChartScan system’s power “OFF.”
1. Turn the ChartScan system’s power “OFF.”
2. Ensure the COMM SELECT micro-switch (on the
rear-panel DIP switch) is in the
“0” (down)
position.
2. Ensure the COMM SELECT micro-switch (on the
rear-panel DIP switch) is in the
“1” (up)
position.
3. Adjust micro-switches 2 through 9 (for parameter
preferences), according to the following table for
standard units
.
3. Adjust micro-switches 2 through 8 (for parameter
preferences), according to the following table for
early production units
.
Note:
Early production
ChartScan units do not have a Calibration Enable/Disable Pushbutton. If you have an
early production
unit, refer to the right-hand DIP switch illustration, above.
RS-232/422 Serial Settings (Standard Units)
RS-232/422 Serial Settings (Early Production Units)
Selection
Micro-
Switch
#
Setting
Selection
Micro-
Switch
#
Setting
COMM
SELECT
1
0 – Serial Communication; RS-232 or
RS-422 depending on switch 9.
1- Selects IEEE 488.
COMM
SELECT
1
0- selects IEEE 488 interface card.
1- Selects RS-232/422.
HANDSHAKE
(H/S)
2,3
0, 0- No Handshake
0, 1- Software Handshake Only
1
(XON/XOFF)
1, 0- Hardware Handshake Only
(RTS/CTS)
1, 1- Both Hardware and Software
Handshake
HANDSHAKE
(H/S)
2,3
0, 0- No Handshake
0, 1- Software Handshake Only
1
(XON/XOFF)
1, 0- Hardware Handshake Only
(RTS/CTS)
1, 1- Both Hardware and Software
Handshake
PARITY
4,5
0, 0 - No Parity
0, 1- Odd Parity
1, 0- Even Parity
1, 1- N/A
PARITY
4,5
0, 0 - No Parity
0, 1- Odd Parity
1, 0- Even Parity
1, 1- N/A
SERIAL
BAUD RATE
2
6,7,8
0,0,0- 300 Baud
0,0,1- 600 Baud
0,1,0- 1200 Baud
0,1,1- 2400 Baud
1,0,0- 4800 Baud
1,0,1- 9600 Baud
3
1,1,0- 19200 Baud
3
1,1,1- N/A
SERIAL
BAUD RATE
2
6,7,8
0,0,0- 300 Baud
0,0,1- 600 Baud
0,1,0- 1200 Baud
0,1,1- 2400 Baud
1,0,0- 4800 Baud
1,0,1- 9600 Baud
3
1,1,0- 19200 Baud
2,3
1,1,1- N/A
RS-232 or
RS-422
9
0- Selects RS-232 serial*
1- Selects RS-422 serial*
* (switch #1 must be in the “0” position)
CALIBRATION
MODE
9
0- Calibration Mode Disabled
1- Calibration Mode Enabled
(normal position is “0”)
1
ChartView software will not run when Handshake is set for “Software Handshake Only,” (0, 1).
2
It is recommended that you do not exceed 9600 Baud unless you have firmware version 1.3 or greater. The firmware version can be read in
ChartView’s
title bar.
3
At 9600 and 19200 Baud Rates, Hardware Handshake should be set to “Hardware Handshake Only” (1, 0). We recommend that you do not
exceed 9600 Baud unless you have firmware version 1.3 or greater. The firmware version can be read in
ChartView’s
title bar.
Summary of Contents for OMB-CHARTSCAN 1400
Page 1: ...August 2002 OMB CHARTSCAN 1400 Portable Data Recorder p n OMB 483 0901 Rev 3 1...
Page 6: ...iv ChartScan User s Manual...
Page 24: ...ChartScan User s Manual...
Page 32: ...2 8 General Information ChartScan User s Manual Notes...
Page 56: ...3 24 ChartScan User s Manual Notes...
Page 124: ...6 20 Calibration ChartScan User s Manual...
Page 126: ...A ii ChartScan User s Manual...
Page 136: ...API Commands Appendix A A 10 ChartScan User s Manual Notes...
Page 176: ...API Commands Appendix A A 50 ChartScan User s Manual...
Page 230: ...Appendix C Registers Data Formats Queries ChartScan User s Manual C 13...
Page 237: ...Registers Data Formats Queries Appendix C C 20 ChartScan User s Manual Notes...
Page 257: ...E 2 ChartScan User s Manual Notes...
Page 265: ...ASCII Code Summary Appendix F F 8 ChartScan User s Manual Notes...
Page 269: ...Abbreviations Appendix H H 2 ChartScan User s Manual Notes...
Page 271: ...ChartScan User s Manual...


