ChartScan User’s Manual
ChartView Software Reference 4-21
Command
Characters
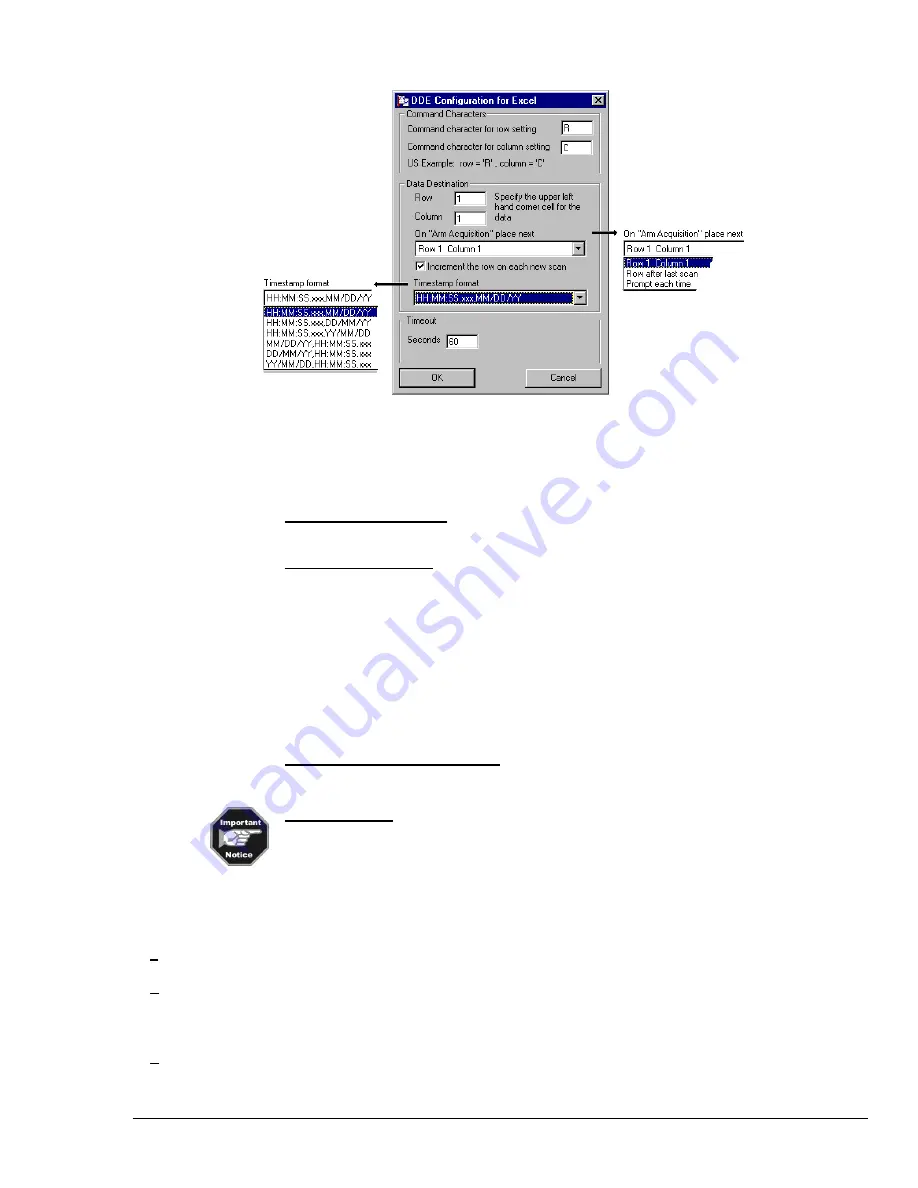
This area contains two fields for entering command characters, one for row setting and one for column
setting. Enter the characters (Excel parameters) to match the applicable version of Excel; for example:
France
- Row =
L
, Column =
C
Germany
- Row =
Z
, Column =
S
United States
- Row =
R
, Column =
C
.
Data Destination
Assign the Data Destination.
This area allows you to assign the data destination on the Excel
spreadsheet. Specify the data starting point by entering a number for row, and another for column. The
two numbers designate the upper left hand corner cell of the Excel data entry.
Positioning Data in Excel.
The data destination region also allows you to select one of three options in
regard to positioning data in Excel on subsequent scans. Options are as follows:
Row 1 Column 1
. This selection starts the next scan at the designated row and column on the Excel
spreadsheet. Changing the values in the “Row” and “Column” boxes (above figure) will automatically enter
the new values in the corresponding fields of the “Row # Column #” placement assignment. For example,
If you entered a 3 in the row box and a 5 in the column box you would see Row 3 Column 5, instead of
Row 1 Column 1, in the above figure; and the next scan would start at row 3 column 5 in Excel.
Row after last scan
. When “Row after last scan” is selected the next scan will begin at the point in Excel
where the previous acquisition left off.
Prompt each time
. When “Prompt each time” is selected, after each acquisition is completed a dialog box
will ask if you want to
return to origin
. If you select “Yes”, you will have an overwrite on the Excel
spreadsheet, starting with the existing column and row designation. If you select “No,” the next scan will
begin on the spreadsheet’s next row (from where the previous acquisition left off).
Increment the Row on each new scan.
With this selected (
9
), the Excel spreadsheet will use multiple
rows, one row for each new data scan. With no check-mark, the spreadsheet will make use of one row
only and will continue to display the latest scan information in that row.
Timestamp Format.
This feature can only be used if
Timestamps
have been enabled in the
Setup/Destination dialog box. If this is the case, you can select a pre-configured format for the timestamps
sent to the Excel spreadsheet. Available formats are indicated in the previous screen capture. This
feature only affects the timestamp format in the Excel spreadsheet. It has no effect on timestamps saved
to disk.
Timeout Region
This field allows you to enter a DDE link timeout value from 5 to 3276 seconds. The value is how long the
data import to Excel can be suspended while you perform a second Excel activity, such as displaying
graphs, or saving data to disk. A screen message informs you when the DDE link is timed out, terminating
the DDE link to Excel.
Link to Excel…
Creates DDE link to Excel spreadsheet. Excel must already be running, and Excel Format must be
selected in the Setup/Data Destination dialog box.
Upload Data
During
Acquisition
(automatic control)
Enables
ChartView
to retrieve scans from device memory as data becomes available. The acquisition is
active.
Stop Upload
(Ctrl + J)
(manual control)
Stops
ChartView’s
transfer of data from the instrument to disk.
Summary of Contents for OMB-CHARTSCAN 1400
Page 1: ...August 2002 OMB CHARTSCAN 1400 Portable Data Recorder p n OMB 483 0901 Rev 3 1...
Page 6: ...iv ChartScan User s Manual...
Page 24: ...ChartScan User s Manual...
Page 32: ...2 8 General Information ChartScan User s Manual Notes...
Page 56: ...3 24 ChartScan User s Manual Notes...
Page 124: ...6 20 Calibration ChartScan User s Manual...
Page 126: ...A ii ChartScan User s Manual...
Page 136: ...API Commands Appendix A A 10 ChartScan User s Manual Notes...
Page 176: ...API Commands Appendix A A 50 ChartScan User s Manual...
Page 230: ...Appendix C Registers Data Formats Queries ChartScan User s Manual C 13...
Page 237: ...Registers Data Formats Queries Appendix C C 20 ChartScan User s Manual Notes...
Page 257: ...E 2 ChartScan User s Manual Notes...
Page 265: ...ASCII Code Summary Appendix F F 8 ChartScan User s Manual Notes...
Page 269: ...Abbreviations Appendix H H 2 ChartScan User s Manual Notes...
Page 271: ...ChartScan User s Manual...


