background image

Installation of the Océ 5250 printer

21

Installing the printer

The printer installation involves the following phases:

1

Opening the dust cover

2

Installing the cleaner blade

3

Removing the carriage locking screw

4

Removing the protection from the pinch rollers

5

Plugging in and switching on the printer

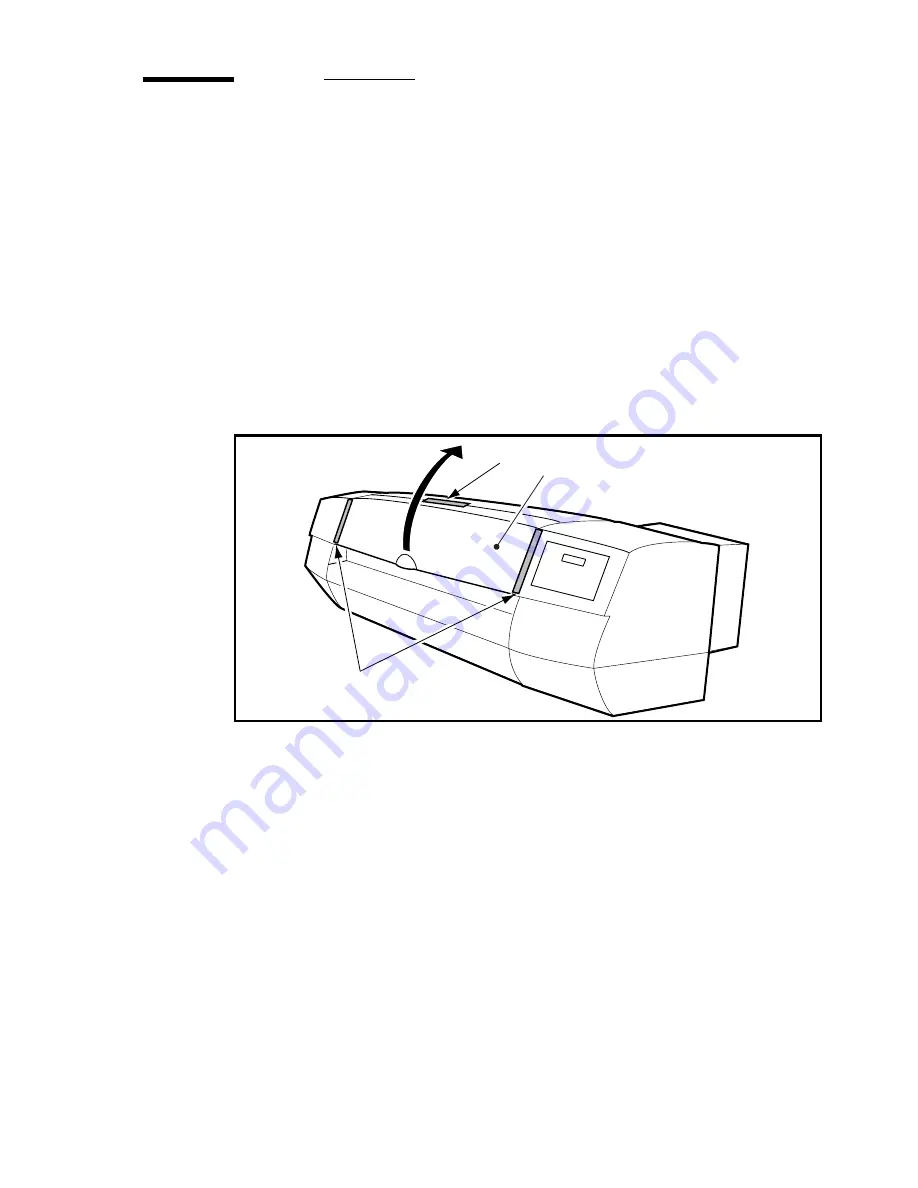
To open the dust cover

Remove the sealing tape [1] from the top and sides of the dust cover [2] as
shown below (see figure 10).

[10] Unsealing the dust cover

[2]

[1]

[1]

Summary of Contents for 5250

Page 1: ...Oc 5250 User manual...

Page 2: ...such revision or changes Edition 1 0 Oc Technologies B V GB This manual which can be kept behind the left hand door of the copier contains a description of the Oc 5250 and the copying that can be don...

Page 3: ...rinter components 18 Carriage 19 Cable connections 20 Installing the printer 21 Plugging in and switching on the printer 26 Using the control panel 27 Menu direction arrows 27 Keys 28 Leds light emitt...

Page 4: ...a print 62 Saving media 64 Nesting 64 Setting the media saver timeout 66 Flushing the media saver queues 67 Autopositioning 68 Defining the pen width 70 Making a palette print 71 Setting the pen colo...

Page 5: ...mode 102 Setting the print origin 104 HP GL HP GL 2 106 Page advance 106 Line Attribute 107 Working with HP GL HP GL 2 format 108 HP GL commands 108 HP GL 2 commands 109 Selecting the HP GL or HP GL 2...

Page 6: ...ges 138 Banner messages 142 Service message 143 Improving poor print quality 144 Checking the print head quality 146 Adjusting the carriage height 146 Printing the registration print 147 Print head pr...

Page 7: ...ventions 174 Reader s comment sheet 175 Addresses of local Oc organisations 177 Appendix D Technical reference Product specifications 180 Printer default values 181 Handshake protocols 184 Centronics...

Page 8: ...8 Oc 5250 user manual...

Page 9: ...manual Chapter 1 Installation of the Oc 5250 printer Preparing for installation Checking the printer components Installing the printer Using the control panel Selecting the display language Connectin...

Page 10: ...then install the Oc 5250 Before you start the installation make sure the power switch of the Oc 5250 is turned to OFF Required installation space For efficient use of the Oc 5250 plan an adequate spa...

Page 11: ...Installation of the Oc 5250 printer 11 3 Required space when installed on the stand 1170mm 1405mm...

Page 12: ...12 Oc 5250 user manual Checking the printer components Check that all of the following components are included 4 Contents of carton 1 Left and 2 Right 1 3 4 2 5 8 8 8 6 7 8 7 6 7 8X 8X 2X 1X...

Page 13: ...Installation of the Oc 5250 printer 13 Contents Carton 1 Carton 2 1 Oc 5250 6 Collection basket 2 Roll holder 7 Stand legs 3 Stopper 8 Upper lower cross bars 4 Starter kit 5 Accessory box...

Page 14: ...1 Assembly instructions packing list 9 Overlay 2 Equipment Delivery Installation Quality report EDIQ 10 Power cord 3 Centronics cable 11 Cleaner blades 4 Order sheet 12 Installation tool 5 5 ink tank...

Page 15: ...50 printer 15 User documentation CD The Oc 5250 User documentation CD contains the following Assembly instructions Packing List User manual Quick reference card this is a menu tree that you can print...

Page 16: ...to allow easy operator access and unrestricted media space during printing see figure 3 on page 11 avoid placing the printer directly in the path of a fan or vent as a high air flow interferes with th...

Page 17: ...ions in this User Documentation CD Removing the printer from the carton To remove the printer from the carton 1 Open the plastic bag 2 Grip firmly the bottom corners of the printer on both sides as in...

Page 18: ...er manual Viewing the printer components 7 External view of the printer 1 Dust cover 2 Carriage 3 Control panel 4 Purge unit inside 5 Green lever to release the pinch rollers 6 Platen 7 Pinch roller 1...

Page 19: ...Installation of the Oc 5250 printer 19 Carriage 8 Carriage 1 Ink tank 2 Print head release tab 3 Carriage height adjustment lever 4 Print head 5 Ink tank release tab 6 Cutter unit 2 3 1 6 5 4...

Page 20: ...user manual Cable connections 9 Cable connections 1 Parallel interface connector 2 Serial interface connector reserved for service 3 Ethernet connector 4 Leds 5 Power cord connector 6 Power switch 1...

Page 21: ...e dust cover 2 Installing the cleaner blade 3 Removing the carriage locking screw 4 Removing the protection from the pinch rollers 5 Plugging in and switching on the printer To open the dust cover Rem...

Page 22: ...off the wrapping tape 1 from the cleaner blade A 2 Hold the tab 2 of the cleaner blades and fit them to the printer from the inner side see figure 11 11 Installing the cleaner blade Caution Do not to...

Page 23: ...wrapping tape 1 as shown below 2 Use the installation tool 2 to remove the carriage locking screw 3 see figure 12 12 Removing the carriage locking screw Note Save the installation tool 2 and the carr...

Page 24: ...er manual To remove the protection from the pinch rollers 1 Grip the green label 1 and gently push the carriage completely to the right until it comes to rest as shown below see figure 13 13 Moving th...

Page 25: ...of the Oc 5250 printer 25 2 Lower the green lever 1 see figure 14 3 Remove the protection 2 underneath the pinch rollers 14 Removing the protective sheet 4 Raise the green lever and close the dust cov...

Page 26: ...ter To switch on the printer 1 Connect the power cord to the socket on the printer A 2 Plug it into an electrical outlet 3 Set the I O power switch B to I to switch on the printer The printer performs...

Page 27: ...nu and to go down the menu levels The up arrow allows you to move up the menu levels The left and right arrows allow you to move horizontally to select a menu option The right arrow increases the nume...

Page 28: ...the selected quality mode Cancel Press this key to cancel immediately the current print job while the printer is printing If you press this key during data transmission it does not cancel the print j...

Page 29: ...h the desired option Refer to the Quick Reference Card User Documentation CD for the complete menu tree Note You can also print the complete menu tree directly from the printer For more details refer...

Page 30: ...ighted in bold type Press the down arrow once to go to the lower level The dotted arrows mean that you must scroll in the direction indicated to reach the option highlighted in bold type 2 The level w...

Page 31: ...our printer is delivered the messages will be by default in English To select a language to display the messages 1 Press the down arrow once to enter the menu 2 Follow the flowchart path to get to the...

Page 32: ...and configure the appropriate drivers see the driver installation instructions Consult the driver installation manuals and your software application manuals to set the necessary connection parameters...

Page 33: ...33 Oc 5250 User manual Chapter 2 Getting started Installing the print heads and ink tanks Loading the media Printing the menu tree Making the print settings Making your first print...

Page 34: ...ink tanks consult the Oc supplies catalog or contact your local Oc representative About print heads Print heads are available in four colours black cyan magenta and yellow Take the following precautio...

Page 35: ...fter the initialisation sequence the message below appears on the display 3 Press the printhead key to move the carriage A out of the purge station 4 Open the dust cover 18 Carriage position for print...

Page 36: ...talling the print head To unpack the print head 1 Remove the print head from its protective wrapping 2 Remove the orange protection cap 1 attached to the head and peel off the protection tape 2 see fi...

Page 37: ...to the projections on the carriage 2 2 Fit the print head into the carriage see figure 20 20 Inserting the print head 3 Push the print head into position as shown below to fix it to the carriage Push...

Page 38: ...22 Removing the orange plastic protection Caution Print heads for each colour fit into a specified position on the carriage Check that the print head colours correspond to their carriage position Prin...

Page 39: ...ank see figure 23 The ink may stain your hand Any dust deposit at the opening may prevent clear print Do not drop or shake the ink tank as the ink may leak out 23 The ink tank To remove the protection...

Page 40: ...t 25 Removing the orange protection cap To install the ink tank 1 Hold the ink tank between your thumb and index finger With the opening facing downward fit the ink tank to the print head 2 Press unti...

Page 41: ...e starting a new print and displays the following messages on the control panel Ink low You will need to change the ink tank soon Out of ink Informs you that the ink tank is empty The printer will not...

Page 42: ...cut The printer automatically cuts off the finished print and loads media for the next print The cut prints drop into the collection basket Roll no cut The printer prints a dotted line to mark the en...

Page 43: ...or you to install media when the display reads To raise the pinch rollers 1 Open the dust cover 1 2 Push down the green lever 2 to raise the pinch rollers 3 see figure 27 27 Raising the pinch rollers...

Page 44: ...oll holder 2 as shown in figure 28 2 Insert the media roll until it comes to rest against the fixed hub 3 28 Placing the roll media on the roll holder Note Ensure that the ends of the media roll form...

Page 45: ...ll core until it fixes the roll media in place see figure 30 30 Inserting the hub To install the media holder Position the fixed hub 1 of the roll holder on the left side viewed from the rear and slid...

Page 46: ...rners 2 Feed the media onto the platen from the rear of the printer see figure 32 The suction mechanism activates to hold the media to the platen 32 Feeding the media 3 At the front of the printer hol...

Page 47: ...de to roll see chapter Setting the media format on page 56 5 Press enter The printer detects and loads the media When the media aligns correctly the display reads ready 34 Fixing the roll media Note I...

Page 48: ...rint quality parameters After you install a new media the media type options display To select the media type 1 On the control panel use the left and right arrows on the control panel to scroll to the...

Page 49: ...sheets smaller than A3 size To install the cut sheet media 1 Open the dust cover 2 Push down the green lever to raise the pinch rollers 3 Insert the cut sheet under the pinch roller as shown below wi...

Page 50: ...t the media mode to cut sheet see chapter Selecting a media mode on page 42 5 Press enter The printer detects and loads the media When the media aligns correctly the display reads ready Note If the me...

Page 51: ...or a specific menu To print the menu tree 1 Check that you have loaded the media and that the 5250 is ready to print 2 Press the down arrow once to enter the menu 3 Select Configuration then Utilities...

Page 52: ...cel a print in progress 1 Press the cancel key on the control panel 2 Press enter to confirm Note If you press Cancel during data transmission it does not cancel the print job Wait for the display to...

Page 53: ...scale Full colour prints monochrome files in black and white and colour files in colour To set the colour mode 1 Press the down arrow once to enter the menu 2 Follow the flowchart path to get to colou...

Page 54: ...ity prints High is suitable for high quality prints of drawings with area fills The printer works out the optimal printing parameters for each of your prints by taking the following settings into cons...

Page 55: ...you can only get additional copies of files that fit entirely on this printer s memory To set the Reprint option 1 Press the down arrow once to enter the menu 2 Follow the flowchart path to reprint 3...

Page 56: ...with three standard media formats ISO ANSI or ARCHITECT To set the media format 1 Press the down arrow once to enter the menu 2 Follow the flowchart path to media format 3 Set the media format 4 Pres...

Page 57: ...57 Oc 5250 User manual Chapter 3 Print management Using the basic printer features Using the media saver option Defining the pen parameters Defining the pen priority...

Page 58: ...ing changes automatically to prevent clipping Note Rotation applies only with vector files To rotate a print 1 Press the down arrow once to enter the menu 2 Follow the flowchart path to get to rotatio...

Page 59: ...e to enter the menu 2 Follow the flowchart path to get to scaling 3 Select the scaling method 4 Press enter Note The control panel can set an accuracy factor of two decimal places For higher accuracy...

Page 60: ...ter clips the area outside the margins if your drawing is larger than the physical dimensions of the media On Cut sheet The printer enlarges or reduces the drawing and rotates it 90 if necessary to fi...

Page 61: ...d size 3 Press enter Note You can combine the rotation mirroring and autoscaling functions when you use roll media Check that your autoscaling results match your rotation mirroring expectations Config...

Page 62: ...options Off no symmetry standard print X Mirror symmetry across the X axis horizontal flip Y Mirror symmetry across the Y axis vertical flip To mirror a print 1 Press the down arrow once to enter the...

Page 63: ...Print management 63 Mirror off x mirror y mirror Configuration Media type Print manager Transform...

Page 64: ...For example if media format is set to ISO there are three separate wait files one for A4 format drawings one for A3 format drawings and one for A2 format drawings When a queue is full the printer begi...

Page 65: ...andard sizes the printer uses the next larger format Note Nesting applies only with vector files To set the nesting mode 1 Press the down arrow once to enter the menu 2 Follow the flowchart path to ge...

Page 66: ...s At the end of the timeout the printer begins to print the queues even if they are not full To set the media saver timeout 1 Press the down arrow once to enter the menu 2 Follow the flowchart path to...

Page 67: ...of media saver timeout At each change in quality media saver mode or rendering modes You can also flush the print queues via the control panel to print out immediately the partially full queues To fl...

Page 68: ...f necessary the printer rotates the drawing 90 to save media and limit clipping Note Auto position applies only with vector files To set autoposition 1 Press the down arrow once to enter the menu 2 Fo...

Page 69: ...Print management 69 37 Autopositioning Print is rotated and shifted to use less media Print is rotated and shifted to reduce clipping...

Page 70: ...pen widths are set to three pixels 0 21 mm 1 pixel 0 07 mm To set the line widths 1 Press the down arrow once to enter the menu 2 Follow the flowchart path to get to pen number and press enter to sele...

Page 71: ...colour 55 this pen prints out the same colour as the palette s rectangle number 55 Setup The palette print shows the colours currently set for each pen Use this printout as a reference for your curre...

Page 72: ...the Oc pen palette colours To set pen colours 1 Press the down arrow once to enter the menu 2 Follow the flowchart path to get to pen number and press enter to select the pen 3 Follow the flowchart pa...

Page 73: ...Patterns 17 to 32 are as shown in figure 38 38 Pen patterns Note Avoid using line widths of less than 0 5 mm with patterned lines To set pen patterns 1 Press the down arrow once to enter the menu 2 Fo...

Page 74: ...ed in the print data file Setup The printer uses the pen parameters defined in the optional remote configuration file or on the printer control panel if no RCF is present The pen priority option is av...

Page 75: ...75 Oc 5250 User manual Chapter 4 Advanced functions Setting the menu access level Calibrating the Oc 5250 Rendering Upgrading the firmware Expanding the printer memory...

Page 76: ...vels for the control panel menu Passwords give authorized users access to the different levels The full menu gives access to all the control panel functions To set the menu access level 1 Press the do...

Page 77: ...ess to the printer menu you enter a password as described below To lock the printer menu 1 Press the down arrow once to enter the menu 2 Follow the flowchart path to get to enter password 3 Enter the...

Page 78: ...pies if reprint is on flush m saver display The short menu does not give access to the configuration menu To set the short menu 1 Press the down arrow once to enter the menu 2 Follow the flowchart pat...

Page 79: ...es access to all the user menus To set the full menu 1 Press the down arrow once to enter the menu 2 Follow the flowchart path to get to enter password 3 Enter the password by pressing successively th...

Page 80: ...licable for data files that do not have an end of print instruction Allow for an adequate time delay for slow computers or complex print data to avoid incomplete prints To set the print timeout 1 Pres...

Page 81: ...st 10 error or warning messages This information is necessary for the Oc technical support if there is a problem with your printer Have this information handy when you call a service representative No...

Page 82: ...82 Oc 5250 user manual Examples of a dump configuration...

Page 83: ...Advanced functions 83 When the printer is in monochrome mode the dump configuration displays the pen pattern When the printer is in cut sheet mode only the Auto scale information differs...

Page 84: ...t use this option the printer can print up to A0 length 1189 mm 46 8 inches To set the long print option 1 Press the down arrow once to enter the menu 2 Follow the flowchart path to get to long print...

Page 85: ...ases Printing the registration print print head alignment Printing the X alignment print then entering an X alignment correction value if necessary Printing the X accuracy print and entering an X accu...

Page 86: ...tic calibration You can use cut sheet or roll media with a minimum A3 media size To print the registration print 1 Press the down arrow once to enter the menu 2 Follow the flowchart path to get to reg...

Page 87: ...once to enter the menu 2 Follow the flowchart path to get to x alignment 3 Press enter This print contains a series of nine vertical bands made up of a specific pattern Choose the value between 4 and...

Page 88: ...me modes then enter the corresponding values To enter a correction value for X alignment 1 Press the down arrow once to enter the menu 2 Follow the flowchart path to get to value 3 Select colour x ali...

Page 89: ...stment the machine accuracy is 0 2 To make this reference print use a roll media or cut sheet of minimum A1 size 40 X accuracy print Note This print never changes whatever the corrections you might ma...

Page 90: ...than 500 enter a negative adjustment value less than 500 enter a positive adjustment value The value range is between 1 mm and 1 mm by increments of 0 1 mm On the control panel this is equivalent to t...

Page 91: ...r the adjustment value 1 Press the down arrow once to enter the menu 2 Follow the flowchart path to get to x accuracy 3 Enter a value between 10 and 10 4 Press enter Value Configuration Media type Cal...

Page 92: ...ints with a large number of area fills set the priority to X alignment For CAD type drawings architectural engineering set the priority to X accuracy Note The type of media you use affects the printer...

Page 93: ...256 shades of gray Cloud is recommended when you are printing drawings with area fills Scattered uses a regular ordered dot pattern It produces 256 shades of gray Scattered is recommended for vector...

Page 94: ...port 1 To avoid interruption during the downloading process check that you have done the following Turn off the screen saver If you use a laptop PC plug it into an electrical outlet Set the timeout d...

Page 95: ...firmware with the updated firmware in the SIMM flash module or downloads the engine firmware to the engine 8 At the end of the download process two possible messages appear UPDATE DONE PLEASE POWER OF...

Page 96: ...Mb 64 Mb or 128 Mb module To remove the printer back cover 1 Check that you have switched off the printer 2 Loosen and remove the 4 screws holding the metallic cover behind the printer Use the instal...

Page 97: ...ule from slot 1 only 1 Press the top and bottom tabs that hold the memory module A This disengages the module from its connector 2 Hold the memory module firmly and pull it out straight toward you see...

Page 98: ...e Watch carefully the position of the slots on the contact area of the module They must match the protusions on the connector of the board 2 Insert the module straight into the slot see figure 42 3 Pr...

Page 99: ...50 User manual Chapter 5 Print data formats Setting automatic language sensing Selecting the data format Using the transparency mode Setting the print origin Working with HP GL HP GL 2 Calcomp and PS2...

Page 100: ...following points in mind Every print data file must terminate with an end of print instruction If you use HP GL data format avoid all HP GL instructions that modify the protocol set handshake etc whe...

Page 101: ...r file to the printer To set the data format manually 1 Press the down arrow once to enter the menu 2 Follow the flowchart path to get to force format 3 Select the data format 4 Press enter Note See S...

Page 102: ...ies only to CalComp HP GL HP GL 2 Merge all the specified colours blend together as shown in figure 45 This is the default setting 45 Transparency mode Merge Overlay only foreground colours are visibl...

Page 103: ...th white as opaque To set the transparency mode 1 Press the down arrow once to enter the menu 2 Follow the flowchart path to get the data format HPGL HPGL 2 CALCOMP 3 Go to transparency 4 Select merge...

Page 104: ...ng the print origin The starting position of the drawing on the paper depends on the print origin selected among the following options Upper left A Center B Lower left C Upper right D Lower right E 49...

Page 105: ...the flowchart path to the data format you want HPGL HPGL 2 CALCOMP Postscript 2 3 Go to origin 4 Select the point of origin 5 Press enter 50 To set the print origin Hpgl setup Calcomp setup Configura...

Page 106: ...fies an end of print Page advance no the printer responds to the HP GL instruction SPO as select pen zero It prints all vectors after the SPO command using the current pen zero To set the page advance...

Page 107: ...f the vector is greater than 0 5 mm Note The LA command applies only to HPGL 2 HP emul means compatible with HP emulation see Working with HP GL HP GL 2 format on page 108 Oc round Lines are processed...

Page 108: ...lowing statements have no meaning and will be treated as no ops Command Explanation AP automatic pen operation AS pen acceleration select BF buffer print CC chord angle CV curve generator DC digitize...

Page 109: ...ers VA activate adaptive velocity VN velocity normal VS velocity select WD write display ESC Q set monitor mode New print Command Explanation BP or ESC 1BBP Begin print End print Command Explanation P...

Page 110: ...ommands Selecting the HP GL or HP GL 2 command set When you select the HP GL data format in manual or automatic mode the printer activates the standard HP GL command set To switch to the HP GL 2 forma...

Page 111: ...owing file is also HP GL 2 Use the following commands to close correctly an HP GL 2 file PUSP0PG or PUSP0PGRP This will print one additional copy of the file HP RTL commands HP RTL is a subset of HP G...

Page 112: ...m synch code double synch step size Note See CalComp commands on page 192 for a list of supported CalComp commands Checksum parameter To set the checksum parameter 1 Press the down arrow once to enter...

Page 113: ...h to eom 3 Select the value Values range from 0 to 30 inclusive The selected value is the decimal equivalent of the byte that indicates the end of the data sequence It should be a unique character in...

Page 114: ...u 2 Follow the flowchart path to synch code 3 Select the value Values range from 0 to 63 inclusive The selected value is the decimal equivalent of the byte that indicates the start of a block of print...

Page 115: ...identify the beginning of a print data message If set to double synch enable the same character is sent twice by the host 1 Press the down arrow once to enter the menu 2 Follow the flowchart path to...

Page 116: ...documentation to choose the appropriate step size A wrong step size can affect the scale of your drawing 1 Press the down arrow once to enter the menu 2 Follow the flowchart path to step size 3 Selec...

Page 117: ...llowing file types CALS Type 1 files Untiled compatible with CCITT Group 4 format TIFF The printer supports the following TIFF monochrome and colour file types Raw no compression Compressed PACKBIT CC...

Page 118: ...rinted page on the roll can be either horizontal landscape or vertical portrait Note This is useful in the case where the format is not specified in the PostScript file 58 To set the PostScript 2 page...

Page 119: ...set the PostScript 2 default page size Note In case of conflict the page size defined in the PostScript driver will have priority Manual feed and Autoscale to format are not supported by the PostScri...

Page 120: ...120 Oc 5250 user manual...

Page 121: ...121 Oc 5250 User manual Chapter 6 Use of media Media types Choosing media Storing and handling media...

Page 122: ...Tracing paper 90 g m2 gives high contrast and excellent Diazo copies It is however dimensionally unstable and therefore not recommended for archiving It is recommended for monochrome and colour line...

Page 123: ...good excellent excellent Overlay N A good N A N A Quality ratings Line b w good excellent excellent excellent Line colour good excellent excellent excellent Mapping good good excellent excellent Imag...

Page 124: ...anual Mapping good good excellent Image excellent good excellent Photography good good excellent Note N A Not applicable not best choice Film media continued Single matt film 120 Double matt film 95 D...

Page 125: ...dia out of the packaging and allow it to adjust to the same environment as the printer for a minimum of two days air conditioning or humidity control is highly recommended if you have a high humidity...

Page 126: ...126 Oc 5250 user manual...

Page 127: ...127 Oc 5250 User manual Chapter 7 Maintenance General cleaning Caring for the wiper blades Replacing the cutter unit Cleaning the print heads Transporting the printer...

Page 128: ...inter off and unplug the power cord 2 Clean the outer surfaces of the printer with a damp sponge and some household detergent Never use abrasive cleaners cleaning solvents or strong detergents as thes...

Page 129: ...bris from the cutter groove using 2 moistened cotton swabs Note Do not touch the encoder strip with your fingers because the slightest fingerprint can cause irregular printing The encoder strip is loc...

Page 130: ...he transparent wiper blades wipes the ink nozzles You can clean and replace the wiper blade assemblies if necessary For ordering information consult the Oc web site To clean the wiper blades Clean the...

Page 131: ...lades 1 Push the wiper blade assembly forward using the knob 2 Lift out the used wiper blade assembly 3 Insert the new wiper blade assembly into the empty socket and push downward until it snaps into...

Page 132: ...e cutter blade Turn the black thumbwheel of the cutter unit The thumbwheel has 5 positions indicated from 1 to 5 To replace the cutter unit 1 Press the printhead key on the printer control panel The c...

Page 133: ...t any time using the clean head function if you find the print quality poor To clean the print heads 1 Press the down arrow once to enter the menu 2 Follow the flowchart path to clean head 3 Press ent...

Page 134: ...rol panel to move the carriage out of the purge station 2 Remove the print heads and ink tanks 3 Switch the printer off and unplug the power cable and connection cables 4 Fix the carriage to its loadi...

Page 135: ...5250 User manual Chapter 8 Troubleshooting Solving printer operations Understanding printer messages Improving poor print quality Checking print head quality Solving colour problems Using the statisti...

Page 136: ...blem Your printer does not operate and stops at one of the autotests Solutions Turn the printer off and then on again to see if the problem is of a permanent nature If the printer still does not opera...

Page 137: ...e station Check heads After a carriage access the printer checks for the presence and working order of the print heads and ink tanks Head cooling The printer waits for the print heads to cool down Cle...

Page 138: ...rted The printer cannot process the file received due to wrong language or wrong file format There is no printed output file processing error Ink low k c m y The ink remaining in the tank indicated is...

Page 139: ...d error Error 18 19 62 The indicated print head is out of order To recover press the Printhead key to move the carriage into position then replace that print head see Unpacking and installing the prin...

Page 140: ...or of the printer on page 129 The following are possible hardware failures These errors may require a shutdown of the printer to recover Comm error Error 103 The communication between the engine and t...

Page 141: ...nd the engine micro controller has failed To recover turn the power of the printer off and on If the error persists contact technical support Fan error Error 28 The fan does not function properly To r...

Page 142: ...printer discards the file and prints nothing initRaster Allocation Failure on the fly mode indicates a memory allocation failure at the start of rasterization during on the fly processing The printer...

Page 143: ...t warns you that the printer has widely exceeded the maximum production described in the 5150 specifications Indeed there is a specific number of prints allowed on a given period of time Solution If t...

Page 144: ...print head comes into contact with the media due to media wrinkles or bubbles during printing Solutions Allow absorbent media paper time to adjust to the same environ ment as the printer before print...

Page 145: ...in a stable recommended environment see Operating recommendations on page 16 Check the printer calibration see Calibrating the Oc 5250 on page 85 Check that you have set the correct media type on the...

Page 146: ...s the printhead key on the printer control panel The carriage moves out of the purge station 2 Open the dust cover The cartridge height adjustment lever is located on the carriage A as shown in figure...

Page 147: ...ing the registration print You must make a registration print after each print head installation or replacement to check for proper position You can use cut sheet or roll media with a minimum A3 media...

Page 148: ...ems Problem The carriage is moving but no ink appears on media Solutions Remove the ink tanks then the printheads check that the film is removed from the print heads and put back the printheads and in...

Page 149: ...iority option is set to Language you should not define your pen colours on the control pan el or in a remote configuration file see Defining the pen priority on page 74 Wrong colours Problem Your draw...

Page 150: ...A0 format A2 for files of surface between A2 and A1 format A3 for files of surface between A3 and A2 format A4 for files of surface less than or equal to A3 format Cutter count gives the number of cu...

Page 151: ...151 Oc 5250 User manual Chapter 9 Connection of the Oc 5250 Connecting the printer Centronics Ethernet...

Page 152: ...Configure the printer IP parameters address subnet mask and default gateway Configure the printer for the SMB protocol Connecting to a Centronics port The Centronics port is located at the rear of th...

Page 153: ...tor 10 or 100Mb s Ethernet connections use UTP cabling Note It is advisable to use the RJ45 100 Mbit to have the highest possible performance RJ45 UTP 10 100 Mbit automatic adjustment Ethernet cabling...

Page 154: ...otocol You have to configure the printer IP address subnet mask and default gateway IP address check with your local administrator You can do this on the printer operator panel or via a configuration...

Page 155: ...of the Oc 5250 155 70 Set the IP address 71 Set the Subnet mask Ethernet IP address Field 0 3 Connection Configuration Media type 0 255 Ethernet Subnet mask Field 0 3 Connection Configuration Media t...

Page 156: ...156 Oc 5250 user manual 72 Set the Default Gateway Ethernet Def gateway Field 0 3 Connection Configuration Media type 0 255...

Page 157: ...dows printing through SMB to print directly to the printer from your workstation s If you experience problems connecting to the printer through SMB or if you want to centralize printing on a server yo...

Page 158: ...ou can send data files to a remote directory via FTP This remote directory then allows the data files to be printed 1 Start the MS DOS prompt 2 Enter the ftp command 3 Open a FTP session with the prin...

Page 159: ...indows 95 98 NT you must do the following Create a configuration file This file contains information on how the Oc 5250 is known in your network Send the configuration file to the Oc 5250 Enable the O...

Page 160: ...188 138 72 SUBNETMASK 255 255 255 0 DEFAULTGATEWAY 134 188 138 4 SMB WORKGROUPNAME OCE PRINTERS DEVICENAME P 001 End of Configuration File You must make the configuration files respecting the followi...

Page 161: ...up the host PC 5 Start up the DOS prompt via the Start menu 6 Browse to the directory where you made the configuation file 7 Enter the following DOS command COPY B YOURFILENAME LPT1 A message appears...

Page 162: ...queues appears 5 Double click on the desired queue or Right click on the desired queue then click on install Select OCE 5250 PS to be associated with Oc PS driver Select OCE 5250 to be associated wit...

Page 163: ...163 Oc 5250 User manual Appendix A Glossary...

Page 164: ...ssion Reduces the file size of raster images by encoding the data CTS Clear to send Serial interface command signal Default settings T she settings made in the factory Dithering A method of simulating...

Page 165: ...GL format Parallel port An interface designed to accept a complete byte of infor mation including control characters at the same time The parallel port on the Oc 5250 is the Centronics port Parity An...

Page 166: ...character placed at the beginning of a data record to no tify the printer that the following data is print data when using CalComp format TIFF Tag information file format a raster format Time out The...

Page 167: ...167 Oc 5250 User manual Appendix B Safety information...

Page 168: ...or electrical circuit breakers Do not use an extension lead to connect the machine It is recommended to connect only those copy control products or other products which meet the inter national product...

Page 169: ...sheet in this appendix for information about space and ventilation requirements General Always use materials recommended by Oc and developed for this Oc machine Materials not approved by Oc may result...

Page 170: ...his information for the adoption of the appropriate safety precautions for his organization and to contact Oc to make sure that he is in possession of the latest version of the sheet If and insofar as...

Page 171: ...ined that this copier meets the ENERGY STAR guidelines for energy efficiency The EPA ENERGY STAR criteria for printers involve Sleep mode also called Low Power mode This feature prevents unnecessary p...

Page 172: ...172 Oc 5250 user manual...

Page 173: ...173 Oc 5250 User manual Appendix C Miscellaneous...

Page 174: ...by step through all phases of performing the operation Figures and tables Figures and tables are titled and numbered sequentially throughout this manual Figures include pictures of product components...

Page 175: ...convenient in size readability and arrangement page layout chapter order etc Yes No Could you find the information you were looking for Always Most of the times Sometimes Not at all What did you use t...

Page 176: ...do fill in your occupation Name Occupation Company Phone Address City Country Please return this sheet to Oc Technologies B V For the attention of ITC User Documentation P O Box 101 5900 MA Venlo The...

Page 177: ...heng Chaoyang District Beijing 100028 China Oc esk republika s r o Hanusova 18 14021 Praha 4 Pankr c Czech Republic Oc Danmark A S Kornmarksvej 6 DK 2605 Br ndby Denmark Oc France S A 32 Avenue du Pav...

Page 178: ...Gulab 190 MacPherson Road Singapore 348548 Oc Espa a SA Business Park MAS BLAU C Osona 2 2 3a Planta 08820 El Prat del Llobregat Barcelona Spain Oc Svenska AB P O box 1231 S 164 28 Kista Sweden Oc Sc...

Page 179: ...179 Oc 5250 User manual Appendix D Technical reference Product specifications Printer default settings Serial and Centronics configuration Software commands...

Page 180: ...38400 baud Centronics P1284 IEEE Compatible mode Ethernet Input data formats HP GL HP GL 2 HP RTL CALCOMP CALS TIFF PS2 Environmental specification Electrical requirements Voltages 100 240 V Automatic...

Page 181: ...4294967295 A1 print count 0 0 4294967295 A2 print count 0 0 4294967295 A3 print count 0 0 4294967295 A4 print count 0 0 4294967295 Power on time 0 0 4294967295 cutter count 0 0 4294967295 Serial numbe...

Page 182: ...y language language setup Calcomp trnsparency merge merge overlay Pen attributes Names Default value Possible values Pen width pen 0 999 0 21 0 07 8 96 Pen colour pen 0 999 0 256 0 256 Pen pattern pen...

Page 183: ...Technical reference 183 Auto scale off off best fit A4 A3 A2 A1 A0 A B C D E A B C D Auto scale cut sheet off Rotation 0 0 90 180 270 Mirror off off x mirror y mirror Print transfomations continued...

Page 184: ...ol Centronics uses hardwire handshaking The computer sends a STROBE signal to move each byte of data into the printer at which time the printer signals BUSY When the transfer is complete the printer s...

Page 185: ...Select 10 Printer to Host ACKN Acknowledge 32 Printer to Host FAULTN Fault 12 Printer to Host PAPEROUT Paper error 2 Host to Printer Data 1 Data 1 LSB 3 Host to Printer Data 2 Data 2 4 Host to Printe...

Page 186: ...No op CP Character Print LB Label ASCII String CS Designate Standard Character Set LO Label Origin CT Chord Tolerance LT Line Type CV Curve generator No op NR Not Ready DC Digitize clear No op OA Out...

Page 187: ...display No op SG Select Pen Group No op WG Fill Wedge SI Absolute Character Size XT X Tick Note The maximum number of edges within one polygon is 30 000 and the maximum number of sub polygons within...

Page 188: ...VECTOR AA Arc Absolute DT Define label terminator AR Arc Relative DV Define variable text path ns AT Absolute Arc Three Point ES Extra Space CI Circle LB Label PA Print Absolute LO Label Origin PD Pe...

Page 189: ...T Sort ns OI Output identification VS Velocity select ns PALETTE EXTENSION CR Set colour range for relative colour data SV Screened vector NP Number of pens TR Transparency mode PC Pen colour assignme...

Page 190: ...ts ESC a N Negative Motion ns ESC b L Raster Line Path ESC t R Set graphics Resolution ESC r T Source Raster Height ESC t S Source Raster Width ESC b Y Y Offset DEFINING COLOURS ESC v W data configure...

Page 191: ...oint ns INTERACTIONS BETWEEN PICTURE ESC l olO Logical Operation ESC v olO Pattern Transparency Mode ns ESC V nlN Source Transparency Mode TRANSMITTING DATA ESC r alA start raster graphics ESC rC end...

Page 192: ...ing Generates end of print 08 01 enable double buffering 08 02 03 07 escape set cc protocol No op 08 04 05 06 08 escape set cc protocol No op 08 09 disable Del No op 08 0A 08 0D buffer size No op 09 s...

Page 193: ...pattern No op 0E 17 reserved No op 0E 18 start print No op 0E 19 force print No op 0E 1A Printer select No op 0E 1B Print copies 0E 1C printer performance No op 0E 1D mirror 0E 1E window Exclusive wi...

Page 194: ...194 Oc 5250 user manual...

Page 195: ...apter 8 troubleshooting 135 151 checksum parameter 112 cleaner blade installation 22 cleaning general 128 print heads 133 clear film 122 clipped print 69 cloud 93 colour problems 149 setting pen colou...

Page 196: ...188 hp rtl commands 190 comments 111 hp rtl commands 111 I i o power switch 26 ink smearing 144 installation preparing 10 installation required space 10 ip address 154 L language selection 31 lpd 158...

Page 197: ...ter installation 21 printer switch on 26 printer unpacking 17 printer messages 137 priority pen 74 Q quality mode setting 54 quality setting 54 queues 64 quick reference card 15 R registration print 8...

Page 198: ...troubleshooting 135 U unpacking the printer 17 upper case in commands 191 V voltage 180 W white glossy film 122 wiper blades care 130 X x scaling 59 x accuracy 89 x alignment 87 x alignment or x accu...

Reviews: