General Description 2-5
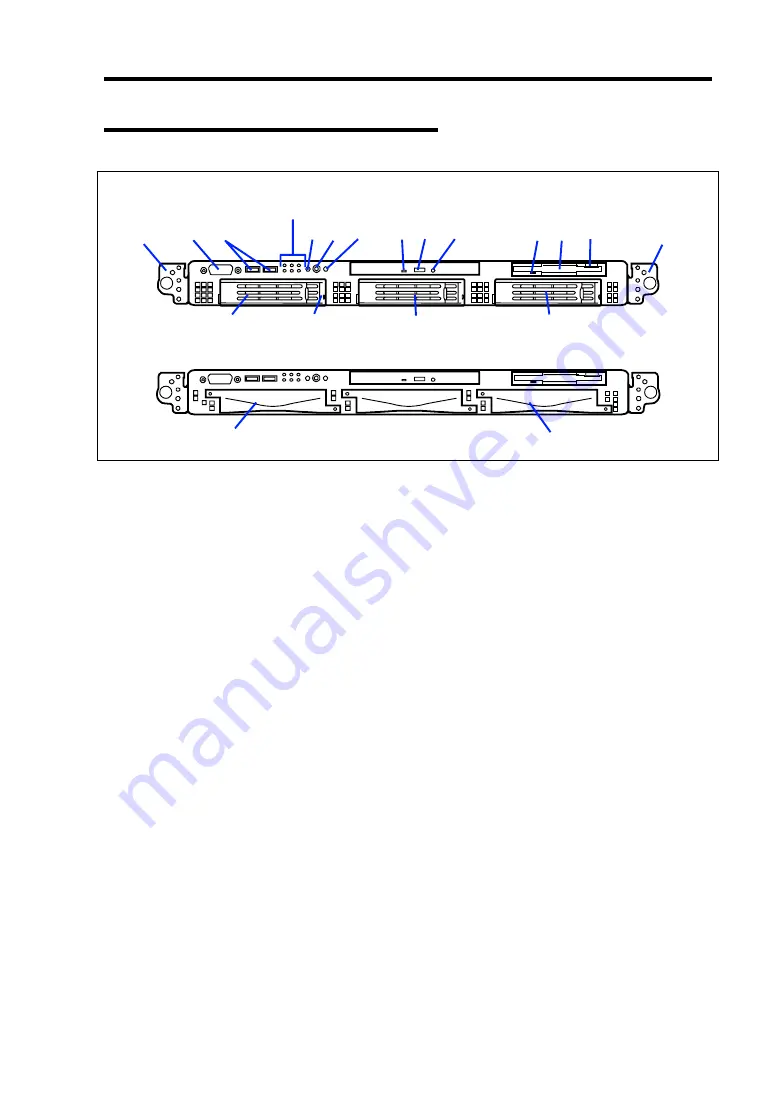
Front View with Front Bezel Removed
1 Handles (1 at the right and left each)
Hold the handles when dismounting/mounting the server from/in the rack.
2 Serial port B (COM B) connector
Connect device having a serial interface to this connector (such as remote console PC).
3 USB connectors (2 ports)
Connect device compliant with the USB interface to the connectors.
4 DUMP (NMI) switch
Press this switch to dump system memory.
5 POWER switch
Press this switch to turn on/off the power. Pressing the switch once turns on the power, and
the POWER LED goes on. Pressing it again turns off the power. Keep pressing the switch
for 4 seconds or more forcibly turns off the power.
6 UID (Unit ID) switch
Press this switch to turn on/off the UID LEDs on the front and rear panels of the server.
Pressing the switch once turns on the LEDs. Pressing it again turns them off.
7 Optical disk drive (CD-ROM drive)
This drive reads data from the CD-ROM.
7
-1 Disk access LED
7
-2 CD tray eject button
7
-3 Emergency hole
8 3.5-inch floppy disk drive
This drive reads/writes data from/to the 3.5-inch floppy disk.
8
-1 Disk access LED
8
-2 Disk slot
8
-3 Eject button
9 Hard disk drive bays
Mount SCSI hard disk drives in the bays. Each number following the bold-faced number
indicates the SCSI ID. In the standard configuration, the hard disk drive trays are mounted in
all the bays.
10 DISK LED (green/amber)
Hard disk drive LED. Each hard disk drive LED is green during access to the hard disk drive.
The LED turns amber when the hard disk drive fails. The LED flashes switching back and
forth between green and amber during build processing (in only disk array configuration).
11 SATA hard disk drive bays
Mount SATA hard disk drives in the bay. The left side bay is connected to channel 1 of the
SATA connector on the mother board. The right side bay is connected to channel 2 of the
SATA connector on the mother board.
See 3 - 7 on the previous page.
Hot-plug SCSI hard disk drive model
9
-1
9
-0
SATA fixed hard disk drive model
1
2
3
4
5
6
7
-1
7
-2
7
-3
8
-1
8
-2
8
-3
1
9
-2
9
-0
10
9
-1
Summary of Contents for Express5800/120Rf-1
Page 32: ...1 16 Notes on Using Your Server This page is intentionally left blank ...
Page 154: ...4 58 Configuring Your Server This page is intentionally left blank ...
Page 236: ...6 26 Installing and Using Utilities This page is intentionally left blank ...
Page 248: ...7 12 Maintenance This page is intentionally left blank ...
Page 348: ...C 2 IRQ This page is intentionally left blank ...
Page 408: ...G 4 Product Configuration Record Table This page is intentionally left blank ...


