4
Installation
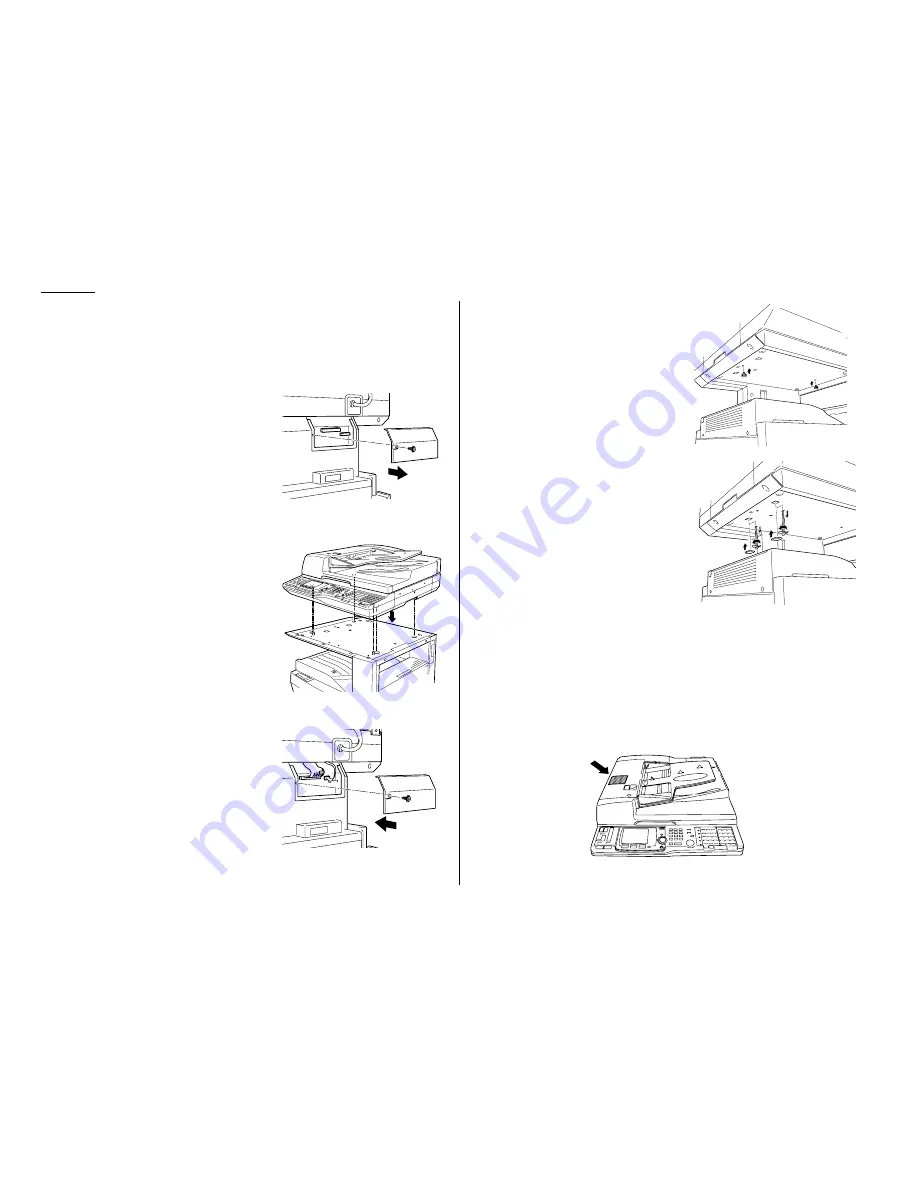
Joining Scanner unit and Printer unit
Important: Be sure that you do not turn the power on until after you have
removed the transport screws (in step 5). Otherwise, damage could
result.
1
Remove one screw, then remove the con-
nect cover.
2
Put the scanner unit on the printer unit.
Set the pins on the printer unit into the
pin holes under the scanner unit.
3
Attach the two connectors of the scanner
unit to the printer unit, then re-attach the
connect cover with one screw.
4
Fix the scanner unit and the printer
unit with two fixing screws.
5
Remove two transport screws by turn-
ing them 90º. Attach protection sponges
on each transport screw hole.
IMPORTANT: BEFORE YOU USE THE MACHINE, YOU MUST
TURN OFF THE TRANSPORT MODE (see page 7).
Note: Be sure to save the screws for reshipment. If you must ship your machine
for some reason, turn on the transport mode, turn the power off and then
undo the above procedures.
Affixing the Function icon label
Attach the function icon label on the
ADF
cover as illustrated below:
Summary of Contents for FAX SCANNER
Page 2: ......
Page 15: ......
Page 16: ...D84 90510 60...
Page 51: ...Copy settings This page intentionally blank 2 31 Copy Features...
Page 119: ...Fax Features Getting Started Advanced fax This page intentionally blank 3 67...
Page 129: ...Fax settings This page intentionally blank 3 77 Fax Features Getting Started...
Page 130: ...Soft Keys 4 1 Macros 4 3 Machine settings 4 6 Common settings...
Page 147: ...Common settings This page intentionally blank 4 17 Common Settings Getting Started...
Page 184: ...This page intentionally blank Appendix index AI 14...
Page 185: ...This page intentionally blank Appendix and index AI 15 Getting Started Appendix Index...
Page 186: ...This page intentionally blank Appendix index AI 16...


