background image

Common settings

Sending a fax using a department code

For this operation to work, two things must be true:
• The four-digit department code must exist on your fax machine.
• You must know the department code or department ID.

1

Place the document and select resolution and contrast you require.

2

Enter the fax number by either pressing a one-touch key, entering a speed-
dial number or dialing from the numeric keypad.

If you enter the fax number using a one-touch key, skip to step 4.
Otherwise, go on to step 3.

3

Press 

START

.

4

If you select the department code for the department mode in the previous
column, proceed to step 5.
If you select the department ID for the department mode, skip to step 6.

5

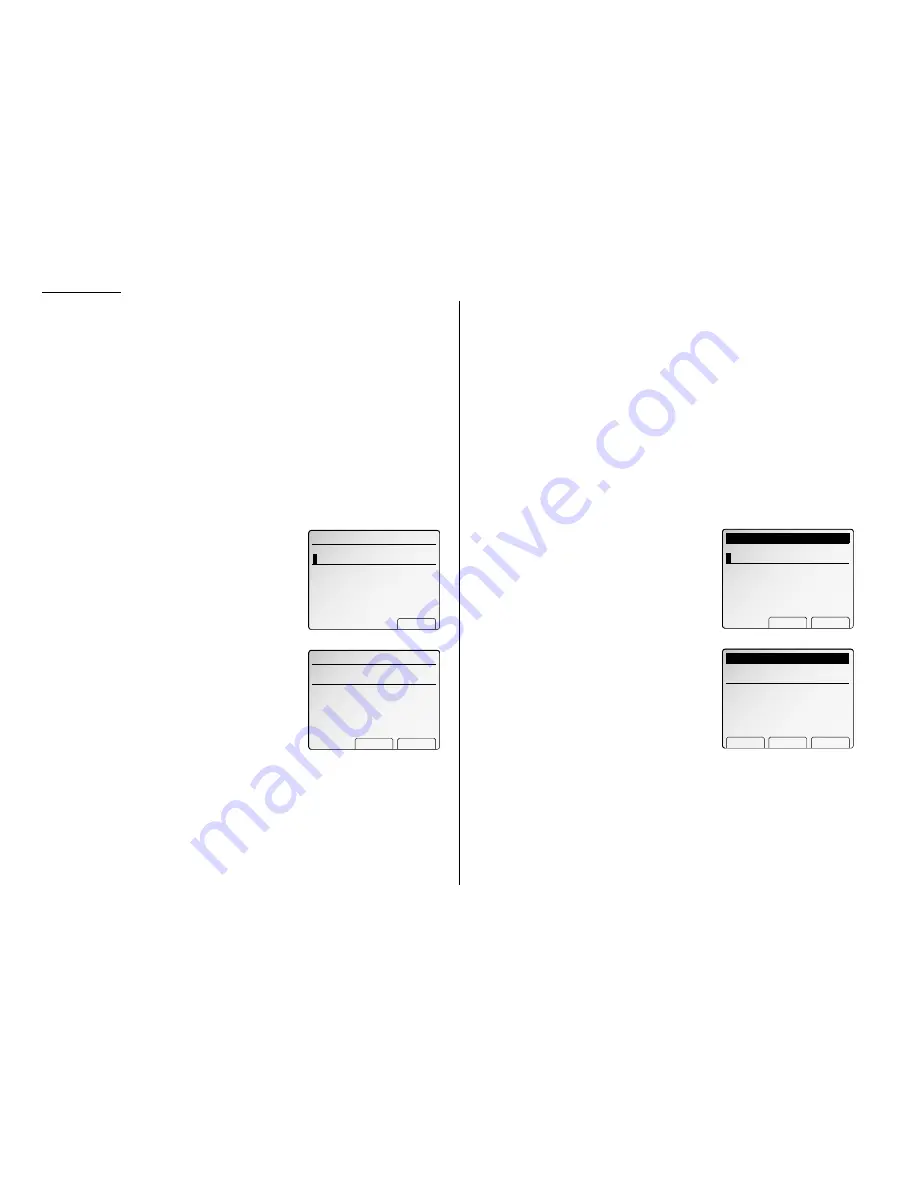
Use the numeric keypad to enter the appropri-
ate four-digit department code.
Skip to step 7.

6

Use the one-touch keys or the numeric keypad
to enter the appropriate department ID.

7

Press [Enter].

Making a copy using a department code

For this operation to work, two things must be true:
• The four-digit department code must exist on your fax machine.
• You must know the department code or department ID.

Note: If you press [No Copy] in step 4 or 5 below, you can set a copy setting or

print a list without entering the department code.

1

Place the document and set any settings you want.

2

Use the numeric keypad to enter the number of copies.

3

Press 

START

.

If you select the department code for the department mode above, proceed to
step 4.
If you select the department ID for the department mode above, skip to step
5.

4

Use the numeric keypad to enter the appropri-
ate four-digit department code.
Skip to step 6.

5

Use the one-touch keys or the numeric keypad
to enter the appropriate department ID.

6

Press [Enter].

Department Codes

No Copy   Clear    Enter

Enter department ID.
̲

Department Codes

         No Copy   Enter

Enter department code.

0

000

Transmission

123‑4567

          Clear    Enter

Enter department ID.
̲

Transmission

123‑4567

                   Enter

Enter department code.

0

000

4.14

Summary of Contents for FAX SCANNER

Page 1: ...ning Scanner unit and Printer unit 4 Installing the printing supplies 5 Plug in and power up 7 Turn off the transport mode 7 Loading paper 8 Paper size and type input 8 Initial setting 10 Changing pap...

Page 2: ......

Page 3: ...rigerator or air conditioner Such high consumption appliances can cause draw downs temporary drops in the power available for other equipment on the circuit which could damage your fax machine Use an...

Page 4: ...er cassette Unpacking 1 Remove the paper cassette from the box and check that the following acces sories are contained in the box 1 Fixing plate 4 2 Flat head screw 4 3 Bracket 1 4 Power supply harnes...

Page 5: ...cassette 6 Attach the bracket with care wedg ing the harness connected Note Push the harness into a recess in the rear as illus trated to ensure easy and proper installation of the bracket Note Make...

Page 6: ...unit to the printer unit then re attach the connect cover with one screw 4 Fix the scanner unit and the printer unit with two fixing screws 5 Remove two transport screws by turn ing them 90 Attach pro...

Page 7: ...r or A4 sized printouts Installing the drum cartridge 1 Unpack the new drum cartridge from its car ton Then remove the seal from the cartridge 2 Remove two pieces of tape and sponge rear from the drum...

Page 8: ...mage to the toner bottle 1 Open the toner bottle cover 2 Sharply tap the new toner bottle against a desk or other hard surface four or five times Then turn the toner bottle upside down and tap it the...

Page 9: ...on page 4 Turn off the transport mode Important Be sure you do not turn the power on until after you remove the transport screws See step 5 on page 4 To turn off the transport mode 1 Power up the mach...

Page 10: ...attach a new paper cassette or change the paper size you must tell the machine the new setting Paper size and type input for 1st cassette 1 Press COPY to change to the copy mode 2 Press NEXT then pres...

Page 11: ...pressing Paper 2 Press Enter North American Version European version When using the non standard paper size 1 Press Other 2 Select the paper size using the cursor key or pressing Paper Note If you wa...

Page 12: ...setting and continue the settings If you are setting up the North American version machine proceed to next step Otherwise skip to step 8 5 The LCD now asks if you want to set the calen dar clock to a...

Page 13: ...ting If you do want to set or change another TTI go back to step 14 If you do not want to set or change any other TTI press Exit 17 The LCD now asks you to set the usual TTI Select the TTI you want to...

Page 14: ...springs under the paper lifting plate Note The replacement springs are stored in the bottom of the front side of the paper cassette Note Always set the springs so the upper end of the spring fits into...

Page 15: ......

Page 16: ...D84 90510 60...

Page 17: ...type of dialing your telephone system requires Choose either tone or pulse rotary dialing 2 The name and fax number you want to appear on your faxes Every fax page you send arrives at the receiving ma...

Page 18: ...o 22 characters in length Select TTI 1 2 or 3 using the cursor key Then press Enter 15 Use the one touch keys to enter letters and other non numeric characters Regarding entering characters see page 1...

Page 19: ...nto the docu ment feeder Your machine s ADF will hold up to 50 sheets Note The green arrow will appear on the ADF cover when the document is set 2 Adjust the document guide to fit your documents Note...

Page 20: ...Some guidelines 2 1 Basic procedure 2 4 Reduce Enlarge 2 5 Sorting 2 6 Using the bypass tray 2 7 Basic copy features...

Page 21: ...following size of your document and select a suitable sized paper to copy your document Letter 8 5 11 Legal 8 5 14 Ledger 11 17 Half letter 5 5 8 5 Note Half letter is available only with the FBS If...

Page 22: ...or send a fax when the documents are set both on the ADF and FBS glass 1 Set your document on the FBS glass See How to set the document page 1 19 2 Set any setting you want 3 Press START Normally the...

Page 23: ...copies during a multi copy run 1 Press INTERRUPT The interrupt key will light on 2 Replace the document with new document for interrupt copying 3 Make your copies 4 After interrupt copying press INTER...

Page 24: ...cument You can set up to 99 copies Note To change the number entered overwrite it with new number 7 Press START to begin the copying process Note To stop the machine during multi copying press STOP No...

Page 25: ...Note According to the ratio you selected a part of the image might be lacked To copy with a preset rate of reduction enlargement 1 Set your document Note If you want to enlarge set the document on FBS...

Page 26: ...nal shift tray 2 Select the sorting mode you want using the cur sor key and then press Enter 3 Enter the number of copies using numeric keypad 4 Set your documents and then press START When setting yo...

Page 27: ...ress Enter 7 Select the paper size When using the standard paper size 1 Select the paper size using the cursor key 2 Press Enter When using the non standard paper size 1 Press Other 2 Select the paper...

Page 28: ...Repeat 2 11 Series Copies 2 13 Erase center 2 13 Erase border 2 14 TopUp Copy 2 14 Binding Margin 2 15 Directional magnification 2 15 Positive Negative 2 16 Last copy job 2 17 Mixed length copy 2 18...

Page 29: ...nter Page 2 13 Combine Page 2 10 Booklet Copies Optional duplex unit required Page 2 23 Duplex Copies Page 2 19 Directional Magnification Page 2 15 Vertical Horizontal Binding Margin Page 2 15 Series...

Page 30: ...rge is selected automatically 3 Select the desired combination modes using the cursor key Note The number of documents combined can be 2 4 or 8 4 If you want to change the recording paper size for com...

Page 31: ...are scanned the copies will be printed If you set your document on FBS glass Press START after set the first page of your documents on the FBS glass Then set the next page of your document then press...

Page 32: ...f 9 Press Layout the LCD will show Note If Layout does not appear on the LCD press NEXT until it appears 10 Select the layout using the cursor key 11 Press Enter to save the layout setting 12 Press En...

Page 33: ...con will be displayed on the LCD 8 Set the documents on FBS glass and press START Erase center Your machine can make copies with erasing the shadow at the center of the record ing paper Note Your mach...

Page 34: ...cuments then press START TopUp Copy Your machine can make copies with erasing the shadow of the outside of the docu ment This feature is convenient when you make a copy keeping the top cover opened an...

Page 35: ...ion You can copy with different magnification ratios horizontally and vertically Note You can enter the ratios from 25 through 400 in 1 step With some ratios you entered a part of the image might not...

Page 36: ...ess of the cursor key 7 Enter the vertical size of the copy using the or of the cursor key or numeric keypad Note To change number you entered press or of the cursor key then enter new number 8 Press...

Page 37: ...the scanned data was erased see the right column Using Last Job feature 1 Press MENU 2 Select Last Job using the cursor key and then press Enter 3 Use the numeric keypad to enter the number of copies...

Page 38: ...Enter to turn this feature On Note If you want to turn this feature Off press Cancel 6 The Mix Length icon will be displayed on the LCD 7 Select the recording paper and the reduction ratio you want I...

Page 39: ...ress Enter 4 Select the bind position using the cursor key Select R L when the document direction is as illustrated below Select Top when the document direction is as illustrated below Note If you wan...

Page 40: ...y result will be as illustrated below Note If you want to change the document type press Doc Type Your machine will return to step 3 5 Press Enter to save the setting The Duplex icon with Sort icon wi...

Page 41: ...pe from the following two types Note The optional duplex unit is required to use this feature Two facing pages One 2 sided sheet When you select Book Face two facing pages of your original documents w...

Page 42: ...cursor key and then press Enter 4 Select the bound side of the book document using the cursor key If your book document type is reading from left to right select L If your book document type is readin...

Page 43: ...key If you want to make a booklet copy reading from left to right select L If you want to make a booklet copy reading from right to left select R If you want to select the binding position to upper 1...

Page 44: ...ase border setting 2 25 Erasing center setting 2 26 Binding margin setting 2 26 Sorting copy setting 2 27 User settings for copy mode 2 27 Print the copy settings 2 30 Changing the default copy settin...

Page 45: ...A Erase Border Setting and then press Enter 3 To change the default setting of Erase Border select Erase Border then press Enter 4 Select ON or OFF then press Enter to save the setting 5 If you want...

Page 46: ...within 0 1 1 0 inch in 0 1 inch steps 1 Press MENU Copy Set 2 Select C Margin Setting and then press Enter 3 To change the default setting of the binding margin select Margin then press Enter 4 Select...

Page 47: ...pe Auto Image density Auto You can change the priority mode of Document type and Image density 1 Press MENU Copy Set 2 Select E User Settings and then press Enter 3 Select 01 Copy Scan Setting and the...

Page 48: ...Reset and then press Enter 4 Select Auto reset time and then press Enter 5 Enter the time for auto resetting and then press Enter to save the setting 6 Select Reset after scan and then press Enter 7 S...

Page 49: ...or copying set it to OFF 1 Press MENU Copy Set 2 Select E User Settings and then press Enter 3 Select 06 Cassette for Copy and then press Enter 4 Select the cassette you want to set using the cursor k...

Page 50: ...he copy settings You can print the list of copy settings In the list the current setting is shaded To print the copy setting list 1 Press MENU Copy Set 2 Select F Print Copy Settings using the cursor...

Page 51: ...Copy settings This page intentionally blank 2 31 Copy Features...

Page 52: ...Some guidelines 3 1 Sending a fax 3 3 Receiving faxes 3 8 Using as a Phone 3 10 Basic fax features...

Page 53: ...de automatically set the suitable setting according to the document density Note You can set the primary mode of the resolution and contrast See page 3 69 Mixing resolution and contrast in a multiple...

Page 54: ...e select the scanning size manually See the right column Select scanning size to be sent When you send or store your document usually the machine automatically detects the size of your document when i...

Page 55: ...n others They include documents with many pages and those with many dark areas When the machine s memory is full it can only transmit through the document feeder Note When you send a fax using the FBS...

Page 56: ...he FBS glass Set your document that cannot be placed in the ADF on the FBS glass one page at a time Note The machine gives priority to the document on the ADF to make a copy or send a fax when the doc...

Page 57: ...l tone either by Pressing MONITOR CALL or Lifting the optional handset In either case the LCD shows see right 4 Enter the fax number Also enter access codes with the number just as for a regular phone...

Page 58: ...nitor speaker or an optional handset 1 Make sure the document is in the ADF and that the resolution and contrast are set 2 Press MONITOR CALL or lift the optional handset to get a dial tone 3 Press Re...

Page 59: ...press START hang up both the fax machine s handset and the second telephone s handset Because remote fax machines will wait several seconds to hear reception tones from your unit you have about 30 sec...

Page 60: ...t s connected directly to your fax machine In this mode An answering machine connected to your fax machine answers each call If a voice call comes in the answering machine begins to record the incomin...

Page 61: ...L mode Hold You can put a call on hold during a conversation by pressing Hold At this point you can either hang up the handset or leave it off the hook To return to your conversation If you hung up th...

Page 62: ...11 Broadcasting 3 24 Delayed transmission 3 25 Batch transmission 3 26 Job Review 3 29 Special features 3 32 F Code communication 3 44 Programmable one touch keys 3 54 Security features 3 61 Advanced...

Page 63: ...abetically Using your EasyDial directory you can look up these numbers by their descriptive names just as if you were using a phone book We ll explain how to store the numbers and location IDs in the...

Page 64: ...en the number is as you want it press Enter to store it 6 Next the LCD now displays see right You can also program the following three items Location ID The destination name If you enter the name you...

Page 65: ...r fax s packaging to write down the stored numbers for easy reference If you have entered the group number you can also print out a directory of your call groups See page 3 22 Helpful Tip Pressing an...

Page 66: ...onds from the standby mode you can also change the one touch number 1 Keep pressing the one touch key you want to change until this LCD appears Note Be careful not to press it too shortly The machine...

Page 67: ...umber list 2 Select the one touch key you want to delete Note You can select the one touch key by pressing that key on the control panel Note You can press Detail to see the num ber which has been pro...

Page 68: ...e of the following Lift the handset Press MONITOR CALL to use the monitor speaker 2 Press the one touch key in which you ve stored the phone number Note Remember that your fax machine s monitor speake...

Page 69: ...ectory dialing func tion see page 3 22 Alternative number After all redial attempts to the regular number fail your fax machine will dial this alter native number If the alternative number also fails...

Page 70: ...numbers less than 100 you must enter leading zeroes to make three digits For example 001 099 Note You can press Detail to see the number which has been pro grammed in that speed dial number 3 Press En...

Page 71: ...Press MENU B Enter The LCD shows the speed dial number list 2 Select the speed dial number in which you want to enter new number Note You can select the speed dial number by directly entering that th...

Page 72: ...ard 7 Press RESET to finish Printing a list of speed dial numbers You can easily print a list of your speed dial numbers The list includes each number s three digit identifier the Location ID if any n...

Page 73: ...sary see Using a one touch dial and Using speed dialing in previous pages After you store the group number you can send the same fax to many different loca tions For example one call group may include...

Page 74: ...so you can find them and dial them easily To dial using EasyDial 1 For a fax call Place the document and select resolution and contrast you require For a regular phone call Lift up the optional hands...

Page 75: ...t successfully reaches the other number It has attempted the number of redials programmed and has still not connected see Changing redial settings page 3 75 If it was a regular phone call You ll have...

Page 76: ...he cursor key to select it and press Clear 5 Press START Your fax machine scans the document into memory and then sends it to each number or call group you ve entered Delayed broadcasting What if you...

Page 77: ...either press a one touch key enter a speed dial number or use the numeric keypad to enter the fax number Note If you want to erase characters press Clear to erase to the left If you want to change ju...

Page 78: ...ne character in the number move the cur sor by using cursor key and press Clear to erase it Then re enter the number correctly 5 Press Enter to save the number 6 Next instruct your fax to send from th...

Page 79: ...s memory Note For this operation to work the batch box must exist on your fax machine To store a document in a batch box for batch transmission 1 Insert the document and make any necessary adjustments...

Page 80: ...1 Press MENU L Enter 2 Select the batch box storing the document you want to print 3 Press Document 4 Select the document s file number 01 40 5 Press PrintDoc Your fax machine prints the document the...

Page 81: ...pear It will be indicated by command numbers date and time set to dial and remote location s names or numbers If the command is to send a broadcast Broadcast appears instead of the remote loca tion s...

Page 82: ...h day at 001 Remote location called The destination name Resolution mode Starting date and time Duration in minutes and seconds Number of pages you sent or received Result of the call If preceded by a...

Page 83: ...nt was received and remote location s names or numbers Note The assigned number identifies the order in which the documents were received by your machine 3 Use the cursor key to scroll through items I...

Page 84: ...ll appear 6 Adjust resolution contrast and memory trans mission if necessary 7 Enter the fax number Also enter any access codes necessary just as you would for a regular phone call Example Enter 9 to...

Page 85: ...transmission You can transmit your document with enlarging Note Enlargement is available only with the FBS Note You can select a preset enlargement ratio or directly enter the ratio using the numeric...

Page 86: ...t having to make the call or pay for it There are several kinds of polling Regular polling Your fax retrieves a document from a remote fax machine F Code polling Your fax retrieves a document stored a...

Page 87: ...n press Clear 8 Press Enter to save the number 9 Press START When your machine polls for documents it dials each number and upon making contact with the other machine begins receiving the document as...

Page 88: ...ax forwarding is not available with the Tel Ready mode Turning the Fax forwarding on or off 1 Press MENU O the letter O not a zero Setting 2 Select ON or OFF using the cursor key 3 Press Enter Note If...

Page 89: ...hen overwrite the correct digit 12 Press Enter to save the setting 13 Select Auto Print and then press Enter Automatic printing determines whether the machine will print a document automatically upon...

Page 90: ...over page message below Entering the cover page message 1 Press MENU K Enter 2 Use the one touch keypad to enter a message for the cover page Enter the message the same way you entered your fax name d...

Page 91: ...ing the cursor key Then press Enter 5 Select the paper source for the separator page using the cursor key Then press Enter 6 Select Prt on Sep Page then press Enter 7 Determine if the separator page w...

Page 92: ...f the activity journal To change the printing order 1 Press MENU G Enter and then select Line Up then press Enter 2 Select ON and then press Enter Setting the reports TCRs and RCRs Your fax machine ca...

Page 93: ...ore sending a fax you can set your fax machine to number each page This will help the person receiving the fax to keep track of all the pages To set up page numbering 1 Count the number of pages in yo...

Page 94: ...0 off F 0 5 on 0 5 off 1 0 on 0 5 off 0 5 on 3 0 off G 0 4 on 0 6 off 0 4 on 4 6 off H 1 5 on 0 5 off 0 5 on 3 5 off For example pattern C is 0 3 seconds ringing 0 2 seconds silent 1 second ringing 0...

Page 95: ...dset Don t hang up your handset yet 5 When you hear fax tones press START and hang up your fax machine s optional handset Your fax machine will send the document Talking first then receiving a fax To...

Page 96: ...idelines for using F Code 1 To use ITU T sub addressing you must create F Code boxes in your machine 2 Your machine holds up to 50 of these boxes 3 Your machine stores up to 30 documents into each F C...

Page 97: ...e numerical identifier you must enter in order to commu nicate with any remote F Code compatible fax ITU T password This is the password for ITU T compatible F Code fax transactions You don t need to...

Page 98: ...nter before you can make any changes to this F Code box 13 Decide on a four digit I D code 0001 9999 for this F Code box Write it down and put it in a safe place Important Do not use 0000 as an I D co...

Page 99: ...Your machine can store up to 30 documents each document can include one or more pages in each box Press Enter to save the box s name and continue 23 To set the Erase Tx Doc Select Erase Tx Doc using...

Page 100: ...nt to appear on the faxes that are relayed to other callers Sender Relay the document with hub unit s TTI don t send your TTI Both Relay the document with both the hub unit s TTI and your TTI Yours Re...

Page 101: ...the F Code box You then have a certain number of days see step 11 on page 3 46 in which to print out the document before your machine automatically erases it Note For this operation to work two thing...

Page 102: ...ed in your machine s F Code bulletin boxes without erasing the document from memory To print a stored document 1 Press MENU N Enter The LCD shows the F Code list 2 Select the F Code bulletin box where...

Page 103: ...ox and get that machine to relay it to others See F Code trans mission on page 3 52 for more detail The hub performs a relay broadcast and the machine which sends the original doc ument to the hub has...

Page 104: ...skip to step 8 8 Press Enter 9 Enter the fax number either by pressing a one touch key entering a speed dial number or dialing from the numeric keypad Important Do not press START if you want to delay...

Page 105: ...select Delayed Tx and then press Enter The LCD shows see right 10 Use the numeric keypad to enter the day and time when the transmission should begin then press Enter 11 Press START If in step 8 you...

Page 106: ...3 Press Enter 4 Use the numeric keypad to enter the fax num ber exactly as your machine should dial it including whatever codes your phone system requires The number can be up to 40 charac ters in le...

Page 107: ...rs Note If you enter characters by mistake press Clear to erase them Or press or of the cursor key to select the number then press Clear 5 Press Enter 6 If you want the broadcast to begin immediately...

Page 108: ...If you want to delay the polling select Delayed Tx and press Enter 8 Next tell your fax to carry out this delayed command one of these ways Option 1 Perform the command once at a certain time on a cer...

Page 109: ...itting for example as a security box or a relay box Different fax manu facturers may use slightly different terms but the concepts are the same You must know the remote fax s ITU T sub address and pas...

Page 110: ...e Programming F Code polling For this operation to work three things must be true The document which you re polling must exist in the remote fax s F Code box ITU T standard sub addressing password box...

Page 111: ...or change any other key s programming press RESET Your machine returns to standby mode Erasing a programmable one touch key 1 Press MENU C Enter The LCD shows the programmable one touch number list 2...

Page 112: ...and contrast you require 2 Press the programmable one touch key in which you ve stored the fax commu nication command Your fax will perform the operation now or at whatever time you programmed Note T...

Page 113: ...y reception tells your machine to keep all received faxes in memory but not print them Then you can print them out later at your convenience For example you could use this if you re concerned about wo...

Page 114: ...he or symbols and it can be entered from the numeric keypad There are three possible settings for the PIN mask Off Turns off the PIN mask feature Any PIN you enter will appear on any dis play or print...

Page 115: ...ssion while using the PIN mask page 3 64 If you chose Mode 2 as you autodial load the code In this mode you don t have to add the PIN to the autodialer setting Instead you enter the PIN manually each...

Page 116: ...LCD and then returns you to step 2 4 Continue with the steps for creating or modifying a batch box page 3 26 Now you can perform batch transmission to this box while the PIN mask is activated Setting...

Page 117: ...activated Mode1 Your fax machine checks whether the last four digits of any phone number in your autodialer matches the last four digits of the remote fax s sub scriber ID the phone number part of th...

Page 118: ...ant to block a fax from someone with a Subscriber ID of 972 555 3038 you should enter 5 5 5 3 0 3 8 If you want to erase an existing entry in the blocked numbers list press or of the cursor key to sel...

Page 119: ...Fax Features Getting Started Advanced fax This page intentionally blank 3 67...

Page 120: ...Settings for transmission 3 69 Settings for reception 3 72 Settings for dialing 3 75 Settings for operation 3 76 Changing the default fax settings...

Page 121: ...ent Press RESOLUTION to change the resolution Press CONTRAST to change the contrast Once your document is transmitted your machine returns to its default settings Setting ECM Default setting ON Line n...

Page 122: ...ny dark areas When the machine s memory is full it can transmit only through the document feeder Note When you use the flatbed scanner the machine always uses memory trans mission To change the defaul...

Page 123: ...can set your fax machine so that it will automatically place a small blue ink stamp mark on the front of each original document that it successfully scans Important Turn off this feature if you re se...

Page 124: ...r fax machine s reduction margin is measured in millimeters mm We ll define reduction margin by explaining how it s used When a fax message enters your machine s electronic brain the machine measures...

Page 125: ...x machine gives you the option of using Error Correction Mode ECM When two fax machines communicate while running in ECM the sending machine automatically checks the data as it sends If the receiving...

Page 126: ...set using the cursor key and then press Enter 3 Select ON or OFF using the cursor key 4 Press Enter to save the setting 5 If you want to set other cassette repeat step 2 4 To finish press Exit Press...

Page 127: ...ow long it waits between redials that length of time between calls is the redial interval To program the redial settings 1 Press MENU J 0 6 Enter 2 Use the numeric keypad to enter the number of redial...

Page 128: ...andby Printing your fax settings After you ve programmed settings into your machine print a fax settings list We recommend this particularly if you re sharing the machine with other users who might ch...

Page 129: ...Fax settings This page intentionally blank 3 77 Fax Features Getting Started...

Page 130: ...Soft Keys 4 1 Macros 4 3 Machine settings 4 6 Common settings...

Page 131: ...14 Binding Margin see page 2 15 Directional Magnification see page 2 15 Nega Posi see page 2 16 Last Job see page 2 17 Mixed length copy see page 2 18 Enhanced copy DocEnhance Makes only the light ar...

Page 132: ...ou need Note Booklet will appears only when the optional duplex unit is attached 5 Press Enter 6 If you want to set another Soft Key go back to step 3 If you do not want to set any more Soft Keys pres...

Page 133: ...in F Code boxes see page 3 49 Regular polling documents see page 3 36 Delayed commands documents see page 3 30 Security receive documents see page 3 62 Batch transmission documents see page 3 28 F Cod...

Page 134: ...ey before the machine do it press No here 9 The machine now asks you to name this job Enter the name of this job A job s name may be up to 130 characters in length If you do not want to enter or chang...

Page 135: ...Macro key 1 Insert the document 2 Select resolution and contrast 3 Press the Macro key in which you ve stored the command Note You can also select the command from the Macro key list Press MACRO PROGR...

Page 136: ...nt from the number on the optional page counter 1 Press MENU Mach Set 2 Select A Page Counter using the cursor key Then press Enter 3 The LCD shows the total number of pages Note Pressing RESET the ma...

Page 137: ...chine is initially set to be in the Sleep mode automatically when 15 minutes has passed after you pressed a key If you want to change the time or to set the Sleep mode to OFF you can set it here Note...

Page 138: ...tone and complete beep Key Touch Tone You can select the key touch tone for each mode fax mode and copy mode Note When the optional scanner kit or network kit are installed to your machine you can als...

Page 139: ...ress Enter 9 Select the desired type of beep using the cursor key Then press Enter to save the setting If you want to set the type of beep for other item repeat steps 8 9 Note If you want to try to he...

Page 140: ...Select I 2 Bin Tray Setting using the cur sor key Then press Enter 3 Select the item you want to change the setting using the cursor key 4 Select Upper or Lower as you want 5 After you set all items y...

Page 141: ...p from the Sleep mode or the Auto power off mode at a certain time you can set it here 1 Press MENU Mach Set 2 Select M EnergySave ReleaseTime using the cursor key Then press Enter 3 Select ON or OFF...

Page 142: ...rtment code list If you want to enter another department code repeat steps 2 3 4 Press Enter to save the setting The machine will return to standby mode Entering a department name You can enter a depa...

Page 143: ...passcode 4 Press Enter 5 Select desired setting 6 Press Enter to save the setting Select the department mode You can select the mode department code four digit number or department ID ten characters...

Page 144: ...rtment ID 7 Press Enter Making a copy using a department code For this operation to work two things must be true The four digit department code must exist on your fax machine You must know the departm...

Page 145: ...3 Press Yes The total communication time and total printed pages for each department code are cleared The department code will not be erased Copy charge setting You can manage the copy charge for eac...

Page 146: ...st and press Enter 3 Use the numeric keypad to enter the depart ment code you want to erase the current total counts Then press Enter Note If you ve selected department ID for department mode enter th...

Page 147: ...Common settings This page intentionally blank 4 17 Common Settings Getting Started...

Page 148: ...Clearing paper jams 5 1 Print quality problems 5 6 Caring for your machine 5 8 In the event of a power failure 5 10 Troubleshooting 5 11 Common questions 5 19 Just in case...

Page 149: ...ial right Then skip to step 5 If you cannot remove the original docu ment proceed to step 3 3 Open the inner cover as shown at right then remove the document by turning the green dial right Then skip...

Page 150: ...g an alarm sounds and the part the paper jammed will blink on the LCD Please remove the jammed paper carefully as below CAUTION The fuser unit becomes very hot Do not touch the fuser unit when you are...

Page 151: ...ver 8 Turn the green dial as the arrow indicates and remove the jammed paper Cassette Optional Large capacity cassette 9 Remove the jammed paper 10 Close the side cover 11 Pull the cassette toward you...

Page 152: ...artridge as an electrostatic discharge may damage the machine 2 Remove the jammed paper 3 Close the printer cover The optional duplex unit 1 Open the duplex unit cover 2 Remove the jammed paper 3 Open...

Page 153: ...as an electrostatic discharge may damage the machine 2 Open the fuser cover by pressing the fuser cover release R2 CAUTION The fuser unit becomes very hot Do not touch it 3 Open the 2 Bin tray cover...

Page 154: ...ner cartridge may be out of toner or the toner may be very low Remove the toner cartridge and shake it a few times to redistribute the toner inside If the problem persists replace the toner cartridge...

Page 155: ...X to change to the copy mode 2If there is a document in the ADF or FBS remove it 3Open the book cover fully 4Press START to make a black copy Printouts have toner smudges The toner may be unevenly dis...

Page 156: ...ed to pro tect your safety and the machine For cleaning external surfaces such as the cover and handset use a mild clean ing solution sprayed onto a lint free towel or cloth Always use a lint free clo...

Page 157: ...en it with water Important Make sure the cloth doesn t have any rough areas Otherwise it could scratch the glass surface of the FBS 3 Using the cloth gently clean the glass surface of the FBS and the...

Page 158: ...ng The printing will stop During power failure Your machine can receive telephone calls even in the event of a power failure if an optional handset is attached But it cannot send or receive a fax docu...

Page 159: ...off copy protection See Copy protect on page 4 7 Enter job hold time You tried to use the Last Job feature but the Last Job hold time has not been entered Enter the Last Job hold time See Last Job Hol...

Page 160: ...Communication Error A communication error disrupted the transmis sion or reception If you were transmitting press STOP to clear the error message and then retry the transmission If you were receiving...

Page 161: ...x which is set to be a relay box Select an F Code box which is set to be a bulletin box then try again Not store in Secure box You tried to store a document for polling in an F Code box which is set t...

Page 162: ...for the fax to finish printing then try again Replace Your drum cartridge doesn t work drum cartridge Your machine cannot print until it is replaced with a new drum cartridge Replace it Scanner in us...

Page 163: ...ted functions cannot be combined functions are Check the combination of functions See Combination unavailable chart pages AI 4 AI 5 In EraseBorder or Margin is too wide Or margin of your document is t...

Page 164: ...er by pressing CONTRAST key Symptom Possible cause What to do The edge of the copy is The FBS pad is dirty dirty Wipe the FBS pad clean with a soft cloth dampened with alcohol or You have selected a p...

Page 165: ...hap pen if someone dials a wrong number or if the remote machine restricts access through use of a passcode R 1 2 The two fax machines were incompatible Your fax machine sends and receives only ITU T...

Page 166: ...nd your machine detects an error it pro duces an error printout headed by the words Check Message This printout lists the following information about the transmission The resulting error code A commun...

Page 167: ...ialed Why A That number you saw is programmed into the remote fax machine by the user Some users prefer different numbers to appear than the ones they re really using And some people don t know how to...

Page 168: ...ically As long as it hasn t stored more than 99 delayed commands counting automatic redials your machine should still accept commands from you If it has exceeded this quantity and will accept no more...

Page 169: ...t is that the remote fax machine will proceed with the transmission Please create an outgoing message on your answering machine that s no longer than 10 seconds see page 3 8 for a suggestion Polling Q...

Page 170: ...Appendix and index Specifications AI 1 Combination chart for copy functions AI 4 Glossary AI 6 Index AI 11...

Page 171: ...17 0 L 3 6 11 7 DL COM10 Monarch Executive Paper capacity Multi purpose cassette Plain Paper 20 lb 275 sheets Custom sized paper Card OHP Label 20 sheets 2nd paper cassette Plain Paper 20 lb 550 shee...

Page 172: ...e 0 8 sec page Memory Tx Grayscale 1 7 sec page Feeder Tx Based on letter sized sheets Grayscale 256 level Receive reduction print Auto Variable from 100 to 25 by 1 ratio Fixed 100 97 91 81 or 75 Enla...

Page 173: ...ed from Main unit Power consumption 21W or less Weight 4 5 pounds Dimensions Width 2 25 Depth 16 25 Height 10 inches Shift Tray Shift home position Rear of unit Shift position 40 mm Paper capacity Pla...

Page 174: ...ipurpose cassette Paper cassette Large capacity cassette Slecting paper cassette Plain paper Others Slecting paper type Paper tray 2 Bin tray Slecting output tray Directional Maginification Scanning f...

Page 175: ...t Directional Magnification Directional Size Magnification inch Duplex Copy 1 sided 2 sided 2 sided 2 sided 2 sided 1 sided Book Face Book F B Booklet Directional magnification Auto Reduce Enlarge Pre...

Page 176: ...well under 10 due to the presence of margins spaces between words spaces between lines and paragraphs and even spaces within letters However drawings and photographs have a much higher black density s...

Page 177: ...atch F Code or polling operation Fine resolution 203H 196V lpi Also shown as G3F Group 3 fine on some fax units Grayscale Not a level of resolution but a method of scanning and transmitting halftone i...

Page 178: ...be fed safely through a fax machine Override To change existing settings Paper sizes All are width length Letter sized 8 5 11 0 216 279 mm Legal sized 8 5 14 0 216 356 mm A5 5 8 8 3 148 210 mm B5 7 2...

Page 179: ...files from polling memory Subscriber ID A fax machine s telephone number as identified by a user setting See TTI Super Group 3 An extension of Group 3 fax technology standards allowing the use of high...

Page 180: ...cordance with the instructions set forth in or provided with product literature This warranty does not apply to any product which has been subjected to tampering alteration misuse abuse neglect improp...

Page 181: ...2 30 Sorting copy setting 2 27 Delayed transmission 3 25 Dialing pause 3 1 3 75 Directional magnification 2 15 Directional ratio magnification 2 15 Directional size inch magnification 2 16 Distinctive...

Page 182: ...e touch numbers 3 12 3 67 Options 1 3 Out of paper reception 3 8 P Paper tray 1 2 Passcode 3 61 Platen cover 1 1 Positive Negative 2 16 Print settings 3 72 Paper save function 3 72 Reduction margin 3...

Page 183: ...guideline 3 1 Sorting 2 6 Sound settings 4 8 Special Dialing Characters 3 11 Special features 3 32 3 67 Specifications AI 1 AI 3 Speed dial numbers 3 16 3 19 Subscriber ID 1 18 1 19 3 64 3 65 T Toner...

Page 184: ...This page intentionally blank Appendix index AI 14...

Page 185: ...This page intentionally blank Appendix and index AI 15 Getting Started Appendix Index...

Page 186: ...This page intentionally blank Appendix index AI 16...

Page 187: ...Muratec America Inc 6400 International Parkway Suite 1500 Plano Texas 75093 http www muratec com MMLitemnumber D84 90560 60 MAIordernumber OMMFX2530 Muratec America Inc 2001 Printed in Japan...

Reviews: