background image

FrameMaker Ver5.5E(PC) CF3102/CF2002 MAINTENANCE
02.06.05

E-14

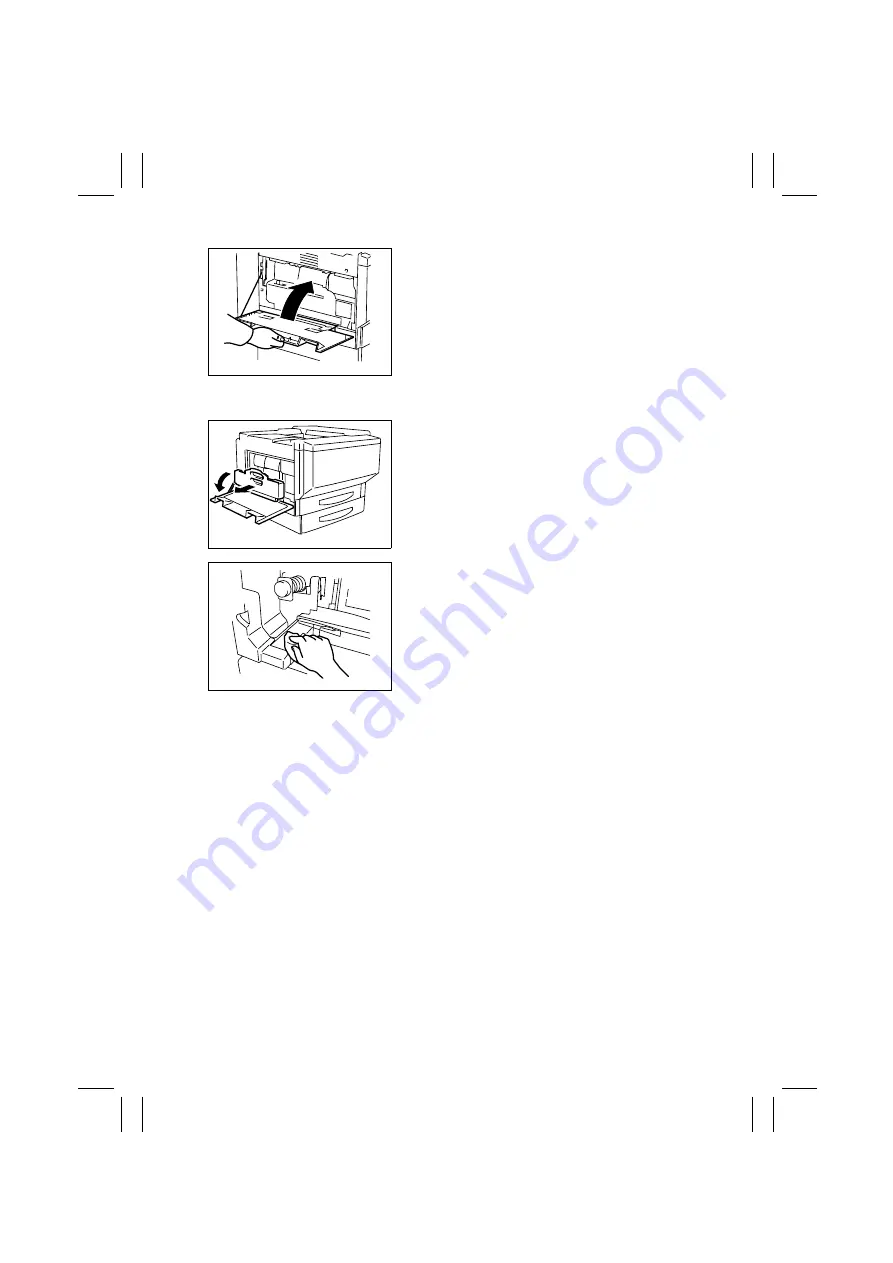
(16) Cleaning of the Area around the Waste Toner Collecting Port

9. Close the Left Door.

4025E010AA

1. Open the Rear Left Cover.
2. Remove the Waste Toner Bottle.

4004D221AA

3. Wipe the areas around the Waste Toner Collect-

ing Port clean of spilled toner and dirt using a soft
cloth dampened with water or alcohol.

4004D222AB

Summary of Contents for CF2002

Page 1: ...The essentials of imaging www minoltaeurope com Service Manual CF2002 CF3102 ...

Page 2: ......

Page 3: ... the marking 1 1 Warning WARNING Indicates a potentially hazardous situation which if not avoided may result in minor or moderate injury It may also be used to alert against unsafe practices CAUTION The following graphic symbols are used to give instructions that need to be observed WARNING 1 Always observe precautions Parts requiring special attention in this product will include a label containi...

Page 4: ...cord with care and never use a multiple outlet Do not break crush or otherwise damage the power cord Placing a heavy object on the power cord or pulling or bending it may damage it resulting in a possible fire or electric shock Do not use a multiple outlet to which any other appliance or machine is con nected Be sure the power outlet meets or exceeds the specified capacity 6 Be careful with the hi...

Page 5: ... To promote safety make sure that all tubing and other insulating materials are returned to their original positions Make sure that floating components mounted on the circuit boards are at their correct distance and position off the boards CAUTION 1 Precautions for Service Jobs A star washer and spring washer if used originally must be reinstalled Omit ting them may result in contact failure which...

Page 6: ...g workbench when servicing Provide good ventilation at regular intervals if a service job must be done in a confined space for a long period of time Avoid dusty locations and places exposed to oil or steam Avoid working positions that may block the ventilation ports of the product 4 Precautions for Handling Batteries Lithium Nickel Cadmium etc Replace a rundown battery with the same type as specif...

Page 7: ... recom mandé par le constructeur Mettre au rebut les batteries usagées conformément aux instructions du fabricant Denmark ADVARSEL Lithiumbatteri Eksplosionsfare ved fejlagtig håndtering Udskiftning må kun ske med batteri af samme fabrikat og type Levér det brugte batteri tilbage til leverandøren Finland Sweden VAROlTUS Paristo voi räjähtää jos se on virheellisesti asennettu Vaihda paristo ainoast...

Page 8: ...Book DIS REASSEMBLY ADJUSTMENT To reassemble the product reverse the order of disassembly unless otherwise specified TROUBLESHOOTING If a component on a PWB or any other functional unit including a motor is defective the text only instructs you to replace the whole PWB or functional unit and does not give trou bleshooting procedures applicable within the defective unit All troubleshooting procedur...

Page 9: ...ecified in the text be sure to use the GND wire 6 Handling of PWBs During Transportation Storage During transportation or when in storage new P W Boards must not be indiscriminately removed from their protective conductive bags Do not store or place P W Boards in a location exposed to direct sunlight and high tem perature When it becomes absolutely necessary to remove a Board from its conductive b...

Page 10: ...scratch the surface of the PC Drum Do not apply chemicals to the surface of the PC Drum Do not attempt to wipe clean the surface of the PC Drum If however the surface is contaminated with fingerprints clean it using the following proce dure A Place the PC Drum into one half of its carton 1076D001 B Gently wipe the residual toner off the surface of the PC Drum with a dry Dust Free Cotton Pad Turn t...

Page 11: ... Precautionary Information on the PC Drum Inside the Imaging Cartridge Use care not to contaminate the surface of the PC Drum with oil base solvent finger prints and other foreign matter Do not scratch the surface of the PC Drum Do not attempt to wipe clean the surface of the PC Drum C Soak a small amount of either ethyl alcohol or iso propyl alcohol into a clean unused Dust Free Cot ton Pad which...

Page 12: ...FrameMaker Ver 5 5 PC CF2002 CF3102 02 07 01 INDEX GENERAL MAINTENANCE DIS REASSEMBLY ADJUSTMENT SWITCHES ON PWBs TECH REP SETTINGS TROUBLESHOOTING ...

Page 13: ... 4 Replacing of the Separator Roll Assy E 6 5 Cleaning of the Synchronizing Rollers E 7 6 Cleaning of the Paper Dust Remover E 7 7 Replacing of the Paper Dust Remover E 8 8 Cleaning of the Transport Roller E 8 9 Cleaning of the 2nd Image Transfer Entrance Upper Guide E 8 10 Cleaning of the Scanner Rails E 9 11 Cleaning of the Mirrors 1st 2nd 3rd E 10 12 Cleaning of the Lens E 11 13 Cleaning of the...

Page 14: ...moval of the Toner Hopper Unit D 16 2 Removal of the LPH Unit D 17 2 4 Disassembly of the IR Unit D 19 1 Removal of the Scanner Motor D 19 2 Remove of the Scanner Assy D 20 3 Removal of the Scanner Drive Cables D 21 4 Winding of the Scanner Drive Cables D 23 2 5 CLEANING AND DISASSEMBLY OF THE ENGINE PARTS D 28 1 Cleaning of the Transfer Belt Unit D 28 2 Removal of the Imaging Unit Motor C M Y Bk ...

Page 15: ...9 15 AE Adjust D 60 16 2nd Transfer Adjust D 61 17 Fuser Temp D 62 18 Fuser Speed D 63 19 Touch Panel Adj D 64 20 Left Image D 65 21 Top Image D 66 22 CD Mag D 67 23 FD Mag D 68 24 Org Detect Sensor D 69 4 OTHER ADJUSTMENTS D 70 4 1 INSTALLATION OF THE MECHANICAL COUNTER OPTION D 70 4 2 MOUNT THE OPTIONAL ORIGINAL SIZE DETECTING SENSORS D 71 4 3 FLASH MEMORY D 72 4 4 REMOUNTING RAM IC IC202 D 74 S...

Page 16: ...Sensor Layout T 14 2 4 Misfeed Detection Timing Troubleshooting Procedures T 16 1 1st Drawer Paper Take Up Misfeed T 16 2 2nd Drawer Paper Take Up Misfeed T 17 3 3rd Drawer Paper Take Up Misfeed PF 118 T 18 4 LCC Paper Take Up Misfeed PF 121 T 19 5 4th Drawer Paper Take Up Misfeed PF 118 T 20 6 LCC Lift 2 to 1 paper transport Misfeed PF121 T 21 7 Manual Bypass Take Up Misfeed T 22 8 Vertical Trans...

Page 17: ...n Motor s failure to turn T 38 17 C004E Power Supply Cooling Fan Motor s failure to turn T 38 18 C004F Cooling Fan Motor 2 s failure to turn T 38 19 C0060 Fusing Drive Motor s failure to turn T 42 20 C0061 Fusing Drive Motor turning at abnormal timing T 42 21 C0094 2nd Image Transfer Roller pressure retraction failure T 43 22 C0096 Image Transfer Belt pressure retraction failure T 44 23 C0098 Fusi...

Page 18: ... C1200 Memory mounting failure T 56 52 C1203 Memory mounting failure T 57 53 C1204 Memory mounting failure T 57 54 C1220 Image Input Time Out T 58 55 C1229 Image Output Time Out T 59 56 C1240 JBIG Error T 60 57 C1241 JBIG Error T 60 58 C1242 JBIG Error T 60 59 C1243 JBIG Error T 60 60 C1261 Memory Board Time Out T 61 61 C1265 Memory Board Time Out T 61 62 C1279 Memory Board Time Out T 61 63 C1290 ...

Page 19: ...ns of the State Confirm Function of Tech Rep Mode Concerning Image Quality Problems T 71 1 Table T 71 2 Level History 1 T 72 3 Level History 2 T 72 4 2 Troubleshooting Image Quality Problems T 73 4 3 Initial Check Items T 73 4 4 Troubleshooting Procedure by a Particular Image Quality Problem T 75 1 IR System white lines in FD white bands in FD colored lines in FD and colored bands in FD T 75 2 IR ...

Page 20: ...inter 4 Color white lines in FD white bands in FD colored lines in FD and colored bands in FD T 104 28 Printer 4 Color white lines in CD white bands in CD colored lines in CD and colored bands in CD T 105 29 Printer 4 Color uneven density in FD T 106 30 Printer 4 Color uneven density in CD T 107 31 Printer 4 Color low image density T 108 32 Printer 4 Color poor color reproduction T 110 33 Printer ...

Page 21: ...FrameMaker Ver 5 5E PC CF2002 CF3102 GENERAL 02 06 26 GENERAL 14413 ...

Page 22: ...n scanning direction x 1800 dpi in sub scanning direction Three Way system Manual Bypass Table Single 1st Drawer 250 sheets 2nd Drawer 500 sheets Tandem type indirect electrostatic recording sysytem LED Unit exposure for each of Y M C and Bk MTHG System DC comb electrobe Scorotron System Ozone Filter Intermediate Transfer Belt System Selecting either nonwoven fabric bias or ground Separation Finge...

Page 23: ...ier 20 cpm copier A3 11 17 A4L 8 1 2 11L A4C 8 1 2 11C 15 15 21 21 31 31 10 15 14 21 20 31 B4L B5L B5C 18 18 21 21 31 31 12 18 14 21 20 31 Fixed Metric Area Inch Area Full size 1 000 1 000 Reduction 0 816 0 707 0 500 0 785 0 733 0 647 0 500 Enlargement 1 154 1 414 2 000 1 214 1 294 1 545 2 000 Variable in 0 001 increments 0 250 to 4 000 Lens Light Source Through Lens White Fluorescent Lamp Max Pow...

Page 24: ... Width 596 mm 23 1 2 Depth 792 mm 31 1 4 Height 1025 mm 40 1 4 Engine 2nd Drawer Width 596 mm 23 1 2 Depth 730 mm 28 3 4 Height 571 mm 22 1 2 Scanner Width 589 mm 23 1 4 Depth 730 mm 28 3 4 Height 152 mm 6 Engine 2nd Drawer 85 kg 187 1 2 lbs Scanner 19 5 kg 43 lbs Rack 18 kg 39 3 4 lbs ...

Page 25: ...t make sure that the capacity of the outlet is not exceeded Use a power source with little voltage fluctuation Never connect by means of a multiple socket any other appliances or machines to the outlet being used for the copier Ensure that the copier does not ride on the power cord or communication cable of other electrical equipment and that it does not become wedged into or underneath the mecha ...

Page 26: ... place a vase or vessel containing water on the copier Be sure to turn OFF the power switch at the end of the workday or upon power failure Use care not to drop paper clips staples or other small pieces of metal into the copier 3 2 Operating Environment The operating environmental requirements of the copier are as follows Temperature 10 to 30 C 50 to 86 F Humidity 25 to 85 RH Rate of temperature c...

Page 27: ...he PC Drum with bare hands The same sized paper is of two kinds short grain and long grain Short grain paper should only be fed through the copier crosswise long grain paper should only be fed lengthwise If your hands become soiled with toner wash them with soap and water Do not throw away any used consumables PC Drum starter toner etc They are to be collected Do not burn bury in the ground or thr...

Page 28: ... a LED light emitting diodes expo sure system There is no possibility of danger from the LED optical radiation because the LED optical radiation level does not exceed the acceptable radiation limit of class 1 under all conditions of operation maintenance service and failure CAUTION Double pole neutral fusing ATTENTION Double pôle fusible sur le neutre ...

Page 29: ...PF 121 5 Copy Desk CD 2M 6 Finisher FN 116 7 Option Tray JS 100 8 Original Cover OC 2 9 Duplex Unit AD 14 10 Paper Feed Unit PF 118 11 Copy Table CT 2 12 Finisher FN 8 13 Copier Stand CS 2 14 Data Terminal DT 105 U S A and Canada only 15 Memory M256 2 16 Hard Disk Drive HDD 5 17 Punch Kit PK 4 18 Mechanical Counter 19 Printer Controller CN3101e 20 Printer Controller CN3102Pro 21 Printer Controller...

Page 30: ...FrameMaker Ver 5 5E PC CF2002 CF3102 MAINTENANCE 02 06 26 MAINTENANCE 14413 ...

Page 31: ...e occurs 200 K 4658 0151 01 E 5 E 6 Transfer Section Synchronizing Roller Upon each call 60 K E 7 Paper Dust Remover Upon each call 60 K 152 K 4588 611 E 7 E 8 Transport Roller Upon each call 60 K E 8 2nd Image Transfer Entrance Upper Guide Upon each call 60 K E 8 Image Transfer Roller Unit 152 K 4588 411 E 18 IR Section Scanner Rail When image failure occurs E 9 Mirrors 1st 2nd 3rd When image fai...

Page 32: ...in the Maintenance Cycle column represent the Life Counter values The contents of this maintenance schedule are subject to change without notice PM Parts Maintenance Cycle Parts No Ref Page in This Manual Clean Replace Developing Section Imaging Unit C M Y 52 K E 22 Imaging Unit Bk 82 K Ozone Filter 152 K 4025 0447 01 E 15 Comb electrode 10 K or When image failure occurs E 15 LPH Section LPH Assy ...

Page 33: ...whose FD exceeds 216 mm 150 K 152 K Transfer Belt Unit The number of copies made is counted The counter counts up 2 for paper whose FD exceeds 216 mm The number of copies made is compared with the value of the number of hours through which the belt has turned trans lated to a corresponding value of the number of copies made and the value whichever reaches the life specifications value is detected ...

Page 34: ...of copies made or figures equivalent to it when given conditions see the Table given below are met They can be more or less depending on the copier operating conditions of each individual user Conditions for Life Specifications Values 31 cpm Copier 20 cpm Copier Job Type Making three copies per job Monochrome Making three copies per job Color Making three copies per job Paper Size A4C Letter C Col...

Page 35: ... Paper Lifting Plate into position 3 Snap off one C clip from the Paper Take Up Roller Assy 4 Slide the Paper Take Up Roller Assy to the rear and take its shaft off the front bushing 4658D008AA 5 Snap off one C clip and remove the Paper Take Up Roller 6 Remove the Paper Separator Roller Assy See 4 Replacement of the Paper Separator Roller Assy 7 To reinstall reverse the order of removal 8 Select T...

Page 36: ...einforcement plate that will come off position when the screws are removed When reinstalling the reinforcement plate make sure that it is doweled into position 4025E001AA 3 Take off the rubber stopper shaft spring and guide plate to remove the Paper Separator Roll fixing bracket assy 4658D003AA 4 Snap off one E ring and the Paper Separator Roll Assy 5 Remove the Paper Take Up Roll See 2 Replacemen...

Page 37: ...ove the Paper Dust Remover See 7 Replacing the Paper Dust Remover 4004D206AB 3 Using a soft cloth dampened with alcohol wipe the Synchronizing Rollers clean of dirt 4004D205AC Synchronizing Rollers 1 Open the Right Door 2 Remove the Paper Dust Remover See 7 Replacing the Paper Dust Remover 4004D206AB 3 Using a brush whisk dust off the Paper Dust Remover 4025E002AA ...

Page 38: ...reinstall reverse the order of removal 5 Select Tech Rep Mode Counter Life and clear the count of Paper Powder Filter Ozone Filter 4004D206AB 1 Open the Right Door 2 Using a soft cloth dampened with alcohol wipe the Transport Roller clean of dirt 4025E053AA 1 Open the Right Door 2 Open the Left Door 3 Remove the Waste Toner Bottle 4 Slide the Transfer Belt Unit out halfway 5 Wipe the 2nd Image Tra...

Page 39: ...ove three screws and the IR Right Cover 4025E003AA 2 Remove one screw each and the Original Glass fixing bracket at the front and rear 3 Remove the Original Glass 4025E004AA 4 Using a soft cloth dampened with alcohol wipe the Scanner Rails clean of dirt NOTE Apply lubricant after cleaning 4025E005AA ...

Page 40: ...2nd 3rd 1 Remove three screws and the IR Right Cover 4025E003AA 2 Remove one screw each and the Original Glass fixing bracket at the front and rear 3 Remove the Original Glass 4025E004AA 4 Using a soft cloth dampened with alcohol wipe mirrors clean of dirt 40004D199AA 1st Mirror 2nd 3rd Mirror ...

Page 41: ... 4025E003AA 2 Remove one screw each and the Original Glass fixing bracket at the front and rear 3 Remove the Original Glass 4025E004AA 4 Remove fourteen screws and the optical cover 4025E006AB 5 Using a soft cloth dampened with alcohol wipe the Lens clean of dirt 4004D200AB 1 Using a soft cloth dampened with alcohol wipe the Original Glass clean of dirt 4004D201AA ...

Page 42: ...4025E003AA 2 Remove one screw each and the Original Glass fixing bracket at the front and rear 3 Remove the Original Glass 4025E004AA 4 Remove fourteen screws and the optical cover 4025E006AB 5 Remove two hooks and the lens cover 4025E050AA 6 Using a soft lint free cloth dampened with alco hol wipe the CCD Sensor clean of dirt 4025E051AA ...

Page 43: ...ng it If scattered toner has accumulated in the vicinity of the toner collecting port do not tilt the waste toner bottle when removing it Do not leave the waste toner bottle in a tilted condi tion after removing it 4004D221AA 4 Remove the seals from the two toner collecting ports 4025E008AA 5 Peel off the seals for blocking the two toner col lecting ports and place them over the toner col lecting ...

Page 44: ...ound the Waste Toner Collecting Port 9 Close the Left Door 4025E010AA 1 Open the Rear Left Cover 2 Remove the Waste Toner Bottle 4004D221AA 3 Wipe the areas around the Waste Toner Collect ing Port clean of spilled toner and dirt using a soft cloth dampened with water or alcohol 4004D222AB ...

Page 45: ...ee 7 Replacement of the Paper Dust Remover 3 To reinstall reverse the order of removal 4 Select Tech Rep Mode Counter Life and clear the count of Paper Powder Filter Ozone Filter 4025E011AA 1 Open the Front Door 2 Clean the Comb Electrode by moving the Comb Electrode Cleaning Lever In and Out several times NOTE Move the Comb Electrode Cleaning Lever slowly forward and backward until it stops 4025E...

Page 46: ...ce Do not leave the Imaging Unit exposed to light for a extended period of time as it may become damaged 1 Open the Front Door 2 Slide out the IU C M Y Bk E 22 3 Remove the LED Cleaning Jig and LED Cleaning Jig Pad 4025E014AA 4 Affix a LED Cleaning Jig Pad to the LED Clean ing Jig 4025E015AA 5 Clean the LED of the LPH Assy by moving the LED Cleaning Jig three reciprocating motions NOTE Use only th...

Page 47: ...ft cloth or cotton swab dampened with alcohol wipe clean the Fusing Entrance Guide Plate NOTES Use care when cleaning the Fusing Entrance Guide Plate as it is easy to damage Be careful the Fusing Unit can be HOT Do not place the Fusing Unit on a workbench with its terminal strip facing down as it can become damaged 4025E016AA 1 Holding onto the hook take out the Deodorant Filter 4025E017AA ...

Page 48: ...he main switch 2 Open the Right Door 4025E018AA 3 Unlock the blue lock levers at two places 4 Holding onto the blue lock levers at two places remove the Image Transfer Roller Unit 4025E019AB 1 Holding onto the blue lock levers at two places mount the Image Transfer Roller Unit 2 Lock the blue lock levers at two places NOTE Avoid touching the Transfer Roller surface as it may become damaged 4025E02...

Page 49: ...ith your hand to prevent if from dropping 1 Turn OFF the main switch 2 Open the Right Door 4025E018AA 3 Open the Left Door 4025E022AA 4 Grasp the handle and remove the waste toner bottle NOTES Raise the waste toner bottle gently before remov ing it If scattered toner has accumulated in the vicinity of the toner collecting port do not tilt the waste toner bottle when removing it Do not leave the wa...

Page 50: ...minal is stopped at the cutout in the guide on the copier side 4025E027AB Terminal 2 Supporting the Transfer Cleaner Assy with a hand remove two screws 3 Remove the Transfer Cleaner Assy 4 Remove protective paper taped to the Transfer Cleaner Assy 4025E028AA 5 Turn over the Transfer Cleaner Assy so that the brush faces upward 4025E029AA Brush 6 Uniformly apply the enclosed toner along the brush an...

Page 51: ...n even coat of toner on the Transfer Belt up to 15 mm from both edges NOTE The toner even if there is any remaining should NOT be used in the copier It is different from the Toner that is used in the Copier 4025E031AA 8 Holding onto both ends of the Transfer Belt rotate the Transfer Belt until the Blade of the Transfer Cleaner Assy contacts the location on the belt to which the toner has been appl...

Page 52: ...ug the power cord 4 Open the Front Door 13 Hold the handle and install the Waste Toner Bot tle in position 4025E009AA 14 Close the Left Door 4025E010AA 15 Close the Right Door NOTE Make sure that the door is locked in position both at front and rear 16 Turn ON the Power Switch 17 Select Tech Rep Mode Gradation Adjust and carry out Gradation Adjust 4025E021AA 5 Release the lock lever of the Imaging...

Page 53: ...87U005AA 9 Position the Imaging Unit Pull out Tray under the Imaging Unit and insert it all the way into position C4587U007AA 10 Supporting the Imaging Unit Pull out Tray with one hand and holding the T Handle with the other carefully slide the Imaging Unit out of the Main Unit After removing the Imaging Unit place it on a level surface and cover it with a light block ing cloth 11 Remove the Imagi...

Page 54: ...o light keep it shielded from light up to the time it is installed Carefully unseal the aluminum pack If the Imaging Unit is packed in the aluminum pack age again seal the package using tape or another means 4025U024AA 3 Remove the protective tapes C4587U013AA protective tape 4 Remove the shipping cushion CAUTION Make sure that the protective sheet is rolled up into the Imaging Unit as shown in th...

Page 55: ...ox 16 Plug in the power cord 17 Turn ON the Power Switch 18 Select Tech Rep Mode Gradation Adjust and carry out Gradation Adjust 6 Holding the underside of the Imaging Unit with your left hand gently insert the Imaging Unit with your right hand NOTE Insert the Imaging Unit until a click is heard 4025U029AB 7 Remove the Imaging Unit Cover 8 Check that the Imaging Unit has been inserted all the way ...

Page 56: ...r NOTE When opening the Upper Right Door be sure to support it with your hand until it is in the fully open position If you remove your hand from the Upper Right Door it may drop and the resulting impact may cause the hinges to bend 4025E041AA 4 Hold the handles at two places and slide out the Fusing Unit 4025E042AB 5 Hold the handles at two places and remove the Fusing Unit NOTE Please use care w...

Page 57: ...ld the handles at two places and place the Fusing Unit in position 4025E044AA 2 Hold the handles at two places and push the Fusing Unit into position 4025E044AB 3 Close the Upper Right Door 4025E046AA 4 Close the Right Door NOTE Ensure that both the front and rear sides are locked 4025E021AA ...

Page 58: ...FrameMaker Ver 5 5E PC CF2002 CF3102 DIS REASSEMBLY ADJUSTMENT 02 06 26 DIS REASSEMBLY ADJUSTMENT 14413 ...

Page 59: ...upply 3 PU201 F1 250 V 5 A F100 250 V 3 15 A DC Power Supply 2 PU2 100 V Area F1 125 V 4 A 200 V Area F1 250 V 4 A DC Power Supply 1 PU1 100 V Area F1 250 V 15 A F2 250 V 15 A F3 250 V 15 A F4 250 V 15 A 200 V Area F1 250 V 8 A F2 250 V 8 A F3 250 V 8 A F4 250 V 8 A DC Power Supply 1 PU1 F101 250 V 3 15 A F102 250 V 3 15 A F103 250 V 3 15 A F104 250 V 3 15 A ...

Page 60: ...that the assembly or unit secured can only be adjusted or set at the factory and should not be adjusted set or removed in the field Note that when two or more screws are used on the part in questions only one representa tive screw may be marked with red paint 2 Variable Resistors on Board Do not turn the variable resistors on boards for which no adjusting instructions are given in ADJUSTMENT ...

Page 61: ...l 4 IR Front Cover Remove the IR Lower Front Cover Loosen three screws and remove the IR Front Cover 5 IR Lower Front Cover Remove the pipe ends left and right Remove two screws and the IR Lower Front Cover 6 IR Left Cover Remove the IR Upper Cover Remove the IR Rear Cover Demount the IR Unit from the Copier Stand Remove four screws and the IR Left Cover 7 IR Upper Cover Remove the Original Cover ...

Page 62: ...screw and lift the Hopper Left Cover upward to take it off 5 Paper Output Cover Open the Upper Right Door Remove two screws and the Paper Output Cover 6 Rear Upper Cover Remove the Paper Output Cover Remove the Rear Cover Remove the deodorant filter Remove three screws and the Rear Upper Cover 7 Rear Cover Remove seven screws and the Rear Cover 8 Rear Right Cover Open the Right Door Remove the Rea...

Page 63: ...on the board be sure to ground your body Symbol Name Removal Procedure CCD Unit D 8 PWB B Image Processing Interface Board D 10 PWB C Image Processing Board D 10 Upgrade the firmware after the replacement PWB IC Scanner Motor Drive Board Remove the IR Rear Cover Remove 11 screws and the reinforcement frame Remove the Scanner Motor Drive Board UN201 Control Panel Remove the four rubber caps on the ...

Page 64: ...FrameMaker Ver5 5E PC CF3102 CF2002 DIS REASSEMBLY ADJUSTMENT 02 06 010 D 6 HV2 PWB F PWB LED PU1 PU2 PWB S1 PWB S PWB I HV3 HV1 PWB PIC PWB G PWB IO 4025D008AA 4025D009AB ...

Page 65: ...after the replacement HV1 High Voltage Unit PC DRUM CH D 13 HV2 High Voltage Unit Image Transfer Neu tralizing D 13 HV3 High Voltage Unit Developing Bias D 13 PU1 DC Power Supply 1 D 15 PU2 DC Power Supply 2 Remove the Paper Output Cover and Rear Upper Cover Remove four screws and the PWB cover Remove three screws and DC Power Supply 2 PWB LED LED Drive Board D 41 PWB I Paper Size Detecting Board ...

Page 66: ...he Image Processing Interface Board cable from the CCD Unit 4025D113AA Image Processing Interface Board 4 Unplug connector 4025D114AA 5 Remove four screws and the CCD Unit NOTE Make doubly sure that you remove the correct screws If any screw that should not be removed is removed it results in the distance between the lens and the CCD sensor or tilt in these parts being varied 4025D115AA ...

Page 67: ...rewdriver or similar tool to tap to move it as a varied distance between the CCD sensor and lens results Adjustment Procedure If the specified width on the copy is less than the specifications move the CCD Unit to the left If the specified width on the copy is longer than the specifications move the CCD Unit to the right Moving the CCD Unit over 1 mm results in the zoom ratio being varied about 2 ...

Page 68: ... remove the cord clamps of the Original Size Detecting Sensors 4 Remove 12 screws and the Image Processing Board lid 4025D010AC 5 Remove the Image Processing Interface Board cable 4025D011AB 6 Unplug all connectors of the Image Processing Board 4025D012AA 7 Remove the IR hookup cable NOTES Be sure to hold onto the connector when removing or installing the cable NEVER pull on the cable At reinstall...

Page 69: ...aker Ver5 5E PC CF3102 CF2002 DIS REASSEMBLY ADJUSTMENT 02 06 010 D 11 8 Remove two screws 4025D013AA 9 Remove eight screws and the Image processing Board Upgrade the firmware after the replacement 4025D014AA ...

Page 70: ...move the Rear Cover 2 Remove eight screws at the I F cable connection five on the side face and three on the rear face of the copier 4334O014AA 4334O015AA Copier Side Face Copier Rear Face 3 Slide the Image Control Board to the left off the copier Remount IC202 and upgrade the firmware after the replacement 4334O016AA ...

Page 71: ...move the Rear Left Cover 3 Remove the Rear Right Cover 4 Remove five screws and the harness protective metal bracket 4025D015AA 5 Remove three screws and unplug three connec tors Then remove the rear left metal bracket 4025D017AA 6 Unplug all connectors from the Main Board 7 Unplug the two connectors from the Option Inter face Board 8 Unplug the two connectors from the PIC Board 4025D016AA 9 Remov...

Page 72: ...lizing 4025D020AA 13 Disconnect connectors terminals and flat cable from the High Voltage Unit PC Drum CH 14 Remove two screws Then lift the High Voltage Unit PC Drum CH and take it out to the front 4025D021AA 15 Disconnect the connectors and flat cable from the High Voltage Unit Developing Bias 16 Remove two screws Then lift the High Voltage Unit Developing Bias and take it out to the front 4025D...

Page 73: ...Upper Cover Exit Tray Then renumber the remaining steps 2 Remove six screws and the PWB cover 4025D024AA 3 Remove four screws and the PWB cover 4025D025AA 4 Unplug all connectors from DC Power Supply 1 4025D026AA 5 Remove nine screws and slide DC Power Supply 1 to the right 4025D027AC 6 Remove DC Power Supply 1 4025D028AA ...

Page 74: ...main unit wrap it in the light shielding cloth and store it in a dark place DO NOT leave the Imaging Unit exposed to light for a extended period of time as it will become damaged 4 Remove the hopper left cover 5 Remove the Front Right Cover 6 Remove two screws and the Front Door Switch cover 4025D029AA 7 Disconnect terminals Terminals from top downward blue white and green 4004D045AA 8 Disconnect ...

Page 75: ...he Toner supply shutter is opened if the Imaging Unit Lower Cover is not used 3 Removed the Rear Left Cover 4 Remove five screws and the harness protective metal bracket 4004D229AA 5 Remove two screws and unplug one connector on the PIC Board 4025D142AA 6 Unplug four connectors from the IO Board 7 Disconnect two hookup connectors 4025D031AB NOTE When unplugging the connector make sure that connect...

Page 76: ...d position at four places NOTES During the locking procedure use care not to touch the LED surface Should the LED surface be touched clean it with the LED Cleaning Jig 4004D024AA 10 Remove four screws and slide out the LPH Unit NOTE When the LPH Unit is to be replaced remove the ATDC Sensor from the old LPH Unit and remount it on the new one This step is not however neces sary if the IU is replace...

Page 77: ...tor Assy 4025D036AA 5 Remove two screws and the Scanner Motor 4025D037AA Reinstallation of the Scanner Motor Assy 1 Temporarily secure the Scanner Motor Assy using three screws 2 Hook the spring 3 With the Scanner drive gear set screw located on the right hand side as shown on the left slide the Scanner Motor Assy to the left and check that it is returned to the original position by the tension of...

Page 78: ...n shown and remove one mounting screw each at the front and rear end 4004D202AA NOTE Do not remove the Scanner Positionng Screws 4025D038AA Scanner mounting Screws Scanner positioning Screws 3 Take out the Scanner Assy by turning it in the direction of the arrow shown 4004D017AB 4 Remove one screw and the holder 5 Remove the flat cable 6 Remove the Scanner Assy 4025D039AA ...

Page 79: ...holding bracket and flat cable 4025D041AB 4 Remove four screws and the control panel base 4025D040AA 5 Remove the IR Front Cover 6 Remove the Original Glass 7 Remove 14 screws and the Optical Cover 4025E006AB 8 Remove the Scanner Assy D 20 9 Remove the IR Right Cover and the IR Left Cover 10 Unhook the springs of the Scanner Drive Cables on the hook side one each at the front and in the rear 4002D...

Page 80: ...lley toward the front 4002D112AA 13 Remove one screw and then slide the rear pulley toward the front 4002D113AA 14 Remove one screw and the Scanner drive gear 4025D043AA 15 Snap off the C clip and remove the bushing front 4025D044AA 16 Slide the shaft toward the rear and lift it Then remove the front and rear pulleys 17 Remove the Scanner Drive Cables 4025D045AA ...

Page 81: ...10 D 23 4 Winding of the Scanner Drive Cables 4025D045AA Pulley A Pulley D Pulley E Pulley B Pulley F Pulley C 1 Position the round bead of the Scanner Drive Cable in the pulley as shown NOTE Make sure that the bead snugly rests in the slit in the pulley Front 4025D046AA ...

Page 82: ...e from the front toward the rear side NOTE Make sure that no part of the cable rides on the other 4025D048AA 4 Slip the Cable Holding Jig onto the pulley to secure the cable in position 4025D049AA 5 Position the round bead of the Scanner Drive Cable in the pulley as shown NOTE Make sure that the bead snugly rests in the slit in the pulley Rear 4025D051AA 6 Wind the fixed bead end of the cable arou...

Page 83: ...part of the cable rides on the other 4025D053AB 8 Slip the Cable Holding Jig onto the pulley to secure the cable in position 4025D054AB 9 Install the front and rear pulleys and bushings onto the shaft and fit the C clip 4025D056AA 10 Mount the Scanner drive gear on the shaft and secure it using one screw NOTE Allow a clearance of about 0 1 mm between the Scanner drive gear and bushing 4025D057AA 4...

Page 84: ... cable around pulley C and pulley B then hook the bead onto the Adjust able Anchor Front 4002D008AA Pulley C Pulley B 14 Wind the hook end of the cable around pulley A and pulley B 4002D009AA Pulley B Pulley A 15 Fit the hook end of the cable to the spring and then hook the spring to the catch in the frame NOTE Select the appropriate catch in the frame from among three so that the spring measures ...

Page 85: ...rs Carriage D 44 NOTE Whenever the Scanner Drive Cables have been removed be sure to carry out the FD Mag adjustment procedure D 68 16 Wind the bead end of the cable around pulley F and pulley E then hook the bead onto the Adjust able Anchor Rear 4002D010AA Pulley F Pulley E 17 Wind the hook end of the cable around pulley D and pulley E 4002D011AA Pulley E Pulley D 18 Fit the hook end of the cable...

Page 86: ...rt dampen it with alcohol Do not use a cloth wet with water If any solvent is to be used select one from among the following IPA ethyl alcohol PPC Cleaner and Solmix AP 7 When the solvent has been used for cleaning make 28 or more copies using A3 blank sheets of paper to remove image noise 1 Remove the Transfer Belt Unit Meintenance Schedule Section 2 Wipe the surface of the Transfer Belt with a d...

Page 87: ...ess protective metal bracket 4025D015AA 5 Remove three screws unplug three connectors and remove the rear left metal bracket 4025D017AA 6 Unplug all connectors of the IO Board 7 Unplug two connectors of the Option Interface Board 8 Unplug two connectors of the PIC Board 4025D016AA 9 Remove two screws and the power line mounting bracket for the 2nd Drawer 4025D018AA 10 Remove 11 screws and lift the...

Page 88: ...the LPH Unit D 17 12 Unplug two connectors 13 Remove four screws and Imaging Unit Motor Y 4025D135AA 14 Unplug two connectors each 15 Remove four screws each and Imaging Unit Motor M C Bk 4025D136AA 1 Remove the PWB Box D 13 steps 1 through 10 2 Unplug one connector 3 Remove four screws and the Main Motor 4004D060AA ...

Page 89: ...gh 10 2 Remove four screws and the Cooling Fan Assy 4025D060AA 3 Unplug one connector 4 Remove four screws and the Fusing Drive Motor 4004D062AB 1 Remove the PWB Box D 13 steps 1 through 10 2 Remove four screws and the Cooling Fan Assy 4025D060AA 3 Remove two screws and the harness holder 4004D063AA 4 Unplug two connectors 5 Remove three screws and the Fusing Pressure Retraction Motor Assy 4004D06...

Page 90: ...ove the bushing 8 Remove two screws and the Fusing Retraction Position Sensor mounting bracket 4004D125AA 9 Remove the gear black 4004D209AA 10 Remove two screws and the Fusing Pressure Retraction Motor 4004D126AB Precaution for Reinstallation When reinstalling the harness holder make sure that the protrusion on the backside of the holder fits into the hole in the metal bracket 4004D065AB ...

Page 91: ...ews and the Cooling Fan Assy 4025D060AA 3 Disconnect connectors terminals and flat cable 4 Remove six screws and slide the High Voltage Unit Image Transfer Neutralizing to the left and off the copier 4025D020AA 5 Unplug one connector 6 Remove two screws and the 1st Image Transfer Pressure Retraction Motor 4004D069AA 1 Remove the Right Front Cover 2 Unplug one connector 3 Remove four screws and the...

Page 92: ...lug one connector 3 Remove two screws and the Front Door Switch Assy 4025D050AA 4 Remove one screw and the gear 4025D055AA 5 Remove two screws Then turn the Toner Replenishing Motor Y M counterclockwise and take it off the copier 4025D061AA 1 Open the Right Door 2 Unlock the tab and remove the Transport Unit Assy 4025D062AA 3 Remove four screws unplug one connector and remove the gear assy and mot...

Page 93: ...er Pressure Retraction Motor 4025D064AA 1 Open the Right Door 2 Unlock the tab and remove the Transport Unit Assy 4025D062AA 3 Remove one screw ground wire and ground plate 4 Unplug five connectors and remove the Transport Unit Assy 4025D065AA 5 Snap off the C clip and remove the gear 6 Unhook the spring 4025D066AA 7 Remove three screws and the holder 4025D093AA ...

Page 94: ...102 CF2002 DIS REASSEMBLY ADJUSTMENT 02 06 010 D 36 8 Snap off the C clip and remove two Gears 4025D067AA 9 Remove three screws and the mounting bracket 4025D068AA 10 Remove two screws and the Transport Roller Motor 4025D069AA ...

Page 95: ...r 2 Remove one screw and the Tech Rep Setting Switches Board Assy 4025D070AA 3 Unplug three connectors 4025D071AA 4 Open the Right Door 5 Remove four screws and the Synchronizing Roller entrance guide 4025D072AA 6 Remove five screws and the cover 4025D073AA 7 Remove three screws unplug one connector and remove AIDC Registration Sensor 1 4025D074AA ...

Page 96: ... remove the Guide Assy 4025D076AA 3 Remove two screws and holding the LPH Assy with hands unlock it NOTES Do not touch the LED by hand Clean the LED if touched by hand using the LED cleaning jig Be careful about the spring that can spring off when the LPH Assy is unlocked 4025D077AA 4 Peel off the seal unlock the LPH Assy and remove the flat cable 5 Unhook the springs 6 Perform the same procedure ...

Page 97: ...081AA 3 Insert the flat cable into the LPH Assy and lock the LPH Assy 4 Affix the seal that comes with the LPH Assy to the location shown on the left NOTE Failure to affix the seal could cause the flat cable to come off the LPH Assy 4025D080AB Seal Seal Flat Cable Flat Cable Double Sided Adhesive Tape 5 Holding onto both ends of the LPH Assy align the portions shown on the left and then press it d...

Page 98: ...Hook the springs and press the LPH Assy down into the locked position 4025D085AA 8 Remove the LPH Assy mounting jigs 9 Install the two screws 4025D083AA 10 Install the two screws to secure the guide assy 11 Connect the connector 4025D087AA 1 Remove the LPH Unit D 17 2 Remove two screws unplug the connector and remove the ATDC Sensor 4025D088AA ...

Page 99: ... 14 Removal of the LED Drive Board 1 Remove the LPH Unit D 17 2 Remove two screws each unplug one connector each and remove each guide assy 4025D089AA 3 Remove the flat cables eight 4025D090AB 4 Remove eight screws unplug two connectors and remove the LED Drive Board 4025D092AA ...

Page 100: ...The adjustment procedures must be carried out in the order of printer and IR 3 1 ADJUSTMENT JIGS AND TOOLS USED Imaging Unit Removal Jig T Handle LED Cleaning Jig LED Cleaning Jig Pad Scanner Drive Cable Holding Jig LPH Assy Mounting Jigs 4025D118AA 4004D185AA 4004D186AA 4025D120AA 4025D121AA ...

Page 101: ...ve the IR Rear Cover 2 Remove 11 screws and the reinforcement frame 3 Loosen the three screws that secure the Scanner Motor mounting bracket 4004D188AC 4 With the Scanner drive gear set screw located on the right hand side as shown on the left slide the Scanner Motor Assy to the left and check that it is returned to the original position by the tension of the spring Perform this step three times 5...

Page 102: ...und Focus Positioning of the Scanner and 2nd 3rd Mirrors Carriage must be completed 1 Slide the 2nd 3rd Mirrors Carriage to the center until it is pressed up against the cutouts in the rails 4025D122AA 2 Turn the cable length adjusting screw so that the 2nd 3rd Mirrors Carriage contacts the cutouts in the rails 4025D123AA 1 Slide the 2nd 3rd Mirrors Carriage to the position shown on the left 4025D...

Page 103: ... Press the following keys in this order Stop 0 0 Stop 0 1 NOTE Ensure appropriate security for Tech Rep mode setting procedures They should NEVER be shown to any unauthorized person not involved with service jobs 2 Producing a Test Print 1 Call the Tech Rep Mode to the screen 2 Touch Test Print 3 Select the desired test pattern type 4 Make the necessary settings 5 Press the Start key ...

Page 104: ...t key to let the copier produce a test pattern 7 Check the dimension of width A on the test pattern 8 If width A falls outside the specified range change the setting using the Up Down key If width A is longer than the specifications make the setting value smaller than the cur rent one If width A is shorter than the specifications make the setting value greater than the cur rent one 9 Press the Sta...

Page 105: ...aint If the image is faint 22 Touch these keys in this order Machine Adjust PRT Area Top Margin 23 Touch 2nd Transfer Timing and then use the Down key to decrease the setting NOTE Decreasing the setting makes transfer timing faster An abnormally low setting could however result in a paper misfeed 24 Touch END 25 Produce a halftone test pattern again 26 Check the image on the leading and trailing e...

Page 106: ...dth A falls outside the specified range change the setting using the Up Down key If width A is longer than the specifications make the setting value smaller than the cur rent one If width A is shorter than the specifications make the setting value greater than the cur rent one 9 Press the Start key to let the copier produce a test pattern 10 Check the dimension of width A on the test pattern 11 If...

Page 107: ...on the test pattern 8 If width A falls outside the specified range change the setting using the Up Down key If width A is longer than the specifications make the setting value smaller than the cur rent one If width A is shorter than the specifications make the setting value greater than the cur rent one 9 Press the Start key to let the copier produce a test pattern 10 Check the dimension of width ...

Page 108: ...10 If width of A or B falls outside the specified range Change the setting using the Up Down keys If width A or B is longer than the specifications make the setting value smaller than the current one If width A or B is shorter than the specifications make the setting value greater than the current one 11 Press the Start key to let the copier produce a test pattern 12 Check width A and width B on t...

Page 109: ...ent Procedure 1 Call the Tech Rep Mode to the screen 2 Touch these keys in this order Machine Adjust Color Shift Correction 3 Select Cyan and SINGLE 4 Press the Start key to let the copier produce a test pattern 5 Check to see if the black cross at the location shown below deviates or not 6 If it deviates change the setting using the Up Down key Setting Instructions C4025o276AA ...

Page 110: ...decrease the setting If the cross deviates in the direction of D increase the setting Direction of C Direction of D C4025s313AA C4025s314AA Adjustment for Y direction Check point Y If the cross deviates in the direction of C increase the setting If the cross deviates in the direction of D decrease the setting Direction of C Direction of D C4025s315AB C4025s316AB ...

Page 111: ...djust Color Shift Correction 3 Select SINGLE 4 Press the Start key to let the copier produce a test pattern 5 Fold the test pattern in half lengthwise 6 Check black lines A and B for deviation 7 If there is any deviation touch the Black key and change the setting using the Up Down key Setting Instructions Check point A B If the lines deviate in the C direction decrease the setting If the lines dev...

Page 112: ...each location 9 Find the number on the panel to which the location of white lines or black lines in FD checked in step 5 corresponds 10 Select the color C M Y or Bk in which white lines or black lines in FD occur If the lines occur only in green on the test pattern select Y 11 Touch the corresponding number on the panel It is then highlighted and the setting value is displayed besides the highligh...

Page 113: ...ttern and then lower the Original Cover 6 Press the Start key to let the copier start scanning the original 7 Repeat steps from 2 to 6 twice a total of three cycles 8 The Adj Value and Conv Value will be displayed for Max and Highlight of each color C M Y Bk 9 Check the Conv Value according to the following procedure Max 0 100 and Highlight 0 60 It completes the adjustment procedure If neither Max...

Page 114: ...n 2 Touch these keys in this order Image Adjust PRT Max Density 3 Select the color to be adjusted 4 Enter the new setting from the 10 Key Pad To increase the maximum amount of toner sticking increase the setting value To decrease the maximum amount of toner sticking decrease the setting value 5 Touch END to return to the Image Adjust menu screen 6 Touch Stabilizer 7 Touch Stabilizer Mode 8 Press t...

Page 115: ...o the screen 2 Touch these keys in this order Image Adjust PRT Highlight 3 Select the color to be adjusted 4 Enter the new setting from the 10 Key Pad To make the Highlight portion darker increase the setting value To make the Highlight portion lighter decrease the setting value 5 Touch END to return to the Image Adjust menu screen 6 Touch Stabilizer 7 Touch Stabilizer Mode 8 Press the Start key t...

Page 116: ...s in this order Image Adjust Background Voltage Margin 3 Select the color to be adjusted 4 Enter the new setting from the 10 Key Pad To make the background level foggier increase the setting value To make the background level less foggy decrease the setting value 5 Touch END to return to the Image Adjust menu screen 6 Touch Stabilizer 7 Touch Stabilizer Mode 8 Press the Start key to validate the a...

Page 117: ...onmental conditions Adjustment Procedure 1 Call the Tech Rep Mode to the screen 2 Touch these keys in this order Image Adjust ATDC Level Setting 3 Select the color to be adjusted 4 Enter the new setting from the 10 Key Pad To increase T C increase the setting value To decrease T C decrease the setting value 5 Touch END to validate the adjustment value 6 Check the copy image for any image problem ...

Page 118: ...justment Procedure 1 Call the Tech Rep Mode to the screen 2 Touch these keys in this order Image Adjust AE Adjust 3 Enter the new setting from the 10 Key Pad To make the background level foggier change the setting value to 3 or 4 To make the background level less foggy change the setting value to 0 or 1 4 Touch END to validate the adjustment value 5 Check the copy image for any image problem ...

Page 119: ...these keys in this order Image Adjust 2nd Transfer Adjust 3 Select the side of the image First side or Second side on which the transfer failure at the trailing edge occurs 4 Enter the new setting from the 10 Key Pad To increase the ATVC value in the direction of a foggier image decrease the setting value To decrease the ATVC value in the direction of a less foggy image increase the setting value ...

Page 120: ...rocedure 1 Call the Tech Rep Mode to the screen 2 Touch these keys in this order Machine Adjust Fuser Temp 3 Select the paper type and Fusing Roller type 4 Enter the new setting from the 10 Key Pad If fusing performance is poor increase the setting The temperature does not change immediately when the setting is change Wait a while before performing the subsequent steps 5 Touch END to validate the ...

Page 121: ...s order Machine Adjust Fuser Speed 3 Select the transport speed at which the brush effect or blurred image has occurred 4 Enter the new setting from the 10 Key Pad If brush effect is evident decrease the setting If a blurred image occurs increase the setting 5 Touch END to validate the adjustment value 6 Check the copy image for any image problem Transport Speed 31 cpm Copier 20 cpm Copier 135 mm ...

Page 122: ...g keys Stop 0 Stop 3 2 Using the tip of a pen or similar object touch the four crosses on the screen in sequence NOTES These crosses may be touched in any order but be sure to touch the center of each cross Use care not to damage the screen surface with the tip of the pen 1155D191CA 3 The cross touched changes into a grid marker that consists of a square with a cross superim posed 4 Touch END 1155...

Page 123: ...p Down key If the 0 mm position on the sample copy is on the right side of the correct 0 mm position perpendicularly to the feeding direction less than 1 mm decrease the setting If the 0 mm position on the sample copy is on the left side of the correct 0 mm position perpendicularly to the feeding direction exceeding 1 mm increase the setting 8 Press the Start key to make a copy 9 Check the image o...

Page 124: ...ting using the Up Down key If the 10 mm position on the sample copy is on the right side of the correct 10 mm posi tion parallel to the feeding direction less than 9 mm decrease the setting If the 10 mm position on the sample copy is on the left side of the correct 10 mm position parallel to the feeding direction exceeding 11 mm increase the setting 8 Press the Start key to make a copy 9 Check the...

Page 125: ...produced 7 If the image does not meet the specifications change the setting using the Up Down key If the specified width on the copy is less than 199 mm increase the setting If the specified width on the copy exceeds 201 mm decrease the setting 8 Press the Start key to make a copy 9 Check the image on the copy to see if the specifications are met 10 If it fails to meet the specifications change th...

Page 126: ...heck the image on the copy produced 7 If the image does not meet the specifications change the setting using the Up Down key If the specified width on the copy is less than 298 5 mm increase the setting If the specified width on the copy exceeds 301 5 mm decrease the setting 8 Press the Start key to make a copy 9 Check the image on the copy to see if the specifications are met 10 If it fails to me...

Page 127: ...original correctly Adjustment Procedure 1 Place a blank sheet of A3 or 11 17 paper on the Original Glass and lower the Origi nal Cover 2 Call the Tech Rep Mode to the screen 3 Touch these keys in this order Machine Adjust Org Detect Sensor 4 Press the Start key If the adjustment has been successfully made it completes the adjustment procedure If the adjustment has turned out to be unsuccessful che...

Page 128: ... OF THE MECHANICAL COUNTER OPTION 1 Open the Front Door 2 Remove the Panel Cover 3 Open the Right Door 4 Cut out the knockout in the Front Right Cover C4004U267AA 5 Remove two screws and the Right Front Cover C4004U268AA 6 Secure the mechanical counter with one screw C4004U269AA 7 Connect one connector C4004U270AA ...

Page 129: ...nd run Org Detect Sensor of Machine Adjust 1 Remove the IR Right Cover and Original Glass 2 Remove the PWB Cover 3 Connect the connector of the Original Size Detecting Sensor to be added to the Image Processing Board 4 Replacing the PWB Cover 5 Mount the Original Size Detecting Sensor option How the Harness should be Placed G FD1 Optional for the U S A FD3 Optional for the Europe U S A Taiwan CD2 ...

Page 130: ...ch in the OFF position unplug the power cord from the power out let 4 Plug the power cord into the power outlet and turn ON the Power Switch Three different types of F W appear on the Touch Panel MSC Image Control Board PWB F IR Image Processing Board PWB C PRT PIC Board PWB PIC 2 Remove one screw and the metal Blanking Plate 4025D110AA 3 Insert the memory card into the slot 4025D111AA 5 Select th...

Page 131: ...the Power Switch 12 Call the Tech Rep mode to the screen 13 Select ROM Version 14 Check that the ROM version matches the version marked on the memory card Action When Data Transfer Fails If NG appears on the Touch Panel indicating that rewriting has been unsuccessful in which case the Start key lights up red take the following steps 1 Perform the data rewriting procedure again 2 If the procedure i...

Page 132: ...rom the NEW Image Control Board PWB F and then install the RAM IC IC202 from the old Image Control Board PWB F on the NEW Image Control Board PWB F NOTE If the Image Control Board PWB F has been replaced and RAM IC IC202 is not to be remounted be sure to record all data of Utility mode and Tech Rep mode functions and make the entries again of these numeric values 4025D137AA 4025D137AA NOTE Note th...

Page 133: ...FrameMaker Ver5 5E PC CF2002 CF3102 SWITCHES ON PWBs TECH REP SETTINGS 02 06 26 SWITCHES ON PWBs TECH REP SETTINGS 14413 ...

Page 134: ...ialize Point Resets a paper misfeed malfunction and erratic display MEMORY Memory Clear Test Point Clears data of various kinds stored in mem ory COM COM Test Point Ground used for memory clear TROUBLE Trouble Reset Switch Resets the following malfunction displays Exposure Lamp system C04XX Fusing system C05XX Scanner system C06XX ROM contents failure detected upon start C3FF SERVICE Not used 4004...

Page 135: ...it across TP1 and TP3 4 Check that the message Memory Clear Completed is displayed on the Touch Panel and then touch END 5 The following types of data are cleared Utility mode Input User s Choice 1 2 Tech Rep mode System Input Administrator Input Security mode Counter Setting Touch Panel Adj NOTES If the copier exhibits an erratic display or operation unplug and plug in the power cord turn OFF and...

Page 136: ...t cleared Clearing Method Data Cleared Front Door Open Close Trouble Reset Switch Initialize Memory Clear Misfeed display Malfunction display Fusing Optical Scanner C3FFF Others Erratic operation display Utility Mode Input User s Choice 1 2 Tech Rep Mode System Input Administrator Input Security Mode Counter Setting Touch Panel Correction Mode ...

Page 137: ...tility key 2 The Utility mode screen will appear Exiting Touch the Fin Time key Changing the Setting Value in Utility Mode Functions Use the ID key to change the sign to sign or vice versa Use the Up Down key to enter or change the setting value Use the 10 Key Pad to enter the setting value To change the setting value first press the Clear key before making an entry ...

Page 138: ...e Indicator Unit Change Reset Mode Job Memory Input Confirmation Beep Date Time Set Memory Recall Auto Panel Reset Energy Saver Sleep Auto Clear Mode Specialty Paper Priority exit tray Intelligent Sorting Criss Cross Mode Priority Device ACS Jugement Level Adjust 2in1 4in1 Booklet Copy Zoom Auto select Paper for Small Original 4in1 Copy Order Centering Copy Scan User s Choice 1 Admin Mode ...

Page 139: ... Track Mode Copy Track Data Copy Print Copy Track Data Copy Copy Track Data Print Copy Track Set Expert Mode Gradation Adjust Thick Paper and OHP Film Image Density Color Shift Correction C Color Shift Correction M Color Shift Correction Y Color Shift Correction Bk Stabilizer PRT Area Top Margin PRT Area Left Margin PRT Area Dup Left Margin Center Binding Position Monochrome Image density correct ...

Page 140: ... registered The copier is initialized at the following timings The Power Switch is turned ON Panel is reset An Interrupt mode is canceled Job Memory Input To register the copy mode functions being currently set as a job program or check or delete a job program that has previously been registered Up to ten different job programs can be regis tered Copy Program Recall as a Utility function is used t...

Page 141: ...n Auto Panel Reset is activated Use the 10 Key Pad to enter the Auto Panel Reset time 1 to 9 min The default setting is 1 min 1 min 1 to 9 No The default priority display is Copy Energy Saver To set the time it takes the copier to enter the Energy Saver mode after a copy cycle has been com pleted or the last key operated Use the 10 Key Pad to enter the time 10 to 240 min The default setting is 15 ...

Page 142: ...at stacks sorted copy sets in a crisscross manner i e one set stacked lengthwise on top of another set stacked cross wise The default setting is Yes Yes No Priority Device To set the print timing for the PC print jobs received The default setting is Copier Copier After the reception of all data Printer After the reception of data for each page ACS Juge ment Level Adjust To set the criterion level ...

Page 143: ...that were provided when the pro gram was registered calling up that particular program is disabled Purpose Setting Precautions To check each unit for life The life indicator of each unit is displayed Allows a list of counter counts to be printed Purpose Setting Precautions To clear the life counters for the Trans fer Roller Unit and Paper Dust Remover Ozone Filter When User is selected for Trans f...

Page 144: ...Sleep Mode To display the option of No for the Sleep setting screen available from User s Choice 1 The default setting is No Yes No Full Bleed paper selection To establish the full bleed paper size The default setting is 305 x 457 mm or 12 x 18 Metric areas 311 x 457 mm 305 x 457 mm Inch areas 12 1 4 x 18 12 x 18 Language Selected To select the language of the LCD display messages The counter outp...

Page 145: ...ed for each individual account or all at once Since it is impossible to display all 99 accounts at once on the screen they are divided into 20 groups each con sisting of five accounts and there are ten different one touch keys displayed Example 1 20 accounts 001 to 005 Copy Track Data Copy To display the copy counter data of each account Copy Track Data Print To display the print counter data of e...

Page 146: ... color shift Automatic correction Pressing the Start key will let the copier produce a test pattern according to the current color shift condition Manual correction Check the test pattern for color shift amount in each of the X Y and direc tions and fine adjust using the Up Down key Fine adjust in X and Y directions for color shift of cyan magenta and yellow For color shift of black adjust tilt in...

Page 147: ...mage sta bilization sequence When the Start key is pressed the histori cal data is cleared and image stabilization sequence is carried out based on the ini tial values PRT Area Top Margin To vary the print start position in the FD direction for each of different paper types in the 1st Drawer Select the appropriate position on the paper type setting dial according to the type of paper loaded in the...

Page 148: ...of the center staple position and folding position independently of each other The adjustment range is 7 0 mm to 7 0 mm in 1 mm increments Monochrome Image den sity correct This func tion is only available on the 20 cpm copier To fine adjust the image den sity for black copies The fine adjustment can be made over a range of a total of five steps two darker levels and two lighter levels around the ...

Page 149: ...ith service jobs Procedure 1 Press the Utility key 2 Press the Meter Count key 3 Press the following keys in this order Stop 0 0 Stop 0 1 4 The Tech Rep Mode menu will appear Exiting Touch the Fin Time key Changing the Setting Value in Tech Rep Mode Functions Use the ID key to change the sign to sign or vice versa Use the Up Down key to enter or change the setting value Use the 10 Key Pad to enter...

Page 150: ... Toner Supply Feeding double sided THIN PAPER Top Margin Left Margin Dup Left Margin Zoom for FD Fuser Nip Fuser Temp Fuser Speed Org Detect Sensor PRT Area IR Area Loop Adjust Color Shift Correction LPH Rank Center Binding Position Memory Hard Disk Adjust Memory Check Compress Extension Check Memory Bus Check Work Memory In Out Check Hard Disk R W Check Hard Disk Format Machine Adjust Image Adjus...

Page 151: ...ut Memory Recall FLS Paper Unit Change Book Erase Center Peripheral Setting Tel Input Counter Life Jam Trouble Warning Maintenance State Confirm I O Check Table IU Lot No Level History 1 Color Shift Option Check Level History 2 Temp Humidity Paper Passage CCD Check LPH Status Tech Rep Mode Org Detect Option Sensor Hard Disk ...

Page 152: ...nput List Output Image Processing Counter Test Print Gradation Pattern Halftone Pattern Lattice Pattern Solid Pattern Color Sample 8 Color Solid Pattern LPH Pattern Gradation Adjust Tech Rep Mode e mail Modem I O Check Tray Volume Adjust Sensor Auto Adjust Detail Setting CT ID DT ID Mail Address CT ID DT ID TEL No Initial Transmission Date Time Input Common DT RAM Clear Detail Setting Date Time In...

Page 153: ...sing speed with transport speed Make the adjustment for each paper type Brush effect Blurred image A brush effect will occur at the trailing edge if the fusing speed is faster than the trans port speed A blurred image will occur on both edges at around the center if the fusing speed is slower than the transport speed 135 mm s plain paper 90 mm s plain paper This function is only available on the 2...

Page 154: ...unted or the LPH Unit is replaced with a new one Select the paper source and press the Start key Check the test pattern and adjust so that the void amount on the left edge of the paper falls within the range of 3 0 5 mm Dup Left Margin To vary the print start posi tion in the CD direction for each paper source in the 2 Sided mode When the Duplex Unit is set up When the image on the backside of a 2...

Page 155: ...posi tion in the CD direction When the Original Glass or Original Width Scale is replaced With a scale placed in parallel with the Original Length Scale and with the lead ing edge of the scale pressed up against the Original Width Scale make a copy of the scale Since a void image occurs on the copy corresponding to the 0 mm portion of the scale due to the shadow of the Orig inal Width Scale and Or...

Page 156: ...curs Adjust for each of the drawers Manual Bypass Table and Duplex Unit Adjust also for each of different transport speeds 135 mm s 6 to 6 90 mm s 10 to 10 CF2002 only 60 mm s 15 to 15 Use Paper Passage for paper passage check Color Shift Correction To automatically or manually correct color shift if any occurs When color shift occurs Automatic correction Press the Start key which lets the copier ...

Page 157: ... the LPH Unit is replaced When the LPH Assy is replaced Let the copier produce LPH Pattern of Test Print and correct intensity between chips in which the FD white line or black line occurs Standard 4 FD white line Increase the setting value FD black line Decrease the setting value Center Binding Position To adjust the positions of center staple and folding for the Finisher Adjust each of the cente...

Page 158: ...quence is dis played in percentage Compress Extension Check To check whether compression and decompression are carried out prop erly If the copy image is faulty Pressing the Start key will automatically start to complete a compression decom pression check sequence The check result will be displayed OK or NG Memory Bus Check To check to see if image data is cor rectly transferred from IR to memory ...

Page 159: ... mounted Pressing the Start key will start the hard disk R W check sequence and be termi nated automatically The check result will be displayed OK or NG Hard Disk Format To format the hard disk When the hard disk is mounted When the hard disk is to be ini tialized Pressing the Start key will start the hard disk formatting sequence and be termi nated automatically The sequence for format is 1st phy...

Page 160: ...has been changed be sure to run an image stabilization sequence to make valid the new value Background Voltage Margin To make an auxiliary adjust ment of the background volt age margin setting value after Gradation Adjust When a foggy background occurs If the setting value has been changed be sure to run an image stabilization sequence to make valid the new value ATDC Level Setting To adjust the T...

Page 161: ...f gradation and max density are faulty even after a Stabi lizer has been run Pressing the Start key will let the copier clear the historical data of the image sta bilization control and run an image stabi lization sequence based on the default settings ATDC Toner Supply To adjust the set T C level by replenishing an auxiliary supply of toner when a low ID occurs due to a lowered T C after large nu...

Page 162: ...put Upon setup When the IR Unit is replaced The IR and printer have been separately adjusted and it is necessary to load the adjustment and other data of the IR side when the IR is con nected to the printer The data is loaded at the timing when the Power Switch is turned OFF and ON after the IR serial number has been entered and END has been touched on the Serial Input screen Tel Input To enter th...

Page 163: ...to replace the unit When User is selected Copying is inhibited When Service is selected Life warning Upon setup The following are the default settings Toner Cartridge User Waste Toner Bottle Service Fusing Unit Service Imaging Unit Service Transfer Roller Unit Service Paper Powder Filter Ozone Filter Service Punch Scraps Box Service Memory Recall To select whether to display the option of Memory R...

Page 164: ... whichever reaches the life value is detected Paper Powder Filter Ozone Filter Number of times a sheet of paper is fed through 1st Number of sheets of paper fed from the 1st Drawer 2nd Number of sheets of paper fed from the 2nd Drawer 3rd Number of sheets of paper fed from the 3rd Drawer 4th Number of sheets of paper fed from the 4th Drawer 2 Cyan IU Period of time over which the Cyan Developing U...

Page 165: ... Interrupt key which will undo the clearing opera tion Warning To check the number of warning conditions detected according to the warming type or to clear the count of each counter To clear the count of a counter select the spe cific part and press the Clear key If a counter is cleared mistakenly press the Interrupt key which will undo the clearing opera tion When a warning condition occurs an oi...

Page 166: ...are surface out put reading taken last ATDC fusing temperature Shows the lat est ATDC and fusing temperature data Reading taken last means After the last image stabilization sequence When a test print is produced by pressing the Start key while Level History 1 is being displayed Level History 2 To display the intensity adjustment value of the AIDC Sensor Transfer Belt bare surface level as adjuste...

Page 167: ... ory has been set up When an add on memory is mounted the copier automatically recognizes it and displays its capacity Color Shift To check each of C M Y and Bk for color shift amount The data is updated after a color shift cor rection has been made or color shift adjustment has been completed For each of C M Y and Bk the color shift amount in X and Y directions at two loca tions one at the front ...

Page 168: ...C M Y and Bk LPHs LPH Lot No LPH lot number 10 digits Average Exposure Average light intensity X Print width accuracy Y Linearity accuracy Z Focus accuracy FFT Rank Print width rank LPH Rank 0 to 5 If any one change is made from the default value as a result of LPH chip to chip correc tions an asterisk is displayed beside the color identification C M Y and Bk on the screen ...

Page 169: ...y be increased as a temporary measure before the part is replaced with a new one Adjustment range 5 mm to 5 mm Auto Adjust Stop Position To make an automatic adjust ment of the document stop position and scanning position in each of the ADF modes Upon setup of the ADF FD 1 Sided Adjust the document stop position for the first side 7 mm to 7 mm FD 2 Sided Adjust the document stop position for the s...

Page 170: ...y Sensor Auto Adjust To make an automatic adjust ment of the sensor When a document misfeed occurs When the sensor is replaced Reset And ADF Sensor Auto Adj The detection level of the document through path sensor is initialized and then an automatic adjustment is made ADF Sensor Auto Adj The detection level of the document through path sensor is automatically adjusted Purpose Setting Precautions T...

Page 171: ...and perform the initial transmission DT Setting Set Password DT ID and TEL No When e mail is selected for the ID Setting TEL No is the e mail address Initial Transmission Press the Initial Transmission key to execute the initial transmission to the Center and the copier equipped with the Data Terminal is registered with the Center only if Modem is selected for System Selection Date Time Input To s...

Page 172: ...To produce an output of a list of setting val ues adjustment val ues Total Counter values and others At the end of setup or when a malfunc tion occurs Press the Start key which will let the copier produce the list The paper used is A4 or 8 1 2 11 length wise plain paper and the paper source is the 1st Drawer Data printed is in English alphanumeric char acters The time of day and date will also be ...

Page 173: ... or HYPER Select Gradation or Resolution Select the color mode Black 4PC Uses four colors Black 1PC Uses one color of black Type the density level 0 to 255 Lattice Pattern To produce a lattice pattern Used for checking fine line reproducibility and uneven density A reverse pattern is also used to check for fine line reproducibility of white letters on a solid back ground Select SINGLE single copy ...

Page 174: ...ce an output of an ideal image and Conv Value represents the differ ence from an ideal image density The image is more ideal when the Conv Value is closer to 0 Press the Start key which will let the copier produce a test pattern Now place the test pattern on the Origi nal Glass Place ten blank sheets of A3 or 11 17 paper on the test pattern lower the Original Cover and press the Start key The copi...

Page 175: ...CURITY MODE 4 1 Security Mode Function Setting Procedure Procedure 1 Show the Tech Rep mode menu screen 2 Press the following keys in this order Stop 9 3 Security Mode menu will appear Exiting Touch the Fin Time key 4 2 Security Mode Function Tree Security Mode Admin Choice Counter Setting ...

Page 176: ...uble count up according to paper size and copying mode Default Europe Size Counter Not counted Default U S A and Canada A3 and 11 17 A3 B4 11 17 and Legal A3 B4 FLS 11 17 11 14 and Legal Default Europe Count up Table 0 No count 1 1 count 2 2 counts 3 3 counts 4 4 counts Copying 1 Sided 2 Sided Size Sizes other than those specified Specified sizes Sizes other than those specified Specified sizes To...

Page 177: ...cle If Mode 2 is selected for Total Counter Specified sizes is selected for Size Counter and the paper used is the specified size Mode 1 2 counts per 1 copy cycle Mode 2 4 counts per 1 copy cycle Mode 3 6 counts per 1 copy cycle Mode 4 8 counts per 1 copy cycle Mode 5 10 counts per 1 copy cycle If Mode 2 is selected for Total Counter Sizes other than those specified is selected for Size Counter an...

Page 178: ...FrameMaker Ver 5 5E PC CF2002 CF3102 TROUBLESHOOTING 02 06 26 TROUBLESHOOTING 14413 ...

Page 179: ...llowing operation to check the condition of the electrical components 1 Sensor 2 Switch Step Check Result Action 1 Does the input signal of the master board change H L L H when the sensor light is interrupted NO Replace the sensor YES Replace the control board Step Check Result Action 1 Does the input signal NO of the master board change from L to H when the switch is turned on NO Replace the swit...

Page 180: ...nal of the master board change from H to L when the solenoid is turned on NO Replace the control board YES Replace the sole noid Step Check Result Action 1 Does the output signal of the master board change from H to L when the clutch is activated NO Replace the control board YES Replace the clutch 1 2 2 1 2 1 4025T522AA 4025T528AA ...

Page 181: ...tor NO Replace the control board Step Check Result Action 1 Does the input signal of the master board change from H to L when the motor is turned on The input signal differs depend ing on the rotation direction YES Replace the motor NO Replace the control board Step Check Result Action 1 Are the relay connector of the motor and the print jack on the master board correctly connected YES Replace the...

Page 182: ...sponsible for it Procedure 1 Remove the sheet of paper misfeed 2 From the I O Check List that follows check the panel display of the 2nd Drawer Paper Take Up Sensor For the 2nd Drawer Paper Take Up Sensor you check the data of Take Up of 2nd Drawer 3 Call the Tech Rep mode to the screen 4 Select State Confirm I O Check and then select the screen that contains Take Up under 2nd Drawer For Take Up u...

Page 183: ...2 CF2002 TROUBLESHOOTING 02 06 13 T 5 2 I O Check List I O Check Screens These are only typical screens which may be different from what are shown on each indi vidual copier 4025T560CA 4025T561CA 4025T562CA 4025T563CA 4025T564CA ...

Page 184: ...PWB A PJ3A 4B PC2 Paper Empty Drawer Paper Empty Sensor Paper not present Paper present PJ3A 14A PC3 Paper Near Empty Drawer Paper Near Empty Sen sor Blocked Unblocked PJ3A 11A PC1 Take Up Drawer Paper Take Up Sensor Paper present Paper not present PJ3A 5A PC5 Double Feed Drawer Double Feed Sensor Paper present Paper not present PJ3A 8A SW D 4th Drawer Set Drawer Set Switch In position Out of posi...

Page 185: ...Sensor Paper not present Paper present Control Board PWB A PJ15A 4 PJ12 2 PC6 Rev Empty Turnover Empty Detecting Sen sor Paper present Paper not present PJ15A 12 PJ13 2 PC45 Dev Cyan Toner Empty Toner Near Empty Sensor PQ C Toner not present Toner present IO Board PWB IO PJ15IO 1A PC43 Magenta Toner Empty Toner Near Empty Sensor PQ M Toner not present Toner present PJ15IO 3A PC41 Yellow Toner Empt...

Page 186: ...te other than pressed PJ4IO 3 PC1 Single Staple Finisher Exit Non sort 1 See the FN 116 service manual PC19 Exit Non sort 3 PC3 Exit Finisher PC4 Transport Upper PC2 Transport Lower PC6 Full Non sort 1 PC20 Full Non sort 3 PC7 Full Elev Tray PC5 Empty Finisher PWB D Surface Elev PC8 Empty Elev PC9 Home CD Align PC14 Home Stap Unit PC12 Home store roller PC13 Home Exit roller Home Stapler 1 Empty S...

Page 187: ...ase Position PI13 Crease Tray PI11 Crease Home PI12 Crease Roller Home PI14 Crease Clock PI8 Paper PI9 Paper Surface PI15 Raised Position PI16 Lowered Posi tion PI17 Clock Middle PI18 Slide Home PI19 Stapler Home PI20 Needle Stapler Connect MS3 Stapler Safety SW PI21 Self Prime PI22 Front Door PI23 Upper Door MS1 Front Door SW Rev Remain MS2 Joint SW Symbol Panel Display Part Signal Name Operation...

Page 188: ...r 2 Original Size Detecting Sensor FD2 Original loaded not mounted Original not loaded PJ8C 9A PC204 Org Detect Sensor 3 Original Size Detecting Sensor FD2 Original loaded not mounted Original not loaded PJ8C 9A PC206 Org Detect Sensor 4 Original Size Detecting Sensor FD3 Original loaded not mounted Original not loaded PJ7C 5 PC206 Org Detect Sensor 5 Original Size Detecting Sensor FD3 Original lo...

Page 189: ...Control Panel UN201 DC Power Supply 3 PU201 Image Processing Board PWB C Scanner Motor Drive Board PWB IC Image Processing Interface Board PWB B Scanner Assy Scanner Motor M201 CCD Sensor Board PWB A Image Control Board PWB F Option Interface Board PWB G Printer Controller LED Drive Board PWB LED LPH Assy PIC Board PWB PIC DC Power Supply 1 PU1 IO Board PWB IO Control Board PWB A AD 14 Finishing O...

Page 190: ...aper storage Is a foreign object present along the paper path or is the paper path deformed or worn Clean or change the paper path Are the Paper Separator Fingers dirty deformed or worn Clean or change the defective Paper Sepa rator Finger Are rolls rollers dirty deformed or worn Clean or change the defective roll roller Are the Edge Guide and Trailing Edge Stop at correct position to accommodate ...

Page 191: ...cedure Open the corresponding door clear the sheet of paper misfeed and close the door Display Misfeed Location Action A 1st Drawer take up T 16 B 2nd Drawer take up T 17 C 3rd Drawer take up T 18 LCC take up T 19 D 4th Drawer take up T 20 LCC Lift 2 to 1 paper transport T 21 E Manual Bypass take up T 22 F Duplex Unit transport T 27 G Vertical Transport T 23 Duplex Unit take up T 26 H 2nd Image Tr...

Page 192: ... System Mounted with AD 14 and PF 121 Exit Sensor PC10 Synchronizing Roller Sensor PC14 Duplex Unit Transport Sensor 1 PI1 Duplex Unit Transport Sensor 2 PC1 Manual Feed Paper Take Up Sensor PC15 2nd Drawer Paper Take Up Sensor PC101 LCC Registration Sensor RSEN LCC Paper Take Up Sensor PPS0 4025T003AA ...

Page 193: ...4 and PF 118 Exit Sensor PC10 Synchronizing Roller Sensor PC14 Duplex Unit Transport Sensor 1 PI1 Duplex Unit Transport Sensor 2 PC1 Manual Feed Paper Take Up Sensor PC15 2nd Drawer Paper Take Up Sensor PC101 3rd Drawer Paper Take Up Sensor PC1 4th Drawer Paper Take Up Sensor PC1 4025T004AA ...

Page 194: ...me after the 1st Drawer Paper Take Up Clutch CL1 has been ener gized 1st Drawer size error detection The Synchronizing Roller Sensor PC14 is not unblocked even after the lapse of a given period of time after it has been blocked by the paper Relevant Electrical Parts Synchronizing Roller Sensor PC14 1st Drawer Paper Take Up Clutch CL1 IO Board PWB IO Step Action Ref Page WIRING DIAGRAM Control Sign...

Page 195: ...e of a given period of time after it has been blocked by the paper Detection of paper left in 2nd Drawer The 2nd Drawer Paper Take Up Sensor PC101 is blocked when the Power Switch is turned ON a door or cover is opened and closed or a misfeed or malfunction is reset Relevant Electrical Parts 2nd Drawer Take Up Sensor PC101 2nd Drawer Take Up Clutch CL101 2nd Drawer Take Up Motor M101 2nd Drawer Co...

Page 196: ...the lapse of a given period of time after it has been blocked by the paper Detection of paper left in 3rd Drawer The 3rd Drawer Paper Take Up Sensor PC1 is blocked when the Power Switch is turned ON a door or cover is opened and closed or a misfeed or malfunction is reset Relevant Electrical Parts 3rd Drawer Take Up Sensor PC1 3rd Drawer Take Up Clutch CL1 3rd Drawer Take Up Motor M1 3rd Drawer Co...

Page 197: ...C Registration Sensor RSEN or 2nd Drawer Paper Take Up Sensor PC101 is blocked when the Power Switch is turned ON a door or cover is opened and closed or a misfeed or mal function is reset Relevant Electrical Parts LCC Paper Take Up Sensor PPS0 LCC Registration Sensor RSEN 2nd Drawer Paper Take Up Sensor PC101 LCC Paper Take Up Clutch1 P1CL LCC Paper Take Up Clutch2 P2CL LCC Separator Clutch BCL L...

Page 198: ...the lapse of a given period of time after it has been blocked by the paper Detection of paper left in 4th Drawer The 4th Drawer Paper Take Up Sensor PC1 is blocked when the Power Switch is turned ON a door or cover is opened and closed or a misfeed or malfunction is reset Relevant Electrical Parts 4th Drawer Take Up Sensor PC1 4th Drawer Take Up Clutch CL1 4th Drawer Take Up Motor M1 4th Drawer Co...

Page 199: ... lapse of a given period of time after an LCC paper take up request has been issued Relevant Electrical Parts LCC Paper Take Up Sensor PPS0 Paper Standby Position Sensor S1 LCC Registration Sensor RSEN LCC Paper Take Up Clutch1 P1CL LCC Paper Take Up Clutch2 P2CL LCC Separator Clutch BCL LCC Registration Clutch RCL LCC Control Board PWB A Step Action Ref Page WIRING DIAGRAM Control Signal Location...

Page 200: ...lapse of a given period of time after it has been blocked by the paper Detection of paper left in Manual Bypass Table The Manual Feed Paper Take Up Sensor PC15 is blocked when the Power Switch is turned ON a door or cover is opened and closed or a misfeed or malfunction is reset Relevant Electrical Parts Manual Feed Paper Take Up Sensor PC15 Synchronizing Roller Sensor PC14 Manual Feed Paper Take ...

Page 201: ... not blocked even after the lapse of a given period of time after the 4th Drawer Paper Take Up Sensor PC1 has been blocked by the paper PF 121 The 2nd Drawer Paper Take Up Sensor PC101 is not blocked even after the lapse of a given period of time after an LCC paper take up request has been issued Relevant Electrical Parts 2nd Drawer Paper Take Up Sensor PC101 Synchronizing Roller Sensor PC14 2nd D...

Page 202: ...A 4th Drawer Control Board PWB A Step Action Ref Page WIRING DIAGRAM Control Signal Location Electrical Component 1 Initial check items T 12 2 PC101 I O check T 4 to T 10 6 H Copier 3 PC1 3rd Drawer I O check T 4 to T 10 2 D 4 PC1 4th Drawer I O check T 4 to T 10 2 D 5 CL1 3rd Drawer operation check T 2 PWB A PJ3A 14B ON 2 I 6 CL1 4th Drawer operation check T 2 PWB A PJ3A 14B ON 2 I 7 M1 3rd Drawe...

Page 203: ...utch BCL LCC Registration Clutch RCL LCC Control Board PWB A Step Action Ref Page WIRING DIAGRAM Control Signal Location Electrical Component 1 Initial check items T 12 2 PC101 I O check T 4 to T 10 6 H Copier 3 PPS0 I O check T 4 to T 10 7 D 4 RSEN I O check T 4 to T 10 7 E 5 P1CL operation check T 2 PWB A CN7A 8 ON 7 B 6 P2CL operation check T 2 PWB A CN7A 6 ON 7 B 7 BCL operation check T 2 PWB ...

Page 204: ...e lapse of a given period of time after a Duplex paper take up sequence has been started Relevant Electrical Parts Synchronizing Roller Sensor PC14 Duplex Unit Motor M2 Duplex Control Board PWB A IO Board PWB IO Step Action Ref Page WIRING DIAGRAM Control Signal Location Electrical Component 1 Initial check items T 12 3 PC14 I O check T 4 to T 10 2 I Copier 4 M2 operation check T 3 PWB A PJ2A 1 to...

Page 205: ...nit Transport Sensor 1 PI1 or Duplex Unit Transport Sensor 2 PC1 is blocked when the Power Switch is turned ON a door or cover is opened and closed or a misfeed or malfunction is reset Relevant Electrical Parts Manual Feed Paper Take Up Sensor PC15 Duplex Unit Transport Sensor 1 PI1 Duplex Unit Transport Sensor 2 PC1 Switchback Motor M1 Duplex Unit Motor M2 Duplex Control Board PWB A IO Board PWB ...

Page 206: ...f paper left at 2nd Image Transfer The Synchronizing Roller Sensor PC14 is blocked when the Power Switch is turned ON a door or cover is opened and closed or a misfeed or malfunction is reset The OHP Detecting Sensor PC19 is blocked when the Power Switch is turned ON a door or cover is opened and closed or a misfeed or malfunction is reset Relevant Electrical Parts Synchronizing Roller Sensor PC14...

Page 207: ...period of time after the Exit Sensor PC10 has been unblocked by the paper during a switchback sequence Detection of paper left at Fusing Exit The Exit Sensor PC10 is blocked when the Power Switch is turned ON a door or cover is opened and closed or a misfeed or malfunction is reset Relevant Electrical Parts Exit Sensor PC10 Duplex Unit Transport Sensor 1 PI1 IO Board PWB IO Step Action Ref Page WI...

Page 208: ...e Tech Rep Setting Switches Board to reset the fol lowing malfunctions scanner related malfunctions fusing related malfunctions exposure lamp related malfunctions and C3FFF For any other malfunctions open and close the Front Door or turn OFF and ON the Power Switch 4025T565CA When a warning condition is detected the maintenance call mark will be displayed on the Touch Panel Touching the maintenanc...

Page 209: ...receiver of the AIDC Sensor that takes a reading of a point in a toner pattern on the Transfer Belt is 1 0 V or less after the adjustment has been completed P 28 Relevant Electrical Parts AIDC Sensor 1 UN20 AIDC Sensor 2 UN21 IO Board PWB IO Image Transfer Belt Unit Step Action 1 Wipe clean the surface of the Transfer Belt with a soft cloth if it is dirty 2 Change the Image Transfer Belt Unit if t...

Page 210: ...lt are 0 4 V AIDC Sensor photoreceiver output or less during max density adjustment Vg Vb adjustment P 7 P 8 P 9 Relevant Electrical Parts IU C IU M IU Y IU Bk Image Transfer Belt Unit Step Action 1 Select Image Adjust PRT Max Density and if the setting value is nega tive readjust 2 Check the drive transmission portion of the IU and correct as necessary 3 Clean the AIDC Sensor window if dirty 4 Cl...

Page 211: ...lt with a soft cloth if it is dirty 2 Change the Image Transfer Belt Unit if the Transfer Belt is damaged Warning Code Description P 22 The color shift amount is greater than the specified range during CD registration correction The color shift amount is greater than the specified range during FD registration correction The skew correction amount is greater than the specified value Relevant Electr...

Page 212: ...ent of the first image transfer ATVC value of each color P 24 P 25 P 26 P 27 An abnormal average value is detected during an adjustment of the second image transfer ATVC value Relevant Electrical Parts High Voltage Unit Image Transfer Neutralizing HV2 IO Board PWB IO Image Transfer Belt Unit Step Action 1 Check the contact of the Transfer Belt Unit and that of HV2 for connection and clean or corre...

Page 213: ... the Main Motor remains stationary Relevant Electrical Parts Main Motor M13 IO Board PWB IO DC Power Supply 1 PU1 Step Action Ref Page WIRING DIAGRAM Control Signal Location Electrical Component 1 Check the M13 connector for proper connection and correct as necessary 2 Check M13 for proper drive coupling and correct as neces sary 3 Check the PU1 connector for proper connection and correct as neces...

Page 214: ...ime while the Imaging Unit Motor C remains stationary C0012 The Imaging Unit Motor M Lock signal remains HIGH for a prede termined continuous period of time while the Imaging Unit Motor M is turning C0013 The Imaging Unit Motor M Lock signal remains LOW for a prede termined continuous period of time while the Imaging Unit Motor M remains stationary C0014 The Imaging Unit Motor Y Lock signal remain...

Page 215: ... necessary PU1 PJ7PU1 1 DC24V 28 G 4 M15 operation check T 3 PWB IO PJ17IO 5A LOCK PWB IO PJ17IO 6A REM 16 A 5 M16 operation check T 3 PWB IO PJ17IO 11A LOCK PWB IO PJ17IO 12A REM 17 B 6 M17 operation check T 3 PWB IO PJ17IO 5B LOCK PWB IO PJ17IO 6B REM 16 C 7 M18 operation check T 3 PWB IO PJ17IO 11B LOCK PWB IO PJ17IO 12B REM 18 C 8 Change PWB IO 9 Change PU1 Step Action Ref Page WIRING DIAGRAM ...

Page 216: ... for a predetermined continu ous period of time while the Cooling Fan Motor 1 is turning C0044 The Fan Lock signal remains HIGH for a predetermined continu ous period of time while the Cooling Fan Motor 3 is turning C0045 The Fan Lock signal remains HIGH for a predetermined continu ous period of time while the Cooling Fan Motor 4 5 is turning C0046 The Fan Lock signal remains HIGH for a predetermi...

Page 217: ...er Supply 2 PU2 Step Action Ref Page WIRING DIAGRAM Control Signal Location Electrical Component 1 Check the motor connector for proper connection and correct as necessary 2 Check the fan for possible overload and correct as neces sary 3 M23 operation check T 3 PWB IO PJ10IO 13 LOCK PWB IO PJ10IO 11 REM 2 H 4 Change PWB IO Step Action Ref Page WIRING DIAGRAM Control Signal Location Electrical Comp...

Page 218: ...GRAM Control Signal Location Electrical Component 1 Check the motor connector for proper connection and correct as necessary 2 Check the fan for possible overload and correct as neces sary 3 M28 M29 operation check T 3 PJ25IO 4B LOCK M28 PJ25IO 2B REM M28 PJ25IO 9B LOCK M29 PJ25IO 7B REM M29 35 B M28 35 C M29 4 Change PWB IO Step Action Ref Page WIRING DIAGRAM Control Signal Location Electrical Co...

Page 219: ...B C Step Action Ref Page WIRING DIAGRAM Control Signal Location Electrical Component 1 Check the motor connector for proper connection and correct as necessary 2 Check the fan for possible overload and correct as neces sary 3 M21 operation check T 3 PU1 PJ12PU1 1 LOCK PU1 PJ12PU1 3 REM 29 I 4 Change PU1 Step Action Ref Page WIRING DIAGRAM Control Signal Location Electrical Component 1 Check the mo...

Page 220: ...remains stationary Relevant Electrical Parts Fusing Drive Motor M14 IO Board PWB IO DC Power Supply 1 PU1 Step Action Ref Page WIRING DIAGRAM Control Signal Location Electrical Component 1 Check the M14 connector for proper connection and correct as necessary 2 Check the Fusing Unit drive for possible overload and correct as necessary 3 Check the PU1 connector for proper connection and correct as ...

Page 221: ...he 2nd Image Transfer Pressure Position Sensor is not deacti vated pressed position within 2 sec after the 2nd Image Trans fer Pressure Retraction Motor has started turning during a sequence of the 2nd Image Transfer Roller s pressing motion Relevant Electrical Parts 2nd Image Transfer Pressure Position Sensor PC23 2nd Image Transfer Pressure Retraction Motor M12 IO Board PWB IO Step Action Ref Pa...

Page 222: ...ge Transfer Retraction Position Sensor is not deacti vated pressed position within 1 sec after the 1st Image Trans fer Pressure Retraction Motor has started turning during a sequence of the Transfer Belt s pressing motion Relevant Electrical Parts 1st Image Transfer Retraction Position Sensor PC28 1st Image Transfer Pressure Retraction Motor M11 IO Board PWB IO Step Action Ref Page WIRING DIAGRAM ...

Page 223: ...r the lapse of 0 5 sec after the motor has started turning for a sequence of the Fusing Pressure Roller s pressing motion The Fusing Pressure Position Sensor is not activated pressed position even when 21 encoder pulses of the Fusing Pressure Retraction Motor are counted after the motor has started turning for a sequence of the Fusing Pressure Roller s pressing motion Relevant Electrical Parts Fus...

Page 224: ...er C0208 PC Drum Charge Corona malfunction has been detected C0204 The SCD signal is detected for a continuous 0 7 sec period when the Yellow PC Drum Charge Corona is automatically energized as the malfunction is reset after C0208 PC Drum Charge Corona malfunction has been detected C0206 The SCD signal is detected for a continuous 0 7 sec period when the Black PC Drum Charge Corona is automaticall...

Page 225: ... value or less during CCD Sensor gain adjustment C0410 The average output value of the CCD Sensor with the Scanner at its standby position is a predetermined value or more at the end of a scan job Relevant Electrical Parts Scanner Assy Flat Cable Image Processing Board PWB C Step Action Ref Page WIRING DIAGRAM Control Signal Location Electrical Component 1 Check the flat cable for proper connectio...

Page 226: ...230 sec after a warm up cycle has been started The output from the Heating Roller Thermistor does not rise beyond a predetermined level within 120 sec after the Fusing Pressure Roller Heater Lamp has lit up C0510 The Heating Roller Thermistor detects 160 C or less for 1 sec or more while the copier is in the standby state The Heating Roller Thermistor detects 160 C or less for 1 sec or more while ...

Page 227: ...UBLESHOOTING 02 06 13 T 49 Action Relevant Electrical Parts Fusing Unit DC Power Supply 1 PU1 IO Board PWB IO Step Action Ref Page WIRING DIAGRAM Control Signal Location Electrical Component 1 Change PWB IO 2 Change Fusing Unit 3 Change PU1 ...

Page 228: ... of 5 mm away from the position at which it blocks the sensor C0660 The Scanner Home Sensor detects the Scanner at its home posi tion during a period of time that begins with the time when a pres can command and a scan preparation command are executed and ends when a home return command is executed Relevant Electrical Parts Scanner Home Sensor PC201 Scanner Motor M201 Scanner Motor Drive Board PWB...

Page 229: ...e target level is detected ten consecutive times while the Developing Unit is being energized during a print cycle ATVC or image stabilization sequence C0F32 Toner density that is 3 or more lower than the target level is detected ten consecutive times while the Developing Unit is being energized during a print cycle ATVC or image stabilization sequence C0F33 Toner density that is 4 or more higher ...

Page 230: ... the ATDC Sensor window on the underside of the IU if dirty 3 Correct the ATDC Sensor spring moving part if faulty 4 Clean the ATDC Sensor LED if dirty 5 Change ATDC Sensor C M Y 10 B C D 6 M9 M10 operation check T 3 PWB IO PJ13IO 10 to 13 Pulse Output M9 PWB IO PJ13IO 6 to 9 Pulse Output M10 10 A 7 Change IU C M Y 8 Change PWB IO 9 Change PWB PIC Step Action Ref Page WIRING DIAGRAM Control Signal...

Page 231: ...ed ten consecutive times while the Developing Unit is being energized during a print cycle ATVC or image stabilization sequence Relevant Electrical Parts IU Bk Toner Replenishing Motor C Bk M9 IO Board PWB IO PIC Board PWB PIC Step Action Ref Page WIRING DIAGRAM Control Signal Location Electrical Component 1 Perform image troubleshoot ing procedure if image density is low T 91 2 M9 operation check...

Page 232: ...unction prop erly failing to adjust to an appropriate value C0F3D Black ATDC Sensor automatic adjustment does not function prop erly failing to adjust to an appropriate value Relevant Electrical Parts ATDC Sensor C PWB N3 ATDC Sensor M PWB N2 ATDC Sensor Y PWB N1 Toner Replenishing Motor C Bk M9 Toner Replenishing Motor Y M M10 IO Board PWB IO PIC Board PWB PIC IU C M Y Bk Step Action Ref Page WIR...

Page 233: ...3 T 55 C0F3D Step Action Ref Page WIRING DIAGRAM Control Signal Location Electrical Component 1 Correct the ATDC connection on the underside of the IU if faulty 2 Clean or correct each contact of the IU if faulty 3 Change IU Bk 4 Change PWB IO 5 Change PWB PIC ...

Page 234: ...e is installed Relevant Electrical Parts Image Control Board PWB F Controller Board WORK memory DIMM Board Step Action Ref Page WIRING DIAGRAM Control Signal Location Electrical Component 1 Select Tech Rep Mode System Input Peripheral Setting and check for correct setting 2 Check that WORK memory is correctly mounted on the Image Control Board PWB F 3 Change WORK memory on the Image Control Board ...

Page 235: ...Image Control Board PWB F is faulty C1204 The FILE memory on the Image Control Board PWB F is short of capacity Relevant Electrical Parts Image Control Board PWB F FILE memory DIMM Board Step Action Ref Page WIRING DIAGRAM Control Signal Location Electrical Component 1 Check that FILE memory is correctly mounted on the Image Control Board PWB F 2 Change FILE memory on the Image Control Board PWB F...

Page 236: ...e Image Processing Board PWB C to the Image Control Board PWB F Relevant Electrical Parts Image Control Board PWB F Image Processing Board PWB C Step Action Ref Page WIRING DIAGRAM Control Signal Location Electrical Component 1 Select Tech Rep Mode Machine Adjust Memory Hard Disk Adjust Memory Bus Check IR Memory 2 Check connection between PWB F and PWB C 3 Change PWB F 4 Change PWB C ...

Page 237: ...t from the Image Control Board PWB F to the PIC Board PWB PIC Relevant Electrical Parts Image Control Board PWB F PIC Board PWB PIC Step Action Ref Page WIRING DIAGRAM Control Signal Location Electrical Component 1 Select Tech Rep Mode Machine Adjust Memory Hard Disk Adjust Mem ory Bus Check Memory PRT 2 Check connection between PWB F and PWB PIC 3 Change PWB F 4 Change PWB PIC ...

Page 238: ...C1242 JBIG Error 59 C1243 JBIG Error Detection Timing Action Malfunction Code Description C1240 Memory of the Image Control Board PWB F is faulty C1241 C1242 C1243 Relevant Electrical Parts Image Control Board PWB F Step Action Ref Page WIRING DIAGRAM Control Signal Location Electrical Component 1 Change PWB F ...

Page 239: ...s faulty C1279 Transfer of image data of the Image Control Board PWB F is faulty Relevant Electrical Parts Image Control Board PWB F Step Action Ref Page WIRING DIAGRAM Control Signal Location Electrical Component 1 Change PWB F Malfunction Code Description C1290 Compression decompression of image data of the Image Control Board PWB F is faulty when the print controller CN3102e is mounted Relevant...

Page 240: ...is faulty Relevant Electrical Parts Image Control Board PWB F Hard Disk Step Action Ref Page WIRING DIAGRAM Control Signal Location Electrical Component 1 Reinstall the hard disk 2 Change Hard Disk 3 Change PWB F Malfunction Code Description C12CC Unformatted hard disk is connected Relevant Electrical Parts Image Control Board PWB F Hard Disk Step Action Ref Page WIRING DIAGRAM Control Signal Loca...

Page 241: ...or 74 C12C8 Hard Disk Error 75 C12C9 Hard Disk Error 76 C12CA Hard Disk Error 77 C12CF Hard Disk Error Detection Timing Action Malfunction Code Description C12C1 Hard disk is faulty C12C2 C12C2 C12C2 C12C2 C12C2 C12C2 C12C2 C12C2 C12C2 C12C2 A hard disk that falls outside the specifications is connected Relevant Electrical Parts Hard Disk Step Action Ref Page WIRING DIAGRAM Control Signal Location...

Page 242: ...tion Malfunction Code Description C13C8 A new installation is not detected when a new Transfer Cleaner Unit Image Transfer Belt Unit is installed C13CA A new installation is not detected when a new Fusing Unit is installed Relevant Electrical Parts IO Board PWB IO Step Action Ref Page WIRING DIAGRAM Control Signal Location Electrical Component 1 Reinstall the unit 2 Change PWB IO ...

Page 243: ...n after the lapse of a predetermined period of time after a magenta IU EEPROM access control has been executed C13D3 Setting 1 Start Flag of GA register does not become ready even after the lapse of a predetermined period of time after a yellow IU EEPROM access control has been executed C13D4 Setting 1 Start Flag of GA register does not become ready even after the lapse of a predetermined period o...

Page 244: ...enta LPH EEPROM to the flash memory on PWB PIC when power is turned ON C13D7 A fault occurs while the LPH correction data is being downloaded from the Yellow LPH EEPROM to the flash memory on PWB PIC when power is turned ON C13D8 A fault occurs while the LPH correction data is being downloaded from the Black LPH EEPROM to the flash memory on PWB PIC when power is turned ON Relevant Electrical Part...

Page 245: ...a CCD gain adjustment Relevant Electrical Parts Scanner Assy CCD Sensor Board PWB A Image Processing Board PWB C Step Action Ref Page WIRING DIAGRAM Control Signal Location Electrical Component 1 Correct the harness connec tion between PWB A and PWB C if faulty 2 Check for possible extraneous light and correct as necessary 3 Clean the lens mirrors CCD surface and shading sheet if dirty 4 Correct r...

Page 246: ... Relevant Electrical Parts IR Power Supply Cooling Fan Motor M202 IR Drive Board Cooling Fan Motor M203 Image Processing Board PWB C Step Action Ref Page WIRING DIAGRAM Control Signal Location Electrical Component 1 M202 operation check T 3 PWB C PJ8C 18B LOCK PWB C PJ8C 17B REM 19 G 2 Change PWB C Step Action Ref Page WIRING DIAGRAM Control Signal Location Electrical Component 1 M203 operation ch...

Page 247: ...age supplied across PJ3PU1 1 and 3 on PU1 30 H NO Check wiring between the wall outlet and PJ3PU1 2 Are the fuses F1 and F2 on PU1 con ducting NO Change PU1 3 Is a power voltage supplied across CN1PU2 1 and 2 on PU2 30 F NO Change PU1 4 Is the fuse F1 on PU2 conducting NO Change PU2 5 Is DC5 V being output from CN2PU2 3 on PU2 31 F NO Change PU2 6 Is DC5 V being input to PJ15PU1 1 on PU1 28 F NO C...

Page 248: ... PWB PIC NO Check the wiring Relevant Electrical Parts Image Processing Board PWB C Control Panel UN201 DC Power Supply 3 PU201 Step Check Item WIRING DIAGRAM Location Result Action 1 Is the I F cable between the IR and engine connected properly NO Reconnect or change the I F cable 2 Is a power voltage being applied across CN3PU201 1 and 2 on PU201 22 H NO Check the wiring from the wall outlet to ...

Page 249: ...ner when an image is produced Standard values Around 400 V A correction is made to make the image lighter when the numeric value is greater A correction is made to make the image darker when the numeric value is smaller Relevant Components IU High Voltage Unit Developing Bias Vg C M Y Bk Shows the grid voltage value of each color of toner when an image is produced Standard values Around 550 V A co...

Page 250: ...ing produced Relevant Components AIDC Sensor Transfer Belt Unit Temp Belt Press Shows the temperature of the Heating Roller Temp Belt and the Fusing Pressure Roller Temp Press in 5 C increments Relevant Components Fusing Unit 4025T570CA AIDC Sensor Adjust Value Shows the AIDC intensity adjustment value It should normally be around 50 and can range from 0 to 255 The value becomes greater as the Tra...

Page 251: ...ly transmitted between IR and memory and between memory and printer 2 Let the copier produce a test print and determine whether the image problem is attribut able to the IR or printer system Evaluation Procedure Action Result Next Step Enter the Tech Rep Mode select Machine Adjust Memory Hard Disk Adjust Memory Bus Check and select and carry out IR Memory and Mem ory PRT checks OK Initial check it...

Page 252: ...problem occurs in a specific single color or four colors Evaluation Procedure Image Problem Action Result Next Step Lines bands From Tech Rep Mode select Test Print Halftone Pattern SIN GLE HYPER Gradation C M Y Bk Density 64 and produce a test print Is image problem evident in each of all four colors YES Printer 4 colors T 104 NO Printer single color T 88 4 colors Mono color 4004T008CA ...

Page 253: ...s dirty YES Wipe the surface clean with a soft cloth Mirror lens Expo sure Lamp and reflectors 5 Mirror is dirty YES Clean Lens is dirty YES Clean Exposure Lamp is dirty YES Clean Reflectors are dirty YES Clean System Input Serial Input Tech Rep Mode 6 The IR serial number has been correctly entered NO Enter correctly Machine Adjust IR Area Left Image Tech Rep Mode 7 The adjustment value for Left ...

Page 254: ... original Original Cover 2 Original Pad is dirty YES Clean Original Glass 3 Original Glass is dirty YES Wipe the surface clean with a soft cloth Machine Adjust IR Area Top Image Tech Rep Mode 4 The adjustment value for Top Image falls within the speci fied range Readjust 5 The problem has been elimi nated through the checks of steps up to 4 NO Change Scanner Assy Change CCD Unit White lines in CD ...

Page 255: ...tep Check Item Result Action Original 1 Original is damaged or dirty YES Change original Original Cover 2 Original Pad is dirty YES Clean Original Glass 3 Original Glass is dirty YES Wipe the surface clean with a soft cloth 4 The problem has been elimi nated through the checks of steps up to 3 NO Change Scanner Assy Change CCD Unit C F 4011T027AA ...

Page 256: ...nal Glass 4 Original Glass is dirty YES Wipe the surface clean with a soft cloth Shading sheet 5 Shading sheet is dirty YES Wipe the surface clean with a soft cloth Mirror lens Exposure Lamp and reflectors 6 Mirror is dirty YES Clean Lens is dirty YES Clean Exposure Lamp is dirty YES Clean Reflectors are dirty YES Clean Photo Density 7 The problem is eliminated when the image is produced in the Ma...

Page 257: ...does not lie flat YES Change Original Cover if it is deformed or hinges are bro ken Original Glass 3 Original Glass tilts YES Position Original Glass cor rectly Check original loading position IR 4 Scanner is not aligned with the 2nd 3rd Mirrors Carriage YES Perform Focus Positioning of the Scanner and 2nd 3rd Mir rors Carriage and Scanner Position Adjustment 5 The problem has been elimi nated thr...

Page 258: ...inal Original Cover 2 Original Cover does not lie flat YES Change Original Cover if it is deformed or hinges are bro ken Slide rails 3 Foreign matter on rails YES Clean and apply lubricant Drive Cables 4 Cable kinks or is damaged YES Correct or change Scanner Assy 5 Scanner moves smoothly NO Adjust the Scanner Motor tim ing belt Change bushing Change Scanner Motor 6 The problem has been elimi nate...

Page 259: ...after the orientation of original has been changed YES Change the original mode select one other than that resulted in moire Photo Density 2 Moire distortions recur even after the original mode has been changed YES Select Gradation mode optimized for gradation or Resolution that optimized for resolution 3 The problem has been elimi nated through the checks of steps up to 2 NO Change the zoom ratio...

Page 260: ...inal Glass 2 Original Glass is in positive contact with the flat spring without being tilt NO Reinstall the glass Check the original loading position 2nd 3rd Mirrors Car riage 3 Scanner Assy is not properly aligned with 2nd 3rd Mirrors Carriage YES Readjust with the Scanner Mirrors Carriage Positioning Jigs 4 The problem has been elimi nated through the checks of steps up to 3 NO Change Scanner As...

Page 261: ... on a level sur face NO Reinstall The Rack is tilted with a lot of play YES Adjust rack leg height 2nd 3rd Mirrors Car riage 2 Scanner Assy is not properly aligned with 2nd 3rd Mirrors Carriage YES Readjust with the Scanner Mirrors Carriage Positioning Jigs Scanner Motor 3 Scanner Motor turns smoothly NO Change belt Change Scanner Motor 4 The problem has been elimi nated through the checks of step...

Page 262: ...Original Glass 2 Original Glass is dirty YES Wipe the surface clean with a soft cloth Shading sheet 3 Shading sheet is dirty YES Wipe the surface clean with a soft cloth Mirror lens Exposure Lamp and reflectors 4 Mirror is dirty YES Clean 5 Lens is dirty YES Clean 6 Exposure Lamp is dirty YES Clean 7 Reflectors are dirty YES Clean 8 The problem has been elimi nated through the check of step 7 NO C...

Page 263: ...ce 2 1 The problem persists even after the ACS Determination Level Adjust function has been changed YES Change the original loading direction Make manual set tings according to the type of original If the original con tains a colored area in one of its corners the copier may fail to properly detect the colored area ABCDE CF ABCDE ABCDE ABCDE ABCDE Colored Area of Original Black and White Area of O...

Page 264: ...ocessing Board PWB C 2 Connectors on the Image Processing Board are con nected properly NO Reconnect CCD Unit 3 Connectors of the CCD Unit are connected properly NO Reconnect Test Print Tech Rep Mode 4 The problem is eliminated as checked with the image on a test pattern produced NO Change I F connection cable Image Processing Board PWB C 5 The problem is eliminated after the I F connection cable ...

Page 265: ...ard are con nected properly NO Reconnect Image Processing Inter face Board PWB B 4 Connectors on the Image Processing Board are con nected properly NO Reconnect Image Control Board PWB F 5 Data on previous page is mixed with data on current page NO Reinstall expanded mem ory Test Print Tech Rep Mode 6 The problem is eliminated as checked with the image on a test pattern produced NO Change interfac...

Page 266: ... Change IU LED Assy 3 The surface of the lens array is dirty YES Clean with cleaning jig IU 4 Dirty on the outside YES Clean 5 Connectors and contact termi nals make good connection between each IU and LED Assy NO Clean contact terminals Reconnect 6 Developing bias contact termi nal makes good connection NO Clean contact terminal and check terminal position 7 The problem has been elimi nated throu...

Page 267: ... Feed 10 to 20 blank sheets of paper with no originals placed as the IU fails to keep up with a high demand for toner LPH Assy 3 LED retracting lever is locked in position NO Slide out the IU and reinstall IU 4 The surface of the PC Drum is scratched YES Change IU 5 Dirty on the outside YES Clean LPH Assy 6 LED surface is dirty YES Clean using the LED Cleaning Jig Image Transfer Belt Unit 7 Cam ge...

Page 268: ...sy 3 The surface of the lens array is dirty YES Clean with cleaning jig Image Transfer Belt Unit 4 Image Transfer Belt Unit makes positive contact with plates on rails NO Check and correct contacts 5 Cam gear operates properly NO Change Image Transfer Belt Unit 6 The problem has been elimi nated through the checks of steps up to 5 NO Change IU Change Image Transfer Belt Unit Change High Voltage Un...

Page 269: ...V NO Clean AIDC Sensor Check Image Transfer Belt for damage Level History data check results 4 Low ATDC and low Vg and Vb YES Go to step 8 5 Low ATDC and high Vg and Vb YES Go to step 14 6 ATDC falling within spec ified range and low Vg and Vb YES Go to step 8 7 ATDC falling within spec ified range and high Vg and Vb YES Go to step 14 LPH Assy 8 LED retracting lever is locked in position NO Slide ...

Page 270: ... Max Den sity Tech Rep Mode 18 The problem has been eliminated through the adjust of PRT Max NO Go to next step Image Adjust PRT Highlight Tech Rep Mode 19 The problem has been eliminated through the adjust of PRT Highlight NO Go to next step Image Adjust Stabilizer Reset Stabilizer Tech Rep Mode 20 After the Reset Stabi lizer sequence has been completed run Grada tion Adjust if the prob lem persi...

Page 271: ...ray is dirty YES Clean with cleaning jig ATDC Sensor window 5 ATDC Sensor window is dirty YES Clean State Confirm Level His tory 1 Tech Rep Mode 6 AIDC output value is around 4 2 V NO Clean AIDC Sensor Check Image Transfer Belt for damage Gradation Adjust Tech Rep Mode 7 Conv Value falls within the specified range as checked through Gradation Adjust Max 0 100 Highlight 0 60 NO Go to step 11 Image ...

Page 272: ... Adjust if the problem persists make adjustments of PRT Max Density and PRT Highlight NO Go to next step 11 The problem has been elimi nated through the checks of steps up to 10 NO Change IU Change LPH Assy Change PIC Board Change LED Drive Board Change LPH Unit Change High Voltage Unit Developing Bias Change High Voltage Unit Image Transfer Neutraliz ing Section Step Check Item Result Action ...

Page 273: ...4 5 V NO Clean AIDC Sensor Check Transfer Belt for dam age Level History data check results 4 Low ATDC and low Vg and Vb YES Go to step 8 5 Low ATDC and high Vg and Vb YES Go to step 12 6 ATDC falling within specified range and low Vg and Vb YES Go to step 8 7 ATDC falling within specified range and high Vg and Vb YES Go to step 12 LPH Assy 8 LED retracting lever is locked in position NO Slide out...

Page 274: ...T Max NO Go to next step Image Adjust PRT High light Tech Rep Mode 15 The problem has been elim inated through the adjust of PRT Highlight NO Go to next step Image Adjust Stabilizer Reset Stabilizer Tech Rep Mode 16 After the Reset Stabilizer sequence has been com pleted run Gradation Adjust if the problem per sists make adjustments of PRT Max Density and PRT Highlight NO Go to next step 17 The pr...

Page 275: ...nsity sec tion YES T 91 2 There is void area at the rear side section YES Perform 2nd Transfer Adjust of Image Adjust under Tech Rep mode IU 3 The surface of the PC Drum is scratched YES Change Imaging Unit 4 Dirty on the outside YES Clean Hopper Unit 5 Foreign matter or caked toner in the Toner Cartridge YES Remove foreign matter 6 The problem has been elimi nated through the checks of steps up t...

Page 276: ...Section Step Check Item Result Action IU 1 Developing bias contact termi nal makes good connection NO Clean contact terminal and check terminal position 2 The surface of the PC Drum is scratched YES Change Imaging Unit 3 Dirty on the outside YES Clean 4 The problem has been elimi nated through the checks of steps up to 3 NO Change IU C F 4011T027AA ...

Page 277: ...ck 1 Image is distorted stretched or shrunk YES Perform Zoom for FD LED Assy 2 LED retracting lever is locked in position NO Slide out the IU and reinstall 3 The surface of the lens array is dirty YES Clean with cleaning jig Imaging Unit 4 Dirty on the outside YES Clean 5 The problem has been elimi nated through the checks of steps up to 4 NO Change IU Change LPH Assy Change LPH Unit 4011T046AA ...

Page 278: ... drive mecha nism is installed properly NO Check and correct drive trans mitting coupling Change IU 3 The PC Drum Charge Corona voltage contact or PC Drum ground contact of the Imaging Unit is con nected properly NO Check clean or correct the contact High Voltage Unit Image Transfer Neu tralizing 4 Connector is connected properly NO Reconnect 5 The problem has been elim inated through the check of...

Page 279: ...13 T 101 24 Printer Monocolor 0 5 mm pitch uneven image Typical Faulty Image Troubleshooting Procedure Section Step Check Item Result Action LPH Assy 1 LED retracting lever is locked in position NO Slide out the IU and reinstall YES Change IU 0 5mm 4011T060AA ...

Page 280: ... 02 06 13 T 102 25 Printer Monocolor 2 mm pitch uneven image Typical Faulty Image Troubleshooting Procedure Section Step Check Item Result Action IU 1 The drive mechanisms for spent toner conveying and IU are dirty YES Clean NO Change IU 2 mm 4011T059AA ...

Page 281: ...alled properly NO Check and correct drive trans mitting coupling Change IU 3 There is play in the IU Motor YES Reinstall or change the IU Motor Image Transfer Belt Unit 4 Image Transfer Belt Unit drive gear has chipped off NO Correct Change Image Transfer Belt Unit Image Transfer Roller Unit 5 Image Transfer Roller is dam aged YES Change Image Transfer Roller Unit 6 The problem has been elimi nate...

Page 282: ...Cleaning Blade is not effec tive in removing toner com pletely YES Clean Cleaning Blade change Image Transfer Belt Unit Image Trans fer Roller Unit 5 Image Transfer Roller is dirty or scratched YES Change Image Transfer Roller Unit Paper path 6 There is foreign matter on paper path YES Remove foreign matter 7 Image Transfer Paper Sepa rator Fingers are damaged or dirty YES Clean or change Paper Du...

Page 283: ...y YES Clean Cleaning Blade change Image Transfer Belt Unit Image Transfer Roller Unit 4 Image Transfer Roller is dirty or scratched YES Change Image Transfer Roller Unit Paper path 5 There is foreign matter on paper path YES Remove foreign matter 6 Image Transfer Paper Separa tor Fingers are damaged or dirty YES Clean or change Paper Dust Remover 7 Paper dust accumulates on Paper Dust Remover YES ...

Page 284: ...vent See DIS REASSEMBLY ADJUSTMENT 2 Image Transfer Belt is dirty or scratched YES Clean dirty belt with a soft cloth Change Image Transfer Belt Unit if belt is damaged 3 Terminal is dirty YES Clean Image Transfer Roller Unit 4 Image Transfer Roller is installed properly NO Reinstall 5 Image Transfer Roller is dirty or scratched YES Change Image Transfer Roller Unit 6 The problem has been elimi na...

Page 285: ...sfer Belt is dirty or scratched YES Clean dirty belt with a soft cloth Change Image Transfer Belt Unit if belt is damaged 3 Terminal is dirty YES Clean Image Transfer Roller Unit 4 Image Transfer Roller is installed properly NO Reinstall 5 Image Transfer Roller is dirty or scratched YES Change Image Transfer Roller Unit 6 The problem has been elimi nated through the checks of steps up to 5 NO Chan...

Page 286: ...ller is installed properly NO Reinstall 4 Image Transfer Roller is dirty or scratched YES Change Image Transfer Roller Unit AIDC Sen sor 5 Sensor is dirty YES Clean with blower brush Gradation Adjust Tech Rep Mode 6 Conv Value falls within the specified range as checked through Gradation Adjust Max 0 100 Highlight 0 60 NO Go to step 10 Image Adjust PRTMax Density Tech Rep Mode 7 The problem has be...

Page 287: ... Adjust if the problem persists make adjustments of PRT Max Den sity and PRT Highlight NO Go to next step 10 The problem has been elimi nated through the checks of steps up to 9 NO Change Image Transfer Roller Unit Change Image Transfer Belt Unit Change PIC Board Change High Voltage Unit Developing Bias Change High Voltage Unit Image Transfer Neutralizing Section Step Check Item Result Action ...

Page 288: ... Roller is installed properly NO Reinstall 4 Image Transfer Roller is dirty or scratched YES Change Image Transfer Roller Unit AIDC Sen sor 5 Sensor is dirty YES Clean with blower brush Gradation Adjust Tech Rep Mode 6 Conv Value falls within the specified range as checked through Gradation Adjust Max 0 100 Highlight 0 60 NO Go to step 10 Image Adjust PRTMax Density Tech Rep Mode 7 The problem has...

Page 289: ... Adjust if the problem persists make adjustments of PRT Max Den sity and PRT Highlight NO Go to next step 10 The problem has been elimi nated through the checks of steps up to 9 NO Change Image Transfer Roller Unit Change Image Transfer Belt Unit Change PIC Board Change High Voltage Unit Developing Bias Change High Voltage Unit Image Transfer Neutralizing Section Step Check Item Result Action ...

Page 290: ...lide out the IU and reinstall Image Transfer Belt Unit 4 Fingerprints oil or other for eign matter is evident on the Image Transfer Belt YES Clean with specified solvent See DIS REASSEMBLY ADJUSTMENT 5 Image Transfer Belt is dirty or scratched YES Clean dirty belt with a soft cloth Change Image Transfer Belt Unit if belt is damaged 6 Drive coupling to the copier is dirty YES Clean IU 7 The surface...

Page 291: ...lor in which color shift occurs YES Perform Color Shift Correc tion If color shift is not cor rected even with a correction of 1 dot go to next step 12 The problem has been elimi nated through the checks of steps up to 11 NO Change Image Transfer Roller Unit Change Image Transfer Belt Unit Change PIC Board Section Step Check Item Result Action ...

Page 292: ...ee DIS REASSEMBLY ADJUSTMENT 4 Transfer Belt is dirty or scratched YES Clean dirty belt with a soft cloth Change Transfer Belt Unit if belt is damaged Transfer Roller Unit 5 Transfer Roller is dirty or scratched YES Change Transfer Roller Unit 6 Charge Neutralizing Cloth is not separated and ground ter minal is connected properly NO Correct or change Paper path 7 There is foreign matter on paper p...

Page 293: ...fer Belt is dirty or scratched YES Clean dirty belt with a soft cloth Change Image Transfer Belt Unit if belt is damaged Image Transfer Roller Unit 4 Image Transfer Roller is dirty or scratched YES Change Image Transfer Roller Unit Paper path 5 There is foreign matter on paper path YES Remove foreign matter Paper Dust Remover 6 Paper dust accumulates on Paper Dust Remover YES Clean Fusing Unit 7 F...

Page 294: ...ep Check Item Result Action Paper 1 Paper type does not match the setting on the paper type set ting dial YES Change the setting of the paper type setting dial Machine Adjust Fuser Temp Tech Rep Mode 2 Changing fusing temperature eliminates the problem of poor fusing performance and offset NO Change Fusing Unit C F C F Offset 4004T003AA C F Poor fusing performance 4004T002AA ...

Page 295: ...e Install Paper Dehumidifying Heater 2 Paper type does not match the setting on the paper type set ting dial YES Change the setting of the paper type setting dial Fusing Unit 3 Fusing Entrance Guide Plate is dirty YES Clean 4 Fusing Belt is dirty or scratched YES Change Fusing Unit Machine Adjust Fuser Speed Tech Rep Mode 5 Changing fusing speed elimi nates the problem of brush effect and blurred ...

Page 296: ...foreign matter Fusing Unit 3 Fusing Entrance Guide Plate is scratched or dirty YES Clean or change 4 Lower Fusing Roller is scratched or dirty YES Change Fusing Unit Transfer Belt Unit 5 Fingerprints oil or other for eign matter is evident on the Transfer Belt YES Clean with specified solvent See DIS REASSEMBLY ADJUSTMENT 6 The problem has been elimi nated through the checks of steps up to 5 NO Ch...

Page 297: ...BLESHOOTING 02 06 13 T 119 39 Printer 4 Color 204 mm pitch uneven image Typical Faulty Images Troubleshooting Procedure Section Step Check Item Result Action Fusing Unit 1 The Fusing Belt is scratched YES Change Fusing Unit 204 mm 4011T061AB ...

Page 298: ...ion Step Check Item Result Action IU 1 The surface of the PC Drum is scratched YES Change IU Image Transfer Belt Unit 2 The Image Transfer Belt Unit drive gear is intact NO Correct Change Image Transfer Belt Unit Image Transfer Roller Unit 3 Image Transfer Roller is dam aged YES Change Image Transfer Roller Unit 4011T047AD 94 mm 94 mm 94 mm 4011T057AA 4011T058AA ...

Reviews: