A-6
A.6 Patient Leakage Current
Patient leakage currents are measured between a selected applied part and mains earth. All
measurements have a true RMS only response.
Preparation
Perform a calibration from the Mains on Applied Part menu.
The following outlet conditions apply when performing this test:
Normal Polarity, Earth Open, Outlet ON
Normal Polarity, Outlet ON
Normal Polarity, L2 Open, Outlet ON
Reversed Polarity, Outlet ON
Reversed Polarity, Earth Open, Outlet ON Reversed Polarity, L2 Open, Outlet ON
WARNING
z
If all of the applied parts correspond to the instrument type, the applied parts
will be tied together and one reading will be taken. If any of the applied parts
differ from the instrument type, all applied parts will be tested individually,
based on the type of applied part. This applies to Auto and Step modes only.
To Perform the Test
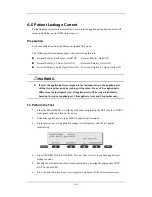
1. From the MAIN MENU, or with the outlet unpowered, plug the DUT into the 601PRO
front panel outlet, and turn on the device.
2. Attach the applied parts to the 601PRO's applied part terminals.
3. Press shortcut key 6. The Patient Leakage test is displayed, and the test begins
immediately.
4. Press APPLIED PART (SOFT KEY 4) at any time to select the desired applied part
leakage current.
5. Modify the configuration of the front panel outlet by pressing the appropriate SOFT
KEY on the 601PRO.
6. Press the print data key at any time to generate a printout of the latest measurement.
Summary of Contents for BeneView T5
Page 1: ...DPM 6 Patient Monitor Service Manual ...
Page 2: ......
Page 4: ...II FOR YOUR NOTES ...
Page 12: ...6 FOR YOUR NOTES ...
Page 16: ...1 4 FOR YOUR NOTES ...
Page 32: ...2 16 FOR YOUR NOTES ...
Page 68: ...3 36 FOR YOUR NOTES ...
Page 80: ...4 12 FOR YOUR NOTES ...
Page 126: ...5 46 FOR YOUR NOTES ...
Page 133: ...6 7 6 3 3 12 1 Screen Assembly with anti glare screen Exploded View ...
Page 163: ...6 37 6 6 7 BIS Module Exploded View ...
Page 180: ...6 54 FOR YOUR NOTES ...
Page 204: ...A 14 FOR YOUR NOTES ...
Page 205: ......

