SECTION 4
MAINTENANCE
89
C
C.
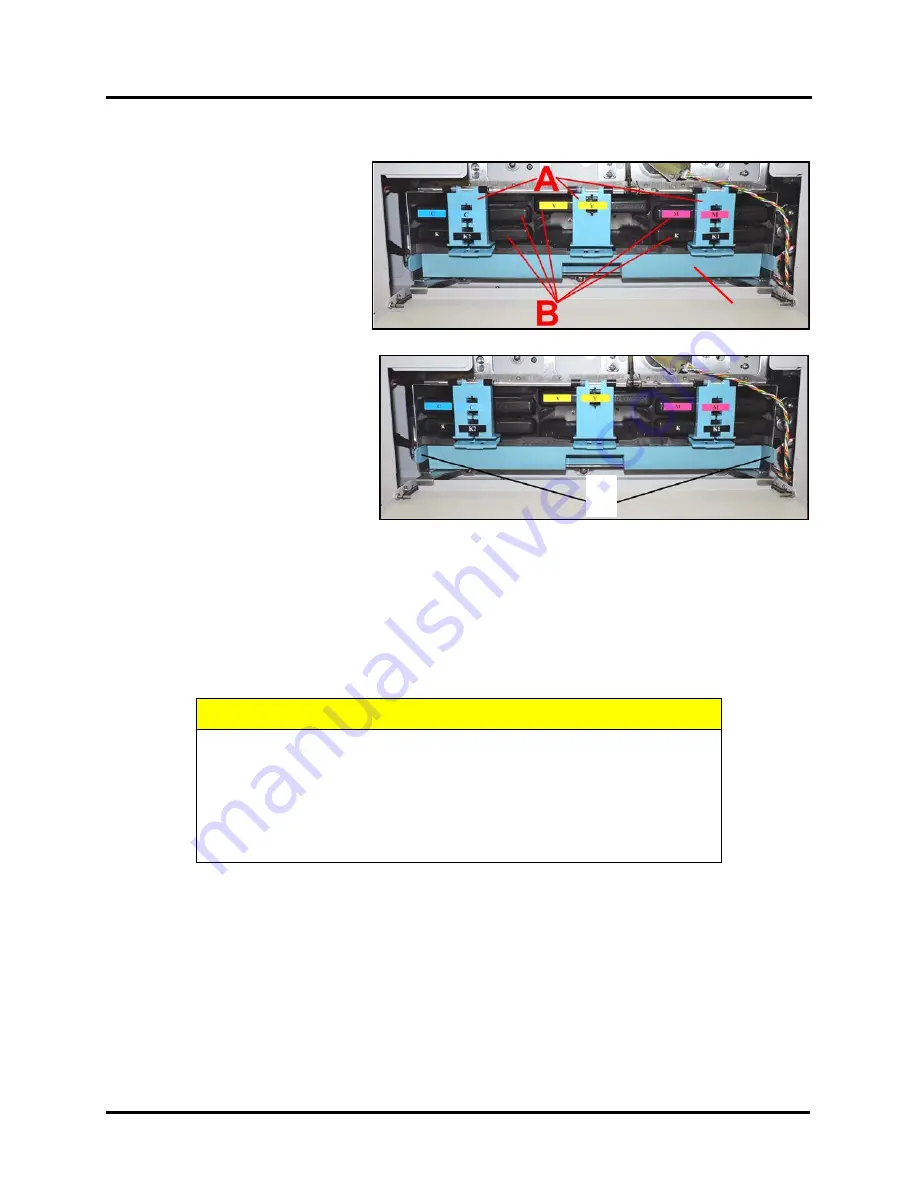
Remove Ink Tanks and Check/Replace Waste Ink Tray
1.
Open
Ink Tank Door
(
hinged
at bottom
). Open the
Ink Tank
Latches
[A]
and pull Ink
Tank(s)
[B]
out of Printer.
2.
Carefully package Ink Tanks.
Place into individual, re-
sealable plastic bags and then
place into original foam
packaging.
IMPORTANT:
Make sure ink
septum’s (seals) on Ink Tanks
face up to prevent leakage.
3.
Pack Ink Tank bays with
absorbent towels to catch any ink
drips or spills.
4.
Remove and inspect
Waste Ink
Tray [C]
. Pull on Tabs [D] to
release and slide Waste Ink Tray
out of Printer.
5.
Inspect absorbent material (pad) within Tray. If nearly or completely black with ink, replace Waste Ink
Tray or pad within Tray.
6.
Install
Waste Ink Tray [C]
.
The tabs
[D]
, located at the left and right sides of the Tray, secure the Tray to the frame.
When re-installing the Waste Ink Tray; please be sure the tabs “click” into the frame, to secure the Tray's
position.
D.
Power-Down Printer and Disconnect Cables (Power cord, USB, Network).
CAUTION
WHENEVER POWERING-DOWN PRINTER, ALWAYS:
1. PRESS SOFT-POWER BUTTON.
2. WAIT FOR PRINTER TO STOP PROCESSING.
TOUCHSCREEN AND SOFT-POWER LIGHT WILL GO OUT.
3. THEN TURN OFF MAIN POWER SWITCH ON REAR PANEL.
D
Summary of Contents for Quadient Rena MACH 6
Page 1: ...Digital Color Inkjet Printer MACH 6 User Guide...
Page 131: ......
Page 132: ...2 1 2020 Quadient April 9 2020...


