


3-16
Wide-Angle Cap Frame
Operation Manual for the EMT 10T, 10/4, and 10/4T
Melco Embroidery Systems
Cap designs
Designs that embroider well on flats may not embroider as well on caps because of the uneven
tension a cap frame provides. Here are some ideas to help improve embroidery quality on your
wide-angle cap frame:
•
To help eliminate slippage, digitize from the center out; start in the center of the design
and embroider one side of the cap then return to the center and embroider the other.
•
Complete entire design elements as you go around the side; for example, if you have let-
tering with shading, embroider a letter, then its shading, then move on. This helps to elim-
inate the push-pull tendency of the fabric of the cap. Underlays should follow this rule,
too.
•
If you have a lot of running stitches in a design, consider converting them to satin stitches.
Running stitches have a tendency to lose registration.
•
With large designs, try to alternate the direction of the stitches. This helps to eliminate the
push-pull tendency of the fabric of the cap.
•
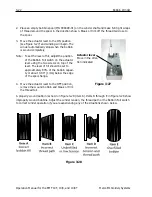
Use more underlay stitches to help stabilize the design and prevent distortion. Six panel
caps need more underlay in the center where the seam is.
•
Using a fusible non-woven backing on six panel caps helps hold the two front panels firm-
ly together.
Modifying your designs to embroider on caps may give you more trims and color changes, but it
will also provide you with much better embroidery quality.
Summary of Contents for EMT 10/4
Page 52: ...2 28 Quick Start Operation Manual for the EMT 10T 10 4 and 10 4T Melco Embroidery Systems ...
Page 108: ...6 10 Error Messages Operation Manual for the EMT 10T 10 4 and 10 4T Melco Embroidery Systems ...
Page 126: ...INDEX Operation Manual for the EMT 10T 10 4 and 10 4T ...
Page 127: ...Quick Ref erence Guide for the EMT 10T 10 4 and 10 4T 11817 Revision A ...


