3-4
Standard Cap Frames
Operation Manual for the EMT 10T, 10/4, and 10/4T
Melco Embroidery Systems
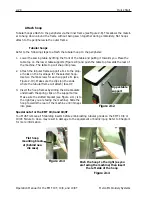
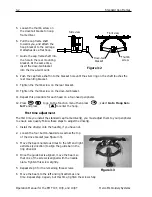
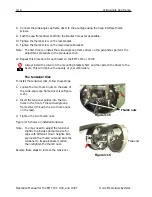
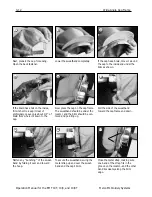
12. Install the cap frame on the cap frame driver by aligning the frame and the driver, then snap-
ping the frame slots under the roller clamps on the driver.
13. Repeat this procedure for each head on a four-head peripheral.
Raised needle plates
Raised needle plates improve embroidery quality on caps. When cap frames are attached, the
curve of the frame leaves extra space between the cap and the needle plate. To eliminate the
space and ensure high-quality embroidery, a qualified operator or maintenance person should
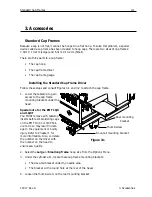
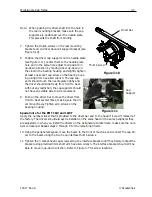
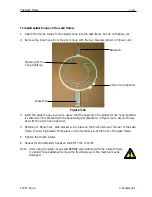
install raised needle plates as described below. See Figure 3-5.
Note: When using a raised needle plate, use spacers to raise the presser foot.
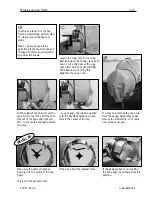
1. Remove the two screws attaching the standard needle plate and replace the standard plate
with the raised plate. Use the same screws to attach the raised needle plate. The needle
should be centered in the hole in the raised needle plate.
2. Remove the lower cover on the front of the needle case. It is not necessary to remove any
thread.
3. Using a small flat-bladed screwdriver,
push the standard spacer up to the top
of the presser foot assembly (see Figure
3-5).
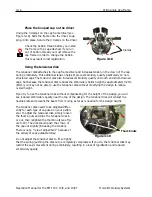
4. Shim spacers come in two thicknesses:
0.020" and 0.040". Each shim spacer
has five holes, which will cover half of
the needles in each sewing head. The
raised needle plates are 0.090" higher
than a standard needle plate, so you
should add two 0.040" spacers to both
sides of each sewing head (needles 1-
10).
Figure 3-5
Add the extra spacers
beneath
the standard shims.
Lower cover
Summary of Contents for EMT 10/4
Page 52: ...2 28 Quick Start Operation Manual for the EMT 10T 10 4 and 10 4T Melco Embroidery Systems ...
Page 108: ...6 10 Error Messages Operation Manual for the EMT 10T 10 4 and 10 4T Melco Embroidery Systems ...
Page 126: ...INDEX Operation Manual for the EMT 10T 10 4 and 10 4T ...
Page 127: ...Quick Ref erence Guide for the EMT 10T 10 4 and 10 4T 11817 Revision A ...

