9. Under the AnyRAID adapter, there is an AnyRAID-adapter tray used to help secure the AnyRAID adapter
in place. If necessary, remove and reinstall the tray by doing the following:
Note:
Depending on the model, the AnyRAID-adapter tray that comes with your server might look slightly
different with the following illustrations. However, the removal and installation procedures are the same.
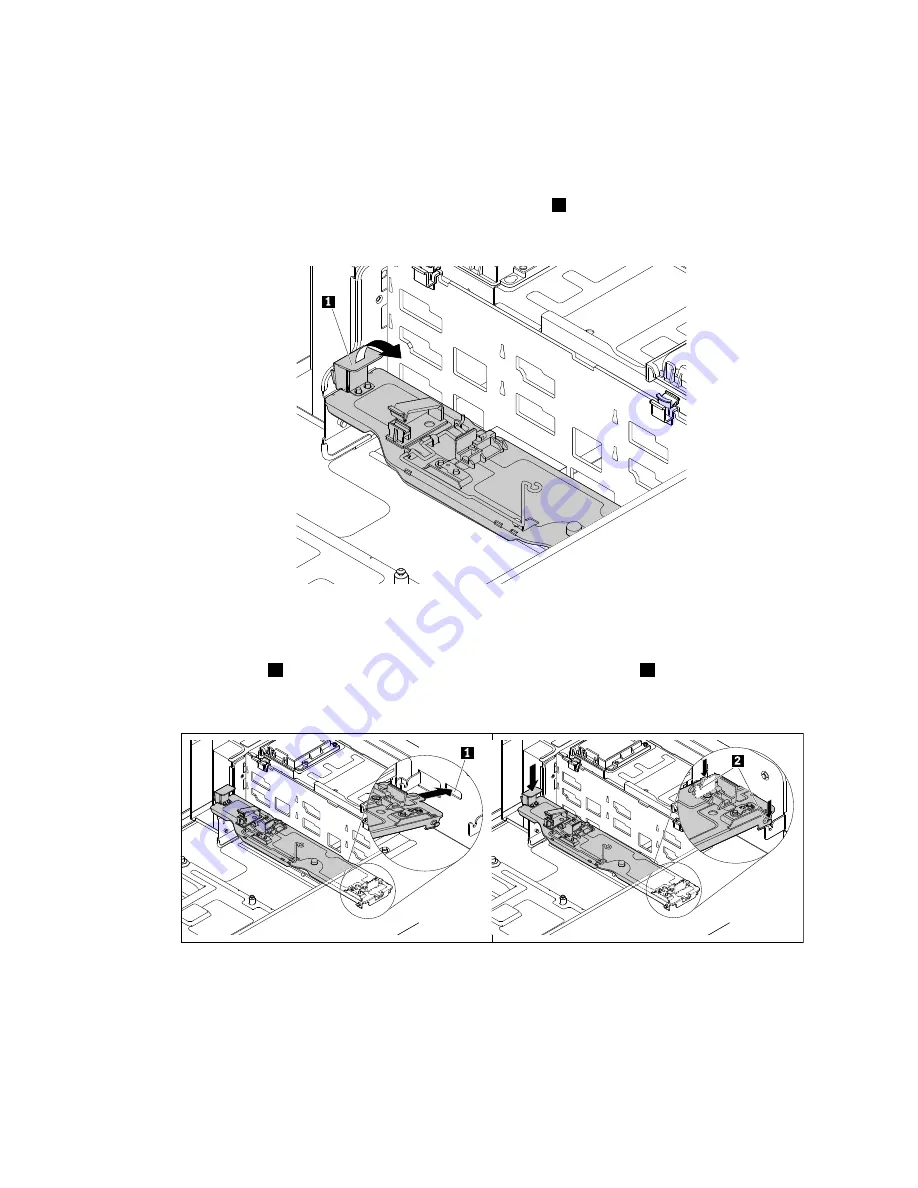
• To remove the AnyRAID-adapter tray, press the release tab
1
. Then, grasp the tray and carefully pull
it out of the chassis.
Figure 125. Removing the AnyRAID-adapter tray
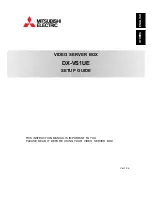
• To reinstall the AnyRAID-adapter tray, locate the mounting area on one side of the chassis. Insert the
tab into the hole
1
and align the two pins on the tray with the two gaps
2
in the mounting area.
Then, pivot the AnyRAID-adapter tray downward until it snaps into position.
Figure 126. Installing the AnyRAID-adapter tray
10. Touch the static-protective package that contains the new AnyRAID adapter to any unpainted surface
on the outside of the server. Then, take the new AnyRAID adapter out of the package.
Chapter 6
.
Replacing hardware
159
Summary of Contents for ThinkServer TD350 70DG
Page 14: ...xii ThinkServer TD350 User Guide and Hardware Maintenance Manual ...
Page 18: ...4 ThinkServer TD350 User Guide and Hardware Maintenance Manual ...
Page 20: ...6 ThinkServer TD350 User Guide and Hardware Maintenance Manual ...
Page 66: ...52 ThinkServer TD350 User Guide and Hardware Maintenance Manual ...
Page 192: ...178 ThinkServer TD350 User Guide and Hardware Maintenance Manual ...
Page 202: ...188 ThinkServer TD350 User Guide and Hardware Maintenance Manual ...
Page 217: ...guidelines 69 Copyright Lenovo 2014 2015 203 ...
Page 218: ...204 ThinkServer TD350 User Guide and Hardware Maintenance Manual ...
Page 219: ......
Page 220: ......


